Chapters
Table of Contents
Troubleshooting

Related Manuals for CDA HG6001SS


Summary of Contents for CDA HG6001SS
- Page 1 Gas Hob Installation, Use and Maintenance Customer Care Department • The Group Ltd. • Harby Road • Langar • Nottinghamshire • NG13 9HY T : 01949 862 012 F : 01949 862 003 E : customer.care@cda.eu W : www.cda.eu www.cda.eu...
-
Page 2: Table Of Contents
Contents: Important Important Notes Using Your Hob Igniting the burners Efficient use of your hob Care And Maintenance Troubleshooting What to do if you smell gas Mains Electricity Connection Technical Information Gas Supply Requirements Ventilation Natural Gas to LPG Conversion LPG to Natural Gas Conversion 20 Fitting the hob How to install the hob... -
Page 3: Important
Appliance information: Please enter the details on the appliance rating plate below for reference, to assist CDA Customer Care in the event of a fault with your appliance and to register your appliance for guarantee purposes. Appliance Model... - Page 4 EU Declarations of Conformity This appliance has been manufactured to the strictest standards and complies with all applicable legislation, including Electrical safety (LVD) 2014/35/EU and Electromagnetic interference compatibility (EMC) 2014/30/EU. Parts intended to come into contact with food conform to 1935/2004/EC. IMPORTANT INFORMATION FOR CORRECT DISPOSAL OF THE PRODUCT IN ACCORDANCE WITH EU DIRECTIVE 2012/19/EU.
-
Page 5: Important Notes
Important Notes Please note: • Gas hobs become hot and remain hot during and immediately after use. We strongly advise that you do not touch the hob, nor any of its components, until it has been allowed to cool. If wiping away a spillage, please take every care not to burn yourself. -
Page 6: Using Your Hob
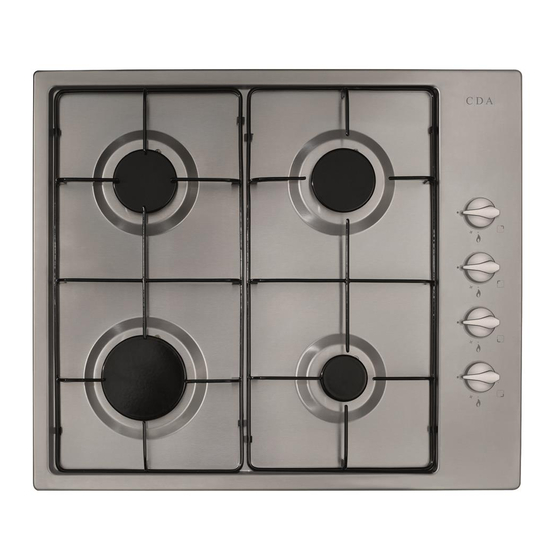
Using your hob Fig.1 Electric hotplates 1. Rapid burner 2.8kW 2. Left Semi-rapid burner 1.8kW 3. Right Semi-rapid burner 1.8kW 4. Auxiliary burner 1.0kW Control knobs 5. Front left 6. Back left 7. Back right Fig.2 8. Front right... -
Page 7: Igniting The Burners
Gas burners Gas flow to the burners is controlled by the control knobs (5,6,7 and 8 on Fig. 1). There are 3 positions shown on the control panel (Fig. 2). Turning the control knob to the positions shown below achieves the following: Closed (switches gas valve and burner off) Maximum position (highest heat level) &... - Page 8 appears around the burner, keep the control knob pressed down for a few seconds to allow the flame failure device to detect the presence of the flame. Once lit, release the control knob and turn it to the desired position i.e.
-
Page 9: Efficient Use Of Your Hob
Efficient use of your hob The hob is equipped with burners of different sizes, designed to accommodate most sizes of pan. For best results, only use pans with flat bottoms and choose an appropriate burner depending on the size of the pan. The most efficient use of the hob is shown below, where the pan and burner are correctly chosen. -
Page 10: Care And Maintenance
Care and maintenance The hob has a stainless steel surface. Due to this you should use a non-abrasive cleaner. Any abrasive cleaner (including Cif) will scratch the surface and could erase the control panel markings. Stainless steel can be effectively cleaned by simply using a dilute solution of water and washing up liquid and drying to a shine with a clean cloth. -
Page 11: Troubleshooting
If one or more burners continue to malfunction, please contact CDA Customer Care. Contact details can be found below. A: Customer Care Department, The CDA Group Ltd, Harby Road, Langar, Nottinghamshire, NG13 9HY T: 01949 862 012 F: 01949 862 003... -
Page 12: What To Do If You Smell Gas
WHAT TO DO IF YOU SMELL GAS: 1. Turn off the gas. For natural gas - Turn off the gas supply at the meter situated at the emergency control valve (ECV) unless the meter is located in a basement or cellar. - Page 13 5. Call the Gas Emergency Contact Centre In the case of natural gas, contact the Gas Emergency Service Provider (ESP) or, in the case of LPG, the Gas Supplier. Below is a list of ESPs relevant to region: England, Scotland and Wales: Natural Gas - 0800 111 999 (Gas Emergency Contact Centre) LPG - Bulk and Metered supplies - See telephone number on bulk storage vessel or at the meter.
- Page 14 Flogas - 0845 7200 100 Shell - 0870 7539 999 Please note: The CDA Group Ltd. makes no warranty about the content of this section and will not be held liable, under any circumstances, for any direct or indirect damages resulting from the use of this information.
-
Page 15: Mains Electricity Connection
Mains Electricity Connection Warning! This appliance must be earthed. This appliance must be connected to the mains power supply by a competent person using fixed wiring via a double pole switched fuse spur outlet, having a contact separation of at least 3mm in all poles, and protected by a 3A fuse. -
Page 16: Technical Information
The wires in the mains lead of this appliance are coloured in accordance with the following code: Green & Yellow = Earth Blue = Neutral Brown = Live As the colours of the wires in the mains lead for this appliance may not correspond with the coloured markings identifying the terminals connecting to the fuse spur, proceed as follows: •... -
Page 17: Gas Supply Requirements
UK and Ireland. The installation must comply with the Gas Safety (installation and use) Regulations 1984. • The CDA Group Ltd is not legally able to provide any assistance in the installation of gas appliances except to Gas Safe registered installers. Any Gas Safe registered fitter requiring help must provide their name, address and registration number. -
Page 18: Ventilation
Ventilation All rooms require a window, or equivalent (e.g. a door), which can be opened. Some rooms require a permanent vent in addition to a window (see below). This unit must not be used in a room which is less than 5m³. The following table details the requirements based on the kitchen volume (DxWxH) in m³. -
Page 19: Lpg To Natural Gas Conversion
3. Remove the injectors and replace with the corresponding injector as shown in the table at the bottom of this page. Setting up minimum flow rates: 1. Remove the control knobs. 2. Turn on the LPG supply, light the burners and turn the controls to the minimum position, as indicated by the small flame. -
Page 20: Fitting The Hob
Fitting the hob Unpacking the hob: Take care not to lose or mishandle any parts. Fitting position of the hob: This appliance, when installed, must be a minimum of 50mm from any back wall and a minimum of 150mm away from any adjacent vertical surfaces, e.g. -
Page 21: How To Install The Hob
greater (typically 80-90°C). • If there is no oven to be built in below the hob it is recommended that, an isolation shelf should be fitted to protect the user from high temperatures. If the hob is to be installed above a working drawer, then a partition should be fitted to protect the contents and user from the heat generated during use. - Page 22 >61.5mm 490mm 560mm 150mm 150mm Fig. 6 Fig. 7 1 - Worktop 2 - Screw 3 - Bracket Fig. 8 4 - Hob B/B* 500x20 mm 500x10 mm 500x10 mm min 30 mm Fig. 9...
- Page 23 • Please contact CDA Customer Care for repairing and exchanging of the components (such as gas valve, control knob) if necessary. • The material of the gas hob is metal. Please dispose of the gas hob in recycling when the gas hob comes to the end-of-life.
- Page 24 T : 01949 862 012 F : 01949 862 003 E : customer.care@cda.eu Customer Care Department • The Group Ltd. • Harby Road • Langar • Nottinghamshire • NG13 9HY T : 01949 862 012 F : 01949 862 003 E : customer.care@cda.eu W : www.cda.eu www.cda.eu Copyright © CDA 2017...
- Page 25 SC223 Single Oven Installation, use and maintenance Customer Care Department • The Group Ltd. • Harby Road • Langar • Nottinghamshire • NG13 9HY T : 01949 862 012 F : 01949 862 003 E : customer.care@cda.eu W : www.cda.eu www.cda.eu...
- Page 26 Contents: Important information Safety instructions First use of the oven Oven controls, functions and use Electronic programmer/timer Setting the current time Minute minder function Semi-automatic cooking Automatic cooking Cleaning and maintenance Removing the appliance door Replacing the appliance door Removing the inner door glass Removing the shelf supports Changing the oven light bulb Installation...
- Page 27 Any other use could be dangerous and may lead to premature failure of the appliance. The CDA Group Ltd cannot be held responsible for injuries or losses caused by incorrect use or installation of this product. Please note that CDA reserve the right to invalidate the guarantee supplied with this product following incorrect installation or misuse of the appliance.
-
Page 28: Important Information
Appliance Model Serial Number EU Declarations of Conformity: This oven has been designed, constructed and marketed in compliance with safety requirements of EU Directive 2014/35/EU (Low voltage) and requirements of EU Directive 2014/30/EU. This appliance has been manufactured to the strictest standards and complies with all applicable legislation, including Electrical safety (LVD) and Electromagnetic interference compatibility (EMC). - Page 29 Important • Read the user instructions carefully before using the oven for the first time. • Follow the instructions for first use of the oven. • Clean the oven regularly. • Remove spills as soon as they occur. • Always use oven gloves when removing shelves and trays from the ovens.
-
Page 30: First Use Of The Oven
First use of the oven First use • The metal casing of this appliance has been coated with a preservative to protect it during transport and storage. This should be removed during installation by using a non-abrasive stainless steel cleaner. Always follow the instructions given with the cleaner being used. -
Page 31: Oven Controls, Functions And Use
Oven controls and use Fig. 1 IMPORTANT: You must set the current time on the oven programmer, as per page 10, for the oven to operate properly. Cooking function knob (E) To set the function, turn the cooking function knob (E in Fig. 1) to the required function. - Page 32 temperature, within the oven which helps to accelerate the defrosting process. Half Grill This function radiates the heat from the grill element. This fully temperature variable grill can be set between 50°C and 250°C maximum. When grilling, please note: • Always grill with the oven door closed.
- Page 33 • Do not grill for more than 30 minutes at a time. • Preheat the grill for up to five minutes with the oven door closed. Full Grill This function radiates the heat from the grill element and the top element. This fully temperature variable grill is ideal for grilling a full family meal.
-
Page 34: Electronic Programmer/Timer
Electronic programmer/timer This oven’s electronic timer is equipped with touch control sensors. Each registered touch of a sensor field is confirmed by a single beep. It is advisable to keep the sensor fields clean at all times to avoid errors in operation. Setting the current time After connection to the mains supply, or re-connection after a power outage, the display will show ‘12.00’... -
Page 35: Semi-Automatic Cooking
• Press any of the three sensors in order to deactivate the acoustic signal that sounds once the minute minder time has elapsed. The timer will then revert to showing the current time. Please note: The acoustic signal, if not switched off manually, will deactivate automatically after approximately 2 minutes. -
Page 36: Automatic Cooking
switched off automatically. An acoustic signal will sound and the ) symbol will flash. Press any of the three sensors in order to deactivate the acoustic signal that sounds once the minute minder time has elapsed. The timer will then revert to showing the current time. - Page 37 • The cooking time will be set after approximately 5 seconds. The display will revert to showing the current time and the ( ) symbol will be illuminated. • Press the menu sensor (C) until the display illuminates the ‘A’ symbol.
-
Page 38: Cleaning And Maintenance
Cleaning and maintenance Keeping your oven clean and well maintained helps to prolong the fault-free lifespan of it. It is important that, before any cleaning or maintenance is performed, you switch off the oven at the mains supply. Do not start any cleaning or maintenance until the oven has been allowed to cool completely. -
Page 39: Removing The Appliance Door
Suitable proprietary chemical cleaners may be used after first consulting with the manufacturers’ recommendations and testing a sample on a small area of the oven cavity. Abrasive cleaning agents or scouring pads/cloths should not be used on the cavity surface. IMPORTANT: •... -
Page 40: Replacing The Appliance Door
Replacing the appliance door • Hold the door to the appliance in the closed position and manoeuvre the hinges so that the part of the hinge, highlighted by the star in fig. 3, inserts into the hinge slot in the cavity frame. -
Page 41: Removing The Inner Door Glass
Removing the inner door glass With the door removed, the inner glass can also be taken out for cleaning purposes. • Use a flathead screwdriver or to unhook the door slat, as shown in fig. 5 • Remove the door slat, as per fig. 6, and place it somewhere safe where it will neither receive nor cause damage. - Page 42 • There are a number of rubber guides attached to the inner pane and these must be returned to their original positions when reassembling the door. Fig. 7 shows these guides and their position on and around the inner glass. •...
-
Page 43: Removing The Shelf Supports
Removing the shelf supports Important: Always remember to allow the oven to cool sufficiently, if it has been in use, before carrying out any maintenance. To remove the shelf supports • Take a firm hold of the shelf support in the middle. Place your thumb against the oven wall and lever the support out of the support holes... -
Page 44: Changing The Oven Light Bulb
Changing the oven light bulb Important: Before any maintenance is started involving electrical parts, the appliance must be disconnected from the power supply. If the oven has been in use, let the oven cavity and the heating elements cool down before attempting any maintenance. Never use screwdrivers or other utensils to remove the light cover. -
Page 45: Installation
Installation Important! If installing this oven below a hob, ensure that the air gap between the two appliances is observed. This gap is usually detailed in the hob’s manual. The installation of this appliance must be carried out by a suitably qualified person. - Page 46 of 75˚C above ambient (typically this is between 90˚C and 100˚C). When correctly installed ensure that there is a gap of 4 mm minimum between the sides of the oven and adjacent furniture doors. How to install your oven You will need the housing area in fig. 12 to fit your oven correctly. The oven is designed to fit into a cabinet of 600 mm width.
-
Page 47: Mains Electrical Connection
Mains electrical DOUBLE POLE SWITCHED connection FUSE SPUR OUTLET Warning! This appliance must be earthed. This appliance is intended to be connected to fixed wiring by a double pole switch, having a contact separation of at least 3mm in all poles and protected by a 13A fuse. - Page 48 Please note: • The mains cable must only be replaced by a qualified electrician or service engineer and must be of equivalent or better rating (i.e. 3 x 1.5 mm ² , HO5VV-F). • This appliance is intended to be connected to the mains supply with a cable of cross sectional area 1.5 mm ²...
-
Page 49: Troubleshooting
Contact CDA Customer Care. If any of the above steps do not resolve your issue, please contact CDA Customer Care to arrange a repair. Contact details are below. Please have to hand all the details from your appliance’s rating plate which can be found on the back of the oven and/or on the back of the instruction manual/warranty card. - Page 50 NOTES:...
-
Page 51: Energy Efficiency Information
(gas final energy) E & O E. All instructions, dimensions and illustrations are provided for guidance only. CDA reserve the right to change specifications without prior notice. - Page 52 T : 01949 862 012 F : 01949 862 003 E : customer.care@cda.eu Customer Care Department • The Group Ltd. • Harby Road • Langar • Nottinghamshire • NG13 9HY T : 01949 862 012 F : 01949 862 003 E : customer.care@cda.eu W : www.cda.eu www.cda.eu Copyright © CDA 2017...