Sign In
Upload
Manuals
Brands
MIMAKI Manuals
Printer
UCJV150-160
MIMAKI UCJV150-160 Manuals
Manuals and User Guides for MIMAKI UCJV150-160. We have
3
MIMAKI UCJV150-160 manuals available for free PDF download: Operation Manual
MIMAKI UCJV150-160 Operation Manual (158 pages)
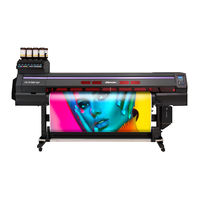
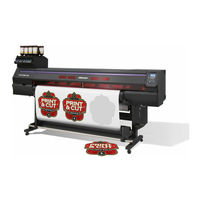
UCJV300 Series; UCJV150 Series UV INKJET Printer Cutter
Brand:
MIMAKI
| Category:
Printer
| Size: 33.16 MB
Table of Contents
Table of Contents
2
Caution
7
Requests
7
FCC Statement (USA)
7
Interference to Televisions and Radios
7
Foreword
8
On this Operation Manual
8
Safety Precautions
8
Symbols
8
Safety Interlock
12
Warning Labels
13
Chapter 1 Before Use
16
Moving this Machine
16
Where to Install this Machine
16
Working Environmental Temperature
16
Names of Parts and Functions
17
Front Side of the Machine
17
Rear Side and Right Side of the Machine
18
Carriage
19
Operation Panel
20
Media Sensor
22
Carriage
22
Cutter Blade and Cutting Slot
22
Capping Station
22
Pinch Rollers and Grit Rollers
22
Connecting Cables
23
Connecting USB 2.0 Interface Cable
23
Connecting a LAN Cable
23
Connecting the Power Cable
24
Ink Bottles
25
Types of Inks You Can Use with the Machine
25
Precautions on Using the Ink Bottles
25
Installing the Ink Bottles
26
Media
31
The Size of Media that Can be Used with this Machine
31
Precautions on Handling the Media
31
Menu Mode
32
Chapter 2 Basic Operations
34
Printing Procedure
34
Turning the Power On/Off
35
Turning the Power on
35
Turning the Power off
35
Setting Media
36
Adjusting the Head Height
36
Adjusting the Positions of the Pinch Rollers to Suit the Media
37
Maximum Print/Cut Area
42
Precautions on Setting the Media
42
Setting a Roll Media
43
Setting the Pinch Roller Pressure
45
Take-Up Device
46
Setting Leaf Media
47
Changing the Printing Origin
48
Test Printing
49
Perform Test Printing with the Normal Test Pattern
50
Perform Test Printing with the Test Pattern for Checking White Ink
50
Head Cleaning
51
About Head Cleaning
51
Perform Head Cleaning Depending on the Test Printing Result
51
Setting Media Correction
51
Setting of Media Correction
51
If the Positions of Dots Shift
52
Printing Data
52
Starting a Printing Operation
52
Cancel Printing (Data Clear)
53
Cutting Media
53
Workflow of Cutting
54
Installing Tools
55
When a Cutter Is Used
55
How to Install a Ballpoint Pen
56
Setting the Cutting Conditions
58
About the Cut Conditions
58
Select the Tool Condition
59
Set the Cut Conditions
59
Test Cutting
60
Cutting Data
61
Setting the Origin
61
Start Cutting
61
Stopping a Cutting Operation (Data Clear)
61
Removing the Cutter Unit Temporarily
61
Cutting Media
62
Chapter3 Setup
64
About SETUP MENU
64
SETUP MENU Table
65
Register the Optimal Print Conditions to Match the Use
66
Setting of Media Correction
67
If the Positions of Dots Shift
68
Setting of Logical Seek
69
Setting of Overprint
69
Setting of Drying Time
69
Setting of Left and Right Margins
70
Setting of Vacuum Fan
70
Setting of Feed Speed
70
Setting of MAPS
71
Setting of Auto Cleaning
71
Setting of Interval Wiping
72
Setting of the UV Mode
72
Setting Ionizer (Option)
72
Setting of LT Mode
73
About MACHINE SETUP MENU
74
MACHINE SETUP Menus Table
75
Setting of AUTO Power-Off
76
Setting of Take-Up Unit
76
Setting of the Display of Media Residual
77
Setting of Media Detection
77
Setting of a LANGUAGE
78
Setting of Time
78
Setting of Unit (Temperature/ Length)
78
Setting of a KEY BUZZER
78
Setting of the CONFIRM. FEED
79
Setting of the SPACE FEED MODE
79
Setting of the Network
79
Setting of Event Mail Function
80
Initializing the Settings
84
About NOZZLE CHECK MENU
85
INFORMATION MENU Table
85
Printing Check Flow
86
Printing Operations at "Nozzle Missing" Judgment and Error Occurrence
86
Setting of the Printing Check
87
Setting of the NOZZLE RECOVERY
87
Setting of the Judgment Condition
87
About INFORMATION MENU
88
INFORMATION MENU Table
89
Displaying the Information
89
Displaying the Machine's Information (LOCAL Guidance)
90
Chapter 4 Cutting Function
92
Cut out Data with Register Mark
92
The Flow of Cutting out the Registered Data
92
Enter Register Mark Detection Mode
92
Precautions for Inputting Data with Register Marks
92
Settings for Detecting Register Marks
95
ID Cut
96
About CUTTING MENU
101
Cutting MENU Table
102
Setting the CUT MODE
103
Perform Multiple Cuttings (Copy Function)
103
Setup Sub Menu
104
Make the Media Without Uncut Area (over CUT Function)
105
Other SETUP SUB MENU
105
Setup Reset
106
Maintenance Function
107
Maintenance of Mark Sensor
107
Perform SAMPLE CUT to Find out the Cause of Cutting Error
109
Cutting a Medium into Multiple Pieces with a Certain Length
109
Cutting out Data Without Register Marks (PC ORIGIN OFFSET)
110
Setting the Scale Adjust
111
Chapter 5 Maintenance
114
When the Machine Is Not Used for a Long Time
114
Precautions for Maintenance
114
Cleaning the Exterior Surfaces
114
Cleaning the Platen
114
Maintenance
114
Cleaning the Media Sensor
115
Cleaning the Media Press
115
About MAINTENANCE MENU
116
MAINTENANCE Menus Table
117
Maintaining the Capping Station
118
Cleaning the Wiper and Cap
118
Cleaning the Mist Filter
119
Clean the NCU
120
Washing the Head Nozzle
121
Cleaning of Ink Discharge Passage
121
When the Machine Is Not Used for a Long Time
122
Cleaning the Ink Head and the Area Around It
124
Nozzle Recovery Function
125
Reset the Set Value
126
Eliminate Ink over Flow
126
Automatic Maintenance Function
127
Setting the Refreshing Intervals
127
Setting the Cleaning Intervals and Type
127
Ink Filling
128
Air Purge
128
Replacing Consumables
130
Replacing the Wiper
130
Replacing the Mist Filter
130
If a Waste Ink Tank Confirmation Message Appears
131
Replace the Waste Ink Tank with Another
131
Replacing the Waste Ink Tank before the Waste Ink Tank Confirmation Message Is Displayed
132
Replacing the Cutter Blade
132
Replacing and Adjusting the Cutter Blade
133
Replacing the Cutter
133
Adjusting the Cutter Blade
134
Replacing Cutters Other than Supplied One
134
Adjusting Blade Edge of Cutters Other than Supplied One
134
Chapter 6 Troubleshooting
136
Power Does Not Turn on
136
The Machine Does Not Start Printing
136
Media Get Jammed / Media Is Soiled
136
Troubleshooting
136
Image Quality Is Poor
137
Nozzle Is Clogged
137
An Error Occurred in the Ink Bottle
137
When the Ink Leakage Occurs
137
Warning / Error Messages
138
Warning Messages
138
Error Messages
141
Chapter 7 Appendix
150
Specification
150
Printer Section Specifications
150
Cutter Section Specifications
151
Common Specifications
152
Ink Specifications
154
Ink Bottle Installation Order
155
Sheet for Inquiry
156
Advertisement
MIMAKI UCJV150-160 Operation Manual (194 pages)
UV Inkjet Printer
Brand:
MIMAKI
| Category:
Printer
| Size: 14.65 MB
Table of Contents
Table of Contents
2
Introduction
6
For Safe Use
8
Symbols
8
Usage Precautions
9
Ink or any Other Liquid Used with the Machine
13
Ink Specifications
14
Restrictions Concerning the Product
14
Installation Precautions
16
Installation Space
17
When Relocating this Machine
17
Moving this Machine
17
Safety Interlocks
19
Warning Labels
20
Chapter 1 Before Using this Product
23
Part Names and Functions
24
Front
24
Rear and Right Side View
25
Carriage
26
Platen
26
Capping Station
26
Pinch Rollers and Grid Rollers
27
Ink Status Lamp
27
Media Sensor
28
Take-Up Unit
28
Power Supply Switch
28
Operating Panel
30
Connecting the Power Cable
34
Turning on the Power
34
Turning off the Power
35
Connecting a PC to the Product
36
Using a USB Cable
36
Using a LAN Cable
36
System Configuration
38
Preparing the Driver
38
Installing RIP Software
39
Obtaining Color Profiles
39
Setting up RIP Software
40
Ink Replacement Method
42
When Ink Near End Is Displayed
42
When Ink End Is Displayed
42
Replacing Ink
43
Chapter 2 Printing
50
Print Process
50
Adjusting Print Head Height
53
Adjust the Pinch Roller Positions
54
MM Size
55
MM Size
57
MM Size
58
Loading the Media
59
Media
59
Loading the Roll Media
59
Setting Leaf Media
64
Setting the Pressure and Number of Pinch Rollers to Use
68
Test Printing
69
Changing the Layout Direction for Test Printing
69
Checking White Ink Ejection
69
Printing Defects
70
Head Cleaning
71
Feed Correction
72
Feed Correction Procedure
72
Correcting the Drop Position
74
Drop Position Correction Procedure
74
Printing RIP Data
75
Preparing RIP Data
75
Changing the Origin
76
Starting Printing
77
Stopping Printing (Data Clear)
78
Cutting the Media
79
Chapter 3 Cutting
82
Cutting Process
82
Installing Cutting Tools
84
Using the Cutter
84
Using a Pen
88
Setting the Cutting Conditions
92
Test Cutting
93
Cutting the Cutting Data
94
Changing the Origin
94
Starting Cutting
94
Stopping Cutting (Data Clear)
95
Retracting the Cutter Unit
95
Chapter 4 Try Cutting Data with Registration Marks
98
Process for Cutting Data with Register Marks
98
Process for Cutting Data with Register Marks.98
98
Creating Register Marks
100
Register Marks
100
Register Mark Size
101
Spacing between Register Marks
101
Reading Range of Register Marks
102
Plotting Areas Around Register Marks
104
Combined Operations of Printing and Cutting
104
Setting Mark Detection Conditions
105
Detecting the Position of the Register Mark Origin
106
ID Cut Process
107
Chapter 5 SETUP
110
Setup Menu
110
Temporary Use
112
Changing the Name of a Setting Type
113
Mode
113
Maintenance Menu
115
Registering Nozzle Recovery
116
Machine Setup Menu
118
Event Email Function Settings
120
Nozzle Check Menu
123
Information Menu
124
Cutting Menu
125
Copying the Last Data
127
Preventing Uncut Media
128
Chapter 6 Maintenance
129
Maintenance Precautions
130
Maintenance Items and Timing
131
Items Required for Maintenance
131
Maintenance Procedure
132
Ink Maintenance
132
Wiper Cleaning
132
Cap Rubber Cleaning
134
NCU Cleaning
135
Carriage Underside Cleaning
136
Cleaning the Mist Filter
137
Ink Discharge Channel Cleaning
138
Media Sensor Cleaning
139
Media Holder Cleaning
140
Platen Cleaning
140
Cover (Exterior) Cleaning
141
When Not in Use for Extended Periods
141
Consumable Item Replacement
144
Wiper Replacement
144
Cap Absorber Replacement
145
Mist Filter Replacement
146
LED Glass Replacement
147
Exhaust Fan Filter Replacement
148
Pinch Roller Replacement
149
Media Holder Replacement
150
Media Cutter Replacement
152
Waste Ink Tank Replacement
153
About the Media Cutter
156
Pen Line Replacement
157
Chapter 7 Dealing with Problems
159
Troubleshooting
160
The Power Does Not Turn on
160
Printing Is Not Possible
160
The Media Jams or the Media Is Dirty
160
Image Defects Occur
161
The Ink Has Leaked
166
The Light-Blocking Cover Comes off
166
Cutting Related
166
Problems Indicated by Messages
171
Warning Messages
171
Ink Error
173
Error Messages
174
System Halt
180
Chapter 8 Appendix
181
Specifications
181
Specifications (Cutting)
182
LICENSE Library
186
MIMAKI UCJV150-160 Operation Manual (194 pages)
UV Inkjet Printer
Brand:
MIMAKI
| Category:
Printer
| Size: 15.31 MB
Table of Contents
Table of Contents
2
Introduction
6
For Safe Use
8
Symbols
8
Usage Precautions
9
Ink and Other Liquids Used with this Machine
12
Ink Specifications
13
Restrictions Concerning the Product
13
Installation Precautions
15
Installation Space
16
When Relocating this Machine
16
Moving this Machine
16
Safety Interlocks
18
Warning Labels
19
Chapter 1 Before Using this Product
21
Part Names and Functions
22
Front
22
Rear and Right Side View
24
Carriage
25
Platen
25
Capping Station
25
Pinch Rollers and Grid Rollers
26
Ink Status Lamp
26
Media Sensor
27
Take-Up Unit
27
Power Supply Switch
27
Operating Panel
29
Connecting the Power Cable
33
Turning on the Power
33
Turning off the Power
34
Connecting a PC to the Product
36
Using a USB 2.0 Interface Cable
36
Using a LAN Cable
36
System Configuration
38
Driver Setup (When Using USB Cable)
39
Installing RIP Software
39
Obtaining Color Profiles
39
Setting up RIP Software
41
Ink Replacement Method
43
When Ink Near End Is Displayed
43
When Ink End Is Displayed
43
Chapter 2 Printing
49
Print Process
50
Adjusting Print Head Height
53
Adjusting the Pinch Roller Positions
54
MM Size
55
MM Size
57
MM Size
58
Loading the Media
59
Media
59
Loading the Roll Media
59
Setting Leaf Media
64
Setting the Pressure and Number of Pinch Rollers to Use
67
Test Printing
68
Changing the Layout Direction for Test Printing
68
Checking White Ink Ejection
69
Printing Defects
69
Head Cleaning
70
Feed Correction
71
Feed Correction Procedure
71
Correcting the Drop Position
73
Drop Position Correction Procedure
73
Printing RIP Data
74
Preparing RIP Data
74
Changing the Origin
76
Starting Printing
76
Stopping Printing (Data Clear)
77
Cutting the Media
78
Chapter 3 Cutting
79
Cutting Process
80
Installing Cutting Tools
82
Using the Cutter
82
Using a Pen
86
Setting the Cutting Conditions
90
Test Cutting
91
Cutting the Cutting Data
92
Changing the Origin
92
Starting Cutting
92
Stopping Cutting (Data Clear)
93
Retracting the Cutter Unit
93
Chapter 4 Try Cutting Data with Registration Marks
95
Process for Cutting Data with Register Marks
96
Process for Cutting Data with Register Marks.96
96
Creating Register Marks
98
Register Marks
98
Register Mark Size
99
Spacing between Register Marks
99
Reading Range of Register Marks
100
Plotting Areas Around Register Marks
102
Combined Operations of Printing and Cutting
102
Setting Mark Detection Conditions
103
Detecting the Position of the Register Mark Origin
104
ID Cut Process
105
Chapter 5 Settings
107
Setup Menu
108
Temporary Use
108
Setup Menu List
109
Maintenance Menu
113
Maintenance Menu List
113
Machine Setup Menu
117
Machine Setup Menu List
117
Nozzle Check Menu
122
Nozzle Check Menu List
122
Information Menu
123
Information Menu List
123
Cutting Menu
124
Cutting Menu List
124
Chapter 6 Maintenance
124
Maintenance Precautions
130
Daily Maintenance
131
Maintenance Items and Timing
131
Items Required for Maintenance
132
Wiper Cleaning
132
Cap Cleaning
134
NCU Cleaning
135
Carriage Underside Cleaning
136
Cleaning the Mist Filter
138
Print Head Nozzle Washing
139
Ink Discharge Channel Cleaning
141
Media Sensor Cleaning
141
Media Holder Cleaning
142
Platen Cleaning
143
Cover (Exterior) Cleaning
143
When Not in Use for Extended Periods
143
Consumable Item Replacement
146
Wiper Replacement
146
Cap Absorber Replacement
147
Mist Filter Replacement
149
LED Glass Replacement
150
Pinch Roller Replacement
151
Media Holder Replacement
151
Media Cutter Replacement
153
Exhaust Fan Filter Replacement
154
Waste Ink Tank Replacement
155
Consumable Item Replacement (Cutting Related)
159
Pen Line Replacement
159
Chapter 7 Troubleshooting
161
Troubleshooting
162
The Power Does Not Turn on
162
Printing Is Not Possible
162
The Media Jams or the Media Is Dirty
162
Image Defects Occur
163
Ink Leakage Occurs
163
Ink Colors Are Mixed
163
If the Light-Blocking Cover Comes off
167
Cutting Related
167
Problems Indicated by Messages
172
Warning Messages
172
Ink Errors (Local Guidance)
173
Error Messages
174
System Halt
180
Chapter 8 Appendix
181
Specifications
181
Specifications (Cutting)
182
Advertisement
Advertisement
Related Products
MIMAKI UCJV150
MIMAKI UCJV300-107
MIMAKI UCJV300-130
MIMAKI UCJV300-160
MIMAKI UCJV300-75
MIMAKI UCJV300
MIMAKI UCJV300/150
MIMAKI UCJV330 Series
MIMAKI UJF-7151 plus
MIMAKI UJV55-320 CMYK
MIMAKI Categories
Printer
Plotter
Printer Accessories
Industrial Equipment
Cutter
More MIMAKI Manuals
Login
Sign In
OR
Sign in with Facebook
Sign in with Google
Upload manual
Upload from disk
Upload from URL