
Related Manuals for AMX Novara 1000 Series


Summary of Contents for AMX Novara 1000 Series
- Page 1 Operation/Reference Guide Novara ControlPads & KeyPads Novara 1000 Series ControlPads Novara AxLink Keypads AMX Novara DCS1000 Software N o v a r a C o n t r o l P a d s L a s t R e v i s e d : 6 / 1 0 / 2 0 1 4...
- Page 2 AMX is not responsible for products returned without a valid RMA number. AMX is not liable for any damages caused by its products or for the failure of its products to perform. This includes any lost profits, lost savings, incidental damages, or consequential damages.
-
Page 3: Table Of Contents
Table of Contents Table of Contents Novara ControlPads ...................1 Overview ........................1 Product Specifications ..................... 2 Mounting Specifications - 8-Button ControlPads ............3 CP-1008-US ........................3 Minimum Internal Clearance for 1-Gang US Conduit Boxes ..........3 CP-1008-UK ........................4 CP-1008-EU ........................5 Mounting Specifications - 16-Button ControlPads ............ - Page 4 Exploded View - 8-Button UK/EU Version ..............29 Exploded View - 16-Button US/UK Version ..............30 AMX Novara DCS1000 Device Configuration Software ........31 Installing the AMX Novara DCS1000 Application ........... 31 Launching AMX Novara DCS1000 ................. 32 Overview ........................ 33 Downloading the Program to the ControlPad ............
- Page 5 AMX IR Libraries......................43 Loading an Existing IR Library ..................43 Creating New IR Libraries....................43 Importing AMX IR Library (IRL) Files................44 Downloading IR Files From www.AMX.com ..............45 Creating New IR Libraries Using an IRIS IR/Serial Data Capture Device ......48 Importing IR HEX File Codes ..................
- Page 6 Table of Contents Novara ControlPads & KeyPads...
-
Page 7: Novara Controlpads
Novara ControlPads are designed to be easily configurable allowing control of equipment by RS232 commands and IR. The ControlPads are configured using the AMX Novara DCS1000 Device Configuration Software software application, available for download from www.amx.com. Refer to the AMX Novara DCS1000 Device Configuration Software section on page 31 for details. -
Page 8: Product Specifications
ControlPad: Rear Panel Connectors: • RELAY 2 - Output port: can be used to control external devices (i.e. the AMX UPC-20+ Universal Power/Motor Controller - not included). This is a current sink (not a voltage driver). Max current sink - 100mA @12V. -
Page 9: Mounting Specifications - 8-Button Controlpads
Novara ControlPads Mounting Specifications - 8-Button ControlPads US version Novara ControlPads are designed to fit in NEC-Compliant wall boxes only. These devices will not fit properly in non-NEC-Compliant wall boxes. CP-1008-US (47 mm) (27 mm) (74 mm) (27 mm) (68 mm) (119 mm) in inches - metric conversions (24 mm) -
Page 10: Cp-1008-Uk
Novara ControlPads CP-1008-UK (68 mm) (27 mm) (147 mm) (27 mm) (47mm) (86 mm) in inches - metric conversions (24 mm) shown in parenthesis FIG. 3 Mounting Specifications - CP-1008-UK Novara ControlPads & KeyPads... -
Page 11: Cp-1008-Eu
Novara ControlPads CP-1008-EU (68 mm) (27 mm) (152 mm) (27 mm) (47mm) (80 mm) in inches - metric conversions shown in parenthesis (24 mm) FIG. 4 Mounting Specifications - CP-1008-EU Novara ControlPads & KeyPads... -
Page 12: Mounting Specifications - 16-Button Controlpads
Novara ControlPads Mounting Specifications - 16-Button ControlPads US version Novara ControlPads are designed to fit in NEC-Compliant wall boxes only. These devices will not fit properly in non-NEC-Compliant wall boxes. CP-1016-US (136 mm) (28 mm) (170 mm) (27 mm) (120 mm) (68 mm) in inches - metric conversions shown in parenthesis... -
Page 13: Cp-1016-Tr-Uk
Novara ControlPads CP-1016-TR-UK (207 mm) (207 mm) (30 mm) (68 mm) (86 mm) in inches - metric conversions shown in parenthesis FIG. 6 Mounting Specifications - CP-1016-TR-UK Wiring and Connections Novara ControlPads - Rear Panel Connectors FIG. 7 shows the rear panel connectors of the Novara ControlPads, and indicates a typical installation: SHARED 12V Projector (RS232) DVD Player (IR) -
Page 14: Relay 1 / Relay 2 Connectors
The "Relay 1" and "Relay 2" Output ports each act as a switch to GND and are rated at 100 mA @ 12 VDC. These Output ports are used to control external devices (i.e. the PC1 Power Controller or AMX UPC-20+ Universal Power/ Motor Controller - not included). -
Page 15: Rs232 Out Connector
IR Emitter polarities on Novara ControlPads are opposite to that of other AMX equipment. This is not an issue if using the included 10-pin connector. FIG. 10 illustrates connecting the IR transmitter heads to a 1000 Series ControlPad for IR-controlled devices:... -
Page 16: Input Connector
Power Supply Connector If using an AMX Power Supply with a 2-pin phoenix connector (not included), be aware that the Power Supply polarities on Novara ControlPads are opposite to that of other AMX equipment. This is not issue if using the included 10-pin connector. -
Page 17: Usb Program Port
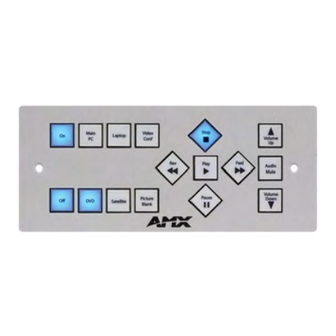
Novara 1000 Series ControlPads are configured using AMX CP1000DCS software (available for download at www.amx.com). Refer to the AMX Novara DCS1000 Device Configuration Software section on page 31 for configuration instructions. Button Layout FIG. 14 indicates the button layout for 8 and 16 button ControlPads:... - Page 18 Novara ControlPads Novara ControlPads & KeyPads...
-
Page 19: Novara Axlink Keypads
Novara AxLink KeyPads Novara AxLink KeyPads Overview Novara AxLink KeyPads can be used in both AxLink and Novara installations. Novara AxLink KeyPads feature a 4-pin AxLink connector and Status LED. Novara AxLink KeyPads feature one bi-directional RS-232 port ... -
Page 20: Product Specifications
Novara AxLink KeyPads Product Specifications Novara AxLink KeyPads System Requirements: Novara AxLink KeyPads are only compatible with AMX NetLinx Central Controllers. Power Requirements: • SP-08: Min: 80mA / Max: 130mA @ 12 VDC • SP-16: Min: 100mA / Max: 210mA @ 12 VDC Button Layout: •... -
Page 21: Mounting Specifications - 8-Button Keypads
Novara AxLink KeyPads Mounting Specifications - 8-Button KeyPads Novara KeyPads are designed to fit in NEC-Compliant wall boxes only. These devices will not fit properly in non-NEC-Compliant wall boxes. SP-08-AX-US (47 mm) (27 mm) (24 mm) (30 mm) (27 mm) (74 mm) (68 mm) (119 mm) -
Page 22: Sp-08-Ax-Uk
Novara AxLink KeyPads SP-08-AX-UK (68 mm) (27 mm) (24 mm) (27 mm) (30 mm) (147 mm) (86 mm) (47 mm) in inches - metric conversions shown in parenthesis FIG. 17 Mounting Specifications - SP-08-AX-UK Novara ControlPads & KeyPads... -
Page 23: Sp-08-Ax-Eu
Novara AxLink KeyPads SP-08-AX-EU (68 mm) (27 mm) (24 mm) (27 mm) (30 mm) (152 mm) (80 mm) (47 mm) in inches - metric conversions shown in parenthesis FIG. 18 Mounting Specifications - SP-08-AX-EU Novara ControlPads & KeyPads... -
Page 24: Mounting Specifications - 16-Button Keypads
Novara AxLink KeyPads Mounting Specifications - 16-Button KeyPads US version Novara KeyPads are designed to fit in NEC-Compliant wall boxes only. These devices will not fit properly in non-NEC-Compliant wall boxes. SP-16-AX-TR-US (136 mm) (27 mm) (24 mm) (27 mm) (30 mm) (27 mm) (170 mm) -
Page 25: Sp-16-Ax-Tr-Uk
Novara AxLink KeyPads SP-16-AX-TR-UK (136 mm) (24 mm) (27 mm) (207 mm) (30 mm) (86 mm) (68 mm) in inches - metric conversions shown in parenthesis FIG. 20 Mounting Specifications - SP-16-AX-TR-UK Novara ControlPads & KeyPads... -
Page 26: Wiring And Connections
Power Supply Connector If using an external Power Supply, be aware that the Power Supply polarities on Novara KeyPads are opposite to that of other AMX equipment. Connect the White strip lead to the +VE terminal on the ControlPad ... -
Page 27: Daisy-Chaining Keypads (Axlink Only)
Novara AxLink KeyPads Daisy-Chaining KeyPads (AxLink only) To daisy chain the KeyPads via AxLink, both KeyPads should be connected to the AxLink, as shown in FIG. 23. Power Supply Power Supply FIG. 23 Daisy-Chaining KeyPads Use screened cable to link to units. Button Layout FIG. -
Page 28: Setting Dip Switches To Assign Alternate Button Numbering
Novara AxLink KeyPads Setting DIP Switches to Assign Alternate Button Numbering Use the 2-position DIP Switch on the rear panel of the KeyPads to specify alternate button numbers for each KeyPad, for cases in which you want to avoid having multiple KeyPads in the same system using the same button numbers. Multiple KeyPads are allowed to share identical button numbers. -
Page 29: Setting The Axlink Address Dip Switch
If you later change the device number, remove and reconnect the AxLink power connector to enter the new device number into memory. Use AMX’s Dip Switch2 application (available for download from www.amx.com) to assist in calculating Dip switch position values. - Page 30 Novara AxLink KeyPads Novara ControlPads & KeyPads...
-
Page 31: Button Labelling
Button Labelling Button Labelling Overview Novara ControlPads, KeyPads and AxLink KeyPads come with a set of clear plastic Key Caps, which are designed to fit tightly over the pushbuttons, and allow you to place a label on each button according to the requirements of your particular installation. - Page 32 Button Labelling Key Cap - tilted so that the bottom of the Cap is placed on the bottom At this point, do not allow the clips of the pushbutton first on the sides of the Key Cap to engage Clip Clip Pushbutton on keypad Press the top of the Key Cap...
-
Page 33: Removing/Replacing Button Labels
Note the orientation of the board - it must be oriented in the same direction when replaced. The top is indicated by an UP arrow at the top center of the board. The bottom is indicated by the AMX logo (FIG. 33). Use a 5mm wrench to remove the second set of stand-offs. -
Page 34: Replacing Key Caps / Button Labels
Note the orientation of the board - it must be oriented in the same direction when replaced. The top of the is indicated by an UP arrow at the top center of the board. The bottom is indicated by the AMX logo (FIG. 33). UP arrow indicates the top of the board AMX logo indicates the bottom of the board FIG. -
Page 35: Re-Assembling The Keypad
Button Labelling Verify that the vertical orientation of the Button Label is correct relative to the Novara keypad. Align the Key Cap with the target pushbutton, and gently push the Key Cap down over the pushbutton. Once seated properly on the pushbutton, the Key Cap will snap into place. Re-Assembling the Keypad Follow the steps in reverse to re-assemble the keypad. -
Page 36: Exploded View - 16-Button Us/Uk Version
Button Labelling Exploded View - 16-Button US/UK Version FIG. 38 16-Button US/UK Novara ControlPads & KeyPads... -
Page 37: Amx Novara Dcs1000 Device Configuration Software
Software Installing the AMX Novara DCS1000 Application Download the AMX Novara DCS1000 installation file from www.amx.com (go to the Products page and search for DCS1000). Double-click the installation file to launch the AMX DCS1000 Setup Wizard (FIG. 39). Click Next to proceed. -
Page 38: Launching Amx Novara Dcs1000
FIG. 42 Installation Complete dialog Launching AMX Novara DCS1000 Assuming you followed the default installation procedures, launch the AMX Novara DCS1000 application by double- clicking the AMX Novara DCS1000 program icon on your desktop (FIG. 43). FIG. 43 AMX Novara DCS1000 - Program icon Alternatively, navigate to Start >... -
Page 39: Overview
AMX Novara DCS1000 software application (initial view) The AMX Novara DCS1000 application allows the ControlPad to perform various functions such as RS232/IR control / Button Feedback /Delay Time / Relay Control / Time Out if a button press is not detected after a certain time period. -
Page 40: Specifying Button Feedback
AMX Novara DCS1000 Device Configuration Software Specifying Button Feedback A button LED has 3 possible states: On, Off and Flash. Use the Add Panel Feedback options to assign feedback to a selected button. Buttons can be assigned to a group where only one LED of the group may be on at any time. -
Page 41: Button Feedback - On / All Buttons Off
Try configuring other buttons with On / Off / Flash actions. To Save your program, select File > Save from the menu bar. AMX Novara DCS1000 data files are saved with the extension *.NVA. Button Feedback - On / All Buttons Off The On / All Buttons Off Button Feedback option will illuminate the chosen button, and turn off all other buttons on the ControlPad (FIG. -
Page 42: Testing Grouped Feedback
AMX Novara DCS1000 Device Configuration Software For instance Play / Stop / Pause. An LED may be assigned to up to 8 groups. Clear the program by selecting File > New from the menu bar. Select Button 1 in the System window (see FIG. 46 on page 34). -
Page 43: Delay Time
AMX Novara DCS1000 Device Configuration Software Delay Time A delay time can be added in between events in a Script. Delays can range from 0.5 seconds up to 24hours. The delay is absolute and no other Event or Button press will be acknowledged until the time period has elapsed. -
Page 44: Rs232 Functions
AMX Novara DCS1000 Device Configuration Software FIG. 56 Event Script window - Event 2 = Delay Time 5 seconds, Event 3 = Feedback On Press the configured Button (in this case, Button #1). The button will flash for 5 seconds, then stay On. -
Page 45: Viewing Rs232 Libraries
FIG. 60 Adding a RS232 Command to the Script Viewing RS232 Libraries To view the RS232 libraries, open the RS232 window then click the View RS232 Library button to open the AMX RS232 Library dialog (FIG. 61). Menu Bar Device Selection... -
Page 46: Adding A New Device To A Rs232 Library
Click the Save Edit button (in the Edit options). Adding a New RS232 Function to a Device Click the Add New Function Command Bar button (see FIG. 57 on page 38). This opens the AMX RS232 Libraries dialog. Select the relevant device, and fill in the function information as described above. -
Page 47: Testing Rs232 Functions
FIG. 65 Verify RS232 Commands dialog In the AMX RS232 Library dialog’s menu bar, select Verify Command, to invoke the Verify RS232 Commands dialog. A cable will be required to connect the Panel port to the PC serial port. Connections are as follows: ... -
Page 48: Ir Commands
AMX Novara DCS1000 Device Configuration Software IR Commands The ControlPad can be configured to output an IR function on a Button action. All IR functions are contained within a Library. Opening IR Library Files Click the Add IR Function button in the Command Bar to invoke the Select IR Function window, indicating the currently selected IR Library (FIG. -
Page 49: Amx Ir Libraries
AMX Novara DCS1000 Device Configuration Software AMX IR Libraries To view the IR libraries, open the IR window then click the View IR Library button to open the AMX IR Library dialog (FIG. 68). Device Selection Function Selection Edit options window... -
Page 50: Importing Amx Ir Library (Irl) Files
AMX Novara DCS1000 Device Configuration Software Importing AMX IR Library (IRL) Files In the Edit Options window of the AMX Library Files dialog, click Import IRL (FIG. 69). FIG. 69 Open dialog In the Open dialog, select an IRL file, and click Open. -
Page 51: Downloading Ir Files From Www.amx.com
AMX Novara DCS1000 Device Configuration Software Downloading IR Files From www.AMX.com As a registered AMX Dealer, you can download AMX IR Library files directly from the Partners page of the www.amx.com website, as described below. You must log into the website as a Dealer in order to access these files. - Page 52 AMX Novara DCS1000 Device Configuration Software In the Control Method drop-down, select IR (FIG. 73). FIG. 73 Control Method drop-down menu Click Search. The results of the search are displayed (FIG. 74): FIG. 74 Search results Novara ControlPads & KeyPads...
- Page 53 AMX Novara DCS1000 Device Configuration Software Click IR in the Control Method column of the search results list to access the Device Model Details dialog for the selected device (FIG. 75). FIG. 75 Device Model Details dialog (IR Control Method) In the left-hand menu bar under Model Control Method >...
-
Page 54: Creating New Ir Libraries Using An Iris Ir/Serial Data Capture Device
In the AMX IR Libraries dialog, select File > New. In the Save As dialog, enter a name for the Library File and click Save. In the AMX IR Libraries dialog, click Add New Device to invoke the Add New Device fields (FIG. 30): FIG. 78 AMX IR Library dialog - Add New Device fields Enter the Device Make (model) and Description, and click Save Device. -
Page 55: Importing Ir Hex File Codes
"text files with HEX codes". In the Edit Options window of the AMX Library Files dialog, click Import Hex File to access the Hex data import and conversion options (FIG. 80). -
Page 56: Using Ir Hex Codes To Create New Ir Libraries
In the AMX IR Libraries dialog, select File > New. In the Save As dialog, enter a name for the Library File and click Save. In the AMX IR Libraries dialog, click the Add New Device button to invoke the Add New Device fields (FIG. 82): FIG. 82 AMX Library Files dialog - Add New Device fields Enter the Device model (Make) and Description, and click Save Device. -
Page 57: Testing Ir Functions
Testing IR Functions It is recommended that all IR functions are tested before being written into program scripts: In the AMX IR Libraries dialog, select the function to test from the Function drop-down menu (FIG. 84). FIG. 84 AMX Library Files dialog - Selecting a Function for testing Connect an IR Transmitter to the ControlPad’s IR Port, and place the IR Emitter directly in front of the device’s IR... -
Page 58: Input Port Scripts
AMX Novara DCS1000 Device Configuration Software Input Port Scripts A script can be executed when a High to Low or Low to High state is detected on the Input Port. This is useful for external detection of a switch or PIR. - Page 59 AMX Novara DCS1000 Device Configuration Software FIG. 89 Assign to Bank window Select Bank X. Bank X1 appears as default. Write a script for Bank X1 (e.g. DVD play - FIG. 90). FIG. 90 Script for Bank X1 (DVD Play) Select X2 from the Assign To Bank drop-down menu and write a script (e.g.
-
Page 60: Bank Enable
AMX Novara DCS1000 Device Configuration Software Select X4 from the Assign To Bank drop-down menu and write a script for a tuner (FIG. 93). FIG. 93 Script for Bank X4 (Tuner On) Select Button 2 (in the System window), and follow the above procedures writing 'Stop' scripts for bank levels X1 to X3 and a Tuner Off command for Bank X4. - Page 61 AMX Novara DCS1000 Device Configuration Software Write a Script for Button 6 and include Enable Bank X2 (FIG. 96). FIG. 96 Button 6 script, with Enable X2 Bank selected Select button 7 which would be the CD select button. Write a script and include Enable Bank X3 (FIG. 97).
-
Page 62: Using Bank Assign To Control Two Projectors - Example
AMX Novara DCS1000 Device Configuration Software Write a script for the Tuner select button including enable Bank X4 in the script (FIG. 98). FIG. 98 Button 8 script, with Enable X4 Bank selected The controlpad will now act in the following way. - Page 63 AMX Novara DCS1000 Device Configuration Software Select X1 from the Button Press drop-down menu (FIG. 101): Button Press drop-down menu FIG. 101 Assign to Bank X, X1 selected Click the Add IR Function button in the Command Bar. Select the appropriate IR Library for the device manufacturer (via the Change Library button), and select the desired device (from the Select Device drop-down menu).
- Page 64 AMX Novara DCS1000 Device Configuration Software Choose the "Volume Down" command (in the Select Function drop-down menu) and click Add To Script to add it to the Event Script (FIG. 103): FIG. 103 Button 1 - Add Sony VPL PX11 LCD Projector "Volume Down" Command to Script Select Button 2 to configure.
- Page 65 AMX Novara DCS1000 Device Configuration Software Select Button 4 to configure (FIG. 106): FIG. 106 Button 4 selected to configure Click on Enable a Bank in the Command Bar; select X2 and Add to Script (FIG. 107). FIG. 107 Button 4 - Button Bank X2 Enabled Download the program to the ControlPad (via the Program menu bar item).
-
Page 66: Advance Toggle
AMX Novara DCS1000 Device Configuration Software Advance Toggle The Advance Toggle feature allows a button to skip toggles. For example, a button is configured to toggle a Device on and off, and the first press turns the Device on. If the Device is also turned off by a Time Out function, then pressing the button a 2nd time will have no effect as the Device is already off. -
Page 67: Start Up
AMX Novara DCS1000 Device Configuration Software Start Up A script can be written for button events to execute when the ControlPad is powered up: From the Ancillary options (in the System window), select Start Up (FIG. 110): FIG. 110 Ancillary options - Start Up This invokes the Program Start Up Events (Event Script) window (FIG. -
Page 68: Time Out
AMX Novara DCS1000 Device Configuration Software Time Out A Script can be written to execute if a button press is not detected within a set time period. For example, switching equipment off that may have been left running overnight. Three time periods can be set: From the Ancillary options (in the System window), select Time Out (FIG. -
Page 69: Downloading The Program
AMX Novara DCS1000 Device Configuration Software Downloading the Program When a program has been written it can then be downloaded to the ControlPad: Select Program > Download from the menu bar. The application will prompt you to connect the USB Programming Cable to a USB port on your PC and the ControlPad’s Program port (FIG. - Page 70 AMX Novara DCS1000 Device Configuration Software Novara ControlPads & KeyPads...
-
Page 71: Control Strings For Axlink
• Adjusting the pulse rate sets the rise and fall time within the flash rate, to be effective, both may need to be adjusted. AMX recommends leaving as default values. NOTE: numbers must be listed in format given, with single numbers prefaced with "0". - Page 72 Control Strings for AxLink Novara ControlPads & KeyPads...
- Page 73 AMX Novara DCS1000 Device Configuration Software Novara ControlPads & KeyPads...
- Page 74 It’s Your World - Take Control™ 3000 RESEARCH DRIVE, RICHARDSON, TX 75082 USA • 800.222.0193 • 469.624.8000 • 469-624-7153 fax • 800.932.6993 technical support • www.amx.com...
Need help?
Do you have a question about the Novara 1000 Series and is the answer not in the manual?
Questions and answers