Table of Contents
Advertisement
Quick Links
Advertisement
Table of Contents

Related Manuals for AMX Novara SP-08-E-US


Summary of Contents for AMX Novara SP-08-E-US
- Page 1 PDF provided by Conference Room AV AMX HPX-U400-SP-08-E Novara 8 Button Keypad Module for HydraPort Table Boxes...
- Page 2 Instruction Manual Novara Ethernet Keypads SP-08-E-US K e ypa ds L a t e s t R e l e a s e : 0 5 / 1 8 / 2 0 1 5...
- Page 3 AMX is not responsible for products returned without a valid RMA number. AMX is not liable for any damages caused by its products or for the failure of its products to perform. This includes any lost profits, lost savings, incidental damages, or consequential damages.
-
Page 4: Table Of Contents
Re-Assembling the Keypad ................... 14 Upgrading Firmware ..................15 Before You Start ..................... 15 Verifying the Current Firmware Version ..............15 Downloading the Latest Firmware Files from www.amx.com ......... 15 Sending Firmware to Novara Ethernet Keypads............. 16 Instruction Manual - Novara Ethernet Keypads... - Page 5 Table of Contents Resetting the Factory Default System and Device Values........17 Programming Ethernet Keypads ..............19 Programming the Novara Ethernet Keypads ............19 Button Layouts ......................19 Channels........................19 Port Numbers and Levels ....................19 Supported SEND_COMMANDs..................20 @BRT ............................20 ?EXPANSION .........................
- Page 6 Table of Contents SHOW CONNECTION LOG ....................27 Notes on Specific Telnet Clients ................28 Windows Client Programs ..................... 28 Linux Telnet Client......................28 Enabling/Disabling Telnet on the Keypad............... 28 SHOW CONNECTION STATS ....................28 SHOW LOG ..........................28 Instruction Manual - Novara Ethernet Keypads...
- Page 7 Table of Contents Instruction Manual - Novara Ethernet Keypads...
-
Page 8: Novara Ethernet Keypads
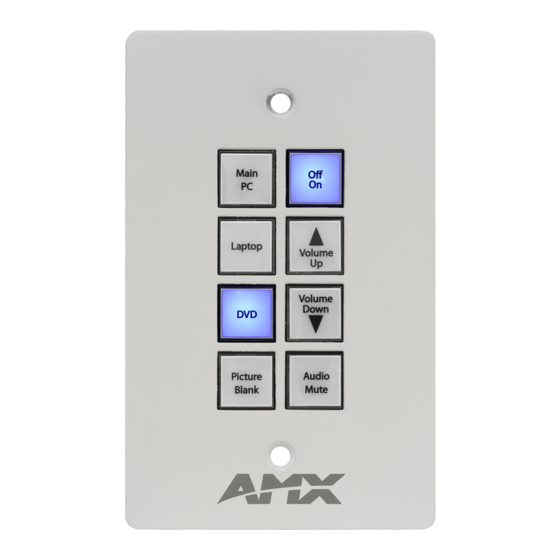
Novara Ethernet Keypads Novara Ethernet Keypads Overview Novara Ethernet KeyPads feature an 8-button layout, integrated Ethernet interface and fit standard 1-gang US back box sizes. The 8-button Novara Ethernet Keypad (FIG. 1) interfaces over Ethernet and receive power via any Power-over-Ethernet (PoE) injector or switch which conforms to the 802.3af standard. -
Page 9: Product Specifications
Novara Ethernet Keypads Product Specifications Novara Ethernet Keypads System Requirements: Novara Ethernet Keypads are only compatible with AMX NetLinx Central Controllers. Power: • PoE: PoE (Power over Ethernet), 802.3af, class 0 • Power Connector: (1) RJ-45 Ethernet Connector, 10/100 Button Layout: 8 buttons;... -
Page 10: Mounting Specifications - 8-Button Keypads
Novara Ethernet Keypads Mounting Specifications - 8-Button Keypads Note: Novara Ethernet Keypads are designed to fit in NEC-Compliant wall boxes only. These devices will not fit properly in non-NEC-Compliant wall boxes. SP-08-E-US (47 mm) (27 mm) (24 mm) (30 mm) (27 mm) (74 mm) (68 mm) -
Page 11: Button Layout
Novara Ethernet Keypads Button Layout FIG. 3 indicates the button layout for 8 and 16 button Keypads: 8-button UK/EU style 16-button US/UK style 8-button US style FIG. 3 Keypads Button Layout 8-Button Keypads can be configured for button numbers 1-8, 9-16, 17-24, or 25-32. ... -
Page 12: Wiring And Device Connections
Wiring and Device Connections Wiring and Device Connections Overview This section describes the device connectors and ports available on Novara Ethernet Keypads. Here you can find wiring and electrical capacities for each type of connector. LAN (RJ-45) The LAN RJ-45 port provides 10/100 Mbps communication via Cat5/5e/6 network cable. The LAN port automatically negotiates the connection speed (10 Mbps or 100 Mbps), and whether to use half duplex or full duplex mode. -
Page 13: Applying Power
Applying power to Novara Ethernet Keypads requires category cable and a PoE injector, such as the PS-POE-AF-TC (FG423-83) available from AMX, or a PoE-capable Ethernet switch which conforms to the 802.3af standard. The network must be connected through the PoE injector to send power to the Keypad. -
Page 14: Installation
ControlPad after mounting it. For instructions on installing button labels, see the Button Labeling section on page 11. Mounting the Keypad AMX recommends mounting the keypad in standard a conduit box per NEC specs section 370. Note: Before installing and mounting the device, you should test it to see that it can receive power. See the Applying Power section on page 6 for more information. - Page 15 Installation Instruction Manual - Novara Ethernet Keypads...
-
Page 16: Configuring Novara Ethernet Keypads
Configuring Novara Ethernet Keypads Configuring Novara Ethernet Keypads Overview This chapter provides instructions on accessing and configuring the Novara Ethernet Keypads. To configure the keypad, you must have it powered by PoE. Locating the IP Address of the Keypad Novara Ethernet Keypads are configured for DHCP addressing by default. The keypads use link local addressing as a backup in case the DHCP server is inaccessible. -
Page 17: Toggling Between Ip Addressing Modes: Dhcp And Static Ip
Configuring Novara Ethernet Keypads Toggling Between IP Addressing Modes: DHCP and Static IP Novara Ethernet Keypads support both DHCP and static IP addresses. You can use a static IP address which you can set via a Telnet command (SET IP), or you can use the factory default static IP address (192.168.1.2). With the keypad powered and booted up (or in ID Mode), you can toggle between the DHCP and Static IP modes by pressing and holding buttons 1 and 2. -
Page 18: Button Labeling
Button Labeling Button Labeling Overview Novara Ethernet Keypads come with a set of clear plastic Key Caps, which are designed to fit tightly over the pushbuttons, and allow you to place a label on each button according to the requirements of your particular installation. Novara Ethernet Keypads also come with a pre-printed acetate sheet with a range of 50 (pre-cut) button label inserts. -
Page 19: Installing Acetate Button Labels And Key Caps - Read This First
Button Labeling Use a Phillips-head screwdriver to remove the three screws that secure the circuit board to the faceplate (see FIG. 9). FIG. 9 Remove the three screws using a Phillips-head screwdriver Carefully pull the top circuit board straight up and off the standoffs. Note the orientation of the circuit board. You must replace it with the circuit board oriented in the same direction. - Page 20 Button Labeling Install the Key Cap on the pushbutton (FIG. 11): Key Cap - tilted so that the bottom of the Cap is placed on the bottom At this point, do not allow the clips of the pushbutton first on the sides of the Key Cap to engage Clip Clip Pushbutton on keypad...
-
Page 21: Replacing Key Caps/Button Labels
Button Labeling Replacing Key Caps/Button Labels Once the circuit board has been removed, you have full access to the pushbuttons with Key Caps installed. Carefully pry the Key Cap off of each pushbutton that you need to re-label. Remove the existing acetate Button Label and insert the replacement label in each Key Cap. Be sure to place the Button Label face-down inside the Key Cap, otherwise the label will be seen in reverse once the Key Cap is installed. -
Page 22: Upgrading Firmware
Web Update option in NetLinx Studio’s Help menu to obtain the latest version. The default location for the NetLinx Studio application is Start > Programs > AMX Control Disc > NetLinx Studio > NetLinx Studio. -
Page 23: Sending Firmware To Novara Ethernet Keypads
The basic process of upgrading firmware on Novara Ethernet Keypads with Ethernet involves downloading the latest firmware files from www.amx.com and using NetLinx Studio to transfer the files to a target keypad. Note: These steps assume that you have already established a connection with the target keypad in NetLinx Studio. -
Page 24: Resetting The Factory Default System And Device Values
Upgrading Firmware Resetting the Factory Default System and Device Values In NetLinx Studio, access the Device Addressing dialog: Right-click on any system device listed in the Workspace and select Device Addressing. Select Diagnostics > Device Addressing from the Main menu. Click the Set Device/System to Factory Default button (FIG. - Page 25 Upgrading Firmware Instruction Manual - Novara Ethernet Keypads...
-
Page 26: Programming Ethernet Keypads
Programming Ethernet Keypads Programming Ethernet Keypads Programming the Novara Ethernet Keypads This chapter provides information on programming Novara Ethernet Keypads, including NetLinx and Telnet commands. Button Layouts The following illustrations indicate the button numbers for the Novara Ethernet Keypads (SP-08-E-US): FIG. -
Page 27: Supported Send_Commands
Programming Ethernet Keypads Supported SEND_COMMANDs Massio Keypads support a number of NetLinx SEND_COMMANDs, described in the following section. To use these commands, establish a Telnet session from the PC to the NetLinx master (see the Establishing a Terminal Connection via Telnet section on page 21 for more information.) Note: All text is based on a Unicode index. -
Page 28: Terminal (Telnet) Commands
Press <Enter>. Without a Telnet password set, a session will begin with a welcome banner similar to the following: Welcome to SP-08-E-US v1.0.44 Copyright AMX LLC > If a Telnet password is set, then user credentials are required:... -
Page 29: Telnet User Name And Password
Programming Ethernet Keypads Telnet User Name and Password There are two Telnet commands that set the Telnet user name and password: Set Telnet Username (see page 27) Set Telnet Password (see page 27) By default, both the user name and password are blank (empty string). Performing a factory reset on the device will return these values to that default. -
Page 30: Telnet Commands
Display device status of a specified device, port, system (<D:P:S>). Example: >device status 14021:1:1 Device Status ------------- Device 14021 AMX LLC,SP-08-E-US,v1.0.25 contains 1 Ports. Port 1 - Channels:8 Levels:1 MaxStringLen=64 Types=8 bit MaxCommandLen=64 Types=8 bit The following input channels are on:1,2,3,4 The following output channels are on:None Level 1=0 Supported data types=UByte,UInt >... -
Page 31: Get Dns
Get list of DNS entries. Example: >get dns DNS Servers ------------------------------- Domain suffix: amx.internal Entry 1: 192.168.20.7 Entry 2: 192.168.20.9 Note: When the module is in DHCP mode, these are active values, NOT the stored values that only apply to static mode. -
Page 32: Ping [Address]
Programming Ethernet Keypads Terminal Commands (Cont.) Command Description PING [ADDRESS] Pings an address (IP or URL), to test network connectivity to and confirms the presence of another networked device. The syntax matches the PING application in Windows or Linux. Example: >ping 192.168.29.209 192.168.29.209 is alive. -
Page 33: Set Dns
• The value is stored in non-volatile memory. • If no value specified, an automatic name consisting of AMX, the product name, and serial number will be used. Note: This command requires a reboot to enable new settings. -
Page 34: Set Ip
Programming Ethernet Keypads Terminal Commands (Cont.) Command Description SET IP Sets the IP configuration of a specified device. Enter a host name, type (DHCP or Fixed), IP address, subnet mask, and gateway IP address. Note: “DHCP” implies “DHCP with link-local fallback". Note: For NetLinx Masters, the "Host Name"... - Page 35 Programming Ethernet Keypads Terminal Commands (Cont.) Command Description SHOW CONNECTION STATS Show the connection statistics for the device. Output similar to the following example: >show connection stats Connection Statistics Total Last 15 Minutes ===== =============== ICSP Messages: 10039 received 333 received 10038 transmitted 333 transmitted Blink Messages: 5014 received...
- Page 36 Programming Ethernet Keypads Instruction Manual - Novara Ethernet Keypads...
- Page 37 It’s Your World - Take Control™ 3000 RESEARCH DRIVE, RICHARDSON, TX 75082 USA • 800.222.0193 • 469.624.8000 • 469-624-7153 fax • 800.932.6993 technical support • www.amx.com...
Need help?
Do you have a question about the Novara SP-08-E-US and is the answer not in the manual?
Questions and answers