Multitech MultiConnect rCell 100 User Manual
Hide thumbs
Also See for MultiConnect rCell 100:
- Quick start manual ,
- User manual (104 pages) ,
- Configuration manual (38 pages)
Table of Contents
Advertisement
Quick Links
Advertisement
Table of Contents

Related Manuals for Multitech MultiConnect rCell 100


Summary of Contents for Multitech MultiConnect rCell 100
- Page 1 ® MultiConnect rCell 100 MTR-H5 User Guide...
- Page 2 Legal Notices The MultiTech products are not designed, manufactured or intended for use, and should not be used, or sold or re-sold for use, in connection with applications requiring fail-safe performance or in applications where the failure of the products would reasonably be expected to result in personal injury or death, significant property damage, or serious physical or environmental damage.
-
Page 3: Table Of Contents
CONTENTS Contents Chapter 1 Product Overview ............................ 7 About MultiConnect rCell 100 Series Router........................ 7 Documentation ................................8 Product Build Options ..............................8 Descriptions of LEDs..............................9 Side Panel Connectors ..............................10 Ethernet LED Descriptions ............................11 Specifications ................................11 Dimensions.................................. - Page 4 CONTENTS Activating the Account for Wireless Devices ......................23 Installing the SIM Card ............................... 23 Setting up Wi-Fi................................24 Resetting the Device ..............................25 Restoring User Defined Settings to the Device ......................25 Notice for Devices that Use Aeris Radios........................25 Chapter 5 Using the Wizard to Configure Your Device....................
- Page 5 CONTENTS Chapter 8 Setting Up the Firewall .......................... 41 Defining firewall rules ..............................41 Adding forwarding rules ............................41 Adding Outbound Traffic Rules ..........................41 Advanced Settings..............................42 Setting up static routes ............................42 Chapter 9 Setting Up Cellular Features........................43 Configuring Cellular ..............................
- Page 6 CONTENTS Upgrading firmware ..............................58 Saving and restoring settings ............................. 59 Using the router's debugging options ........................60 Automatically rebooting the device.......................... 60 Configuring Syslog..............................60 SMTP Settings ................................60 Chapter 13 Device Status ............................62 Viewing device statistics ............................62 Mail Log..................................
-
Page 7: Chapter 1 Product Overview
About MultiConnect rCell 100 Series Router This guide describes the MultiConnect rCell 100 Series router. The rCell family of routers is carrier approved and ready-to-deploy. You can use your device to provide secure data communication between many types of devices that use legacy as well as the latest communication technologies. -
Page 8: Documentation
1 Trimble GPS antenna 66800-52 and 1 Globtek GT-41052-1509 9V 1.7A power supply. Documentation The following table describes additional documentation for your device. The documentation is available on the Multi-Tech Installation Resources website at www.multitech.com/setup/product.go. Document Description User Guide This document. -
Page 9: Descriptions Of Leds
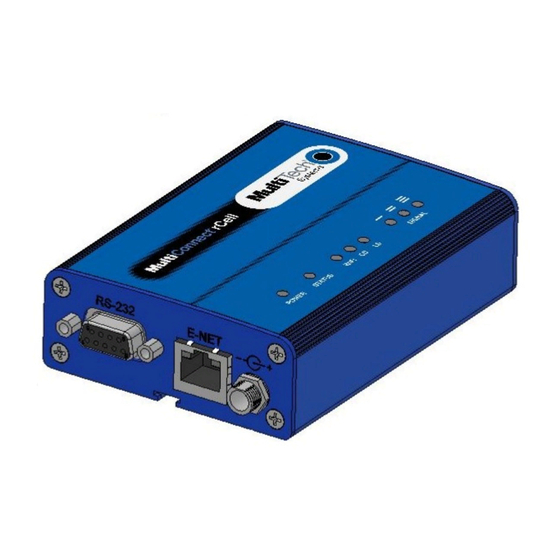
CHAPTER 1 PRODUCT OVERVIEW Descriptions of LEDs The top panel contains the following LEDs: ■ Power and Status LEDs—The Power LED indicates that DC power is present and the Status LED blinks when the unit is functioning normally. ■ Wi-Fi—Indicates if the device is serving as a Wi-Fi access point or acting as a Wi-Fi client. Not all models support Wi-Fi. -
Page 10: Side Panel Connectors
CHAPTER 1 PRODUCT OVERVIEW Side Panel Connectors The device has connectors on both sides of the housing. The right side of the device has a SIM card holder, as well as Wi-Fi, auxiliary, GPS, and cellular antenna connectors. It also has a reset button. Depending on the model of your device, the GPS antenna connector may or may not appear. -
Page 11: Ethernet Led Descriptions
CHAPTER 1 PRODUCT OVERVIEW Label Description RESET Resets the device. Refer to Resetting the Device or Resetting the Device to Factory Defaults. E-NET RJ-45 receptacle for standard Ethernet 10/100 Base-T. Caution: Ethernet ports and command ports are not designed to be connected to a public telecommunication network or used outside the building or campus. - Page 12 CHAPTER 1 PRODUCT OVERVIEW Category Description WiFi Reverse polarity male SMA connector for Wi-Fi SIM Holder Mini-SIM, standard 1.8 V and 3 V SIM receptacle Female SMA connector Power Requirements Voltage 7 V to 32 V DC Physical Description Dimensions Refer to the Dimensions topic that follows.
-
Page 13: Dimensions
CHAPTER 1 PRODUCT OVERVIEW Dimensions Label locations The images that follow show where you can find regulatory information for your device. ® MultiConnect rCell 100 MTR-H5 User Guide... - Page 14 CHAPTER 1 PRODUCT OVERVIEW ® MultiConnect rCell 100 MTR-H5 User Guide...
-
Page 15: Power Draw
CHAPTER 1 PRODUCT OVERVIEW Power Draw Radio Protocol Cellular Cell Box (AVG) Measured TX Pulse (AVG) Total Inrush Charge Connection No Data Current (Amps) at Amplitude Current Measured in (Amps) Max Power (Amps) for GSM850 or Millicoulomb (mC) Peak Current for HSDPA) 7.0 Volts GSM 850MHz... -
Page 16: Chapter 2 Safety Warnings
CHAPTER 2 SAFETY WARNINGS Chapter 2 Safety Warnings Lithium Battery ■ A lithium battery located within the product provides backup power for the timekeeping. This battery has an estimated life expectancy of ten years. ■ When this battery starts to weaken, the date and time may be incorrect. ■... -
Page 17: Atex (Europe Only)
CHAPTER 2 SAFETY WARNINGS AVERTISSEMENT – Risque d'explosion – Le remplacement des composants peut annuler la compatibilité du produit avec les zones de Classe I Division 2. AVERTISSEMENT – Risque d'explosion – Ne débranchez pas l'équipement sauf s'il est hors tension ou si la zone est considérée comme non dangereuse. -
Page 18: Interference With Pacemakers And Other Medical Devices
CHAPTER 2 SAFETY WARNINGS ■ Operating your device close to other electronic equipment may cause interference if the equipment is inadequately protected. Observe any warning signs and manufacturers’ recommendations. ■ Different industries and businesses restrict the use of cellular devices. Respect restrictions on the use of radio equipment in fuel depots, chemical plants, or where blasting operations are in process. - Page 19 CHAPTER 2 SAFETY WARNINGS Compliance of the device with the FCC and IC rules regarding RF Exposure was established and is given with the maximum antenna gain as specified above for a minimum distance of 20 cm between the devices radiating structures (the antenna) and the body of users.
-
Page 20: Chapter 3 Cellular Information
CHAPTER 3 CELLULAR INFORMATION Chapter 3 Cellular Information Antenna System Cellular Devices The cellular/wireless performance depends on the implementation and antenna design. The integration of the antenna system into the product is a critical part of the design process; therefore, it is essential to consider it early so the performance is not compromised. -
Page 21: Gps Antennas Specifications
CHAPTER 3 CELLULAR INFORMATION GPS Antennas Specifications Category Description Frequency Range 1575.24 MHz Impedance 50 Ohms VSWR 2.0:1 max Gain 10-30 dBi LNA Current Consumption 40 mA max Noise Figure < 2dB Polarization RHCP Input voltage 3.0V ± 0.2V Bluetooth and Wi-Fi Antennas Manufacturer: Taoglas Antenna Solutions Manufacturer's Model Number:... -
Page 22: Chapter 4 Installing The Router
CHAPTER 4 INSTALLING THE ROUTER Chapter 4 Installing the Router Installing the Router To use the router’s cellular features, connect a suitable antenna to the antenna connector. If your device is capable of supporting antenna diversity, see the section about diversity. Some routers support Wi-Fi. -
Page 23: Mounting The Device
The dimensions illustration in this guide shows the mounting rod, as well as the dimensions for placement of the screws. Activating the Account for Wireless Devices For information on activating your cellular modem: Go to http://www.multitech.com/support. Select your device. Scroll to Activation and click Download. Note:... -
Page 24: Setting Up Wi-Fi
CHAPTER 4 INSTALLING THE ROUTER Push the SIM card into the slot until it snaps into place. To remove the SIM, push the edge of the card in. When released, the card pops out of the device. Setting up Wi-Fi Some models have Wi-Fi capability. -
Page 25: Resetting The Device
CHAPTER 4 INSTALLING THE ROUTER Resetting the Device You need: ■ A pin, paperclip, or similar thin object that can fit into the reset hole The following is the default condition for the RESET button on the Conduit. You can program a change to the behavior of the button if needed. -
Page 26: Chapter 5 Using The Wizard To Configure Your Device
CHAPTER 5 USING THE WIZARD TO CONFIGURE YOUR DEVICE Chapter 5 Using the Wizard to Configure Your Device Setting Up Your Device The initial setup wizard can help you quickly set up the main features of your rCell. To use the wizard: From Administration, select Initial Setup, and follow the on-screen instructions. - Page 27 CHAPTER 5 USING THE WIZARD TO CONFIGURE YOUR DEVICE To enable the dial-on-demand feature, check Dial-on-Demand. This indicates to the router that it should only bring up the PPP connection when there is outgoing IP traffic, and that it would bring the PPP connection down after a given idle timeout.
-
Page 28: Chapter 6 Configuring Your Device
Click Home to display the following information: ■ Router: ■ Model Number: The MultiConnect rCell model ID. ■ Serial Number: The MultiTech device ID. ■ IMEI: International Mobile Station Equipment Identity. Note: Not applicable for the MTR-C2 or MTR-EV3 models. ■... -
Page 29: Configuring Ip Address And Dns Information For Lan
CHAPTER 6 CONFIGURING YOUR DEVICE ■ Wi-Fi: ■ Mode: Indicates the current Wi-Fi mode. Options include None, Wi-Fi as WAN, or Wi-Fi Access Point. For configuration go to Wireless > Wi-Fi. ■ MAC Address: Media Access Control Address used to uniquely identify the Wi-Fi interface. This MAC will be the same as the Ethernet MAC when in Access Point mode. -
Page 30: Editing Failover Configuration
CHAPTER 6 CONFIGURING YOUR DEVICE Failover mode enables the WAN with the highest priority as displayed on the WAN Configuration page. If the WAN with priority 1 is disabled or a connection failure is detected, the WAN with priority 2 is automatically selected for establishing connection to the Internet. -
Page 31: Configuring Dynamic Domain Naming System (Ddns)
CHAPTER 6 CONFIGURING YOUR DEVICE Configuring Dynamic Domain Naming System (DDNS) This feature allows your router to use a DDNS service to associate a hosted server's domain name with a dynamically changing internet address. To configure your router to use DDNS: From Setup, select DDNS Configuration. -
Page 32: Assigning Fixed Addresses
CHAPTER 6 CONFIGURING YOUR DEVICE In the Gateway field, type the gateway address. The default Gateway address is the LAN IP address of the router. In the Domain field, type your network domain, if any. In the Lease Time field, type the DHCP lease time. Lease time is set in days, hours, and minutes. A Lease Time of 00-00-00 is an infinite lease time. -
Page 33: Sending Gps Information To A Remote Server
CHAPTER 6 CONFIGURING YOUR DEVICE To use the serial port for GPS, disable the serial port client/server. The serial port configuration settings are used to configure the port. The serial port client/server must be disabled to use the serial port for GPS. -
Page 34: Configuring Device To Act As Client
CHAPTER 6 CONFIGURING YOUR DEVICE Configuring Device to Act as Client You can set up the router to act as a client. The TCP, UDP, SSL/TLS client feature enables the router to act as a proxy TCP, UDP, or SSL/TLS client to the serial terminal connected to the DE9, RS-232 port on the router. -
Page 35: Setting The Device's Date And Time
CHAPTER 6 CONFIGURING YOUR DEVICE ALWAYS-ON. TIMEOUT. The IP pipe connection disconnects if the configured timer expires with no data sent or received. In the Timeout field, enter the desired number of seconds for this timeout. SEQUENCE. A sequence of received characters disconnects the IP pipe. DTR-TOGGLE. -
Page 36: Editing Or Deleting An Existing Network
CHAPTER 6 CONFIGURING YOUR DEVICE In the IP Address field, type the IP address of the network. In the Subnet Mask field, type the network mask. Editing or Deleting an Existing Network To delete a network, click Delete. At the top of the pane, a message tells you the network is deleted. To un-do the delete, click the Undo link found in the message. - Page 37 CHAPTER 6 CONFIGURING YOUR DEVICE Note: This is an optional value that can be used if you use a DNS server other then the servers received from your carrier. Click Next. Or if you are done making changes, click Finish. In the PPP Configuration panel, configure PPP for your router.
-
Page 38: Chapter 7 Setting Up Wireless Features
CHAPTER 7 SETTING UP WIRELESS FEATURES Chapter 7 Setting Up Wireless Features Setting Up Wi-Fi Access Point Your router can be configured as a wireless access point (AP) to allow Wi-Fi enabled devices to connect to the router using Wi-Fi. The Wi-Fi access point can have up to 8 clients at a time. To set up your router as an access point: Go to Wireless >... -
Page 39: Viewing Information About Wi-Fi Clients Using Your Wireless Network
CHAPTER 7 SETTING UP WIRELESS FEATURES From the Encryption drop-down list, select the encryption to be used. To generate a key from a phrase, in the Passphrase field, type a phrase. Click Generate. To manually enter keys, type the keys in the Key 1, Key 2, Key 3 or Key 4 fields. To configure WPA-PSK and WPA2-PSK: Select the WPA Algorithm from the drop-down list. -
Page 40: Ip Pipe In Tcp/Udp Server Mode
CHAPTER 7 SETTING UP WIRELESS FEATURES IP Pipe in TCP/UDP Server mode In the IP Pipe group, from the Mode drop-down list, select SERVER. From the Protocol drop-down list, select the desired protocol, either TCP or UDP. In the Server Port field, type the desired port value in the range 1 to 65535. From the Connection Termination drop-down list, select a disconnect method for the IP pipe. -
Page 41: Chapter 8 Setting Up The Firewall
CHAPTER 8 SETTING UP THE FIREWALL Chapter 8 Setting Up the Firewall Defining firewall rules The router's firewall enforces a set of rules that determine how incoming and outgoing packets are handled. By default, all outbound traffic originating from the LAN is allowed to pass through the firewall, and all inbound traffic originating from external networks is dropped. -
Page 42: Advanced Settings
CHAPTER 8 SETTING UP THE FIREWALL In the Source Mask field, type a network mask for the origin of the traffic. In the Source Port field, type the port that is the origin of the traffic. Type ANY if the source port does not matter. -
Page 43: Chapter 9 Setting Up Cellular Features
CHAPTER 9 SETTING UP CELLULAR FEATURES Chapter 9 Setting Up Cellular Features Configuring Cellular To configure how cellular is used on your router: Go to Cellular > Cellular Configuration to display the Cellular Configuration window. Check the Enabled box. For GSM radios, enter the APN in the field located in the Modem Configuration section of the window. Click Submit. - Page 44 CHAPTER 9 SETTING UP CELLULAR FEATURES Field Description Sim Pin The pin used to unlock SIM for use (only required if SIM is locked). This does not apply to CDMA radios. The Access Point Name assigned by the wireless service provider (carrier specific).
-
Page 45: Configuring Wake Up On Call
CHAPTER 9 SETTING UP CELLULAR FEATURES Configuring Wake Up On Call This feature allows the router to wake up and initiate a cellular connection when there is an incoming call, SMS, or LAN activity. Go to Cellular > Wake Up On Call to display the configurations. Check the Wake Up On Call box. -
Page 46: Using Telnet To Communicate With The Cellular Radio
CHAPTER 9 SETTING UP CELLULAR FEATURES Field Description Acknowledgment String to Caller String used to acknowledge (to the delivering SMSC) the receipt of an SMS. Init String Number Router initialization strings specific to the integrated cellular modem required for the Wake Up On Call feature. - Page 47 CHAPTER 9 SETTING UP CELLULAR FEATURES Field Description Home Network Cellular service provider associated with the module's data account Current Network Current cellular service operator (Not available for C2 or EV3 models) RSSI Received Signal Strength Indication Service Cellular service connection type Roaming Indicates whether or not current service is provided by Home Network carrier Provisioned...
-
Page 48: Chapter 10 Configuring Sms
CHAPTER 10 CONFIGURING SMS Chapter 10 Configuring SMS Configuring SMS To enable SMS messaging via the web UI or API: Go to SMS > SMS Configuration. Check Enabled Set messages to keep and resend options. Click Submit. For field descriptions see SMS Field Descriptions. SMS Field Descriptions Field Description... - Page 49 CHAPTER 10 CONFIGURING SMS Go to SMS > Sent to display the Sent SMS window. The messages are sorted by date with the most recent messages on top. The table shows up to 30 characters for each message. To view a full message, click the "eye" icon to the right of the message entry. To delete a sent SMS message, click the "cross"...
-
Page 50: Chapter 11 Defining Tunnels
CHAPTER 11 DEFINING TUNNELS Chapter 11 Defining Tunnels Setting up Generic Routing Encapsulation (GRE) tunnels Tunneling allows the use of a public network to convey data on behalf of two remote private networks. It is also a way to transform data frames to allow them to pass networks with incompatible address spaces or even incompatible protocols. -
Page 51: Ipsec Tunnel Configuration Field Descriptions
CHAPTER 11 DEFINING TUNNELS To setup a Network-to-Network VPN tunnel on your router: Go to Tunnels > IPsec Tunnels. Click Add Tunnel in upper right. IEnter a name for the tunnel. Click Next. In the Remote WAN IP field, enter the external IP address of the remote endpoint. In the Remote Network Route and Mask fields, enter the remote subnet. - Page 52 CHAPTER 11 DEFINING TUNNELS Field Description Tunnel Type Internet Key Exchange (IKE) for host-to-host, host-to- subnet, or subnet-to-subnet tunnels. This field cannot be modified. Authentication Method Authentication is performed using secret Pre-Shared Keys and hashing algorithms (SHA1 MD5). This field cannot be modified.
-
Page 53: Chapter 12 Device Administration
CHAPTER 12 DEVICE ADMINISTRATION Chapter 12 Device Administration Resetting the Device You need: ■ A pin, paperclip, or similar thin object that can fit into the reset hole The following is the default condition for the RESET button on the Conduit. You can program a change to the behavior of the button if needed. -
Page 54: Ip Defense
CHAPTER 12 DEVICE ADMINISTRATION Field Description Port The port the router will listen for HTTP requests on. Via LAN If checked, the router will listen and respond to HTTP requests from the LAN. Via WAN If checked, the router will listen and rewspond to HTTP requests from the WAN. -
Page 55: Configuring Ip Defense
CHAPTER 12 DEVICE ADMINISTRATION Field Description Per Minute Allowed number of new connections per minute until burst points are consumed. For example, if 60 new connections are received in a minute, decrement one burst point. If no more burst points, drop the packet. Burst Number of burst points. -
Page 56: Ping Limit
CHAPTER 12 DEVICE ADMINISTRATION Ping limit To mitigate the effects of a ping DoS on your router: Check Enable. In the Per Second field, type the average number of ICMP pings to the router. To limit the burst of traffic from any source, in the Burst field, type the allowed burst for traffic spikes. Brute force To foil brute force, password-guessing attacks: Check Enabled. -
Page 57: Setting Up The Remote Server
CHAPTER 12 DEVICE ADMINISTRATION Setting up the Remote Server To allow the device to connect to the Remote Management Server, check Enabled. If you want the device to use a secure connection, check SSL Enabled. This feature might be supported in a future release. -
Page 58: Customizing Support Information
CHAPTER 12 DEVICE ADMINISTRATION Customizing support information To customize the interface that displays information that can be used to support users: To enable display of the custom support information, check Show Custom Info. Type the desired information into the fields. For example, type the desired zip code in the Zip Code field, a city name in the City field, and so on. -
Page 59: Saving And Restoring Settings
■ The Multi-Tech Device Manager is a cloud platform that provides the ability to remotely manage and upgrade rCell devices. Please see the Remote Management section or visit mdm.multitech.com for more information. ■... -
Page 60: Using The Router's Debugging Options
CHAPTER 12 DEVICE ADMINISTRATION Using the router's debugging options The router has utilities to help troubleshoot and solve technical problems. You can set up your device: ■ To automatically reboot itself at a particular time of day or at a particular hour from boot. ■... - Page 61 CHAPTER 12 DEVICE ADMINISTRATION Field Description Entries to Keep Enter the desired number of mail log entries that are to be stored in the router. The range of values is 10 to 1000. If you click Submit, this setting is not applied to the emails that are in progress or deferred.
-
Page 62: Chapter 13 Device Status
CHAPTER 13 DEVICE STATUS Chapter 13 Device Status Viewing device statistics The router collects sent/received traffic data for Wi-Fi as WAN, Cellular, and Ethernet networks. The daily statistical data is stored on the device for the 365-day period. All data that is older than 365 day is automatically deleted. -
Page 63: Mail Queue
CHAPTER 13 DEVICE STATUS To see the delivery details, click the "eye" icon under Options for the desired email entry. To delete all mail log entries, click Purge Log. Note: Logs do not persist through power cycles. Mail Queue Go to Status & Logs > Mail Queue to display the Mail Queue window. Mail Queue shows the emails that are waiting to be sent. - Page 64 CHAPTER 13 DEVICE STATUS the data if more than 5 minutes has elapsed, or if more than 5 MBytes has been sent or received from the last check. The router checks these condition every minute, but the data is saved only if one of the conditions is met. Field Description Save Timeout...
-
Page 65: Appendix: Regulatory Information
APPENDIX: REGULATORY INFORMATION Appendix: Regulatory Information 47 CFR Part 15 Regulation Class B Devices This equipment has been tested and found to comply with the limits for a Class B digital device, pursuant to part 15 of the FCC Rules. These limits are designed to provide reasonable protection against harmful interference in a residential installation. -
Page 66: Fcc And Ic Antenna Requirements Toward License Exempt Radio Transmitters (Bluetooth/Wlan)
APPENDIX: REGULATORY INFORMATION FCC and IC Antenna Requirements Toward License Exempt Radio Transmitters (Bluetooth/WLAN) The license-exempt Bluetooth/WLAN radio transmitter contained in this equipment may only be operated with an antenna of a type, a maximum gain and the required antenna impedance as approved and specified below. To reduce potential radio interference to other users, choose the antenna type and it's gain so that the equivalent isotropically radiated power (EIRP) is not more than that necessary for successful communication. -
Page 67: Restriction Of The Use Of Hazardous Substances (Rohs)
2011/65/EU of the European Parliament (Restriction of the use of certain Hazardous Substances in electrical and electronic equipment - RoHS). These MultiTech products do not contain the following banned chemicals ■ Lead, [Pb] < 1000 PPM ■... -
Page 68: Reach Statement
Substances) complements the WEEE Directive by banning the presence of specific hazardous substances in the products at the design phase. The WEEE Directive covers all MultiTech products imported into the EU as of August 13, 2005. EU-based manufacturers, distributors, retailers and importers are obliged to finance the costs of recovery from municipal collection points, reuse, and recycling of specified percentages per the WEEE requirements. -
Page 69: Information On Hs/Ts Substances According To Chinese Standards
APPENDIX: REGULATORY INFORMATION Information on HS/TS Substances According to Chinese Standards In accordance with China's Administrative Measures on the Control of Pollution Caused by Electronic Information Products (EIP) # 39, also known as China RoHS, the following information is provided regarding the names and concentration levels of Toxic Substances (TS) or Hazardous Substances (HS) which may be contained in Multi-Tech Systems Inc. -
Page 70: Information On Hs/Ts Substances According To Chinese Standards (In Chinese)
APPENDIX: REGULATORY INFORMATION Information on HS/TS Substances According to Chinese Standards (in Chinese) 依 依 照 照 中 中 国 国 标 标 准 准 的 的 有 有 毒 毒 有 有 害 害 物 物 质 质 信 信 息 息 根据中华人民共和国信息产业部...
Need help?
Do you have a question about the MultiConnect rCell 100 and is the answer not in the manual?
Questions and answers