
Related Manuals for Zeppelin PERCOLATOR

Summary of Contents for Zeppelin PERCOLATOR
-
Page 1: Assembly Instructions
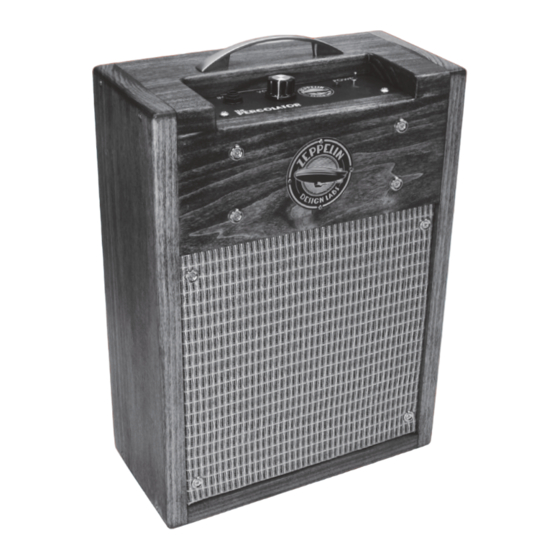
THE PERCOLATOR COMBO Assembly Instructions WATT AMPLIFIER KIT ZEPPELINDESIGNLABS.COM • 2950 N. WESTERN, CHICAGO, IL 60618... -
Page 2: Table Of Contents
COMPLETING THE COMBO ..................84 INSTALLING THE AMP ..................84 INSTALLING THE BAFFLE BOARD ................85 USING YOUR NEW COMBO .................. 88 © 2015 ZEPPELIN DESIGN LABS. NO PART OF THIS DOCUMENT MAY BE REPRODUCED WITHOUT WRITTEN PERMISSSION FROM THE AUTHOR. -
Page 3: Introduction
“Compactron.” Compactron tubes have multiple amplifier sections in one bottle. The tube in the Percolator has two triodes and one sharp cut-off pentode. That’s the same topology as the Fender Champ, but in one bottle! This tube was never intended to be used in an audio circuit (it was originally designed for use in various parts of a TV circuit), but it works and sounds great in a guitar amplifier. -
Page 4: Building The Amplifier
The Percolator is available wired for either 115-120VAC / 60hz OR for 230-235VAC / 50hz. You must use the model appropriate to your region. If the power cord furnished with the Percolator has the wrong plug for the type of receptacle used in your area, you must go to the hardware or electronics store and obtain the appropriate GROUNDED adapter! Never defeat the grounding of the power cord. - Page 5 i. #1 Phillips ii. #2 Phillips iii. Small Straight 3. 12” Ruler 4. A small awl, or metal poking probe 5. Small hammer 6. Soldering Iron (not a soldering gun, or a “cold heat” iron), good quality, 15-50 watt, with a good medium or small sized tip, conical or “screwdriver”...
-
Page 6: What's In The Box
WHAT’S IN THE BOX Table 1: Percolator Combo Bill Of Materials (BOM) is a complete TIP: Empty parts list of everything that should be present in your kit, followed the parts of the kit onto a cookie sheet or into a big fruit by photos of each part. - Page 7 GC02 Grill Cloth Black/Silver/Beige 12” x 12” HA13 Handle LS08 Loudspeaker 8” 8 ohm PC23 Printed Circuit Board PL11 Percolator Face Label Power Receptacle Power Transformer 120V Primary Output Transformer TM02 Paper Templates Vacuum Tube NOS Compactron BB08 CA06.1 CA06.2 CH06.3...
- Page 8 In the Components bag: Part # Description Notes CB10.1 10.5cm Hookup Wire 20/1 Feedback loop CB10.2 10.5cm twisted pair Hookup Wire 20/1 Heater voltage CB10.3 4cm Hookup Wire 20/1 Ground CB10.4 6cm Hookup Wire 20/1 Output jumper C9, C10, C11 Electrolytic Capacitor 100uF/250V C2, C5, C8, C12 Electrolytic Capacitor 100uF/16V...
- Page 9 KN05 R1, R6, R11 R5, R9, R10 R3, R8 R7, R14, R17 R15, R12 SK05 SK10 In the Hardware bag: Part # Description Notes CB20 Solder Lug CH05 Isolation Fin GR02 Rubber Grommet NU10 Keps Lock Nut M3 SC38 Philips Machine Screw – Pan head M3x6 SC63 Philips Sheet Metal Screw - Pan head 8x1/2”...
- Page 10 SC63 SC68 SC69 SP11 WA07 Part # Description Notes 6” CB11 Zip Wire multi-stranded 16 awg FT03 Foot 1/2”x1/4” Speaker cable JA07 1/4” Phono Jack - Male Baffle NU03 T - Nut #8-32 Speaker SC13 Philips Machine Screw – Pan head #8-32x3/4 Cabinet SC61 Philips Wood Screw - Flat head #6x1-1/4”...
-
Page 11: Populating The Printed Circuit Board
The printed circuit board (PCB) holds most of the components in this amp. Nearly all of the components will be installed on the “component side” of the board, which is the side that has the Zeppelin Design Labs logo on it. The other side of the board is called the “solder side”, which, as the name implies, is the side on which the legs of the components are soldered to the board. - Page 12 Let’s begin! Standoffs (Part # SP11): Use 6 standoffs, 6 M3 screws (Part # SC38), and 6 lock washers (Part # WA07). The plastic standoffs are installed on the solder side of the board, which means they are screwed in from the component side. The lock washer goes between the PCB and the standoff (not between the screw head and the PCB) .
-
Page 13: Red, Red, Orange, Gold
Figure 2: Component Values and Locations a. Start with the 22K resistors (R1, R6, R11), labeled RED, RED, ORANGE, GOLD. Compare to its picture in the BOM. Find their locations on the circuit board and install and bend the leads as described above . -
Page 14: Gray, Red, Brown, Gold
Make sure they are all correct (within 5%) before moving on! Capacitors: The Percolator uses 3 different types of capacitors: Film capacitors, tiny ceramic disc capacitors, and electrolytic capacitors. Film and ceramic caps can be installed in either direction on the circuit board (the legs can be reversed in their holes). But electrolytic caps... - Page 15 a. Let’s start with the two tiny ceramic caps (C4 ,C7). Install, solder and clip the leads. b. Continue with the three film caps (C1 ,C3 ,C6). Install , solder and clip the leads. c. Now for the tricky electrolytic caps. Note all the electrolytic capacitors have one leg that is longer than the other.
- Page 16 d. Install all of the smaller electrolytic caps (C2 ,C5 ,C8 ,C12). Solder and clip the leads. e. Now install the three big electrolytic caps (C9 ,C10 ,C11). Solder and clip the leads , but put one of these clipped leads aside for use in the next step. WARNING: The big electrolytic caps (C9 ,C10 ,C11) are likely to explode if they are installed backwards, which could result in personal injury.
- Page 17 Bridge rectifiers (Part # BR1, BR2): Bridge rectifiers have 4 leads and it is very important to make sure each lead goes in the correct hole. The only indication on the circuit board of how the rectifiers should be oriented is a square pad. The positive lead (the longest lead , labeled with a “+”) goes in the square hole .
- Page 18 Input jack (Part # J1): Remove the plastic nut from the input jack and put it aside until the next section. Snap the input jack into its holes on the circuit board. Make sure you solder the leads well. The leads are too short to cut on this component so don’t bother. Potentiometer (Part # VR1): Remove the nut and washer from the shaft of the pot and put them aside until the next section.
- Page 19 Once you have soldered all the leads, check the rigidity of the solder joints by flipping the switch several times. Make sure it feels secure. 10. LED (Part # D1): The LED (light emitting diode) is a polarized component, meaning that it matters which way it goes into the holes.
- Page 20 12. 6cm Hookup wire (Part # CB10.4): Strip about 1/8” (3-4mm) of insulation from each end of the 6cm hookup wire. With your pliers bend both ends at a right angle. This wire goes on the solder side of the board, so flip the board over and install the wire where it goes (note the picture Solder it on the component side of the board.
- Page 21 13. 10.5cm Twisted pair hookup wire (Part # CB10.2): This wire is used to transmit the 6.3V heating filament voltage to the tube. Untwist about 1/4” (6-7mm) of each end of the twisted pair and straighten the ends out with your pliers. Strip off about 1/8”...
- Page 22 14. Tube socket (Part # SK10): a. Before installing the tube socket, we need to help prepare it to easily seat the tube. These sockets come a little tight from the factory, so it is helpful to loosen up the place where the tube pins fit in.
- Page 23 c. Solder the leads of tube socket on the component side of the board. 49, 50 The circuit board is now complete! Double check all your solder joints and make sure everything is well soldered and making good connections. If anything looks at all sketchy, touch-up each solder joint. It’s much easier to fix a problem with the board now than once it is installed in the chassis.
-
Page 24: Loading The Chassis
LOADING THE CHASSIS Note the chassis face with the big square hole is the BACK of the amp! Generally, hold the chassis with the back AWAY from you unless told otherwise! This will help avoid building the thing backwards. Grommets: Pop the 4 rubber grommets (Part # GR02) into the holes on top of the chassis as shown. - Page 25 b. The power transformer goes on the RIGHT side of the chassis (with the back of the chassis AWAY from you). Pass the red and brown wires through the rear-right grommet, and the black wires through the front-right grommet. Align the transformer mounting holes with the holes in the chassis.
- Page 26 c. Now you need to twist the wires. Twist the black wires together somewhat tightly, but do not over twist the wires near where they emerge from the transformer. You do not want to stress the wires near the transformer coil, because they can easily break on the inside of the transformer, and that would be very bad.
- Page 27 c. Twist the green and black wires together, and twist the red and blue wires together, in the same way as the power transformer wires. Once again, be mindful not to over twist the wires close to the coil. Fins (Part # CH05) (2 pcs): These flank the tube socket and shield the tube from the magnetic fields from the transformers.
- Page 28 Label (Part # PL11): Clean the front of the chassis with a clean rag moistened with isopropyl alcohol, denatured alcohol, or rubbing alcohol. Clean it thoroughly, and allow any liquid to dry completely. Be careful NOT TO TOUCH the face AT ALL after cleaning.
- Page 29 Install the PCB (Part # PC23): a. Flip the chassis over so the fins and transformers are resting on the table top, and the front of the chassis is facing you. Bend all the transformer wires to the outside of the chassis so that they don’t get in the way of the placement of the PCB.
- Page 30 d. Place the washer and nut back on the pot, and snug down with your pliers. Place the plastic nut back on the input jack, and snug it down with your pliers. Do not over-tighten this nut or the label could start warping. e.
- Page 31 Wiring the PCB: Once the PCB is affixed to the chassis you can attach the transformer wires. All of the wires will pass around the side of the PCB, and you will solder them on the component side of the board. a.
- Page 32 11. IEC Power Receptacle (Part # J3): a. Strip about 1/4” (6mm) of insulation off the ends of the other 4cm hookup wire (Part # CB10.3). Attach the wire to the power receptacle lug as shown, with the wire pointing to the left away from the power receptacle (study the picture carefully).
- Page 33 c. Now solder the wires to the lug. Be careful not to use too much heat or the lug could start melting out of the plastic. d. Bend both wires slightly forward and push the power receptacle through the chassis. BE SURE TO INSTALL IT WITH THE CORRECT SIDE UP (look at the picture).
- Page 34 e. Place the wire coming from the right side of the power recepticle (the wire without the ground lug on it) in one of the 3 square ground pads on the PCB next to the power recepticle. Solder this wire in place on the component side of the board. f.
- Page 35 13. Wiring the IEC power receptacle: WARNING: If you make a mistake here, you could expose yourself or others to electric shock. Double check all your connections. a. Retrieve the lengths of wire that you cut off the power transformer earlier. Cut each of the two black wires to 4-1/4”...
- Page 36 14. Output jack (Part # J2): a. Remove the nut and washer from the output jack and install it on the back of the chassis. Orient the jack so the lugs are facing up, as in the picture. The washer goes on the outside of the jack, between the nut and the chassis.
- Page 37 15. Tube (Part # V1): a. Take the tube out of its box and closely look at the pins. Sometimes a few of the pins get bent in the handling TIP: You can tell if or shipping process from the factory. If any of the the vacuum is bad in your tube because the “getter flash”...
-
Page 38: Testing The Amp
(page 69) and attach it to the speaker (page 82) and plug this into the amp. Make sure the Percolator’s power switch is in the off position (when the amp is upside down, the switch should be up). - Page 39 WARNING! As soon as you plug in the Percolator, there is LINE VOLTAGE across some parts of the exposed circuit board. Touching the board could shock, injure, or kill you! NEVER TOUCH ANY PART OF THE CIRCUIT BOARD WHEN THE AMP IS PLUGGED INTO THE WALL! Before you turn the power switch on, set your multimeter to test AC voltage.
- Page 40 Turn on the power switch. WARNING! As soon as you turn on the Percolator, there is HIGH VOLTAGE across several parts of the exposed circuit board. Touching the board could shock, injure or kill you! NEVER TOUCH ANY PART OF THE CIRCUIT BOARD WHEN THE AMP IS PLUGGED INTO...
- Page 41 WARNING: Capacitors contain high-voltage electricity hours after the amp is unplugged! Handling the capacitor could shock or burn you! If you must remove or re-solder a capacitor, either let it sit unplugged overnight, or safely discharge it as described in the tip below. Figure 3 has 11 DC test voltages (in red) with arrows pointing to the place on the circuit board where these TIP: To safely discharge...
- Page 42 TIP: If it turns out that you need to re-solder any of the resistors, don’t bother removing the board from the chassis to get to the solder side, just solder them on the component side of the board. Once the voltages are all within spec, carefully plug your guitar (or harp mic) into the input jack, taking care not to touch the exposed circuit board.
-
Page 43: Assembling The Chassis
ASSEMBLING THE CHASSIS Turn the power switch off. Unplug any cables that are plugged in to the amp (power, speaker, instrument). Carefully seat the chassis base plate (Part # CH03.2) onto the inverted chassis. is a snug fit. Use four sheet metal screws, pan head Philips #8x1/2 (Part # SC63), two in front , two in back , to secure the chassis to the base plate. -
Page 44: Building The Cabinet
Take your time, be careful, and you should produce a lovely solid wood cabinet to be proud We are going to show you how we make the pre-finished Percolator Combo here in our lab. There are as many carpentry and finishing techniques as there are carpenters and finishers. If you prefer to do something differently, go for it. -
Page 45: A Word On Countersinks
A WORD ON COUNTERSINKS The overall success of this project depends somewhat on your ability to accurately countersink the wood screws, so that the heads lie just below the surface of the wood, but no deeper. There are several ways to do this: • buy a #6 pilot bit (9/64) with matching fluted countersink and stop collar, or an all-in-one #6 pilot / counterbore / countersink tool • buy a countersink bit... - Page 46 2. With the pencil, label the parts where it won’t show so you can easily fit them together again later. Put the labels all towards the front. 3. With scissors or blade and ruler, cut out the templates provided with your kit. Tape the templates to the outside face of the various cabinet parts: the Top, Bottom, Front, one Side, and the Upper and Lower Ports.
- Page 47 5. Rear Cleats (Part #CA06.5): Tape the shorter template to the cleat, centering it along the length of the wood. Poke two holes in one side of each Rear Cleat. 6. Front Cleats (Part #CA06.6): Fold the longer template along its length and wrap it around one of the longer cleats.
- Page 48 7. Now remove the tape, fold the same template the other way, wrap it around the other long cleat, and mark the five holes. Peel back the template and mark “TOP” and “IN” as you did before. NOTE: you are making a PAIR of Front Cleats, not two identical ones! 8.
- Page 49 9. With the pencil, carefully label each cleat and each side, in a spot where it will not show, so you can easily put each cleat back in its correct spot. 10. Now pick one of the long Front Cleats, and use one of the Port pieces (Part # CA06.7) on edge as a spacer to space the cleat in from the front edge, and to center it in from the top and bottom edges.
- Page 50 11. Grab your drill with the 5/64 bit set to stick out about 1-1/8”, and drill three pilot holes at the upward-facing marks, through the Cleat and into the Side. Remove the clamps and set this cleat aside. 12. Repeat steps 10 - 11 for the other Front Cleat. 13.
- Page 51 15. Now with the 9/64 bit, re-drill all the pilot holes in all the TIP: You will get cleaner holes Cleats. You should find ten of them. Further, drill on the inside face of the cleat if you through-holes at the other two marks near the “IN” can go straight through into a piece of labels –...
- Page 52 19. Grab your screw gun (fitted with a NEW #2 Philips driver and the clutch down low), press down hard and drive the screws home. If the clutch spins out early, increase it ONE STEP AT A TIME just until the cleat goes down firm to the cabinet side. DO NOT OVERTIGHTEN as the screw will either spin out or break.
- Page 53 21. Dry fit the cabinet together, on its back, with the Front in place. Look at those two little vertical edges on the cabinet Top, at either side of the amp cutout. If you want to apply an edge detail to this spot, like a roundover, but you want to leave the edge of the Front square, then YOU MUST APPLY THAT DETAIL TO THE TOP NOW! You will have the dickens of a time detailing it later without also messing up the Front, unless you are a crafty craftsman indeed.
- Page 54 24. When you are satisfied with the alignment of the corner, add the second clamp as shown and tighten both clamps moderately to securely hold that joint in place for drilling. NOTE: Take your time with this step. The overall neatness of your cabinet depends on getting this step right.
- Page 55 27. Disassemble the four pieces. With the 9/64 bit, re-drill the eight small holes you drilled in the sides, and countersink them. You will get cleaner holes if you can drill straight through and into a piece of plywood or a board. Also, at this time, use the 9/64 bit to drill the 4 chassis mounting screw holes in the front of the cabinet.
- Page 56 30. Dry-fit the four sides as before, with the front edges down on the table. Apply some wood glue to one end of the TOP. Smooth the glue with a screw until it uniformly coats the end. 31. Fit two wood screws into the appropriate two holes of the mating SIDE piece. Guide the tips into the little pilot holes in the TOP piece.
- Page 57 33. With a #2 Philips screwdriver, or cordless screw gun with the clutch at its LOWEST SETTING, press in hard and drive the two screws barely snug. You will tighten these later. 34. Now attach the BOTTOM to the same SIDE, holding the joint secure with a clamp while driving the screws barely snug.
- Page 58 35. Now apply glue to the remaining exposed ends of both the TOP and BOTTOM. Fit four screws into the remaining SIDE and maneuver them into all four little pilot holes. Align, clamp and screw the joints (barely snug) one at a time. 178,179 36.
- Page 59 37. Check the box for overall squareness: Set the cabinet on its back and drop the baffle board into place. Does the opening seem reasonably square? If not, clamp the baffle board into the acute corner as shown. (We demonstrate this here on a 1x8 speaker cabinet shell.) This will pull the whole box into perfect square.
- Page 60 40. Remove the Ports. Label them so you can easily put them back in the same orientation! 41. Installing the Front: Use both clamps to squeeze the Front tight against the cabinet Top. From the rear, run a wood screw in through the cleat and spin it a few times with a Philips screw driver to mark the Front.
- Page 61 43. Apply glue to the cleats and the underside of the Top, where the Front will touch them. Fit the Front back into place, clamping it to the Top as before. Using a screw driver or cordless screw gun, run four wood screws #6x1-1/4” through the cleats and into the Front. 44.
- Page 62 45. Remove the clamps from the port, set the cabinet on its back, and check the front for square again. If the cabinet is not square, clamp the baffle tightly into the acute corner again. This will pull the whole box perfectly square. Leave the whole thing alone for at least four hours! 46.
- Page 63 47. Remove the dust with a vacuum or compressed air and inspect all the seams. If there are any gaps you cannot live with, fill them with wood dough. Pack it in tight, leave some extra on the surface, and then leave it alone for at least four hours to harden thoroughly. That’s it! Congratulations.
-
Page 64: Finishing The Box
FINISHING THE BOX There are lots of ways to apply a beautiful, durable finish to a solid wood box. Following is how we finish our cabinets here at the Lab. You may finish your cab any way you like. Please send us photos of your completed project for our gallery! Your cabinet is made of top-grade solid poplar. - Page 65 c. Sand the three exposed faces of the upper Port and ease the edges. d. Carefully and thoroughly hand-sand the inside corners around the cutout in the cabinet top. Be thorough! The better job you do here will strongly influence how uniform your stain turns out later.
- Page 66 4. Now wipe the stain off again with a large clean rag. Rub it out thoroughly and carefully, leaving no fingerprints or streaks. 5. Now repeat for the exterior. =SM81 Set the cabinet down on its back, propped up on a few pencils, or chopsticks, or triangular strips of wood.
- Page 67 7. When dry, very lightly hand-sand the exterior of the cabinet with 320 grit sandpaper. Ignore the interior; it’s done. Precisely where the border lies between interior and exterior is up to you. The finish is thin, so be careful you do not remove the poly and damage the stained wood underneath.
-
Page 68: Assembling The Cabinet
9. Apply a second coat of Wipe-On Poly to the exterior. Ignore the interior; it’s done. Allow to dry thoroughly. 10. At this point, if the box is beautiful and satiny-smooth, you are done. If it is still a little fuzzy or uneven, sand very lightly with 320 grit sandpaper and apply a third light coat. -
Page 69: Making The Speaker Cable
2. Use a screw driver to install the handle, using the screws that came with it. Your combo 225,226 probably shipped with a different handle than the one shown here. The cabinet is done! MAKING THE SPEAKER CABLE 1. Take the 6” zip wire (Part # CB11) and split the ends about ½” (13mm). Now use your flush or diagonal cutters and cut off about 3/16”... - Page 70 CAUTION: Solder fumes are not healthy for you. The fumes consist of vaporized flux, which can irritate your nose, lungs, and even your skin. You MUST work in a space where the air drifts away from you as you work, so fumes do not rise straight onto your face. CAUTION: Solder residue usually contains lead, which is poisonous if you ingest it.
- Page 71 4. Mount the jack in some sort of clamp, vise or fixture, with the solder terminals exposed. 5. Tin the two contact points on the jack as shown. 234,235 6. Solder the slightly-shorter ribbed wire to the negative lug as shown. Now solder the other wire (with writing on it) to the positive lug.
- Page 72 7. After the lugs have adequately cooled, carefully squeeze the crimp rings back down onto the wire. This should be snug enough to hold the wire in place, but not so tight that you damage or cut through the insulation! 8.
-
Page 73: Building The Baffle Board
b. Next test for continuity from the jack shaft (the negative point) to the end of the ribbed wire. c. Now, test for infinite resistance from the positive tip to the negative ribbed wire. That’s it! You have just built a quality speaker cable for your cabinet! This cable is the impedance delivery device for your amplifier. - Page 74 If necessary, re-position the template to align the big circle with the big cutout in the board. Use the hammer and awl or nail to mark the locations of the four 7/32 holes near the edge of the round cutout. Remove the template. Use the drill and the 9/64 bit to drill the four holes in the corners of the board.
- Page 75 Use the hammer to tap the four t-nuts (Part # NU03) into the four holes near the round cutout. Keep tapping until the t-nuts are flat against the board. Paint the side of the baffle board with the t-nuts and the inside surface of the round cutout flat black.
- Page 76 The first part of putting on grill cloth consists of folding the four sides while carefully following straight lines. a. Set the grill cloth face-down on the table. The face is the side with a distinct grid pattern and broken black lines. Set the baffle board black-side-down neatly centered on the grill cloth.
- Page 77 c. Place the baffle board back on the cloth with the edges against the two folds. Now find the line on the grill cloth (one of the threads) that is parallel and closest to the the other side of the baffle, opposite the first fold. Remove the baffle board and cut the grill cloth along the previously folded crease to this new parallel line.
- Page 78 Check the straightness of the lines (in both directions) with your speed square and make sure the back of the grill cloth is flat against the front of the baffle board. The process is illustrated with a grill cloth frame from the Percolator amp head.
- Page 79 11. Place the assembly face down on the table. While holding the grill cloth in its proper place, use your staple gun to put one staple into the edge of the baffle board in the middle of each side. Make sure the staple is right in the middle of the baffle board in both directions (up/down and left/right).
- Page 80 14. Fold the remaining grill cloth over to the back of the baffle board and staple it down. Leave about 1/2” from the corners without any staples. 271, 272 15. At one corner of the baffle board, hold both corners of the grill cloth down, one of top of the other.
- Page 81 WARNING: The grill cloth is flammable! Be extremely careful to only singe the tips of loose fibers without setting your baffle board on fire. 17. If the grill cloth seems looser than you are comfortable with then you can use your heat gun to tighten it up.
- Page 82 19. Place a #8 Flat Washer (Part # WA06) on the shaft of a #8x3/4 machine screw (Part # SC13) and run it through the speaker rim and into one of the t-nuts. Be careful not to cross- thread the nut and screw; it should screw in easily. Also, be careful not to press down too hard on the screw as you tighten it, otherwise it might push out the t-nut from baffle board.
- Page 83 That’s it! The baffle board is done. Set it aside until the cabinet is complete.
-
Page 84: Completing The Combo
COMPLETING THE COMBO INSTALLING THE AMP 1. Place the cabinet upside down on the table, propping it up on a couple of books or something so the handle doesn’t touch the table. Carefully set the amp in place, with the black label facing down. -
Page 85: Installing The Baffle Board
INSTALLING THE BAFFLE BOARD 1. Use a hot soldering iron to melt a little hole through the grill cloth over the four mounting holes near the corners of the baffle board. =SM161 2. Place the cabinet on its back and drop the completed baffle into the front. Orient the baffle so that the cable is facing toward the amp. - Page 86 4. Remove the baffle and use the 5/64 bit to drill four pilot holes about ½” deep into the cleats. 5. Drop the baffle back into place, careful to place it in the same orientation as previously. 6. Place a #8 Finish Washer (Part # WA10) over the end of a #6x1-1/4 wood screw (Part # SC61) and drive it through one of the holes and into the cleat.
- Page 87 8. Flip the cabinet over face-down. Plug the speaker cable into the amplifier output jack. Plug the IEC cable (the power cord, Part #CB03) into the amplifier. 9. Place the Upper Port in place, careful to put it in the same orientation as when you drilled the holes;...
-
Page 88: Using Your New Combo
USING YOUR NEW COMBO Please obtain the “Percolator 1x8 Combo Owner’s Manual” online from the same place you found this manual. Go to www.zeppelindesinglabs.com. Navigate to the product page for the Combo, either DIY Kit or Assembled Ready-to-Play. On the “Documentation” tab you will find all the latest manuals for download.
Need help?
Do you have a question about the PERCOLATOR and is the answer not in the manual?
Questions and answers