
Related Manuals for Custom Engineering TG1260 series


Summary of Contents for Custom Engineering TG1260 series
- Page 1 TICKET PRINTER TG1260 series TG2460 series 60 mm User Manual www.custom.it TG1260/2460...
- Page 2 All rights reserved. Total or even partial reproduction of this manual in any form, whether on paper or electronically, is strictly forbidden. While CUSTOM ENGINEERING SPA guarantees that the information contained in this manual has been carefully checked and verified, CUSTOM ENGINEERING SPA and other resources utilized in its creation assume no responsibility for situations arising from its use.
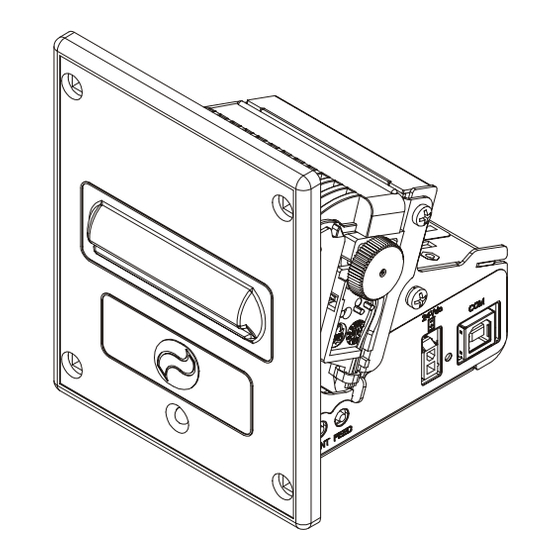
- Page 3 PRINTER COMPONENTS The figures showed list printer parts with USB interface but the remarks are good for the RS232 interface printers too (apart from the connector). A. TG1260/TG2460-x-A External view The x suffix indicates the following models : -TG1260/TG2460-U-A: USB interface, metal front panel and autocutter model. -TG1260/TG2460-S-A: RS232 serial interface, metal front panel and autocutter model.
- Page 4 B. TG1260/TG2460-x-P external view The x suffix indicates the following models : - TG1260/TG2460-U-P: USB interface and plastic front panel. - TG1260/TG2460-S-P: RS232 serial interface and plastic front panel. 1- Printing mechanism 2- “Print” key 3- “Feed” key 4- Power supply connector 5- USB interface connector 6- Printer frame 7- Plastic front panel...
- Page 5 D. Back view The back view is the same for all models available. 1- Paper input 2- Inspection cover for paper outlet TG1260/2460...
- Page 6 Blank page TG1260/2460...
-
Page 7: Table Of Contents
TABLE OF CONTENTS INTRODUCTION MANUAL ORGANIZATION ..........................1 SYMBOLS USED IN THE MANUAL ......................... 1 GENERAL SAFETY INFORMATION ........................ 1 UNPACKING THE PRINTER ..........................2 PRINTER DESCRIPTION ..........................2 MAIN APPLICATIONS ............................2 1. INSTALLATION AND OPERATION 1.1 CONNECTIONS ............................. 1-1 1.1.1 Power supply TG1260 ........................ - Page 8 TABLE OF CONTENTS Blank page TG2460...
-
Page 9: Introduction
INTRODUCTION MANUAL ORGANIZATION In addition to the Introduction which contains information regarding the symbols used in the manual, general safety information, instructions for unpacking the printer and a brief description and main characteristics of the machine, this manual is divided into the following chapters: Chapter 1: Contains the information required for correct printer installation and use Chapter 2:... -
Page 10: Unpacking The Printer
INTRODUCTION UNPACKING THE PRINTER Remove the printer from the carton, taking care not to damage the packing materials which should be retained for future shipping/moving. Make sure all components listed below are present and not damaged. If any part is missing and/or damaged, contact customer service. -
Page 11: Installation And Operation
1. INSTALLATION AND OPERATION 1.1 CONNECTIONS (Fig.1.1) 1.1.1 Power supply (1260) Every printer available is equipped with a 2 pin male molex connector serie 5569, for the power supply. The signals on the pins of the feed connector are as follows: Model no. -
Page 12: Usb Connector
1. INSTALLATION AND OPERATION 1.1.3 USB connector (Fig.1.2) The printer with USB interface complies to USB 1.1 specifications that is: • Communication speed equal to 12 Mbit/sec. • Type of connector “Receptacle series B”. The signals on the pins of the USB connector are as follows: (Tab.1.3) 1.1.4 RS232 serial connector The printer with serial RS232 interface is equipped with RJ45 connector. -
Page 13: Connection Printer-Pc
1. INSTALLATION AND OPERATION (Tab.1.4) 1.1.5 Connection Printer-PC The diagrams below show a sample connection between printer and Personal Computer using a 8 pin male RJ45 connector by printer side and a 9 pin female connector by a PC side. (Fig.1.4) Printer side PC side... -
Page 14: Autotest
1. INSTALLATION AND OPERATION • Speed/Quality: Normal , Low. • Offline : Disabled , Enabled. • Print density: Normal , Dark, Very Dark, Light, Very Light. Notes: The parameters indicates with a symbol are the default values. NOTE: Using this parameter, it is possible to select whether the Busy signal is activated when the printer is both in Off Line status and the buffer is full, or only if the reception buffer is full. -
Page 15: Maintenance
1. INSTALLATION AND OPERATION 1.4 MAINTENANCE 1.4.1 Changing the paper roll Every time you change the paper, referred to fig.1.5, need to check as follows : • Lift the wicket relative to paper roll compartment, and check that there are no scraps of paper at the area indicated with a) letter near the printing head. -
Page 16: Notes For Installation And Using The Printer In The Upside Down Position
1. INSTALLATION AND OPERATION To clean, do not use harsh chemical solvents; the use of a soft, alcohol-moistened cloth is recommended. To change the paper roll in the printer, proceed as follows: Position the paper roll (1), so that it rotates in the direction shown in fig.1.6; Insert the end of the paper roll in the print mechanism (2)and wait until the roll loads automatically;... - Page 17 1. INSTALLATION AND OPERATION 1) Release the spring as indicated in fig. 1.8 and placed it in the new position as indicated in fig. 1.9; (Fig.1.10) Hook the spring in this position 2) The printer is ready to be installed in the upside down position. (Fig.1.11) NOTE: The operations described are valid for all models.
-
Page 18: Printer Functions
2. PRINTER FUNCTIONS 2.1 CONTROL CHARACTERS 2.1.1 ESC/POS Emulation The following table lists all the commands for the management of the ESC/POS™ Emulation. The commands can be transmitted to the printer at any moment, but they will only be carried out when the commands previously sent have been executed. - Page 19 2. PRINTER FUNCTIONS t n i t n i t n i t i s t n i c i t s t i t n i t n i t n i c i f t p i t n i y t i NOTE: in “Note”...
- Page 20 2. PRINTER FUNCTIONS [Default] [Reference] $1B $44 [Example] [Name] Print and line feed [Format] ASCII Decimal 10 [Description] Prints the data in the buffer and feeds one line, based on the current line spacing. [Notes] • This command sets the print position at the beginning of the line. [Default] [Reference] $1B $32, $1B $33...
- Page 21 2. PRINTER FUNCTIONS / f f n i l - f f n i l n=2: Off-line status / f f t n i t n i t n i n=3: Error status / f f * . r * . r TG1260/2460...
- Page 22 2. PRINTER FUNCTIONS n=4: Paper roll sensor status / f f n=17: Paper status / f f . n i n=20: Full Status ( 6 bytes) 1° Byte = $10 (DLE) 2° Byte = $0F 3° Byte = Paper Status / f f TG1260/2460...
- Page 23 2. PRINTER FUNCTIONS 4° Byte = User Status t n i t n i ) l l i 5° Byte = Recoverable Error Status t n i . l a t n i a t l a t l 6° Byte = Unrecoverable Error Status / f f Note(*): Only printer mudel with cutter [Name]...
- Page 24 2. PRINTER FUNCTIONS [Name] Set character right-side spacing [Format] ASCII Decimal 0 ≤ n ≤ 255 [Range] [Description] Sets spacing to right of character at [ n x horizontal or vertical motion units]. [Notes] • The spacing to the right of the character for double width mode is double that used for normal mode.
- Page 25 2. PRINTER FUNCTIONS • The command $1B $2D can also turn on/off underline mode. However, the setting of the last received command is effective • The command $1B $34 can also turn on/off script mode. However, the setting of the last received command is effective.
- Page 26 2. PRINTER FUNCTIONS [Notes] • The commands nL and nH indicate the number of horizontal dots in the graphic image. The nL and nH indicate the number of dots of the bit image in the horizontal direction. The number of dots is calculated by nL + nH × 256 •...
- Page 27 2. PRINTER FUNCTIONS n = 1. 49 Turns on underline mode (1-dot thick) n = 2. 50 Turns on underline mode (2-dot thick) [Notes] • The printer can underline all characters but cannot underline the space set by $09 and right-side character spacing.
- Page 28 2. PRINTER FUNCTIONS [Default] n = 32 (1/6 inch) [Reference] $1B $30, $1B $32, $1D $50 [Example] [Name] Set / reset script mode. [Format] ASCII ESC 4 Decimal 27 0 ≤ n ≤ 1, 48 ≤ n ≤ 49 [Range] [Description] Turns script mode on or off, based on the following values of n : i r c...
- Page 29 2. PRINTER FUNCTIONS [Name] Inizialize the printer. [Format] ASCII ESC @ Decimal 27 [Description] Clears the data in the print buffer and resets the printer mode to the mode that was in effect when the power was turned on. [Notes] •...
-
Page 30: Character Set
2. PRINTER FUNCTIONS • When the LSB of n is 1, bold mode is turned on. [Notes] • Only the LSB of n is effective. • The command $1B $21 also turns bold mode on and off. In any case, the last command received is enabled. - Page 31 2. PRINTER FUNCTIONS [Description] Selects the international character set by setting n as in the following table : à ° ç § è ù è " β § Ä Ö Ü ä ö ü £ ∅ φ Æ Å æ å...
- Page 32 2. PRINTER FUNCTIONS [Name] Set relative print position. [Format] ASCII ESC \ Decimal 27 0 ≤ nL ≤ 255 [Range] 0 ≤ nH ≤ 255 [Description] Sets the print starting position based on the current position by using the horizontal or vertical motion unit.
- Page 33 2. PRINTER FUNCTIONS [Name] Enable or disable the front panel keys. [Format] ASCII Decimal 27 0 ≤ n ≤ 255 [Range] [Description] Enables or disables the front panel keys. • When the LSB of n is 0, the panel keys are enabled. •...
- Page 34 2. PRINTER FUNCTIONS [Name] Select the character code table. [Format] ASCII Decimal 27 [Range] n = 0, 19, 255 [Description] Selects a page n from the character code table, as follows: t i s [Note] [Default] n = 0 [Reference] See character code table [Example] For printing Euro symbol (•), the command sequence is:...
- Page 35 2. PRINTER FUNCTIONS [Name] Select speed / quality mode. [Format] ASCII ESC x Decimal 27 0 ≤ n ≤ 2 [Range] [Description] Selects speed / quality mode. Function Draft mode (high speed) Normal mode High quality (low speed) [Notes] • In high quality mode ( n= 2 ), the printer may be noisy. [Default] n = 1 [Reference]...
- Page 36 2. PRINTER FUNCTIONS 1 ≤ n ≤ 2 [Range] 0 ≤ xH, xL, yH, yL ≤ 255 [Description] Prints the graphics bank from flash or ram. n selects the bank as follows: t n i a l f t n i a l f xL + xH ×...
- Page 37 2. PRINTER FUNCTIONS In this example; d0=FF; d1=03; d2=FC; d3=0F Then send this command to the printer 0x1B 0xFF 0x02 0xF8 0x7F 0xFF 0 x 03 0xFC 0x0F... N. logo Dimension [Name] Total cut and automatic paper moving back. [Format] ASCII Decimal [Description]...
- Page 38 2. PRINTER FUNCTIONS [Name] Select character size. [Format] ASCII Decimal 0 ≤ n ≤ 255 [Range] [Description] Selects character height and width, as follows: • Bits 0 to 3 : character height selection ( see table 2 ). • Bits 4 to 7 : character width selection ( see table 1 ). Table1: Character width selection Table2: Character height selection [Notes]...
- Page 39 2. PRINTER FUNCTIONS [Name] Turn white / black reverse printing mode on/off. [Format] ASCII Decimal 0 ≤ n ≤ 255 [Range] [Description] Turns white/black reverse printing mode on or off. • When the LSB of n is 0, white/black reverse printing is turned off. •...
- Page 40 2. PRINTER FUNCTIONS [Name] Select count mode (A). [Format] ASCII Decimal 0 ≤ aL, aH ≤ 255 [Range] 0 ≤ bL, bH ≤ 255 0 ≤ n, r ≤ 255 [Description] Selects a count mode for the serial number counter. •...
- Page 41 2. PRINTER FUNCTIONS [Name] Select count mode. [Format] ASCII sc 3B Decimal sc 59 0 ≤ sa, sb, sc ≤ 65535 [Range] 0 ≤ sn, sr ≤ 255 These values are all character strings. [Description] Selects a count mode for the serial number counter and specifies the value of the counter.
- Page 42 2. PRINTER FUNCTIONS [Notes] • HRI characters are printed using the font specified by GS f. [Default] n = 0 [Reference] $1D $66, $1D $6B [Example] [Name] Transmit printer ID. [Format] ASCII Decimal 1 ≤ n ≤ 3, 49 ≤ n ≤ 51 [Range] [Description] Transmits the printer ID specified by n as follows:...
- Page 43 2. PRINTER FUNCTIONS Left margin Width of print area [Notes] • This command is enabled only at the beginning of the line. • If the setting exceeds the printable area, the maximum value of the printable area is used. • If left margin + printing area width is greater than printable area, then printing area width is set at maximum value.
- Page 44 2. PRINTER FUNCTIONS • The left margin is set at [(nL + nH × 256) × (horizontal motion unit)] inches. Printable area Left margin Width of print area [Notes] • This command is only enabled at the beginning of the line. •...
- Page 45 2. PRINTER FUNCTIONS [Name] Print counter. [Format] ASCII Decimal [Description] Sets the serial counter value in the print buffer and increments or decrements the counter value. [Notes] • After setting the current counter value in the print buffer as print data (a character string), the printer counts up or down based on the count mode set.
- Page 46 2. PRINTER FUNCTIONS [Reference] $1D $6B [Example] [Name] Print bar code. [Format] ASCII Decimal ASCII Decimal 0 ≤ m ≤ 6 [Range] 65 ≤ m ≤ 73 [Description] Selects a bar code system and prints the bar code. m selects a bar code system as follows: 1 ≤...
- Page 47 2. PRINTER FUNCTIONS • After printing the bar code, this command sets the print position at the beginning of the line. • This command is not affected by print modes (bold, double strike, underline or character size), with the exception of upside-down mode and justification. [Note for •...
- Page 48 2. PRINTER FUNCTIONS [Description] Transmits the status specified by n as follows: Function 1, 49 Transmits paper sensor status (same as $1B $76). [Notes] • This command is executed when the data is processed in the reception buffer. There may therefore be a time lag between receiving the command and transmitting the status, depending on the status of the reception buffer.
- Page 49 2. PRINTER FUNCTIONS [Range] n = 0, 1, 48, 49 [Description] Sets superscript or subscript character position. n specifies the position as follows: i r c t i s i r c t i s [Notes] • This command is executed if there are characters with different heights on the same line.
-
Page 50: Custom Emulation
2. PRINTER FUNCTIONS 2.1.2 Custom emulation The following table lists all the commands for the management of the Custom emulation. The commands can be transmitted to the printer at any moment, but they will only be carried out when the commands previously transmitted have been carried out. - Page 51 2. PRINTER FUNCTIONS t i s c i t s t i c i f y t i NOTE: in “Note” column where the model is not specified, the command is valid for all models. The following pages provide a more detailed description of each command. [Name] Print with small character [Format]...
- Page 52 2. PRINTER FUNCTIONS [Notes] • Setting remains until next set [Default] Set up from front keys. [Reference] $00, $01, $03, $04 [Example] [Name] Printing with expanded character [Format] ASCII Decimal 3 [Description] Printing of the character is executed in expanded format [Notes] •...
- Page 53 2. PRINTER FUNCTIONS [Default] [Reference] [Example] [Name] Print and line feed [Format] ASCII Decimal [Description] This command prints the data in the buffer. [Notes] • This command sets the print position at the beginning of the line. [Default] [Reference] [Example] [Name] Ignore CR [Format]...
- Page 54 2. PRINTER FUNCTIONS P3, P2, P1) follow from left to right as shown: 1st byte 2nd byte 3rd byte P6 P5 P4 P3 P2 P1 P6 P5 P4 P3 P2 P1 P6 P5 P4 P3 P2 P1 [Default] [Reference] [Example] To print a line of dots, transmit: $11, n x $7F (where n is the number of characters per line), $0D.
- Page 55 2. PRINTER FUNCTIONS 0 ≤ nH ≤ 255 [Description] Sets the distance from the beginning of the line to the position in which the subsequent characters are to be printed. The distance from the beginning of the line to the print position is [(nL + nH × 256)× (vertical or horizontal motion unit)] inches.
- Page 56 2. PRINTER FUNCTIONS 8 dot image 24 dot image [Default] [Reference] [Example] [Name] Inizialize the printer. [Format] ASCII Decimal [Description] Clears the data in the print buffer and resets the printer mode to the one that was in effect when the power was turned on [Notes] •...
- Page 57 2. PRINTER FUNCTIONS [Notes] • The printer waits until all the paper movement commands have been completed before executing total cut [Default] [Reference] [Example] [Name] Set the characters to transmit on pressing the Print key. [Format] ASCII Decimal [Description] Saves characters to transmit on pressing Print key. “d”...
- Page 58 2. PRINTER FUNCTIONS [Name] Set default parameters of print mode. [Format] ASCII Decimal [Description] Sets the default parameters of print mode as indicated as follows : $00 : small print $01 : double width printing $02 : double height printing $03 : bold printing [Notes] Setting is memorized in EEPROM.
- Page 59 2. PRINTER FUNCTIONS r ° r ° [Notes] • When underlined mode is turned on, the printer does not underline 90° rotated charac- ters. All the same it’s possible select the underline mode. • Double-width and double-height commands in 90° rotation mode enlarge characters in the opposite directions from double-height and double-width commands in normal mode.
- Page 60 2. PRINTER FUNCTIONS [Default] Set up from front keys. [Reference] $1B $42 [Example] [Name] Read default parameters of print mode [Format] ASCII Decimal 27 [Description] Reads default parameters of print mode. [Notes] See ESC M. [Default] Set up from front keys. [Reference] $1B $4D [Example]...
- Page 61 2. PRINTER FUNCTIONS [Name] Select the character code table. [Format] ASCII Decimal [Range] n = 0, 19, 255 [Description] Selects a page n from the character code table, as follows: t i s [Note] [Default] n = 0 [Reference] See character code table [Example] For printing Euro symbol (•), the command sequence is: $1B, $74, $13, $D5...
- Page 62 2. PRINTER FUNCTIONS t n i a l f xL + xH × 256 specifies the starting dot line ( 1 ÷ 1170 ). yL + yH × 256 specifies the number of lines to print. • If (xL + (xH × 256)) > 1170 the printer does not execute the command. [Notes] •...
- Page 63 2. PRINTER FUNCTIONS In this example; d0=FF; d1=03; d2=FC; d3=0F Then send this command to the printer 0x1B 0xFF 0x02 0xF8 0x7F 0xFF 0 x 03 0xFC 0x0F... N. logo Dimension [Name] Total cut and automatic paper moving back. [Format] ASCII Decimal [Description]...
- Page 64 2. PRINTER FUNCTIONS [Default] [Reference] [Example] [Name] Print the buffer contents. [Format] ASCII Decimal [Description] Prints contents of buffer characters and executes a line feed. Sets the printing start position at left margin. [Notes] [Default] [Reference] [Example] [Name] Start / end macro definition. [Format] Decimal 29 [Description]...
- Page 65 2. PRINTER FUNCTIONS i t s c i f i t s c i f ’ 0 ‘ . t f i t s c i f . t h [Notes] • if n or m is outside the defined range, the previously set print mode is not changed. •...
- Page 66 2. PRINTER FUNCTIONS 0 ≤ nL, nH ≤ 255 [Range] [Description] Sets the serial number counter value. • nL and nH determine the value of the serial number counter set by [nL + (nH × 256)]. [Notes] • In count-up mode, if the counter value specified by this command goes out of the counter operation range specified by GS C 1 or GS C ;, it is forced to convert to the minimum value by GS c.
- Page 67 2. PRINTER FUNCTIONS [Name] Select printing position of Human Readable Interpretation ( HRI ) [Format] ASCII Decimal 0 ≤ n ≤ 3, 48 ≤ n ≤ 51 [Range] [Description] Selects the printing position of HRI characters when printing bar code. n selects the printing position as follows: [[Notes] •...
- Page 68 2. PRINTER FUNCTIONS identification) if it has not been given confirmation that the host is ready to receive data. • This command is carried out once the data has been processed in the reception buffer. There may therefore be a delay between the moment in which the command is received and that in which the data is transmitted, depending on the status of the reception buffer.
- Page 69 2. PRINTER FUNCTIONS • When the macro is executed by pressing the FEED button ( m = 1), the paper can not be fed by using the FEED button. [Default] [Reference] $1D $3A [Example] [Name] Print counter. [Format] ASCII Decimal [Description] Sets the serial counter value in the print buffer and increments or decrements the counter value.
- Page 70 2. PRINTER FUNCTIONS [Name] Set bar code height [Format] ASCII Decimal 1 ≤ n ≤ 255 [Range] [Description] Sets the height of the bar code. n specifies the number of dots in the vertical direction. [Notes] [Default] n = 96 ( 12 mm ) [Reference] $1D $6B [Example]...
- Page 71 2. PRINTER FUNCTIONS 1 ≤ n ≤ 2 4 ≤ d ≤ 7 1 ≤ n ≤ 2 4 ≤ d ≤ 7 1 ≤ n ≤ 3 4 ≤ d ≤ 7 7 ≤ n ≤ 8 4 ≤ d ≤ 7 4 ≤...
- Page 72 2. PRINTER FUNCTIONS c i f ' { ' [Default] [Reference] $1D $48, $1D $66, $1D $68, $1D $77 [Example] [Name] Set bar code width. [Format] ASCII Decimal 2 ≤ n ≤ 6 [Range] [Description] Sets the horizontal size of the bar code. n specifies the bar code width as follows: [Notes] [Default] n = 3...
-
Page 73: Cbm Idp560Rs Emulation
2. PRINTER FUNCTIONS [Description] Sets the printing density. n specifies the printing density as follows: g i l [Notes] • The printing density is cleared at default value when the printer is reset or the power is turned off. [Default] n = 2 [Reference] [Example]... - Page 74 2. PRINTER FUNCTIONS c i t c i t y t i NOTE: in “Note” column where the model is not specified, the command is valid for all models. The following pages provide a more detailed description of each command. [Name] Print with small character [Format]...
- Page 75 2. PRINTER FUNCTIONS [[Name] Printing with expanded character [Format] ASCII Decimal [Description] Printing of the character is executed in expanded format [Notes] • Setting remains until next set [Default] Set up from front keys [Reference] $00, $01, $02, $04, $0E, $0F, $1E, $1F [Example] [Name] Print with small character...
- Page 76 2. PRINTER FUNCTIONS [Name] Print and line feed [Format] ASCII Decimal [Description] When autofeed is “$0D enabled”, this command functions in the same way as $0A, otherwise, it is ignored. [Notes] This command sets the print position at the beginning of the line. [Default] See the “autofeed”...
- Page 77 2. PRINTER FUNCTIONS [Notes] • Only this code can be accepted independently of the status OFF LINE. [Default] [Reference] [Example] [Name] Places the printer OFF LINE. [Format] ASCII Decimal [Description] Places the printer OFF LINE. [Notes] [Default] [Reference] [Example] [Name] Set/ erase reverse printing mode.
- Page 78 2. PRINTER FUNCTIONS [Name] Standard character designation. [Format] ASCII Decimal [Description] Printing of the character is executed in small format (normal). [Notes] [Default] Set up from front keys [Reference] $01, $02, $03, $04, $0E, $0F, $1E [Example] [Name] Set 3 mm. line spacing [Format] ASCII ESC 1...
- Page 79 2. PRINTER FUNCTIONS [Name] Page length designation and page formatting. [Format] ASCII ESC C Decimal 14 ≤ n ≤ 120 [Range] [Description] This command sets the length (number of lines) of the page, and paging formatting begins. A space of three lines is left at both the top and bottom of the page. [Notes] •...
- Page 80 2. PRINTER FUNCTIONS [Notes] • The printer waits until all the paper movement commands have been completed before executing total cut [Default] [Reference] [Example] Print graphic bank ( 448 × × × × × 1170 dots). [Name] [Format] ASCII FA n Decimal 1 ≤...
- Page 81 2. PRINTER FUNCTIONS t n i c i f t n i i t n c i f i t n c i f o l l i t n c i f f i t t t u e i l t t u e i l [Notes]...
-
Page 82: Technical Specifications
3. TECHNICAL SPECIFICATIONS 3.1 TECHNICAL SPECIFICATIONS Table 3.1 gives the main technical specifications of the printer. Tables 3.2, 3.3, 3.4 give specifications of every emulation available. (Tab.3.1) i f l s l l v i t l l o ± ±... - Page 83 3. TECHNICAL SPECIFICATIONS Note : Referred without paper roll and model with plastic front panel. (Tab.3.2) (Tab.3.3) (Tab.3.4) TG1260/2460...
-
Page 84: Dimensions
3. TECHNICAL SPECIFICATIONS 3.2 DIMENSIONS 3.2.1 TG2460-U-A (Fig.3.1) 3.2.2 TG2460-U-N (Fig.3.2) TG1260/2460... -
Page 85: Tg2460-U-M
3. TECHNICAL SPECIFICATIONS 3.2.3 TG2460-U-M (Fig.3.3) NOTE: the figures in this part show the USB interface model but the dimensions are the same even for the serial RS232 interface model. TG1260/2460... -
Page 86: Character Set
4. CHARACTER SET 4.1 CHARACTER SET The printer has seven sets of 224 character each one. In the following figures are shown the examples: ESC/POS 32 columns ESC/POS 42 columns ESC/POS 56 columns DPT 24 FONT A DPT 24 FONT B DPT 42 FONT A DPT 42 FONT B TG1260/2460... - Page 87 4. CHARACTER SET Blank page TG1260/2460...
-
Page 88: Appendix A - Accessories And Spare Parts
APPENDIX A - ACCESSORIES AND SPARE PARTS A.1 ACCESSORIES A.1.1 Power supply A.1.1.1 Power supply for TG2460 The figure below illustrates the power supply provided by Custom to be used for printer operation. (Fig.A.1) TOLERANCE RANGE ± < 8 ÷ ±... -
Page 89: Power Supply For Tg1260
APPENDIX A - ACCESSORIES AND SPARE PARTS A.1.1.2 Power supply for TG1260 The figure below illustrates the power supply provided by Custom to be used for printer operation. (Fig.A.1.2) (Tab.A.1.2) PPSPS-070-12V Switching power supply 12V÷070W Input specification Input voltage 85V ÷ 264 Current 0A ÷... -
Page 90: Adjustable Paper Holder Support Kit
APPENDIX A - ACCESSORIES AND SPARE PARTS A.1.2 Adjustable paper holder support kit For the printer is available a swinging paper holder support kit (see fig. A.2). This accessory allows to use bigger diameter paper rolls (max 80mm). The kit is already assembled as shown in fig A.2. Paper holder support kit: 1- Paper holder support 2- Paper roll pin... - Page 91 APPENDIX A - ACCESSORIES AND SPARE PARTS Assembling instructions The paper holder support positioning isn’t fixed but adjustable on 3 different positions: back, lower and upper as shown in fig. A.3. 1 = Upper positioning 2 = Back positioning 3 = Lower positioning (Fig.A.3) TG1260-2460...
- Page 92 APPENDIX A - ACCESSORIES AND SPARE PARTS Fastening the paper holder support in upper position Fix the paper holder support to the printer frame by the two fastening screws on issue in the kit. Screw them where shown in fig. A.4 and connect the near paper end sensor cable to the printer connector. WARNING: Check the paper roll pin is assembled with the beveled side turned in the low position (see the paper roll containment disks part).
- Page 93 APPENDIX A - ACCESSORIES AND SPARE PARTS Fastening the paper holder support in back position Fix the paper holder support to the printer frame by the two fastening screws on issue in the kit. Screw them where shown in fig. A.6 and connect the near paper end sensor cable to the printer connector. WARNING: Check the paper roll pin is assembled with the beveled side turned in the low position (see the paper roll containment disks part).
- Page 94 APPENDIX A - ACCESSORIES AND SPARE PARTS Fastening the paper holder support in lower position Fix the paper holder support to the printer frame by the two fastening screws on issue in the kit. Screw them where shown in fig. A.8 and connect the near paper end sensor cable to the printer connector. WARNING: Check the paper roll pin is assembled with the beveled side turned in the low position (see the paper roll containment disks part).
- Page 95 APPENDIX A - ACCESSORIES AND SPARE PARTS Using the paper roll containment disks The paper holder support kit is equipped with two paper roll containment disks. The disks operates to keep the roll paper in the right position. They are realized with holes, which let the near paper end sensor on the paper holder support works correctly, and with a slot, which hinder the disks from rotating around their own axises .
- Page 96 APPENDIX A - ACCESSORIES AND SPARE PARTS Dimensions of printer with paper holder support TG2460-U-A model (USB interface, metal front panel and autocutter model) (Fig.A.11) TG1262-2460...
- Page 97 APPENDIX A - ACCESSORIES AND SPARE PARTS TG2460-U-N model (USB interface and plastic front panel) (Fig.A.12) TG1260-2460...
- Page 98 APPENDIX A - ACCESSORIES AND SPARE PARTS TG2460-U-M model (USB interface and metal front panel without autocutter) (Fig.A.13) TG1262-2460...
-
Page 99: Paper Dispenser Unit
APPENDIX A - ACCESSORIES AND SPARE PARTS A.1.3 Paper dispenser unit (Fig.A.14) Assembling paper dispenser unit: Insert the paper dispenser unit feathers in their seats on the plate which holds the autocutter. (Fig.A.15) Assemble the fastening screw of paper dispenser unit to the plate which holds the autocutter. -
Page 100: Spare Parts
APPENDIX A - ACCESSORIES AND SPARE PARTS Ø2.1 51.5 57.1 A.2 SPARE PARTS Paper rolls l l o (Tab.A.4) TG1262-2460...
Need help?
Do you have a question about the TG1260 series and is the answer not in the manual?
Questions and answers