Yaesu FT-51R Owner's Manual
Dual band fm paging transceiver
Hide thumbs
Also See for FT-51R:
- Technical supplement (65 pages) ,
- Technical supplement (67 pages) ,
- Technical supplement (83 pages)
Table of Contents
Advertisement
Advertisement
Table of Contents

Related Manuals for Yaesu FT-51R


Summary of Contents for Yaesu FT-51R
- Page 1 FT-51R Dual Band FM Paging Transceiver...
-
Page 2: Table Of Contents
Contents ..Specifications ARS (Automatic Repeater Shift) ..Memory Storage Accessories Options List & ..Recalling Memories Controls Connectors & Call Channel Memory Front Panel &... - Page 3 Annunciator - decodes incoming DTMF Pag- Yaesu amateur transceiver! Whether this is your ing codes and messages with CW play-back! first rig, or if Yaesu equipment is already the backbone of your station, rest assured that your Improved cross-band and full-duplex opera- transceiver will provide many hours of operat- tion with "Duplex"...
- Page 4 Morse code! (the naming feature can be turned off to expand The FT-51R can even respond to or relay (for- memory capacity to 60 per band, if desired). ward) paging calls when you are absent. For...
-
Page 5: Specifications
Specifications General > Adjacent channel selectivity: 65 dB VHF > 60 dB UHF Frequency range: (Rx) 110-180 MHz 420-470 MHz Intermodulation: > 65 dB (VHF), > 60 dB (UHF) (Tx) 144-148 MHz 430-450 MHz Channel steps: 5, 10,12.5,15,20,25 50 kHz &... -
Page 6: Accessories
CA-9 Base Charging Stand Availability ofaccessories may vary: some accessories are supplied (used w/NC-34B/C, -38B/C and -55B/C) as standard per local requirements, others may be unavailable in some regions. Check with your Yaesu dealer for changes to the above list. -
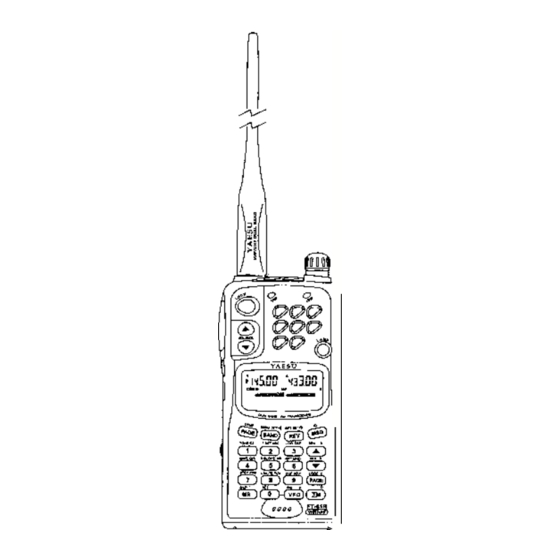
Page 7: Controls Connectors
Controls Connectors Front Panel use, to protect the inside of the transceiverfrom dust and water. Jack This 2-conductor, 2.5-mm phone jack accepts a optional microphone or speaker/mic (im- pedance is 2 kQ). The internal microphone is disabled while this jack is used. Rotary Selector DIAL Rotate this to tune, or select memories and... - Page 8 abled). The labels on the keyfaces indicate their primary functions, while labels on the panel indicate alternate functions, which are activated by momentarily pressing first, and then the desired key within five seconds. -1 1 There are also some "Setting Mode" func- tions, for customizing less-commonly used -1 2 features.
-
Page 9: Side Panel
Switch ( 1 1 ) LAMP Press to illuminate the display and keypad for 5 seconds when operating in the dark. Press first if you want the lamp to stay on (until you press the switch again). LCD (Liquid Crystal Display) (12) See the graphic on the next page for descrip- tions of the display icons and indications. -
Page 10: Lcd Indications
LCD Indications CTCSS Encode CTCSS Encode Memory CTCSS Rptr LowTX Memory CTCSS Rptr APO Scan Skip Decode Power Scan Skip Decode Shift T CTCSS T S Q LOW SKIP DTMF Decoder on for Paging Indicator Paging Enabled One-Touch Main DTMF Decoder Paging Enabled Channel on for Paging Indicator Paging Message DTMF Paging DTMF Code... -
Page 11: Accessories
Accessories Batteries Chargers The FT-51R requires the FNB-38 9.6-volt re- FN B-311-33 chargeable Ni-Cd battery pack for the full 5-watt FNB-35 transmitter power output. However, where FNB-38 slightly lower maximum power output is practi- cal, the 7.2-volt FNB-35 (providing 4 watts) and Ensure you use the correct charger for each the 4.8-volt FNB-31 and FNB-33 Ni-Cd packs... - Page 12 One or more of the above battery packs/cases may be supplied with the transceiver. need a battery, contact your Yaesu dealer. W e do not recommend the use of any other type of battery with the FT-51R, and using another type may affect your warranty.
-
Page 13: Battery Removal & Replacement 1
Battery Removal Replacement To open the FBA-14 battery case, place your thumbs on the lugs on top of the case and gently Make sure the power is switched off, and re- pry the case apart. Replace all four batteries, move the protective soft case, if used. Grasp noting the polarity indicated inside the case. -
Page 14: Antenna Considerations
To transmit just hold the ard BNC jack allows use of a higher gain antenna to extend range in base or mobile operation. Any switch on the microphone. antenna used with the FT-51R should have an impedance close to ohms on the 2-m 70-cm &... - Page 15 FT-51 R Key Functions Normal Alt Function (after pressing 5 secs. Function Toggles CTCSS EncodeIDecode Mode: T I T SQ Enter digit 1 off. Toggle display of CTCSS tone frequency (use the knob or the keys TSETABC DIAL Enter digit 2 select a desired tone).
-
Page 16: Key Functions
Key Functions (continued) (OM)) Alternate Function (after pressing icon dis- played for secs. = . , - - From VFO: recall last-used memory chan- From memory mode only: toggle scan skip of currently nel. From Memory: enable memory tuning selected memory channel. appears at display bottom. -
Page 17: Operation
DTMF tones accord- ing to their numeric label or the blue A, B, Before operating the FT-51R the first time: label (near the non-numeric keys). Charge the battery pack completely (if using You need not be too concerned about the fol- Ni-Cd batteries) as described on page 11. - Page 18 the box, but we recommend keeping it enabled Keypad Beeper while getting to know the key functions. You can turn the keypad beeper on and off With that said, if you experience any difficul- press then rotate the until DIAL ties getting the transceiver to work as described In Case of Prob- in the manual, see the chapter...
-
Page 19: Volume & Squelch Setting
Dual receive is active only when a sub chan- nel is displayed; the button selects which band or bands appear in the main and sub chan- nel displays. Transmission is only possible on the main channel, but both receivers can be set to Main-Channel (active) Sub-channel VOL level... -
Page 20: Frequency Selection Modes
1-MHz steps, and the scanning function LED turns off. (If the squelch is set to a higher tunes in the selected step size. The FT-51R has level, sensitivity to weak signals is reduced.) two independent VFOs, A and B, for the main channel, and two more for the sub channel. -
Page 21: User Help Messages
DIAL, keys and scanning function select stored memo- The FT-51R incorporates a bank of pre-pro- ries. The FT-51R provides up to 70 memories grammed user-help messages that scroll across with 2 call-channel memories (plus 8 special- the bottom portion of the display to assist in purpose memories), each of which can store re- changing various transceiver settings. -
Page 22: Frequency & Step Selection
Some user help messages appear as soon as a If user help is enabled, appears fol- key is pressed (such as entering a frequency di- lowed by instructions whenever a keypad digit rectly), while others only appear with 2nd-level is pressed. functions (@@+ selected key) or set-mode func- tions These are covered in detail... - Page 23 ing either =or ping), or press and turn the DIAL. 1 kHz Default channel (tuning) steps are 25 kHz for invalid, others 12.5125 are rounded to nearest valid UHF and 5 kHz for VHF in U.S.A. versions. To 12.5- or 25-kHz channel. STEP select another step size, press turn...
-
Page 24: Spectrum Scope Operation
Spectrum Scope Display Indications markers (8) signal activity strong ktivity center channel no'signa single "Zero" stacked "zeros" marker activity Spectrum Scope Operation activate any time rotate the press DIAL; The spectrum scope allows viewing operat- and turn the to select 5Et DIAL ing activity on channels above or below the cur- rent operating channel in either the VFO or MR... -
Page 25: Transmitting
Visible bandwidth 10-kHz channel steps 70 kHz or turning the Tune until you DIAL. station activity, then slowly turn the 144.970 145.000 145,040 until a station is centered in the center- DIAL Center Frequency channel marker (colon). To turn the scope off and operate on the centered (and displayed) simply press the PTT momevztarily. -
Page 26: Duplex Operation
during setting and when transmit- power level versations with a personal autopatch), refer to Duplex Operation. ting. Press the or wait 3 seconds to save the next section your selection and exit. In European versions, press the oval just be- low the switch to transmit a 1750-Hz Burst Cross-Band Full Duplex Operation... - Page 27 (cumbersome), an easy way to obtain hassle-free operation is to use the du- transceiver (and your hand!) considerably, we plex function of the FT-51R. first recommend selecting a low power* setting if extended transmit periods are expected. The duplex function has three selectable modes:...
-
Page 28: Sub-Channel Receiver Mute
Sub-channel Receiver Mute Repeater Splits The FT-51R offers three methods to set up With dual receive capability, there will be split transmit/receive operation for repeaters: many instances when audio from both receivers manual, automatic and independently-stored will be heard simultaneously. Aside from be oc-... -
Page 29: Setting Standard Repeater Offset
Setting Standard Repeater Ofset Tune the display to 447.50 MHz (to receive on the repeater output frequency). The repeater offset is preset (in version A only) to 600 kHz for VHF, and 5,7.6 or 1.2 MHz RPT MNO once. A appears at the Press for UHF. -
Page 30: Ars (Automatic Repeater Shift)
The ARS (Automatic Repeater Shift) feature so that Press (OM)+ then rotate the in the FT-51R activates repeater offset automat- DIAL appears. ically whenever you tune to the standard re- peater subband. With this feature enabled, a Now you can press... - Page 31 Memo y Storage Memory Channel Organization default, the FT-51R offers 40 programma- ble memory channels for each band. These con- sist of 35 regular memories along with 5 These store frequency S a m e d e f a u l t a n d o p e r a t i o n a l special-purpose memories.
- Page 32 To store a frequency in memory: Select the desired frequency (and repeater split manually, if desired) in the VFO mode as already described. Hold (SM) %-second (until a second beep sounds). The icon appears blinking. Within five seconds of pressing (OM), turn the or press to select the desired DIAL...
-
Page 33: Memory Storage
Recalling Memories Call Channel Memory The Call channel memory for each band can In confirming the results of the last example, be instantly recalled by the button. we used to change from the VFO mode to appears below the frequency display for the re- the memories after they were stored. -
Page 34: Tuning & Masking Memories
Press and hold the switch while pressing Once you have retuned a memory, if @once more momentarily (this does not don’t want to save your changes, just press key the transmitter). to return to the original memory data. Whenever you recall a separate transmit fre- Masking Memories quency memory, appear together above... -
Page 35: Naming Memories
Naming Memories First recall the memory you wish to name. Press and hold second, then release You can assign alphanumeric (A/N) names it and press At this point the lower dis- up to 8 characters long to the memories, and play should clear, except for blinking in have those memories displayed by name rather... -
Page 36: Scanning
Scan Resume Mode Selection the name, then Note: Named meqg-ies are tunedM$$e gkber The FT-51R offers a choice of three selectable memories (using (MR)+ DIA L scan-resume modes: However, appears in place of the name until... - Page 37 The limits are stored in two pairs of special You can stop the scanner maguglly by press- memories labeled ing the switch, or the keys, which will leave operation on the curre:; Store the lower edge of the desired scanning Scanning is also halted by m o r but op- range in memory...
-
Page 38: Priority Channel Monitoring
Example: To limit reception to 445.0 446.9 MHz Once the k memory pairs are stored, you can reactivate PMS scanning and tuning just by any channel between 445.000 and Tune a VFO to recalling any PMS memory and pressing 445.095 MHz. again. - Page 39 Locking the Controls onds the displayed frequency and channel number shift to the priority memory briefly keypad buttons, and volume PTT, DIAL while the receiver checks for a signal. level can each be "locked" (disabled), to prevent As long as no signal appears on the priority inadvertent transmissions or adjustments.
- Page 40 Lamp Lamp Illumination Settings When inserting the FT-51R into the PA-10 Mo- Momentarily pressing the bile Power Adapter! the lamp turns on automat- switch lights the LCD L AMP ically to illuminate the transceiver for easy and keypad for 5 seconds. If viewing at night.
-
Page 41: Ctcss Operation
With one press, (encode) appears at the top of the display and the tone genemtsr is activated The FT-51R can be used to access repeaters for transmission. Press that require a CTCSS (continuous, subaudible) tone, and to silently monitor for calls on busy (decode) will channels. -
Page 42: Ats (Auto Tone Search) Operation
found, scanning stops, the decimal point blinks, ATS (Auto Tone Search) Operation a high-low beep sounds and the display illumi- If you hear signals which you suspect (or nates (if enabled). The CTCSS tone in use now know) are using CTCSS, but are unsure which appears on the display. -
Page 44: Ctcss "Bell" Operation
Paging ”CTCSS Bell” Press four times to select the CTCSS Bell mode. This cycles through the following pag- CTCSS Bell operation is an extension of the ing mode/displays: CTCSS encode/decode function described DTMF paging - is displayed below the above: incoming subaudible tones open the PAGE center of the respective frequency display. -
Page 45: Dtmf Paging & Code Squelch
DTMF Code Squelch Paging Like the CTCSS Bell system described pre- viously, the DTMF paging and code squelch sys- The FT-51R includes a DTMF (Dual-Tone, tems are selected by pressing Either the Multi-Frequency) tone encoder/decoder and a icon appear on the dis-... - Page 46 The key to using quence, your squelch opens and stays open until DTMF paging in the FT-51R is first under- a few seconds after the end of their transmission. standing how the Code Memories are used.
- Page 47 not your persona2 DTMF Code Memories If the paging code received is code, but matches one of those stored in Code Memories 1-9, the transceiver still responds as Individual ID code of stations you wish to before, but the display now shows the Code call or monitor stored here.
- Page 48 Monitoring DTMF Code Selected Code Memory Code When a 3-digit DTMF code is received while either Code Squelch or DTMF Paging is active, it is automatically written into Code Memory C. By selecting this Code Memory as described be- low, you can view what DTMF code was last heard, whether or not it opened your squelch.
- Page 49 After pressing (OM)+-= to activate Code displayed), trigger paging code (PAGE setting you can press (OM> to toggle DTMF squelch CTCSS Bell paging and no (CODE), squelch paging capability on and off. When on, paging (none of these symbols). that is, when the decoder DTMF Code Squelch Operation is enabled to receive pag- ing calls with this Code...
- Page 50 If you press your switch after receiving a Paging Tx Delay page, the transceiver sends the other station’s ID code, a DTMF ”star” (*) followed by your own When calling other stations using DTMF 3-digit personal ID code (Code Memory f J ) all Paging or Code Squelch, particularly automatically, and then resets the radio to re- through repeaters, you may find that some...
- Page 51 Code Squelch mode when responding to a page. It can only be used between transceiv- ers equipped with this feature: such as the Yaesu To free up (display) the 100's-of-MHz fre- CODE C...
-
Page 52: Sending Messages
Sending Messages range. This feature uses DTMF signaling to send You can leave your FT-51R with this mode messages to a friend or any group of stations that enabled, for instance in your vehicle, office or are set up for message reception. Yaesu FT-11R &... - Page 53 DTMF Note: Resetting Alternate Functions string contained within as a message when de- coded. The FT-51R automatically formats your All alternate-function settings (those se- message with flags, so you only have to enter...
- Page 54 Selecting Message Operation I.D. Memory Slot When sending messages, you can also have your ID included; "ti!EW'or else ' ' t ZBi3 /D"ap- pears at the left of the display indicating if one or both are to be sent (and displayed). Likewise, while receiving, this selection determines if the ID will be correctly formatted and displayed I.D.
- Page 55 When sending a pre-stored message, the #‘s are auto- Before sending a message, you must first in- matically inserted by the FT-51R’s CPU. When form the other station to switch his or her trans- remember sending messages manually, however, ceiver into its message reception mode.
- Page 56 Receiving Messages Next, the message text slowly scrolls across the lower display. If the Morse annunciator is en- abled, the message is decoded and played back To receive a message, ensure QB or QZB in Morse code over the speaker (see page 56). is displayed in the left of the LCD, as explained before.
- Page 57 Message Storage Messages subsequently received continu- overwrite first-in, ously previously full slots on a After receiving ten incoming messages, any first-ou t Single order, unless message storage is overwrite subsequent messages normally pre- selected. In this case messages are not stored, viously full slots on afirst-in,first-out order.
-
Page 58: Customizing Ringer Settings
Customizing Ringer Settings Ringer Repetition Melody Function (on/off) Selection The way the transceiver's ringer responds when a CTCSS Bell, DTMF Paging or DTMF CTCSS 0 (off) Message call is received depends on the ringer A I (CW Decode) configuration you select. Three types of ringer melodies are available: Internal Melody (factory-programmed) Paging... -
Page 59: Dtmf Autodial Memories
DTMF Auto-dial Memories Selected DTMF Autodial Serial digit's place (1-15) of last-entered digit. Ten memories, numbered 0 9, store DTMF tone sequences of up to 15 digits each. These can be used for remote DTMF control sequences or telephone numbers for auto-patching systems. Memories 0 9 are reserved for a special pur- &... - Page 60 DTMF Auto-dial Memories Selected DTMF Autodial Serial digit's place (1-15) of last-entered digit. Ten memories, numbered 0 9, store DTMF tone sequences of up to 15 digits each. These can be used for remote DTMF control sequences or telephone numbers for auto-patching systems. Memories 0 &...
- Page 61 Auto-Dial Memory Playback Naming DTMF Auto-Dialer Memories You can manually check the contents of You may assign a name (up to 8 characters) to DTMF auto-dial memories while 2 ! S is dis- each DTMF auto-dial memory, to be displayed played: when the memory is recalled.
- Page 62 Composing the Ringer User-Melody Press and hold (OM> for 1/2-second, then press to enter the A/N naming mode. Autodial The default ringer with CTCSS Bell or DTMF memories are pre-named as Paging operation is factory programmed. You etc. The first character's place of the name may compose your own melody if desired, and starts blinking, and you can enter the charac- and store it in a special DTMF Autodial memory...
- Page 63 If you are storing fewer than 15 notes, press Chord (1-3)- after the last note to finish, otherwise entry terminates automatically. You can press to select another DTMF memory to store, and repeat the last two steps, or else press again to return to exit to the frequency display.
- Page 64 Press the all versions, in accordance with regulations in the save your entry and exit. country the FT-51R is shipped to. Note: Do not confuse DTMF Paging Code Speed buttons, then turn the power on with DTMF Autodialer playback. Autodialer again.
- Page 65 Alpha-Numeric & Special Character Key Code Table name DTMF (auto-dial) Memories: To name Channel Memories: 1. Recall memory channel to be named. to display 2. Press 2. Press (OM> for 112 sec, then the number of the 3. Use DIAL to choose characters, press to enter.
- Page 66 Set Mode Functions and Selections Display Function Dispiay ......Select single or continuous Transfer VOUSQL control to message storage. top-panel rotary DIAL knob. Enableldisable Scan Lamp Select front panel locking (while paused) scheme.
- Page 67 Power-On Settings Some transceiver default operational settings can be enabled/disabled, changed or reset using a power-on procedure. This requires holding a particular key (or key combination) depressed while turning the transceiver on, as outline in the table below. For detailed explanations on how these affect transceiver operation refer to the page(s) listed in the far right column.
-
Page 68: Appendix
(page 16), you will operating habits, and how you care for the bat- hear a few short beeps about a minute before the tery pack. The FT-51R offers several ways to transceiver turns itself off. you don’t press a conserve battery power, and extend the life of key in that minute, the transceiver turns off. - Page 69 Battery Saver Settings communications. As described on the box on page 24, the FT-51R offers a choice of five levels of power output: one high and four low - Et (economy low), i and i...
- Page 70 DTMF selective calling (code squelch, and Another tip to consider is that if you live in a DTMF paging) features in the FT-51R can be location where high power is almost always used to essentially make a quiet channel out of needed, consider using a higher gain antenna an otherwise busy one.
- Page 71 Yaesu battery pack type is installed, mic or the MH-19~2~3 Earpiece/Mic, and keep as shown below. Press the to exit.
-
Page 72: Cross-Band Repeater Settings
Bi-directional repeat operates the same way, ex- The FT-51R can be set up to operate as a full- cept, as its name implies, it can repeat signals featured cross-band repeater with a simple from either channel (one at a time, of course). - Page 73 RPT MNO show which channel the FT-51R is transmit- For bi-directional cross band repeat, hold ting, or else can glance at the while turning on the power. VHF/UHF LEDs to see which is green/red, respectively. BAND In this case do not need to press...
-
Page 74: Transceiver Cloning
Now insert the clone cable into jack of each tranceiver, and press the key on You can transfer all data stored in one FT-51R destination FT-51R. to another set automatically by a cloning proce- dure. This requires a user-constructed cable to... -
Page 75: Packet Radio Connections
Packet Radio Connections Connect the jacks to your TNC as shown below. jack imped- FT-51R use the for packet, the power saver FT-51R ance is 2 kQ, and maximum input is 300 should be disabled, since the sleep periods used... -
Page 76: In Case Of Problems
In Case of Problems Invalid key entries usually do nothing, and no beep sounds. However, if the keys are locked, Don’t worry if you find FT-51R operation nothing happens when you press a key for even somewhat complicated at first. You might find valid commands. - Page 77 Warning (for USA users) As a last resort, if you are unable to gain This transceiver generates and utilizes radio control the transceiver, FT-51R can reset frequency (RF) energy. Unapproved modifi- keypad from the to clear all settings, memories, cations performed on the circuitry of this...
- Page 78 YAESU Performance without YAESU MUSEN CO., LTD. Copyright 1994 C.P.0. Box 1500, Tokyo, Japan Yaesu Musen Co., Ltd. All rights reserved. YAESU U.S.A. 17210 Edwards Rd., Cerritos, California 90703 No portion of this manual U.S.A. may be reproduced without YAESU EUROPE B.V.
Need help?
Do you have a question about the FT-51R and is the answer not in the manual?
Questions and answers