Table of Contents
Advertisement
Quick Links
Download this manual
See also:
User Manual
Advertisement
Table of Contents

Related Manuals for Elation PLATINUM BEAM 15R


Summary of Contents for Elation PLATINUM BEAM 15R
- Page 1 PLATINUM BEAM 15R Elation Professional 6122 S Eastern Ave Los Angeles, Ca 90040 www.elationlighting.com 4/18/2012 ~ Visage Version 1.0...
-
Page 2: Table Of Contents
Platinum Beam 15R™ CONTENTS General Information………………………………………………………..………………...…… 3 a. Introduction……………..………………………………………………………………… b. Unpacking………………………..………………………………………..……………… c. Customer Support………………………..……………………………….……………… 3 d. Warranty Registration…………….……………….……………………………….…… e. Discharge Lamp Warning………………………....……………………………. Safety Instructions……………………………………………………………..…..…………. Features………………………………………………………………..………………..………… General Guidelines…………..…………………………………………………...………………. 9 Fixture Overview………………………..…………………………………………...……………. Lamp Installation…………………………………..…………………………………...…………. 13 a. Lamp Protection Circuitry.………………………..……………………….…..………… 13 b. Lamp installation……………………………………………..…………….……..……… 14 c. -
Page 3: General Information
1. GENERAL INFORMATION INTRODUCTION: Congratulations, you have just purchased one of the most innovative and reliable lighting fixtures on the market today! The Platinum Beam 15R™ has been designed to perform reliably for years when the guidelines in this booklet are followed. -
Page 4: Warranty Registration
Lamp Replacement: Please note that due to the nature of the Platinum 15RLamp and the optical path of the Platinum Beam 15R it is imperative to replace the lamp at the rated 2000 hour lamp life! UV RADIATION: This fixture emits intense UV radiation, which is harmful to the eyes and skin. -
Page 5: Discharge Lamp Warning
Platinum Beam 15R™ lamp life and intensity. To achieve the intensity associated with discharge lamps, these lamps use gas sealed in a high-pressure environment to emit a brilliant output. Due to the high pressure involved with the construction of the lamp, the lamp may explode during prolonged extensive use. -
Page 6: Safety Instructions
2. Never touch the fixture during normal operation. This can cause severe personnel injuries and/or damage to the fixture. 3. Be sure to unplug the Platinum Beam 15R™ from the power outlet before performing any service related issues. 4. Lamp Replacement; Allow at least 15 minutes after disconnecting main power before you open the Platinum Beam 15R™. - Page 7 Platinum Beam 15R™ 11. Do not attempt to operate this fixture if the power cord has become damaged or frayed. Important Notice: Damages resulting from the disregard of safety and general user instructions found in this user manual are not subject to any warranty claims.
-
Page 8: Features
• USITT DMX-512 Complaint (3-pin and 5-pin DMX Connections) • Electronic Focus via DMX • Upgradable Firmware via Elation “E-Loader” • 7 User Assignable Program Presets - Internal Program: Edit and save programs to the incorporated EEPROM. Maximum of 64 scenes. -
Page 9: General Guidelines
Platinum Beam 15R™ 4. GENERAL GUIDELINES This fixture is a professional lighting effect designed for use on stage, in nightclubs, in theatres, etc. Do not attempt operation or installation without a proper knowledge on how to do so. This fixture was designed for indoor use only. -
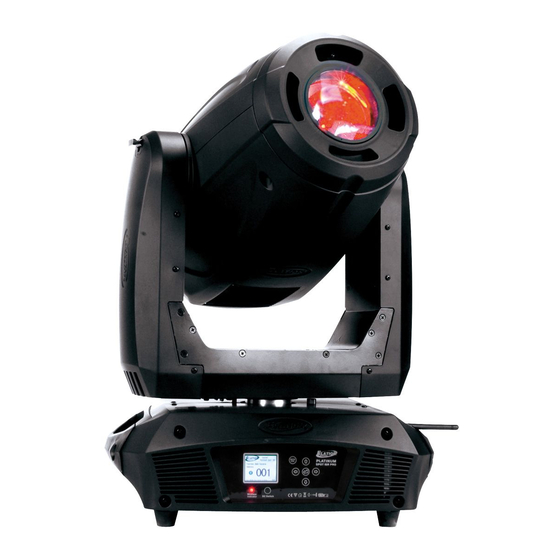
Page 10: Fixture Overview
Platinum Beam 15R™ 5. FIXTURE OVERVIEW 1: Lens 2: Display 3: Wireless indicator 4:DC Switch 5: Microphone 6: Left Button 7: Down Button 8: Right Button 9: Mode/Esc Button 10:Up Button 11:Enter Button 12: Lamp Access Panel 13: 3-Pin DMX in... - Page 11 Platinum Beam 15R™ 1. Lens – Main output lens. 2. LCD – Full color animated menu display. 3. Wireless indicator –Wireless indicator. 4. DC Switch -Controls menu and display power when the unit is disconnected from main power. 5. Microphone – This microphone receives external low frequencies to trigger the unit in Sound-Active mode.
- Page 12 17. Fuse Holder Assembly – This assembly houses the 8 amp GMA safety fuse. Always replace the fuse with an exact match unless otherwise specified by an authorized Elation Service Technician. Using a fuse other than that specified could seriously damage the unit and will void your manufactures warranty.
-
Page 13: Lamp Installation
Disconnect the unit’s main power supply. • If you unit has been running, please allow the unit to cool for at least 15 minutes before attempting any type of service. • Before the Platinum Beam 15R™ is put into operation be sure all covers have... - Page 14 Platinum Beam 15R™ been replaced, otherwise you risk damage to the retina and expose to UV radiation! • When replacing an old lamp, always be sure to replace with an approved replacement. In this case a Philips MSD Platinum 15R lamp is required. Be sure the replacement lamp meets or exceeds the original lamp specifications, failure to do so may damage the fixture and void the manufactures warranty.
-
Page 15: Lamp Optimization
Platinum Beam 15R™ 8. If the lamp protection circuitry has already been initiated and the lamp run time is not reset the “Replace the Lamp” warning will continue to flash in the display and the fixture will eventually shut down. To reset the lamp running time follow the procedures below;... -
Page 16: Mounting And Installation
3.5 feet Mounting The Platinum Beam 15R™ is fully operational in two different mounting positions, hanging upside-down from a ceiling, or set on a flat level surface (see illustration on next page). Be sure this fixture is kept at least 0.5m away from any flammable materials (decoration etc.). -
Page 17: Mounting Points
Platinum Beam 15R™ Mounting points Overhead mounting requires extensive experience, including amongst others calculating working load limits, a fine knowledge of the installation material being used, and periodic safety inspection of all installation material and the fixture. If you lack these qualifications, do not attempt the installation yourself. -
Page 18: Securing
Platinum Beam 15R™ Clamp Mounting The Platinum Beam 15R™ provides a unique mounting bracket assembly that integrates the bottom of the base, the included “Omega Bracket,” and the safety cable rigging point in one unit (see the illustration below). When mounting this fixture to truss be sure to secure an appropriately rated clamp to the included omega bracket using a M10 screw fitted through the center hole of the “omega bracket”. -
Page 19: Understanding Dmx
120 ohms; this cable is designed for DMX transmission and may be purchased from your Elation dealer or at most professional lighting retailers. Your cables should be made with a male and female XLR connector on either end of the cable. Also, remember that a DMX line must be daisy chained and cannot be split, unless using an approved DMX splitter such as the Elation Opto Branch 4™... -
Page 20: Dmx Terminator
Always be sure daisy chain your in and out data connections, never split or “Y” your DMX connections unless you are using an approved DMX splitter such as the Elation Opto Branch 4™ or DMX Branch/4™. DMX-512 connection with DMX terminator... - Page 21 DATA -). This fixture is inserted in the female XLR connector of the last fixture in your daisy chain to terminate the line. Using a line terminator (Elation part: DMX T PACK) will decrease the possibilities of erratic behavior.
- Page 22 That means changing the settings of one channel will only affect the selected fixture. In the case of the Platinum Beam 15R™, which is a 16 channel fixture (default), you should set the starting DMX address of the first unit to 1, the second unit to 17 (16 + 1), the third unit to 23 (16 + 17), and so on.
-
Page 23: Fixture Menu
Platinum Beam 15R™ 9. CONTROL BOARD The Control Board offers several features: you can simply set the starting address, run the pre-programmed program or make a reset. The main menu is accessed by pressing and holding down the -button until the display starts flashing. - Page 24 Platinum Beam 15R™ =”038” Clear lamp time Temperature Head XXX℃/℉ Temperature in the Info Temperature head Software V1.0…… Software version Version Lamp On/Off ON/OFF Lamp on/off Automatic On ON/OFF Lamp on/off Lamp On via DMX ON/OFF Power on Lamp Off via DMX...
-
Page 25: Dmx Addressing
Platinum Beam 15R™ Reset All Reset all motors Reset Reset Pan/Tilt Pan&Tilt Reset color wheel Reset Colors Reset gobos Reset Gobos Reset shutter Reset Shutter dimmer Reset Others Reset other motors Test Channel PAN …… Test function Manual PAN =XXX... -
Page 26: Operation
Platinum Beam 15R™ that is not meant specifically for the fixture. Because each fixture is connected in a daisy-chain fashion it is imperative to assign a proper and unique starting DMX address to each and every fixture. The DMX address is non-destructive and will remain in the fixture’s memory even when the power to the unit is switched off. - Page 27 Platinum Beam 15R™ Total Run Time This function tracks the total running time of the fixture from the very first start-up. Where “XXXX ”represents the total number of running hours. This time is none destructive and will remain in the fixtures memory indefinitely.
- Page 28 Platinum Beam 15R™ 9.2.3. Software version This function will display the current operating software version of the fixture. • The LCD will read “V-X.X”, “X.X” represents the version number, e.g. “V-1.0”, “V-2.6”. • Use the UP and DOWN buttons to toggle through the software version of different IC’s.
- Page 29 Platinum Beam 15R™ temperatures below 90° C are not critical. Temperatures above 90° C should lead to the lamp being switched off. Please note that the outside temperature should not exceed 45° C. 9.4 Personality: 9.4.1 Status setting Address via DMX - This function allows the DMX address to remotely be adjusted from a DMX console.
- Page 30 Platinum Beam 15R™ Movement Speed – This function changes the speed function of the Pan and Tilt motors. Use this function intergrading Platinum Beam 5Rinto lighting rigs that includes original Design Spot 250s. There are 3 different mode variations; Speed 1 (Default): Slower than the original Design Spot 250 for smoother, more precise movements.
- Page 31 Platinum Beam 15R™ light in situations that require an extremely dark environment. This function will adjust the amount of time the display will remain on until it is automatic turned off. This function is disabled as default. Display Reverse – This function will allow the entire display to be flipped by 180˚ to allow for better view when the fixture is hung from truss or a ceiling.
- Page 32 Platinum Beam 15R™ Ø Reset Others: This function will reset all other motors not associated with any in the previously listed reset commands to the home position. 9.6 Effect Adjust: 9.6.1 Test Channel – This menu function allows the user to select each individual fixture channel and test it’s function independently from the control board.
- Page 33 Platinum Beam 15R™ 9.8.1 Select program – This function allows the user to select one of ten of the user defined built-in programs. This program is then accessed in “Function Mode” under “Program Run.” 9.8.2 Edit program – This function allows the user to edit the built-in programs.
- Page 34 Platinum Beam 15R™ 10. DMX ADDRESSING Setting the DMX address -After the fixture is turned “ON” it will immediately complete a reset process that test all the fixture’s functions. When the reset process concludes the LCD will display the fixture’s current DMX. If the fixture is not receiving a DMX signal, the display will flash continuously.
- Page 35 Platinum Beam 15R™ 7. Press MODE/ESC to return to the main menu. Controller Settings: 1. Set the DMX value of channel 1 to a value of 7. 2. Set the DMX value of channel 2 to a value of 7 or 8. When channel 2 is set to "7"...
- Page 36 Platinum Beam 15R™ 11. OPERATING MODES Operating Modes: The Platinum Beam 15R™ can operate in six different modes. This next section will detail the differences in the operating modes. • Internal Program Mode (Master) - The fixture will chasing through the built-in programs, sending a DMX control signal to all other fixtures connect via DMX cables instruction for a synchronized light show.
- Page 37 11.3 Universal DMX Control: This function allows you to use a universal DMX-512 controller such as the Elation® Show Designer 2™ or Elation® Show Designer 3™ to control head movement, the color wheel, the shutter (strobe), and all other DMX traits.
-
Page 38: Working With Built-In Programs
Platinum Beam 15R™ 12. WORKING WITH BUILT-IN PROGRAMS The fixture comes equipped with a built-in DMX recorder that allows custom programs to be installed and recalled directly from the fixture’s control board. Programs can be created and stored using the fixture’s control board or by using an external DMX controller. - Page 39 Platinum Beam 15R™ “TILT-Fine” – precision tilt movement “Color” – adjust the color value “Gobo 1” – adjust gobo wheel 1 value “Gobo Rotation” – adjust gobo 1 indexing value “Gobo 2” – adjust gobo wheel 2 value “Strobe” – adjust the strobe value “Prism”...
- Page 40 Platinum Beam 15R™ 1.” Press the “ENTER” button to add a scene to the program. Tapping the “Enter” button will automatically lock the selected scene into the programs’ memory. Repeat the process until all the desired scenes have been added to the program.
- Page 41 Platinum Beam 15R™ 13. BUILT-IN WIRELESS RECIEVER The Platinum Beam 15R™ is equipped with an Elation WDMX Wireless DMX Receiver built-in. This receiver is fully compatible with your existing Elation Wireless DMX System or any WDMX compatible solution. 13.1 Working with the Wireless DMX (WDMX) System: •...
- Page 42 Platinum Beam 15R™ indicators on the both the fixture and the transmitter will stop flashing and glow solid green. If the paring is unsuccessful repeat the process until the paring is secured. d) The fixture will store the pairing information inside a nondestructive memory bank once a link is created between the fixture and a transmitter.
-
Page 43: Dmx Channel Traits
Platinum Beam 15R™ 14. DMX CHANNEL TRAITS The chart below details the channel layout for 16 DMX channels (default). In 8bit mode the “Pan Fine” and “Tilt Fine” channels are not used, thus converting the fixture into a 14-channel DMX fixture. - Page 44 Platinum Beam 15R™ Color Wheel Fine: 0-255 Fine Color Wheel Adjustment (Split Colors) Rotating gobos, cont. rotation: Open 10-19 Rotating Gobo 1 20-29 Rotating Gobo 2 30-39 Rotating Gobo 3 40-49 Rotating Gobo 4 50-59 Rotating Gobo 5 60-69 Rotating Gobo 6...
- Page 45 Platinum Beam 15R™ 128-135 Gobo 3 shake 136-143 Gobo 4 shake 144-151 Gobo 5 shake 152-159 Gobo 6 shake 160-167 Gobo 7 shake 168-175 Gobo 8 shake 176-183 Gobo 9 shake 184-191 Gobo 10 shake 192-199 Gobo 11 shake 200-207 Gobo 12 shake...
- Page 46 Platinum Beam 15R™ Shutter, strobe: 0-31 Shutter closed 32-63 No function (shutter open) 64-95 Strobe effect slow to fast 96-127 No function (shutter open) 128-159 Pulse-effect in sequences 160-191 No function (shutter open) 192-223 Random strobe effect slow to fast...
-
Page 47: Error Codes
Platinum Beam 15R™ 15. ERROR MESSAGE When power is applied, the unit will automatically enter a “reset/test” mode. This mode brings all the internal motors to a home position. If there is an internal problem with one or more of the motors an error code will flash in the display in the form of “XXer” were as XX will represent a motor function. - Page 48 Platinum Beam 15R™ magnetic-indexing circuit malfunctions (sensor failed or magnet is missing) or there is a stepper motor failure (defective motor or a defective motor IC drive on the main PCB). Rotating gobo-wheel error: The gobo-wheel is not located in the default position after start-up or after a reset command.
-
Page 49: Cleaning And Maintenance
There are no user serviceable parts inside this fixture with the exception of the lamp. Please refer all other service related issues to an authorized Elation service technician. Should you decide to service the fixture yourself please order genuine Elation parts... -
Page 50: Photometric Data
Platinum Beam 15R™ PHOTOMETRIC DATA... -
Page 51: Gobo Patterns
Platinum Beam 15R™ GOBOS PATTERNS... - Page 52 Platinum Beam 15R™ 19. DIMENSIONAL SCHEMATICS...
-
Page 53: Circuit Schematic
Platinum Beam 15R™ 20. CIRCUIT SCHEMATICS... - Page 54 It is the owner’s responsibility to establish the date and place of purchase by acceptable evidence, at the time service is sought. B. For warranty service, send the product only to the Elation Professional® factory. All shipping charges must be pre-paid. If the requested repairs or service (including parts replacement) are within the terms of this warranty, Elation Professional®...
- Page 55 F. No warranty, whether expressed or implied, is given or made with respect to any accessory supplied with products described above. Except to the extent prohibited by applicable law, all implied warranties made by Elation Professional® in connection with this product, including warranties of merchantability or fitness, are limited in duration to the warranty period set forth above.
-
Page 56: Technical Specifications
Platinum Beam 15R™ 22. TECHNICAL SPECIFICATIONS Power supply Power Requirements AC 100V-240V~, / 50Hz/60Hz Fuse Protection 6A/250V, GMA (5x20mm fine-wire fuse) Power Consumption 500 Watts Lamp Type Platinum 15R (Phillips) Lamp Wattage 320W Life time 750 Hrs Color temperature 8000˚ K... - Page 57 Platinum Beam 15R™ Mode: Auto 1m = 55.9 dB Mode: High 1m = 56.2 dB Mode: Auto 1m = 51.6 db (Lamp off) Ambient Operating Temperature -25˚C ~ 45˚ C All specifications are subject to change at any time without notice.
- Page 58 Platinum Beam 15R™...
Need help?
Do you have a question about the PLATINUM BEAM 15R and is the answer not in the manual?
Questions and answers