Table of Contents
Advertisement
Advertisement
Table of Contents

Related Manuals for Peak Pilates Deluxe Reformer


Summary of Contents for Peak Pilates Deluxe Reformer
- Page 1 Peak PilateSystem ® Deluxe Reformer...
-
Page 2: Table Of Contents
Table of Contents Chapter 1: About the Peak PilateSystem ......................1 ® Safety Statement ............................. 2 Proper Use ..............................2 Specific Operating Warnings ........................2 Warranty ................................3 Contact Information ............................3 Chapter 2: Getting Started ..........................4 Specifications ..............................4 Glossary of Parts ............................ - Page 3 Chapter 4: Operating the Peak PilateSystem ....................19 ® Folding the Peak PilateSystem ........................19 Unfolding the Peak PilateSystem ........................21 Adjusting the Footbar ........................... 23 Attaching the Reformer Springs ........................24 Adjusting the Gear Change Bar ........................24 Adjusting the Head Rest ..........................25 Adjusting the Risers .............................
-
Page 4: Chapter 1: About The Peak Pilatesystem
3. We strongly advise that the PPS be used only by or under the supervision of a Certified Pilates Instructor. Peak Pilates offers Education Programs and can provide training leading to certification. Visit the Peak Pilates website at www.peakpilates.com or call (1) 800.925.3674 for more information. -
Page 5: Safety Statement
Safety Statement It is the sole responsibility of the purchaser of Peak Pilates products to instruct all individuals, whether they are end users or supervising personnel, on proper use of the equipment. Inspect the machine, including the springs, ropes, clips and straps, before use. Do not exercise on the machine if signs of excessive wear or other defects are evident. -
Page 6: Warranty
All claims must be made within the relevant warranty period specified above. Warranties outside the U.S. may vary. If you have any questions or need additional assistance, please contact our Peak Pilates® Customer Team Contact Information... -
Page 7: Chapter 2: Getting Started
Chapter 2: Getting Started Specifications Deluxe Weight 341 pounds (138.1 kg) Folded: Length 25.5 inches (64.8 cm) Width 29.0 inches (73.7 cm) Height 76.5 inches (193.0 cm) Unfolded: Length 102.5 inches (260.4 cm) Width 29.5 inches (75.0 cm) Carriage Height 15.5 inches (39.4 cm) Other: Tower Assembly Height... -
Page 8: Glossary Of Parts
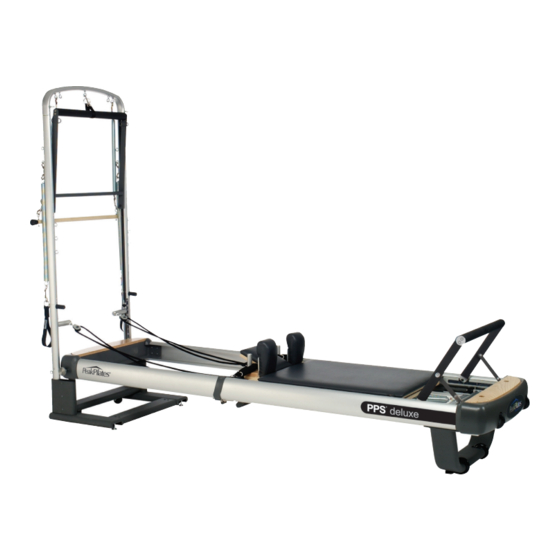
Glossary of Parts The following is a list of the major components of the Peak PilateSystem. The numbers indicate where they are located in the following three figures. Many other parts are shown and described in other sections of the manual. 1. -
Page 9: Deluxe Model
Deluxe Model Head Left Right Foot Mat Mode Head Left Right Foot Peak PilateSystem Assembly Guide ®... -
Page 10: Recommended Use
Unsafe or improper use of this equipment due to failure to read and comply with all requirements and warnings could result in serious injury. Because Peak Pilates cannot anticipate every situation and condition which can occur while using the Peak PilateSystem, they make no representation concerning the safety of this equipment. There are risks associated with the use of any exercise equipment. -
Page 11: Chapter 3: Unpacking And Assembling The Peak Pilatesystem
Chapter 3: Unpacking and Assembling the Peak PilateSystem ® Identifying the Package Contents Important: Do not use any sharp cutting tools when unpacking the Peak PilateSystem! Doing so can damage this equipment. When you open the packaging you will find the following items: Package Contents Part Description... - Page 12 Package Contents Part Description Quantity Number Roll Down Bar 830-300 Short Box Foot Strap Assembly (with 2 830-400 Safety Links) Leg Spring Assembly 830-003 Arm Spring Assembly 830-801 Push Through Bar Spring Assembly (with 1 Snap 805-026-2A Clip, 1 Safety Link, and Cover) Safety Chain Assembly 830-600...
-
Page 13: Unpacking And Assembling The Peak Pilatesystem
Package Contents Part Description Quantity Number Long/Short Box PPS04 Non-Slip Pad 830-007 Mat Set (2 mats) PPS05 R1 Unpacking and Assembling the Peak PilateSystem ® Note: You will need a 5 mm Allen wrench to assemble the equipment. Unpacking the Machine and Parts To unpack the machine: 1. - Page 14 3. Remove the Jump Board and its cardboard sleeve. 4. Remove the support pillars. 5. Remove the Mat set Peak PilateSystem Assembly Guide ®...
- Page 15 6. Remove the outer sleeve of the package exposing the machine. 7. Remove the remaining corner support pillars. 8. Remove the Long/Short Box from under the machine. The accessories for the machine are in the Long/Short Box. 9. Lift up the machine and place it upright on the floor. Caution: A minimum of 2 people are required to lift up the machine.
-
Page 16: Unfolding The Machine
Unfolding the Machine When you have removed the Peak PilateSystem from the packaging, it will look like the photo below with a nylon band wrapped horizontally around the machine. Note: The unfolding process can be performed from left side of the machine. 1. - Page 17 Warning: Keep hands, loose clothing, jewelry, hair, towels, and ALL loose articles away from the hinge at ALL times. 5. To continue unfolding, use one hand on the Lift Handle and lift the Head End Rail toward the Tower. Handle Using the other hand, pull the Release Knob until the safety feature is fully disengaged.
-
Page 18: Assembling The Tower
Assembling the Tower 1. Place the Tower on the Head End of the machine. 2. The side of the Tower with the 3 lower eye bolts should face the Foot End of the machine. Assemble the Tower with 8 M6 x 35 mm screws using a 5 mm Allen wrench. Assembling the Leg Springs To assemble the Leg Springs (544 mm (21.4 in) long): 1. -
Page 19: Assembling The Arm Springs
Assembling the Arm Springs To assemble the Arm Springs (444 mm (17.5 in) long): 1. Using the Double Ended Clips, attach Arm Spring to each side of the Roll Down Bar. 2. Store the Arm Springs by hooking them to the upper eye bolts located in the back of the Tower. -
Page 20: Assembling The Ropes
Assembling the Ropes To assemble the Ropes: 1. Hook the Double Ended Clip on the rope to the ring 2. Feed the other end of the rope through the Pulley on the Riser Assembly (also called Riser). Note: Make sure both of the Risers are in the same of the 7 preset positions. -
Page 21: Assembling The Short Box Foot Strap Assembly
6. To store the Ropes, place the handles on the Shoulder Pad Posts. Assembling the Short Box Foot Strap Assembly To assemble the Short Box Foot Strap Assembly: 1. Attach the Safety Links to the 2 eye bolts on the Foot End Crossmember. 2. -
Page 22: Chapter 4: Operating The Peak Pilatesystem
Chapter 4: Operating the Peak PilateSystem ® The following describes how to: • Fold and unfold the machine • Adjust the Footbar, Gear Change Bar, Head Rest, and Risers • Attach the Reformer Springs • Install the Jump Board and the Long/Short Box •... - Page 23 5. Store the Short Box Foot Strap, placing it on the storage hook located on the Foot End Base. 6. To unlock, turn the Lock Knob as shown on the attached label. When the knob is disengaged, a spring will pop it free. 7.
-
Page 24: Unfolding The Peak Pilatesystem
8. When the Head End Rail contacts the Folding Bumper, grasp the Foot End Rail with your free hand. Lock the machine in the storage position by turning the Lock Knob as indicated on the attached label. Caution: Make sure the Head End Locking Mechanism is engaged before completing the unfolding procedure. 9. - Page 25 Caution: Check to make sure the machine is locked. If the machine is not locked and you undo the Lock Strap, it may begin to unfold. 2. Undo the Lock Strap. 3. To unlock, place one hand on the Foot End Rail and use the other hand to turn the Lock Knob as indicated on the attached label.
-
Page 26: Adjusting The Footbar
Note: A safety feature will cause the machine to stop unfolding if the Release Knob is let go at any time. To continue unfolding, slightly lift using the Lift Handle and pull on the Release Knob. 6. Release the knob and the handle. 7. -
Page 27: Attaching The Reformer Springs
Attaching the Reformer Springs The Peak PilateSystem comes with 5 Reformer Springs attached to the Carriage. There are 3 types of springs described below. • Light - There are 2 light springs marked with a blue tab. • Medium - There are 2 medium springs marked with a yellow tab. •... -
Page 28: Adjusting The Head Rest
Adjusting the Head Rest The Head Rest has 3 positions: • Flat (shown in figure on the right) • Half Raised • Fully Raised To change the Head Rest from the Flat position to the Half Raised position: 1. Lift and push in on the Head Rest Support Block until it rests on the first ledge of the Head Rest Support Block. -
Page 29: Adjusting The Risers
Adjusting the Risers The Risers have 7 scaled and 1 stored positions. The Riser positions are scaled so that both Risers can be easily adjusted to the same height. To adjust the Risers: 1. Pull the Riser Pull Pin and move the Riser up or down to the desired position. 2. -
Page 30: Converting To The Mat
To use it as a Short Box: 1. Place the Head Rest in the flat position and rest the Footbar and Support Bar on the Standing Platform. 2. Place the long side of the box across the machine, locating the box between the Shoulder Pad Posts (see figure on page 30) and the Shoulder Pads or butting up against the Shoulder Pads (see figure on the right), depending on the height of the user. - Page 31 4. Fold Footbar and Support Bar down into the machine. 5. Flip the Pulleys into the stored position. 6. Pull on the Riser Pull Pin and lower the Risers as far as they will go. Peak PilateSystem Assembly Guide ®...
- Page 32 7. Lift the Carriage by the Shoulder Pad Posts. 8. Unfold the Carriage, angling the Head Rest downward. Rest the end of the Carriage on the Gear Change Bar. 9. Place the mat with the Foot Strap onto the rails at the Foot End of the machine.
-
Page 33: Chapter 5: Maintaining The Peak Pilatesystem
Chapter 5: Maintaining the Peak PilateSystem ® You have purchased a high quality piece of equipment that is constructed of the finest components and materials. Proper maintenance requires only a small, but very important investment of your time in a regular routine maintenance program. The following assortment of basic tools is required to service our equipment: •... -
Page 34: Clean
Clean • Framework – The wooden components on this equipment are finished with a non-toxic, waterbased lacquer. Other than an occasional wipe down using a mild soapy solution or furniture polish, no additional cleaning is necessary. The metal framework should be cleaned with a mild soapy solution. •... -
Page 35: Replacement Parts
Replacement Parts You can order replacement parts for your Peak PilateSystem as shown in the table below. Replacement Parts Part Replacement Parts Description Number Reformer Springs: 805-026-4 • Light 805-026-5 • Medium 805-026-6 • Heavy 805-026-7 Double End Clip 4910-3551 Safety Link 4910-3553 Snap Clip... - Page 36 830-500 Short Box Foot Strap Assembly (with 2 Safety Links) 830-400 Non-Slip Pad 830-007 Foot Loop 830-110 Push Through Bar Storage Strap (with 1 Safety Clip) 804-700 Contact Peak Pilates for parts not listed ® Peak PilateSystem Assembly Guide ®...
- Page 38 Mad Dogg Athletics, Inc. 2111 Narcissus Court Venice, CA 90291 USA (1)800.847.7746 or 310.823.7008 www.maddogg.com Copyright 2012 Mad Dogg Athletics, Inc. All rights reserved. SPIN , Spinner , Spinning , the Spinning logo, Peak Pilates , Resist-A-Ball ® ® ® ® ®...
Need help?
Do you have a question about the Deluxe Reformer and is the answer not in the manual?
Questions and answers