Table of Contents
Advertisement
Quick Links
Advertisement
Table of Contents

Subscribe to Our Youtube Channel
Related Manuals for Modecom MC-421


Summary of Contents for Modecom MC-421
- Page 1 MC-421 WLAN Router user’s manual MODECOM...
-
Page 2: Table Of Contents
WLAN Router MC-421 WLAN Router Contents: Introduction Features Parameters that you need to configure the Wireless Gateway What the Internet/WAN access of your own Network now is Internet/WAN access is the DHCP client Internet/WAN access is the Static IP Internet/WAN access is the PPPoE client... - Page 3 WLAN Router Configuring WPA (TKIP) HEX (64 characters) security Configuring WPA2 (AES) Passphrase security Configuring WPA2 (AES) HEX (64 characters) security Configuring WPA2 (Mixed) Passphrase security Configuring WPA2 (Mixed) HEX (64 characters) security Operation Mode Wireless Network Basic Settings Advanced Settings Security WEP + Encryption Key WEP + Use 802.1x Authentication...
- Page 4 IP Addresses Subnet masks UPnP Control Point Software on Windows ME/XP UPnP Control Point Software on Windows ME UPnP Control Point Software on Windows XP with Firewall Troubleshooting T roubleshooting Suggestions Diagnosing Problem using IP Utilities Glossary Environment protection: www.modecom.eu...
-
Page 5: Introduction
WLAN Router Introduction Congratulations on becoming the owner of the Wireless Gateway. You will now be able to access the Internet using your high-speed xDSL/Cable modem connection. This User Guide will show you how to connect your Wireless Gateway, and how to customize its configuration to get the most out of your new product. -
Page 6: Parameters That You Need To Configure The Wireless Gateway
Username / Password which was given by Telecom or by your Internet Service Provider (ISP). IP Address / Subnet Mask / Gateway / DNS Server IP which was given by your network administrator or by Telecom or by your Internet Service Provider (ISP). www.modecom.eu... -
Page 7: What The Internet/Wan Access Of Your Own Network Now Is
WLAN Router What the Internet/WAN access of your own Network now is Now you could check what the Internet/WAN access of your network is to know how to configure the WAN port of Wireless Gateway. Please follow steps below to check what the Internet/WAN access if your own Network is DHCP Client, Static IP or PPPoE Client. -
Page 8: Internet/Wan Access Is The Dhcp Client
Click Local Area Connection in LAN or High-Speed Internet and you could see string Manually Configured in Details. Right click Local Area Connection and click Properties and then you could get the IP settings in detail and write down the IP settings as follow: IP Address: 192.168.10.110 Subnet mask: 255.255.255.0 Default gateway: 192.168.10.100 www.modecom.eu... -
Page 9: Internet/Wan Access Is The Pppoe Client
WLAN Router Preferred DNS server: 192.168.10.100 Alternate DNS Server: If you have it, please also write it down. Internet/WAN access is the PPPoE client If you can see any Broadband Adapter in the Network Connections, your Internet/WAN access is PPPoE Client. Click Broadband Adapter in Broadband and you could see string Assigned by Service Provider in Details. -
Page 10: Configure The Obtain An Ip Address Automatically For Lan Card
To configure the Wireless Gateway by Easy Setup utility or Web page, please follow steps below to configure your LAN Card to obtain an IP Address automatically (DHCP Client). If your LAN Card is configured to obtain an IP Address automatically (DHCP Client) already, just skip this chapter. Click Start -> Control Panel Double click Network Connections www.modecom.eu... - Page 11 WLAN Router Right click Local Area Connection and then click Properties Click Internet Protocol [TCP/IP] and then click Properties...
- Page 12 WLAN Router Select Obtain and IP Address automatically and then click OK Click Close Now you’ve already configured the LAN to obtain an IP Address automatically (DHCP Client), just follow reset steps to finish the installation of Wireless Gateway. www.modecom.eu...
-
Page 13: Getting To Know The Device
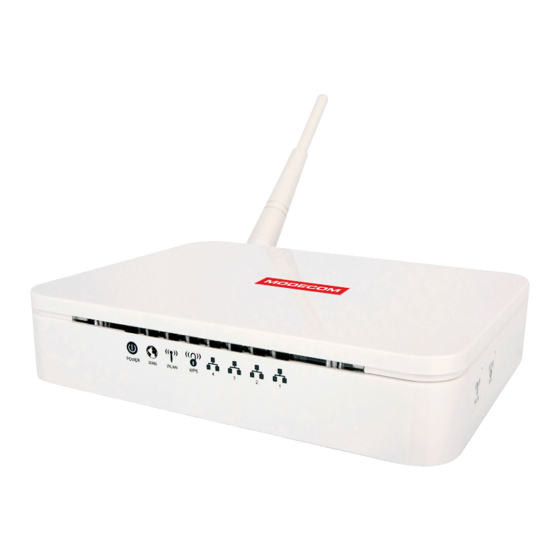
WLAN Router Getting to know the device Parts Check In addition to this document, your package should arrive containing the following: 1. Wireless Gateway 2. Ethernet cable 3. CD-ROM containing the online manual 4. QIG 5. Power Adapter Front Panel The front panel contains lights called Light Emitting Diodes (LEDs) that indicate the status of the unit. -
Page 14: Rear And Right Panel
Connects the device via Ethernet to up to four PCs on your LAN Connects the device via Ethernet to xDSL / Cable Modem RESET Pressing this button for 3 seconds to restores the factory default configuration on your device www.modecom.eu... -
Page 15: Connecting Your Device
WLAN Router Label Function WLAN Press this button for 5 seconds to Disable or Enable Wireless LAN. Press this button for 3 seconds to Enable WPS function. Connecting your device This chapter provides basic instructions for connecting the Wireless Gateway to a computer or LAN and to the Internet. -
Page 16: Easy Setup
From the Protocol modes drop-down list, select DHCP Client Mode setting. Click Setup, it will start to configure the router for a while. Follow the instructions of the Easy Setup utility which will guide you to complete the configuration. www.modecom.eu... - Page 17 WLAN Router Easy setup configuration completed. Now you are ready to Surf the Internet!!!
-
Page 18: Pppoe Client
Click Setup, it will start to configure the router for a while. Follow the instructions of the Easy Setup utility which will guide you to complete the configuration. Easy setup configuration completed. Now you are ready to Surf the Internet!!! www.modecom.eu... -
Page 19: Fixed Ip
WLAN Router Fixed IP From the Protocol modes drop-down list, select Fixed IP Mode setting. Enter IP Address, Subnet Mask, Gateway, Primary DNS Server and Secondary DNS Server. Click Setup, it will start to configure the router for a while. Follow the instructions of the Easy Setup utility which will guide you to complete the configuration. -
Page 20: Getting Started With The Web Pages
For the best display quality, use latest version of Internet Explorer, Netscape or Mozilla Firefox.From any of the LAN computers, launch your web browser, type the following URL in the web address (or location) box, and press [Enter] on your keyboard: http://10.0.0.2 The Status homepage for the web pages is displayed: Homepage www.modecom.eu... -
Page 21: Testing Your Setup
WLAN Router The first time that you click on an entry from the left-hand menu, a login box is displayed. You must enter your user- name and password to access the pages. A login screen is displayed: Login screen Enter your user name and password. The first time you log into the program, use these defaults: admin User Name: Password:... - Page 22 LAN computers. Protocol) dresses: To use this service, you must have set up your compu- 10.0.0.100 ters to accept IP information dynamically, as described in through Configuring Ethernet PCs. 10.0.0.200 www.modecom.eu...
-
Page 23: Quick Setup
WLAN Router Quick Setup The Quick Setup page displays useful information about the setup of your device, including: details of the device’s Internet access settings details of the device’s VoIP settings details of the device’s Wireless settings To display this page: From the left-hand menu, click on Quick Setup. -
Page 24: Wireless Isp
Point. Here you may change the access method to static IP, DHCP, or PPPoE by click the item value of WAN Access type. To change the WAN Access Type: From the WAN Access Type drop-down list, select Static IP, DHCP Client, or PPPoE setting determined by your Network Administrator or ISP. Click Next>>. www.modecom.eu... -
Page 25: Static Ip
WLAN Router Static IP In this mode, the device is supposed to connect to internet via ADSL/Cable Modem. The NAT is enabled and PCs in four LAN ports share the same IP to ISP through WAN port. The connection type can be setup in WAN page by using static IP. -
Page 26: Pppoe
Access Point is used to configure the parameters for wireless LAN clients who may connect to your Access Point. From the Mode drop-down list, select AP setting. Enter SSID for example AP_Router. From the Channel Number drop-down list, select a Channel. Click Next>>. www.modecom.eu... -
Page 27: Main Wds Station
WLAN Router WDS (Wireless Distribution System) WDS stands for Wireless Distribution System. It enables the access points (APs) to be connected wirelessly. Integrated Access Device can also provide you services of WDS. Integrated Access Device that supports WDS does not support security systems like WEP, WPA or WPA- Enterprise on a WDS network. -
Page 28: Wds (Wireless Distribution System) Only
Access Point is used to configure the parameters for wireless LAN clients which may connect to your Access Point. From the Mode drop-down list, select AP+WDS setting. Enter SSID for example VoIP_Wireless. From the Channel Number drop-down list, select a Channel. Click Next>>. www.modecom.eu... -
Page 29: Wireless Security Setup
WLAN Router Wireless Security Setup This page allows you setup the wireless security. Turn on WEP or WPA by using Encryption Keys could prevent any unauthorized access to your wireless network. You can protect your wireless data from potential eavesdroppers by encrypting wireless data transmissions. An eavesdropper might set up a compatible wireless adapter within range of your device and attempt to access your network. -
Page 30: Configuring Wep 64Bit Ascii (5 Characters) Security
From the Default Tx Key drop-down list, select Key 1, Key 2, Key 3 or Key 4 setting. Type the Default Tx Key to Key 1, Key 2, Key 3, or Key 4. The Default Tx Key is realated to Encryption Key 1, Encryption Key 2, Encryption Key 3 and Encryption Key 4. Click Finished. www.modecom.eu... -
Page 31: Configuring Wep 64Bit Hex (10 Characters) Security
WLAN Router Change setting successfully! Please wait for a moment while rebooting. Configuring WEP 64bit Hex (10 characters) security The example set in this section is for 64bit encryption. From the Encryption drop-down list, select WEP setting. From the Key Length drop-down list, select 64-bit setting. From the Key Format drop-down list, select Hex (10 characters) setting. -
Page 32: Configuring Wep 128Bit Hex (26 Characters) Security
Type the Default Tx Key to Key 1, Key 2, Key 3, or Key 4. The Default Tx Key is realated to Encryption Key 1, Encryption Key 2, Encryption Key 3 and Encryption Key 4. Click Finished. Change setting successfully! Please wait for a moment while rebooting. www.modecom.eu... -
Page 33: Configuring Wpa (Tkip) Passphrase Security
WLAN Router Configuring WPA (TKIP) Passphrase security The example set in this section is for WPA (TKIP) Passphrase encryption. From the Encryption drop-down list, select WPA (TKIP) setting. From the Pre-Shared Key Format drop-down list, select Passphrase setting. Type the Pre-Shared Key. Click Finished. -
Page 34: Configuring Wpa2 (Aes) Passphrase Security
The example set in this section is for WPA2 (AES) HEX (64 characters) encryption. From the Encryption drop-down list, select WPA2 (AES) setting. From the Pre-Shared Key Format drop-down list, select HEX (64 characters) setting. Type the Pre-Shared Key. Click Finished. Change setting successfully! Please wait for a moment while rebooting. www.modecom.eu... -
Page 35: Configuring Wpa2 (Mixed) Passphrase Security
WLAN Router Configuring WPA2 (Mixed) Passphrase security The example set in this section is for WPA2 (Mixed) Passphrase encryption. The WPA2 (Mixed) Passphrase encryption supports both WPA (TKIP) and WPA2 (AES). From the Encryption drop-down list, select WPA2 (Mixed) setting. From the Pre-Shared Key Format drop-down list, select Passphrase setting. -
Page 36: Operation Mode
See Configuring Wireless PCs. Basic Settings The Wireless Network page allows you to configure the Wireless features of your device. To access the Wireless Network Basic Settings page: From the left-hand Wireless menu, click on Basic Settings. The following page is displayed: www.modecom.eu... -
Page 37: Advanced Settings
WLAN Router Wireless Network page Field Description Disable Wireless LAN Enable/Disable the Wireless LAN Interface. Interface Default: Disable Band Specify the WLAN Mode to 802.11b/g Mixed mode, 802.11b mode or 802.11g mode Mode Configure the Wireless LAN Interface to AP, Client, WDS or WDS + AP mode Network Type Configure the Network Type to Infrastructure or Ad hoc. -
Page 38: Security
This page allows you setup the wireless security. Turn on WEP or WPA by using Encryption Keys could prevent any unauthorized access to your wireless network. To access the Wireless Network Security page: From the left-hand Wireless menu, click on Security. The following page is displayed: www.modecom.eu... -
Page 39: Wep + Encryption Key
WLAN Router Field Description Encryption Configure the Encryption to None, WEP, WPA , WPA2 or WPA Mixed Set WEP Key Configure the WEP Key Use 802.1x Authentication Use 802.1x Authentication by WEP 64bits or WEP 128bits Configure the WPA Authentication Mode to Enterprise (RADIUS) or Personal (Pre- WPA Authentication Mode Shared Key) WPA Cipher Suite... - Page 40 From the Default Tx Key drop-down list, select a key is used for encryption. Enter the Encryption Key value depending on selected ASCII or Hexadecimal. Click Apply Changes button. Change setting successfully! Click on OK button to confirm and return. www.modecom.eu...
-
Page 41: Wep + Use 802.1X Authentication
WLAN Router WEP + Use 802.1x Authentication WEP aims to provide security by encrypting data over radio waves so that it is protected as it is transmitted from one end point to another. However, it has been found that WEP is not as secure as once believed. From the Encryption drop-down list, select WEP setting. -
Page 42: Wpa/Wpa2/Wpa2 Mixed + Enterprise (Radius)
WPA2 implements the full standard, but will not work with some older network cards. Both provide good security, with two significant issues: Either WPA or WPA2 must be enabled and chosen in preference to WEP. WEP is usually presented as the first security choice in most installation instructions. www.modecom.eu... - Page 43 WLAN Router In the “Personal” mode, the most likely choice for homes and small offices, a pass phrase is required that, for full se- curity, must be longer than the typical 6 to 8 character passwords users are taught to employ. From the Encryption drop-down list, select WPA, WPA2 or WPA2 Mixed setting.
-
Page 44: Access Control
From the Wireless Access Control Mode drop-down list, select Allowed Listed setting. Enter the MAC Address. Enter the Comment. Click Apply Changes button. Change setting successfully! Click on OK button to confirm and return. The MAC Address that you created has been added in the Current Access Control List. www.modecom.eu... -
Page 45: Deny Listed
WLAN Router Deny Listed When ‘Deny Listed’ is selected, these wireless clients on the list will not be able to connect the Access Point. From the Wireless Access Control Mode drop-down list, select Deny Listed setting. Enter the MAC Address. Enter the Comment. - Page 46 Click the Set Security. This page allows you setup the wireless security for WDS. When enabled, you must make sure each WDS device has adopted the same encryption algorithm and Key. Configure each field with the Encryption that you selected. www.modecom.eu...
- Page 47 WLAN Router Click Apply Changes button. Change setting successfully! Click on OK button to confirm and return. Click Close button to close and exit the WDS Security Setup. Click Apply Changes button.
- Page 48 From the Channel Number drop-down list, select a Channel. Click Apply Changes button. Change setting successfully! Click on OK button to confirm and return. From the left-hand Wireless menu, click on WDS settings. Check on the option Enable WDS. Enter the MAC Address. Enter the Comment. www.modecom.eu...
- Page 49 WLAN Router Click the Set Security. This page allows you setup the wireless security for WDS. When enabled, you must make sure each WDS device has adopted the same encryption algorithm and Key. Configure each field with the Encryption that you selected. Click Apply Changes button.
-
Page 50: Site Survey
To access the Wireless Network WDS settings page: From the left-hand Wireless menu, click on Site Survey. The following page is displayed: Configure Wireless ISP + Wireless client + Site Survey From the left-hand Operation Mode menu, click on Wireless ISP Settings. Click Apply Changes button. www.modecom.eu... - Page 51 WLAN Router Change setting successfully! Click on OK button to confirm and return. From the left-hand Wireless menu, click on Basic Settings. From the Mode drop-down list, select Client. Enter SSID of the AP that you want to connect to for example AP_Router. If you don’t know what the SSID of the AP that you want to connect to, please skip this step.
- Page 52 Now you could see the APs that scanned by the Wireless Gateway were listed below. Click on the ratio of AP’s SSID under the item Select that you want the Wireless Gateway to connect to. Click Connect button. Connect successfully! Click on OK button to confirm and return. www.modecom.eu...
-
Page 53: Wps
WLAN Router This page allows you to change the setting for WPS (Wi-Fi Protected Setup). Using this feature could let your wire- less client automatically syncronize its setting and connect to the Access Point in a minute without any hassle. To access the Wireless Network WPS page: From the left-hand Wireless menu, click on WPS. -
Page 54: Supported Wps Features
At this state, AP is transparent to users. If users want to configure a station or any device that is capable of being an enrollee, they have to enter device’s PIN into an external registrar and choose an appropriate wireless profile. After www.modecom.eu... -
Page 55: Infrastructure-Client Mode
WLAN Router the PIN is entered, the external registrar will inform AP this event. AP then conveys the encrypted wireless profile between the device and the external registrar. Finally, the device will use the wireless profile and associate with AP. However, the device may connect to other APs if the wireless profile does not belong to the proxy AP. -
Page 56: Operations Of Ap - Ap Being An Enrollee
“Continue“, edit properties of “Windows Connect Now”, choose the “Startup type” with “Automatic” and click “Start”. If the previous steps are done, open Windows Explorer. Go to the Network section. Click on “Network discovery and file sharing are turned off. Network computers and devices are not visible. Click to Change…“ www.modecom.eu... - Page 57 WLAN Router Click on “Turn on network discovery and file sharing“ Click on “No, make the network that I am connected to a private network“...
- Page 58 WLAN Router AP’s icon will show up. Double click on it. AP’s icon will show up. Double click on it. Users could also Click “Add a wireless device” if the icon is not there. Click “next”. www.modecom.eu...
- Page 59 WLAN Router Enter AP’s Self-PIN Number and click “next”. Choose a name that people who connect to your network will recognize. Enter the Passphrase and then click Next.
- Page 60 Finally, AP will become configured (see WPS Status). The authentication algorithm, encryption algorithm, and key assigned by WCN will be displayed below “Current Key Info”. The SSID field of Wireless Basic Settings page will also be modified with the value assigned by WCN. www.modecom.eu...
-
Page 61: Operations Of Ap - Ap Being A Registrar
WLAN Router If users try to modify the SSID at this moment, there will be a warning message popping up that informs the risk of this action. The reason is that users may not know whether the SSID is already given to a station. Changing the SSID will result in the link between AP and stations to be broken. - Page 62 Users must start the PIN method on the station side within two minutes. If the device PIN is correct and the WPS handshake is successfully done on the station side, User’s Wi-Fi Protected status will be shown as below. www.modecom.eu...
-
Page 63: Push Button Method
WLAN Router If the device PIN is correct and the WPS handshake is successfully done, AP’s Wi-Fi Protected Setup page will be shown as below. Other pages such as Wireless Basic Settings page and Wireless Security Setup page will also be updated appropriately as described in previous sections. - Page 64 If the device PCB and the WPS handshake is successfully done on the station side, User’s Wi-Fi Protected status will be shown as below. If the device PIN is correct and the WPS handshake is successfully done, AP’s Wi-Fi Protected Setup page will be shown as below. www.modecom.eu...
-
Page 65: Warning Pop-Up Windows Of Ap
WLAN Router Other pages such as Wireless Basic Settings page and Wireless Security Setup page will also be updated appropria- tely as described in previous sections. In this case, AP is in un-configured state before the station initiates the WPS handshake. -
Page 66: Un-Supported Security In Wps
In most cases, you will not need to make any changes to this configuration. Note LAN Interface Setup To check the configuration of LAN Interface: From the left-hand Network Settings -> LAN Interface menu. The following page is displayed: www.modecom.eu... -
Page 67: Changing The Lan Ip Address And Subnet Mask
WLAN Router Field Description The LAN IP address IP Address Default: 10.0.0.2 The LAN netmask Subnet Mask Default: 255.255.255.0 The LAN Gateway Default Gateway Default: 0.0.0.0 DHCP Type: Disable, DHCP Client or Server DHCP Default: DHCP Server Specify the starting/ending IP address of the IP address pool. DHCP Client Range Default Start IP: 10.0.0.100 Default Ending IP: 10.0.0.200... - Page 68 Type pump to renew the lease. If you change the LAN IP address of the device while connected through your Web browser, you will be discon- nected. You must open a new connection by entering your new LAN IP address as the URL. Note www.modecom.eu...
-
Page 69: Show Client
WLAN Router Show Client To the IP Address, MAC Address, and Expired Time of the DHCP lease for each client computer/device: From the left-hand Network Settings -> LAN Interface menu. The following page is displayed: Click on Show Client button. The following page is displayed: WAN Interface This chapter describes how to configure the way that your device connects to the Internet. - Page 70 Check with your ISP provider DNS 2 (Secondary DNS Server) Check with your ISP provider DNS 3 (Third DNS Server) Check with your ISP provider Clone MAC lets the device identify itself as another computer or Clone MAC Address device www.modecom.eu...
-
Page 71: Configuring Static Ip Connection
WLAN Router Option Description Enable uPNP Enable or Disable uPNP Enable Ping Access on WAN Enable or Disable Ping Access on WAN Enable Web Server Access on WAN Enable or Disable Web Server Access on WAN Enable IPsec pass through on VPN connection Enable or Disable IPsec pass through on VPN connection Enable PPTP pass through on VPN connection Enable or Disable PPTP pass through on VPN connection... - Page 72 WLAN Router www.modecom.eu...
-
Page 73: Configuring Dhcp Client Connection
WLAN Router Configuring DHCP Client connection Dynamic Host Configuration Protocol (DHCP), Dynamic IP (Get WAN IP Address automatically). If you are connected to the Internet through a Cable modem line, then a dynamic IP will be assigned. If your ISP wants you to connect to the Internet using DHCP Client, follow the instructions below. From the left-hand Network Settings ->... - Page 74 WLAN Router www.modecom.eu...
-
Page 75: Configuring Pppoe Connection
WLAN Router Configuring PPPoE connection If your ISP’s Internet service uses PPPoE you need to set up a PPP login account. The first time that you login to the Internet, your ISP will ask you to enter a username and password so they can check that you are a legitimate, regi- stered Internet service user. - Page 76 WLAN Router From the left-hand Management -> Status menu. The following page is displayed: If you could see the Attain IP Protocol is shown PPPoE Connected, you can have the Internet Access right now. www.modecom.eu...
-
Page 77: Clone Mac Address
WLAN Router Clone MAC Address Some particularly ISPs do not want you to have a home network and have a DSL/Cable modem that allows only 1 MAC to talk on the internet. If you change network cards, you have to call them up to change the MAC. The Wireless Gateway can it’s MAC to computer’s one that was originally set up for such an ISP. - Page 78 WLAN Router From the left-hand Management -> Status menu. The following page is displayed: If you could see the WAN Configuration -> MAC Address is changed to the one that you configured. www.modecom.eu...
-
Page 79: Port Filtering
WLAN Router Port Filtering Entries in Current Filter Table are used to restrict certain ports and types of data packets from your local network to Internet through the Gateway. Use of such filters can be helpful in securing or restricting your local network. From the left-hand Firewall ->... - Page 80 Enter 53 and 53 in Port Range field. From the Protocol drop-down list, select UDP setting. Enter DNS Resolve in Comment field. Click Apply Changes. Now the port filter that you created has been added and listed in the Current Filter Table. www.modecom.eu...
-
Page 81: Ip Filtering
WLAN Router Now the UDP port 80 for both Outbound and Inbound packet has been denied. Now you cannot visit any web site by domain due to the UDP port 53 has been blocked by the Port Filtering rule that created. You can enter the IP Address of that web site to visit. -
Page 82: Port Filtering For Tcp Port
Now The Local IP Address for example 10.0.0.102 that listed in the Current Filter Table cannot visit any application that use TCP protocol for example web site due to the Protocol TCP has been blocked by the IP Filtering rule that created. www.modecom.eu... -
Page 83: Ip Filtering For Udp With Specified Ip
WLAN Router IP filtering for UDP with specified IP Please follow example below to deny the UDP protocol for specified IP. From the left-hand Firewall -> IP Filtering menu. The following page is displayed: Check the option Enable IP Filtering to enable the IP Filtering. Enter the IP Address that you want to be denied in Loal IP Address field. -
Page 84: Ip Filtering For Both Tcp And Udp With Specified Ip
Enter any comment in Comment field. Click Apply Changes. Now the IP Filter that you created has been added and listed in the Current Filter Table. Now the TCP and UDP protocol for both Outbound and Inbound packet has been denied. www.modecom.eu... -
Page 85: Mac Filtering
WLAN Router MAC Filtering Entries in this table are used to restrict certain types of data packets from your local network to Internet through the Wireless Gateway. Use of such filters can be helpful in securing or restricting your local network. From the left-hand Firewall ->... -
Page 86: Port Forwarding
Internet appears to come from the IP address of your device. In this way, details about your LAN PCs remain private. This security feature is called Port Forwarding. From the left-hand Firewall -> Port Forwarding menu. The following page is displayed: www.modecom.eu... -
Page 87: Port Forwarding For Tcp With Specified Ip
WLAN Router Port Forwarding for TCP with specified IP Please follow example below to configure the Port Forwarding to Specified IP with TCP. From the left-hand Firewall -> Port Forwarding menu. The following page is displayed: Check the option Enable Port Forwarding to enable the Enable Port Forwarding. Enter the IP Address that the port you want to be forwarded in IP Address field. -
Page 88: Port Forwarding For Udp With Specified Ip
Now the IP Address and port range that you created has been added and listed in the Current Filter Table. Now the port range of the IP Address in the Current Filter Table can be access from Internet by UDP protocol. www.modecom.eu... -
Page 89: Url Filtering
WLAN Router URL Filtering URL filter is used to deny LAN users from accessing the internet. Block those URLs which contain keywords listed below. From the left-hand Firewall -> URL Filtering menu. The following page is displayed: URL filtering for specified URL Address Please follow example below to deny LAN users from accessing the Internet. -
Page 90: Dmz
From the left-hand Firewall -> DMZ menu. The following page is displayed: Check the option Enable DMZ to enable the Enable DMZ. Enter the IP Address that to be the DMZ Host in DMZ Host IP Address field. Click Apply Changes. www.modecom.eu... -
Page 91: Status
WLAN Router Click OK. Status This page displays the current information for the device. It will display the LAN, WAN, and system firmware informa- tion. This page will display different information, according to WAN setting (Static IP, DHCP, or PPPoE). From the left-hand Management ->... -
Page 92: Statistics
DNS service to this host. For this to work, an automated update client needs to be implemented. These update clients send update messages to the servers whenever there is some change in the IP address of that host. Then, the server updates the entries for that host and replies back with some return code. www.modecom.eu... - Page 93 WLAN Router Above Figure explains one such scenario in which a host gets a dynamic IP address for itself from a DHCP server. As the host has registered with one of the dynamic DNS service providers on the Internet, it sends an update message to the service provider with host name and changed IP address.
-
Page 94: Configure Dyndns
Type your own unique User Name, Password and Domain Name which you applied from www.dyndns.com in the relevant boxes. They can be any combination of letters or numbers with a maximum of 20 characters. Click Apply Changes. Click OK. www.modecom.eu... -
Page 95: Configure Tzo
WLAN Router Configure TZO From the left-hand Management -> DDNS menu. The following page is displayed: Click on Enable DDNS Select the TZO from the Service Provider drop-down list. Type your own unique Email, Key and Domain Name which you applied from http://www.tzo.com/ MainPageWebClient/clientsignup.html in the relevant boxes. -
Page 96: Time Zone Setting
From the NTP server drop-down list, select a NTP Server. Or you can add server to the SNTP association list using IP address. Adding a server to the association list automatically starts the synchronization process. Click Apply Changes. Click OK. www.modecom.eu... -
Page 97: Denial-Of-Service
WLAN Router Denial-of-Service A “denial-of-service” (DoS) attack is characterized by an explicit attempt by hackers to prevent legitimate users of a service from using that service. Denial-of-Service From the left-hand Management menu, click on Denial-of-Service. The following page is displayed: Check the option Enable NTP client update. - Page 98 WLAN Router Click OK. www.modecom.eu...
-
Page 99: Log
WLAN Router This page can be used to set remote log server and show the system log. System Log From the left-hand Management menu, click on Log. The following page is displayed: Option Description Enable/Disable the feature. Enable Log Default: Disable system all All system logs will be recorded in the system log wireless... -
Page 100: Firmware Update
Click Upgrade >. The device checks that the selected file contains an updated version of firmware. A status screen pops up, please wait for a while……. Firmware update has been update complete. The following page is displayed: Click OK. www.modecom.eu... -
Page 101: Save/Reload Settings
WLAN Router Save/Reload Settings This page allows you save current settings to a file or reload the settings from the file which was saved previously. Besides, you could reset the current configuration to factory default. If you do make changes to the default configuration but then wish to revert back to the original factory configura- tion, you can do so by resetting the device to factory defaults. -
Page 102: Load Settings From File
If you do make changes to the default configuration but then wish to revert back to the original factory configura- tion, you can do so by resetting the device to factory defaults. If you reset your device to factory defaults, all previous configuration changes that you have made are overw- ritten by the factory default configuration. Note www.modecom.eu... - Page 103 WLAN Router Software Reset: From the left-hand Management menu, click on Reset factory default. The following page is displayed: Reset to Defaults page Click on Reset Settings to Default. This page reminds you that resetting to factory defaults cannot be undone – any changes that you have made to the basic settings will be replaced.
-
Page 104: Password
Setting your username and password Non-authorized users may try to access your system by guessing your username and password. We recom- mend that you change the default username and password to your own unique settings. Note To change the default password: www.modecom.eu... - Page 105 WLAN Router From the left-hand Management menu, click on Password. The following page is displayed: Currently Defined Administration Password: Setup page This page displays the current username and password settings. Change your own unique password in the relevant boxes. They can be any combination of letters or numbers with a maximum of 30 characters. The default setting uses admin for the username and administrator for password.
-
Page 106: Logout
If you are happy with these settings, click Apply. You will see following page that the new user has been displayed on the Currently Defined Users. You need to login to the web pages using your new username and new password. Administration Password If you want to login the web page again, please click OK. www.modecom.eu... -
Page 107: Configuring Your Computers
WLAN Router Configuring your Computers This appendix provides instructions for configuring the Internet settings on your computers to work with the Wireless Gateway. Configuring Ethernet PCs Before you begin By default, the Wireless Gateway automatically assigns the required Internet settings to your PCs. You need to con- figure the PCs to accept this information when it is assigned. - Page 108 Click on Microsoft in the Manufacturers list box, and then click TCP/IP in the Network Protocols list box. Click OK to return to the Network dialog box, and then click OK again. You may be prompted to install files from your Windows 95/98 installation CD. Follow the instructions to install the files. www.modecom.eu...
- Page 109 WLAN Router Click OK to restart the PC and complete the TCP/IP installation. Next, configure the PCs to accept IP information assigned by the Wireless Gateway: Open the Control Panel window, and then click the Network icon. Select the network component labeled TCP/IP, and then click Properties. If you have multiple TCP/IP listings, select the listing associated with your network card or adapter.
-
Page 110: Ip Addresses, Network Masks, And Subnets
Network ID Host ID Here are some examples of valid IP addresses: Class A: 10.30.6.125 (network = 10, host = 30.6.125) Class B: 129.88.16.49 (network = 129.88, host = 16.49) Class C: 192.60.201.11 (network = 192.60.201, host = 11) www.modecom.eu... -
Page 111: Subnet Masks
WLAN Router Network classes The three commonly used network classes are A, B, and C. (There is also a class D but it has a special use beyond the scope of this discussion.) These classes have different uses and characteristics. Class A networks are the Internet’s largest networks, each with room for over 16 million hosts. -
Page 112: Upnp Control Point Software On Windows Me/Xp
2. In the “Network and Internet Connections” dialog box, select “Network Connections”. 3. In the “Network Connections” dialog box, right-click on the local area connection entry for your network; this will display a menu. Select the “Properties” menu entry. www.modecom.eu... - Page 113 WLAN Router 4. In the “Local Area Connection Properties” dialog box, select the “Advanced” tab. Disable the Internet Connection Firewall by de-selecting the entry with the following label: “Protect my computer and network by limiting or preventing access to the computer from the Internet”. 5.
-
Page 114: Troubleshooting
Ethernet cable is at- Verify that your cable is sufficient for your network requirements. A tached. 100 Mbit/sec network (10BaseTx) should use cables labeled CAT 5. A 10Mbit/sec network may tolerate lower quality cables. www.modecom.eu... -
Page 115: Diagnosing Problem Using Ip Utilities
WLAN Router Problem Troubleshooting Suggestion Internet Access Use the ping utility (discussed in the following section) to check whether your PC can communicate with the device’s LAN IP ad- dress (by default 10.0.0.2). If it cannot, check the Ethernet cabling. If you statically assigned a private IP address to the computer, (not a registered public address), verify the following: My PC cannot access the... - Page 116 There may be several addresses associated with an Internet name. This is common for web sites that receive heavy traffic; they use multiple, redundant servers to carry the same information. To exit from the nslookup utility, type exit and press [Enter] at the command prompt. www.modecom.eu...
-
Page 117: Glossary
WLAN Router Glossary 10BASE-T A designation for the type of wiring used by Ethernet networks with a data rate of 10 Mbps. Also known as Category 3 (CAT 3) wiring. See data rate, Ethernet. 100BASE-T A designation for the type of wiring used by Ethernet networks with a data rate of 100 Mbps. - Page 118 URLs, which identify a specific file at a web site. See DNS. download To transfer data in the downstream direction, i.e., from the Internet to the user. Digital Subscriber Line A technology that allows both digital data and analog voice signals to travel over existing copper telephone lines. www.modecom.eu...
- Page 119 WLAN Router encryption keys See network keys Ethernet The most commonly installed computer network technology, usually using twi- sted pair wiring. Ethernet data rates are 10 Mbps and 100 Mbps. See also 10BASE-T, 100BASE-T, twisted pair. File Transfer Protocol A program used to transfer files between computers connected to the Internet. Common uses include uploading new or updated files to a web server, and downlo- ading files from a web server.
- Page 120 A group of computers that are connected together, allowing them to communicate with each other and share resources, such as software, files, etc. A network can be small, such as a LAN, or very large, such as the Internet. www.modecom.eu...
- Page 121 WLAN Router network mask A network mask is a sequence of bits applied to an IP address to select the network ID while ignoring the host ID. Bits set to 1 mean “select this bit” while bits set to 0 mean “ignore this bit.
- Page 122 An interactive, character-based program used to access a remote computer. While HTTP (the web protocol) and FTP only allow you to download files from a remote computer, Telnet allows you to log into and use a computer from a remote location. www.modecom.eu...
- Page 123 WLAN Router TFTP Trivial File Transfer Protocol A protocol for file transfers, TFTP is easier to use than File Transfer Protocol (FTP) but not as capable or secure. TKIP Temporal Key Integrity Protocol (TKIP) provides WPA with a data encryption func- tion.
- Page 124 WLAN Router Virtual Circuit Identifier Together with the Virtual Path Identifier (VPI), the VCI uniquely identifies a VC. Your ISP will tell you the VCI for each VC they provide. See VC. Virtual Path Identifier Together with the Virtual Circuit Identifier (VCI), the VPI uniquely identifies a VC. Your ISP will tell you the VPI for each VC they provide.
-
Page 125: Environment Protection
Contact your local city office, your waste disposal service or the place of purchase for more information on the collection. Weight of the device: 0,8 kg MODECOM S.A. 00-124 Warszawa, Rondo ONZ 1. www.modecom.eu MODECOM Copyright©2008 MODECOM S.A. All rights reserved. MODECOM Logo is a registered trademark of MODECOM S.A.
Need help?
Do you have a question about the MC-421 and is the answer not in the manual?
Questions and answers