Xerox Phaser 3250 Service Manual
Laser printer
Hide thumbs
Also See for Phaser 3250:
- User manual (90 pages) ,
- Service manual (36 pages) ,
- Evaluator manual (12 pages)
Table of Contents
Troubleshooting

Related Manuals for Xerox Phaser 3250


Summary of Contents for Xerox Phaser 3250
- Page 1 Версия 14.04.2010 Руководство по техническому обслуживанию Phaser 3250 Документация изменена и дополнена: 1. Изменен парт номер PBA Main Controller (P3250 D) на 140N63322. 2. Изменен парт номер PBA Main Controller (P3250 DN) на 140N63323.
- Page 2 Service Manual 701P47817 Phaser 3250 ® Laser Printer...
-
Page 4: Service Manual
Service Manual 701P47817 ® Phaser 3250 Laser Printer Warning The following servicing instructions are for use by qualified service personnel only. To avoid personal injury, do not perform any servicing other than that contained in the operating instructions, unless you are qualified to do so. First Printing: March 2008... - Page 5 Xerox technical training materials and service manuals are intended for use by authorized Xerox service technicians and service partners only and are not for resale. These materials may not be distributed, copied, or otherwise reproduced without prior written consent from Xerox Corporation.
-
Page 6: Service Terms
Caution: A personal injury hazard exists that may not be apparent. For example, a panel may cover the hazardous area. Danger: A personal injury hazard exists in the area where you see the sign. Phaser 3250 Laser Printer Service Manual... -
Page 7: Symbols Marked On The Product
Refer to the manual(s) for information. Do not touch the OPC Drum. Do not expose the item to sunlight. Do not tilt the Print Cartridge. 35°C Do not expose item to high temperature. 0°C 95°F 32°F Recycle the item. Phaser 3250 Laser Printer Service Manual... -
Page 8: Power Safety Precautions
Phaser 3250 Laser Printer Service Manual... -
Page 9: Electrostatic Discharge Precautions
Handle IC’s and Erasable Programmable Read-Only Memories (EPROM’s) carefully to avoid bending pins. Pay attention to the direction of parts when mounting or inserting them on Printed Circuit Boards (PCB’s). Phaser 3250 Laser Printer Service Manual... -
Page 10: Service Safety Summary
Class 1 Laser Product The Phaser 3250 is certified to comply with Laser Product Performance Standards set by the U.S. Department of Health and Human Services as a Class 1 Laser Product. This means that this product does not emit hazardous laser radiation;... - Page 11 Do not install a Fuse of a different type or rating. Installing the wrong type or rating of Fuse can cause overheating and a risk of fire. Part Replacement Only use genuine Xerox approved spare parts or components to maintain compliance with legislation and safety certification. Reassembly Precautions Use extreme care during assembly.
-
Page 12: Servicing Electrical Components
This printer uses heat to fuse the toner image to paper. The Fuser is VERY HOT. Turn the printer power Off and wait at least 5 minutes for the Fuser to cool before attempting to service the Fuser or adjacent components. Phaser 3250 Laser Printer Service Manual... - Page 13 Back injury could result if you do not lift the printer properly. The printer can be lifted by one person. Use safety lifting and handling techniques when moving the printer. Always move the printer separately from Tray 2. 11.9 kg 26.2 lb s3250-001 Phaser 3250 Laser Printer Service Manual...
- Page 14 When shipping the printer, repack the printer using the original packing material and boxes or a Xerox packaging kit. Instructions for repacking the printer are included in the kit. If you do not have all the original packaging, or are unable to repackage the printer, contact your local Xerox service representative.
-
Page 15: Regulatory Information
Consult the dealer or an experienced radio/television technician for help. Any changes or modifications not expressly approved by Xerox could void the user's authority to operate the equipment. To ensure compliance with Part 15 of the FCC rules, use shielded interface cables. -
Page 16: European Union
European Union The CE mark applied to this product symbolizes Xerox’s declaration of conformity with the following applicable Directives of the European Union as of the dates indicated: December 12, 2006: Council Directive 2006/95/EC as amended. Approximation of the laws of the member states related to low voltage equipment. -
Page 17: Manual Organization
Manual Organization The Phaser 3250 Laser Printer Service Manual is the primary document used for repairing, maintaining, and troubleshooting the printer. Use this manual as your primary resource for understanding the operational characteristics of the printer and all available options. This manual describes specifications, theory, and the diagnosis and repair of problems occurring in the print engine and attached options. -
Page 18: Table Of Contents
Accessing the CentreWare IS ............1-24 Phaser 3250 Laser Printer Service Manual... - Page 19 Phaser 3250 Operational Overview ........
- Page 20 Background Contamination ............. 5-19 Phaser 3250 Laser Printer Service Manual...
- Page 21 Manual Feeder Cover (PL4.1.3) ............8-36 xviii Phaser 3250 Laser Printer Service Manual...
- Page 22 Xerox Supplies and Accessories ........
- Page 23 Acronyms and Abbreviations ..............A-9 Index Phaser 3250 Laser Printer Service Manual...
-
Page 24: General Information
General Information In this chapter... Printer Introduction and Overview Printer Configurations Parts of the Printer Printer Options Maintenance Items Consumables Specifications Non-Genuine Mode Maintenance Function Power Save Mode Printer Settings Utility CentreWare IS Reports and Information Pages Chapter... -
Page 25: Printer Introduction And Overview
1200 x 1200 dots-per-inch image quality. The printer supports PostScript 3 and PCL 6 for Base and Network configurations. The Phaser 3250 provides a standard 250-Sheet Tray 1. The Manual Feeder holds 1 sheet and does not act as a tray. The Manual Feeder supports specialty media, card stock, and envelopes. -
Page 26: Printer Configurations
General Information Printer Configurations The Phaser 3250 printer is available in two configurations. Phaser 3250 Configurations Features Printer Configurations 3250D 3250DN Processor and Clock Speed 400 MHz 400 MHz Memory Configuration* 32 MB 32 MB Duplex Unit Standard Standard Print Speed... -
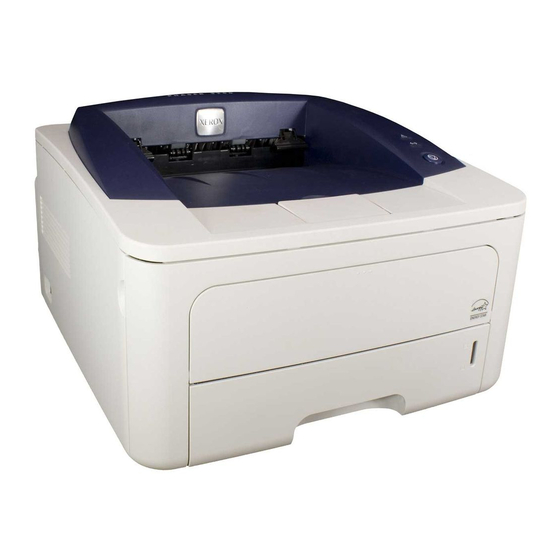
Page 27: Parts Of The Printer
Access Panel Manual Feeder Tray 1 Optional 250-Sheet Feeder/Tray 2 Front Cover Paper Level Indicators s3250-002 Rear View Power Switch Power Cord Connector Duplex Unit Ethernet Port USB Port Tray 2 (Optional) Cable Connector s3250-003 Phaser 3250 Laser Printer Service Manual... -
Page 28: Duplex Unit
General Information Duplex Unit The Phaser 3250 includes a Duplex Unit. User can install the Duplex Unit without using any tools. s3250-006 LAN (Network Model) The Phaser 3250 can be used with a wired LAN. LED State Printer State Active LED Random Blink Normal NPC &... -
Page 29: Control Panel
Start/Stop button (approximately 10 seconds). Cancel a Print Job: In Ready mode, press the Start/Stop button. Note: In Manual Feed mode, it is not possible to cancel the print job by pressing the Start/Stop button. Phaser 3250 Laser Printer Service Manual... - Page 30 The Print Cartridge is empty or is not installed. Flashing Red A minor error has occurred. The Print Cartridge toner is low. Note Refer to “LED Status and Errors” on page 4-2, Chapter 4, Troubleshooting Procedure for additional detailed information. Phaser 3250 Laser Printer Service Manual...
-
Page 31: Printer Options
General Information Printer Options The Phaser 3250 printer options include: Additional Memory (128 MB) 250-Sheet Feeder (Tray 2) Additional Memory The standard 32 MB memory is soldered on board. The printer features one memory slot that supports a 128 MB for a maximum of 160 MB. Memory... -
Page 32: Maintenance Items
Print life is based on “typical” office printing and 5% coverage per color on 24 lb. paper. The 50,000 life is not guaranteed and varies depending on usage habits. Tray Pad Holder Fuser Transfer Roller Pick-Up Roller s3250-051 Phaser 3250 Laser Printer Service Manual... -
Page 33: Consumables
When toner empty is detected, Life End status will be sent to indicate toner empty. Life ratings are based on A4 (Letter) sheets at 5% coverage. Print Cartridge Print Life Standard Capacity 3,500 pages High Capacity 5,000 pages s3250-016 1-10 Phaser 3250 Laser Printer Service Manual... -
Page 34: Specifications
* Assumes a 30 day month of printing. Memory Specifications Characteristic Specifications Memory Minimum 32 MB on-board Maximum 160 MB Supported RAM Supports up to 160 MB of DDR2 DIMM with one slot for 128 MB. Phaser 3250 Laser Printer Service Manual 1-11... -
Page 35: Environmental Specifications
2,500 meters (8,200 feet) Acoustic Noise Level Sound Power/Pressure (Decibels) Simplex Duplex Tray 2 Printing Less than Less than Less than 50.0 dB(A) 54.0 dB(A) 55.0 dB(A) Standby Less than 25.0 dB(A) Sleep Background Level 1-12 Phaser 3250 Laser Printer Service Manual... -
Page 36: Electrical Specifications
Less than 40 Amp Hot Start 135 Amp Other Conditions Less than 60 Amp Leakage Current Less than 3.5 mA (UL) Print Speed Resolution Simplex (ppm) Duplex (ipm) Letter Legal ----- ----- ----- Phaser 3250 Laser Printer Service Manual 1-13... -
Page 37: Operating Mode
General Information Operating Mode The Phaser 3250 consists of the following operating modes: Ready Mode: When the machine is turned On, it changes from the power Off state to Ready mode. In this mode, printing is available. Running Mode: The printer operates in the Print mode. -
Page 38: Image Specifications
241.3 mm (9.5 in.) ± 2.4 mm (.09 in.) Registration Left Print Position Simplex: 2.5 mm (.09 in.) (scanning direction) Duplex: 3.0 mm (1.2 in.) Top Print Position Simplex: 3.0 mm (1.2 in.) (feeding direction) Duplex: 3.0 mm (1.2 in.) Phaser 3250 Laser Printer Service Manual 1-15... -
Page 39: Physical Dimensions And Clearances
2.62 kg (5.7 lb.) 2.62 kg (5.7 lb.) Minimum Clearances 564 mm 951.6 mm (22.3 in.) (37.3 in.) 100 mm 100 mm (3.9 in.) (3.9 in.) 100 mm (3.9 in.) 482.6 mm (18.8 in.) s3250-055 1-16 Phaser 3250 Laser Printer Service Manual... -
Page 40: Mounting Surface Specifications
Mounting surface flatness must be within the specified range. The printer must not be tipped or tilted more than 2 mm. 2 mm 2 mm s3250-010 Failure to adhere to the specified mounting specifications will void all guarantees of print-quality and/or performance. Phaser 3250 Laser Printer Service Manual 1-17... -
Page 41: Media And Tray Specifications
General Information Media and Tray Specifications The following tables list the supported paper and media for the Phaser 3250. Supported Paper Type and Size Manual Tray Duplex Paper Type Paper Size Dimension Feeder 1, 2 Plain Paper Letter 8.5 x 11 in. - Page 42 C6 Envelope 4.49 x 6.38 in. (114 x 162 mm) DL Envelope 4.33 x 8.66 in. (110 x 220 mm) Note: Do not use envelopes with hot melt glue, windows, or metal clasps. Phaser 3250 Laser Printer Service Manual 1-19...
-
Page 43: Non-Genuine Mode
Windows PC or Macintosh with dedicated utilities. Firmware updates are available at www.xerox.com/office/support. Detailed procedures are available in the “Updating Firmware” on page A-3. Updated Firmware Windows Via USB/IEEE1284 Via Network (port 9100) Main Controller Board Available Available 1-20 Phaser 3250 Laser Printer Service Manual... -
Page 44: Diagnostics
Fuser and the Fan Unit in the engine. The main system then sets the engine to a sleep state. User can adjust Power Save Mode for the Phaser 3250 printer. The Power Save can be set from 5 to 120 minutes. - Page 45 General Information CentreWare IS View (Network Connection) 1-22 Phaser 3250 Laser Printer Service Manual...
-
Page 46: Printer Settings Utility
Layout: Orientation, Simplex Margin, Duplex, Duplex Margin Paper Option: Copies, Paper Size, Paper Type, Paper Source, Tray Chaining Graphic: Resolution, Darkness, Image Enhance Emulation: Emulation Setting Network: Configuration Network, Print Network Configuration About Phaser 3250 Laser Printer Service Manual 1-23... -
Page 47: Centreware Is
Troubleshoot: Provides list of embedded pages including Menu Map, PostScript Font List, PCL Font List, and Print Cleaning Page. Support: Provides web links and information for support including Software, Documentation, Supplies, and Registration. 1-24 Phaser 3250 Laser Printer Service Manual... - Page 48 General Information Index provides additional detailed information on the printer. Phaser 3250 Laser Printer Service Manual 1-25...
-
Page 49: Reports And Information Pages
General Information Reports and Information Pages The following reports and information pages are available in the Phaser 3250 printer. The embedded pages can be printed using various methods. Report/Information Page Print Method Printer Settings CentreWare IS Control Panel Utility (USB) -
Page 50: Control Panel Method
Information Blinking Rate Slowly Quickly Slowly Quickly Approx. 2 seconds 5 seconds 10 seconds 15 seconds Release Time For Customer Only for Service Technician (in the User Guide) (in the Service Manual) s3250-074 Phaser 3250 Laser Printer Service Manual 1-27... -
Page 51: Centreware Is Method (Network)
Enter the printer’s IP address. CentreWare IS page is displayed. Click the Index button. Click the appropriate page link to be printed. Print Cleaning Page Print Configuration Pages Print Demo Page Print Diagnostics Pages Print Help Pages 1-28 Phaser 3250 Laser Printer Service Manual... - Page 52 General Information Print Cleaning Page Print Configuration Pages Print Demo Page Print Diagnostics Pages Print Help Pages Phaser 3250 Laser Printer Service Manual 1-29...
- Page 53 Click the Blue button. The status window is displayed. Click OK to close the window. Close the CentreWare IS window. The Green LED on the Control Panel starts blinking and a printable page is printed. 1-30 Phaser 3250 Laser Printer Service Manual...
-
Page 54: Printer Settings Utility Method (Usb Connection)
On the right column of the window, Information is displayed. Select the appropriate page to be printed and click the Print button. Information: Prints the Configuration Page or Print Demo Page. Network: Prints the Network Configuration. Phaser 3250 Laser Printer Service Manual 1-31... -
Page 55: Demo Page
General Information Demo Page The Demo Page provides sample print for the Phaser 3250 Laser Printer. 1-32 Phaser 3250 Laser Printer Service Manual... -
Page 56: Menu Map
7. Network TCP/IP, EtherTalk, Ethernet Speed, Clear Setting, Network Info. PCL (-) Typeface, Symbol, Courier, Pitch, Lines PostScript (-) Print PS Error EPSON (-) Font, Character Set, Character Tab, Pitch, LPI, Auto Wrap Phaser 3250 Laser Printer Service Manual 1-33... -
Page 57: Configuration Page
Cartridge Information Toner Remaining, Page Counts, Model ID, Capacity, Supplier, Product Date Network Card NIC Firmware Version, MAC Address, IP Address, SubNet Mask, Default Gateway Install Options Option Tray Installed/Option Tray Not Installed 1-34 Phaser 3250 Laser Printer Service Manual... - Page 58 LPD Printing, Port Number SLP Information SLP Protocol, SLP Multicast TTL, Port Number IP Filtering Information IP Filtering UPnP Information Auto IP, SSDP, SSDP TTL EtherTalk Information EtherTalk Protocol, Printer Name, Printer Type, Current Zone Phaser 3250 Laser Printer Service Manual 1-35...
-
Page 59: Event Log
Error Counts Detailed information on the Event Log Info and Error Counts include: Event Log Info (##): Page number where the error occurs Error Counts (#): Number of error per the type of error 1-36 Phaser 3250 Laser Printer Service Manual... -
Page 60: Supplies Info
Counts, Page Counts, Main Motor On Time, Clear Toner, Replaced Toner Counts, Model ID, Capacity, Supplier, Product Date, Serial Number Toner Event Log Page Count Page Count information is available through CentreWare IS. Phaser 3250 Laser Printer Service Manual 1-37... -
Page 61: Print Cleaning Page
Control Panel Method - refer to “Control Panel Method” on page 1-27 (Chapter 1, General Information). CentreWare IS Method - refer to “Printing the Print Cleaning Page” on page 7-5 (Chapter 7, Cleaning and Maintenance). 1-38 Phaser 3250 Laser Printer Service Manual... -
Page 62: Pcl Font List
The user can print the PCL Fonts List on A-size paper from the default tray. The PCL Font List contains: Font Number, Font Name, Pitch/Point, Escape Sequence PS Font List The user can print the PostScript Font List on A-size paper from the default tray. Phaser 3250 Laser Printer Service Manual 1-39... - Page 63 General Information 1-40 Phaser 3250 Laser Printer Service Manual...
-
Page 64: Theory Of Operation
Theory of Operation In this chapter... Phaser 3250 Operational Overview Paper Path of the Printer Major Assemblies and Functions Electrical Components Chapter... -
Page 65: Phaser 3250 Operational Overview
Theory of Operation Phaser 3250 Operational Overview The Phaser 3250 is a monochrome laser printer that uses Laser Scanner Unit (LSU) with an electrophotographic process. The printer system consists of one print cartridge which creates toner image. System Overview The Phaser 3250 Laser Printer consists of the Feeding Mechanism, Drive Assembly, Transfer Roller, Fuser, Laser Unit, Control Panel, and Printer Controller. -
Page 66: Paper Path Of The Printer
Separation Method Individual sheets are separated from the Friction Pad in the tray. When paper feeds into the printer, it passes over a spring loaded Friction Pad that separates the sheets of paper. Phaser 3250 Laser Printer Service Manual... - Page 67 Sensing function, Paper Arranging function, Various Size Papers Accepting function, Tray 2 Paper Path function, and Displaying Remaining of Paper function. Holder Pad Paper Guide Paper Guide Knock Up P Plate Rear Paper Guide s3250-012 Phaser 3250 Laser Printer Service Manual...
- Page 68 Feed Roller (Registration) The Feed Roller arranges paper, transfers paper, detects paper, and removes jam. Feed Roller (top area of the printer) s3250-042 Feed Roller (bottom area of the printer) s3250-043 Phaser 3250 Laser Printer Service Manual...
- Page 69 The Duplex Unit can be installed without using any tools. The Duplex Unit uses a side feeding method. When a jam occurred in the front or rear part of the printer, the Duplex Unit can be removed to access the jam area. s3250-006 Phaser 3250 Laser Printer Service Manual...
- Page 70 Theory of Operation Tray 2 (Optional Tray) The Optional Tray 2 is universal with Tray 1 and has a capacity of 250 sheets. Tray 2 has a separate driving mechanism. s3250-007 Phaser 3250 Laser Printer Service Manual...
-
Page 71: Major Assemblies And Functions
Main Motor provides drive energy to the paper feed, Toner Cartridge, Fuser, Pick-Up Roller, Feed Rollers, and Duplex Unit. The Drive Assembly consists of a Main Motor. Main Motor: DC 24V Rated RPM: 2170 rpm s3250-072 Phaser 3250 Laser Printer Service Manual... -
Page 72: Fuser
Halogen Lamp Heat Roller (inside Heat Roller) Thermostat Pressure Roller (behind Heat Roller) Thermistor Pressure Roller s3250-107 Halogen Lamp Voltage ± 120V: 115 ± 220V: 230 ± Capacity: 750 Watt 25 W Temperature Distribution: 120% Phaser 3250 Laser Printer Service Manual... - Page 73 The temperature of the Fuser cover’s surface is maintained at less than 80° to protect the user. A Caution label is attached where the customer can easily see when the Rear Cover is opened. 2-10 Phaser 3250 Laser Printer Service Manual...
-
Page 74: Laser Unit
Theory of Operation Laser Unit The Laser Unit is the core part of the Phaser 3250 and is controlled by a video controller. The Laser Unit converts video data received from the computer into an electrostatic latent image on the surface of the OPC Drum. This is achieved by controlling the laser beam and exposing the surface of the OPC Drum to the laser light. -
Page 75: Print Cartridge
Management of Waste Toner: Collects toner using the Cleaning Blade. OPC Drum Protecting Shutter: No Toner CRUM Reader: Identifies whether toner is Xerox branded toner or whether a Non-Xerox toner cartridge is installed in the printer, except for the initial cartridge. Cleaning Roller Laser Scanning Unit (LSU) 0.20 mW... -
Page 76: Electrical Components
Main Controller Board. U3 EEPROM U6 SDRAM U7 SDRAM U4 EEPROM DC to DC Ethernet IC Converter, 3.3V DC to DC Converter, 1.3V USB IC U8 ASIC U17 NOR FLASH U18 NOR FLASH s3250-028 Phaser 3250 Laser Printer Service Manual 2-13... - Page 77 PCI Local Bus specification rev2.2 Compliant Host/Agent Mode (supports 4 devices in Host mode) NAND Flash Controller 8/16 Bits, H/W EEC Generation Auto Boot Mode (using Internal SRAM, 4 KB) 10 M/100 Mbps Full IEEE 802.3 compatibility 2-14 Phaser 3250 Laser Printer Service Manual...
- Page 78 DRAM also stores Font List, compresses into Flash memory on DRAM, and uses it as PCL font for export based on printer configuration. Capacity: 32 MB (basic), up to 160 MB (factory option) Type: SDRAM 100 MHz/133 MHz, 32 Bit Phaser 3250 Laser Printer Service Manual 2-15...
- Page 79 Exit Sensor by reading D22 of the CPU, and the normal operation or a jam status is reported. If a Jam2 error occurs, the amber LED is lit on the printer’s Control Panel. Exit Sensor Actuator s3250-018 2-16 Phaser 3250 Laser Printer Service Manual...
- Page 80 Motor Driver IC is used in this case. The resistance Rs value for sensing and voltage value for the V reference can be changed by the motor driving voltage value. I = Vref / Rs, wherein Vref is (R1 x 5V) / (R1+R2) Phaser 3250 Laser Printer Service Manual 2-17...
-
Page 81: High-Voltage Power Supply (Hvps)
The HVPS uses 24 V and outputs high voltage for the THV/MHV/BIAS and the outputted high voltage is supplied to the toner, OPC Cartridge, and Transfer Roller. CN1 Main Controller Board Front Cover Open Switch Rear Cover Open Switch Supply Developer Varistor s3250-019 2-18 Phaser 3250 Laser Printer Service Manual... - Page 82 Output Voltage Riding Time: 50 ms Max Output Voltage Failing Time: 50 ms Max Ω Ω Output Loading Range: 30 M ~ 1000 M Output Control Signal (MHV-PWM): CPU is HV output when PWM is Low. Phaser 3250 Laser Printer Service Manual 2-19...
- Page 83 Output Voltage Rising Time: 50 ms Max Output Voltage Failing Time: 50 ms Max Ω Ω Output Loading Range: 10 M ~ 1000 M Output Control Signal (BIAS-PWM): The CPU is HV output when PWM is low. 2-20 Phaser 3250 Laser Printer Service Manual...
-
Page 84: Low-Voltage Power Supply (Lvps) (Smps)
DC power for driving the printer, and the AC heater control, which supplies power to the Fuser. The LVPS has two output channels: +5.0 V and +24 V. CON3 Main Board CON2 Fuser CON1 AC Inlet s3250-020 Phaser 3250 Laser Printer Service Manual 2-21... - Page 85 Under 500mVp-p Voltage Maximum Output 15 W 105.6 W Peak Output 18 W 127.2 W Protection for Shut down or Fuse Shut down or Output Loading Shortage Protection Voltage Drop and Overflowing Current 2-22 Phaser 3250 Laser Printer Service Manual...
-
Page 86: Fuser Ac Power Control
Triac. When the Triac turns Off, the Lamp is turned Off. Triac (Q501) Feature: 24A-LV model/16A-HV model, 600 V Switching Phototriac Coupler (PC501) Turn On if Current: 15 mA~50 mA (Design: 16 mA) High Repetitive Peak Off State Voltage: Min 600 V Phaser 3250 Laser Printer Service Manual 2-23... -
Page 87: Engine F/W
Regi Sensor in the specified time. DUPLEX JAM 0 After the leading edge of the paper passes the Regi Sensor, the leading edge of the paper cannot reach the Feed Sensor in the specified time. 2-24 Phaser 3250 Laser Printer Service Manual... - Page 88 Lower than 90° C for more than 10 seconds while warming up. When the engine operates warm-up process, if the temperature of the fixing unit is not higher than a specified temperature. Phaser 3250 Laser Printer Service Manual 2-25...
- Page 89 In case of Over Heat Error, no heat is supplied to the fixing unit. When a specified time is elapsed, the engine detects a present temperature again. If the present temperature is a specified degree lower than the memorized temperature, the error is recovered. 2-26 Phaser 3250 Laser Printer Service Manual...
- Page 90 When LReady or H-SYNC error occurs, paper exits from the printer. The engine mode is changed to recovery mode and the engine checks the LSU error. When the error stops, print job will continue. Phaser 3250 Laser Printer Service Manual 2-27...
- Page 91 Theory of Operation 2-28 Phaser 3250 Laser Printer Service Manual...
-
Page 92: Error Messages And Codes
Error Messages and Codes In this chapter... Introduction Servicing Instructions Error Messages and Procedures Jam Errors Tray and Paper Errors Consumables/Routine Maintenance Part Errors Motor, Cover, and Laser Errors Print-Quality Error Chapter... -
Page 93: Introduction
Menu Map Information Blinking Rate Slowly Quickly Slowly Quickly Approx. 2 seconds 5 seconds 10 seconds 15 seconds Release Time For Customer Only for Service Technician (in the User Guide) (in the Service Manual) s3250-074 Phaser 3250 Laser Printer Service Manual... -
Page 94: Event Log
Information on the Event Log includes: Event Log Info, Error Counts, and Toner Event Log. Event Log Info (##): Page number where the error occurs Error Counts (#): Number of error per the type of error Phaser 3250 Laser Printer Service Manual... -
Page 95: Servicing Instructions
1. Use the Parts List to locate a part number. 2. Use the Disassembly procedures to replace the part. Step 5: Final Checkout 1. Test the printer to be sure you have corrected the initial problem and there are no additional problems present. Phaser 3250 Laser Printer Service Manual... -
Page 96: Error Messages And Procedures
Error Message Abbreviations Due to limited display space, some error messages include abbreviations. The most common abbreviations used throughout this chapter are listed here. Term Definition Developer HSYNC Horizontal Sync Signal Laser Scanner Unit Phaser 3250 Laser Printer Service Manual... -
Page 97: Error Message Summary
Motor, Cover, and Laser Errors (page 3-27) Defective Motor Operation page 3-27 Front Cover Open page 3-28 Fuser Error (Overheat Error) page 3-18 Laser Unit Not Ready page 3-29 Laser Unit Not Ready page 3-29 Phaser 3250 Laser Printer Service Manual... - Page 98 Main Controller Board, PL1.1.2 Map 1 - Main Controller Board Pick-Up Roller, PL6.1.26 “Map 6 - Main Motor, Interlock Switch, Fans, and Sensors” on page 10-14 Pick-Up Solenoid, PL6.1.37 Feed Sensor, PL6.1.75 Paper Holder Pad, PL11.1.14 Phaser 3250 Laser Printer Service Manual...
- Page 99 (page 8-11). cloth. 2. Is the Pick-Up Roller damaged? 1. Check the Feed Sensor for damage. Replace the Replace the Feed Sensor Main Controller 2. Is the Feed Sensor damaged? (page 8-49). Board (page 8-62). Phaser 3250 Laser Printer Service Manual...
-
Page 100: Paper Jam 1
Actions and Questions 1. Check the Feed Actuator for correct Replace the Complete. installation. Reseat the Feed Feed Actuator Actuator (page 8-45). (page 8-45). Go to step 2. 2. Does the error still occur? Phaser 3250 Laser Printer Service Manual... - Page 101 2. Does the error still occur? 1. Check the Main Controller Board for Replace the Complete. correct installation. Reseat the Main Main Controller Controller Board (page 8-62). Board (page 8-62). 2. Does the error still occur? 3-10 Phaser 3250 Laser Printer Service Manual...
-
Page 102: Paper Jam 2
Wiring and Plug/Jack Map References Fuser, PL9.1.0 Map 1 - Main Controller Board Guide Claw, PL9.1.16 Map 7 - LVPS, HVPS, Fuser, Developer Unit CRUM, and Power Switch Exit Actuator, PL9.1.19 Exit Sensor (Photo Interrupter), PL9.1.37 Phaser 3250 Laser Printer Service Manual 3-11... - Page 103 Replace the Exit Go to step 4. Actuator 2. Is the Exit Actuator damaged? (page 8-54). 1. Check the Guide Claws for damage. Replace the Complete. Fuser 2. Are the Guide Claws damaged? (page 8-13). 3-12 Phaser 3250 Laser Printer Service Manual...
-
Page 104: Jam Duplex
Troubleshooting Procedure Table Step Actions and Questions 1. Check the Duplex Unit for correct Replace the Complete. installation. Reseat the Duplex Unit Duplex Unit (page 8-37). (page 8-37). 2. Does the error still occur? Phaser 3250 Laser Printer Service Manual 3-13... -
Page 105: Tray And Paper Errors
(page 8-51). damaged? 1. Check the Main Controller Board for Replace the Complete. correct installation. Reseat the Main Main Controller Controller Board (page 8-62). Board (page 8-62). 2. Does the error still occur? 3-14 Phaser 3250 Laser Printer Service Manual... -
Page 106: Paper Empty Without Indication
(page 8-51). damaged? 1. Check the Main Controller Board for Replace the Complete. correct installation. Reseat the Main Main Controller Controller Board (page 8-62). Board (page 8-62). 2. Does the error still occur? Phaser 3250 Laser Printer Service Manual 3-15... -
Page 107: Multi Feeding
(page 8-8), if damaged. 1. Check the Pick-Up Solenoid for Replace the Complete. correct installation and damage. Pick-Up Reseat the Pick-Up Solenoid Solenoid (page 8-39). (page 8-39). 2. Does the error still occur? 3-16 Phaser 3250 Laser Printer Service Manual... -
Page 108: Wrong Print Position
Go to step 2. Feed Sensor 2. Is the Feed Sensor damaged? (page 8-49). 1. Check the Feed Actuator for Replace the Complete. damage. Feed Actuator (page 8-45). 2. Is the Feed Actuator damaged? Phaser 3250 Laser Printer Service Manual 3-17... -
Page 109: Consumables/Routine Maintenance Part Errors
Troubleshooting Reference Table Applicable Parts Wiring and Plug/Jack Map Reference Fuser, PL9.1.0 “Map 7 - LVPS, HVPS, Fuser, Developer Unit CRUM, and Power Switch” on Thermistor Assembly, PL9.1.5 page 10-15 Thermostat, PL9.1.7 Halogen Lamp, PL9.1.30 3-18 Phaser 3250 Laser Printer Service Manual... - Page 110 2. Is the Thermistor damaged? 1. Check the Halogen Lamp for Replace the Replace the damage or overheating. Halogen Lamp Fuser (page 8-24). (page 8-13). 2. Is the Halogen Lamp damaged or overheated? Phaser 3250 Laser Printer Service Manual 3-19...
-
Page 111: Paper Rolled In The Fuser
Fuser and clean 2. Is the Fuser dirty? the debris between the Heat Roller (page 8-17), Thermistor (page 8-15), and Pressure Rollers (#1 - page 8-20; #2 - page 8-22). Go to step 2. 3-20 Phaser 3250 Laser Printer Service Manual... - Page 112 Error Messages and Codes Troubleshooting Procedure Table (continued) Step Actions and Questions 1. Check the Guide Claws for damage? Replace the Complete. Fuser 2. Are the Guide Claws damaged? (page 8-13). Phaser 3250 Laser Printer Service Manual 3-21...
-
Page 113: Fuser Gear Does Not Function Due To Overheating
Halogen Lamp (page 8-24). 2. Is the Halogen Lamp damaged? 1. Replace the Fuser (page 8-13). Replace the Go to step 3. LVPS 2. Does the error still occur? (page 8-67). 3-22 Phaser 3250 Laser Printer Service Manual... - Page 114 Actions and Questions 1. Check the Main Controller Board for Replace the Complete. correct installation. Reseat the Main Main Controller Controller Board (page 8-62). Board (page 8-62). 2. Does the error still occur? Phaser 3250 Laser Printer Service Manual 3-23...
-
Page 115: Paper Rolled On The Opc Drum
Fuser, PL9.1.0 page 10-15 Troubleshooting Procedure Table Step Actions and Questions 1. Check the paper type. Replace the Go to step 2. paper with the 2. Does the paper type meet correct specifications? specifications. 3-24 Phaser 3250 Laser Printer Service Manual... - Page 116 1. Check the Print Cartridge for paper Remove the Complete. jam. paper. Clean the OPC 2. Is there paper caught inside the Drum using a Print Cartridge? lint-free cloth slightly dampened with cold water. Phaser 3250 Laser Printer Service Manual 3-25...
-
Page 117: Print Cartridge Not Installed
Print Cartridge, PL1.1.20 Troubleshooting Procedure Table Step Actions and Questions 1. Check the printer for the Print Reseat the Print Install a Print Cartridge. Cartridge Cartridge. (page 8-7). 2. Is the Print Cartridge installed? 3-26 Phaser 3250 Laser Printer Service Manual... -
Page 118: Motor, Cover, And Laser Errors
Go to step 2. contamination. and remove the debris. 2. Is the Fuser dirty? 1. Check the Guide Claws inside the Replace the Complete. Fuser for damage. Fuser (page 8-13). 2. Are the Guide Claws damaged? Phaser 3250 Laser Printer Service Manual 3-27... -
Page 119: Front Cover Open
2. Is the Interlock Switch damaged? 1. Check the Main Controller Board for Replace the Complete. correct installation. Reseat the Main Main Controller Controller Board (page 8-62). Board (page 8-62). 2. Does the error still occur? 3-28 Phaser 3250 Laser Printer Service Manual... -
Page 120: Laser Unit Not Ready
1. Check the Laser Unit for correct Replace the Replace the installation. Reseat the Laser Unit Laser Unit Main Controller (page 8-57). (page 8-57). Board (page 8-62). 2. Does the error still occur? Phaser 3250 Laser Printer Service Manual 3-29... -
Page 121: Print-Quality Error
Replace the voltage. LVPS (page 8-67). 2. Does the voltage show +24V? 1. Replace the Laser Unit (page 8-57). Replace the Complete. Main Controller 2. Does the error still occur? Board (page 8-62). 3-30 Phaser 3250 Laser Printer Service Manual... -
Page 122: General Troubleshooting
General Troubleshooting In this chapter... Introduction Inoperable Printer Troubleshooting Power Supply Troubleshooting Print Cartridge Troubleshooting Operating System and Application Problems Chapter... -
Page 123: Introduction
Replace the Print on toner. Cartridge. Amber A paper jam has occurred. Remove paper. Online Green The printer is in Power Save mode. The printer is on-line and can receive data from the computer. Phaser 3250 Laser Printer Service Manual... - Page 124 General Troubleshooting Status Description Solution Blinking Slowly indicates that the printer is receiving data from the computer. Quickly indicates that the printer is printing. Phaser 3250 Laser Printer Service Manual...
-
Page 125: No Error Led When The Front Cover Is Open
Check the Main Controller Board signal. Complete. Replace the Main 1. Is there +24 V across: Controller CN10-1, CN10-4, CN10-6, CN10-8, and Board CN10-10 pins (page 8-62). 2. Is there +5 V across: CN10-12, CN10-14, and CN10-16 pins Phaser 3250 Laser Printer Service Manual... -
Page 126: Inoperable Printer Troubleshooting
If reinstalling the print drivers does not solve the problem, check the port settings. CMOS is on ECP the address is IRQ 7 378 (for parallel port 1) Phaser 3250 Laser Printer Service Manual... -
Page 127: The Printer Is Not Responding To A Print Command Due To Incorrect Setup
If the regular fonts are not printing, the cable or the printer driver could be defective. Turn the computer and printer Off and back On. Send a print job. If the regular fonts are not printed again, replace the cable. Phaser 3250 Laser Printer Service Manual... -
Page 128: Spool Error
If there is a problem with the printer (out of toner, out of paper, etc...), the job may take a long time to delete as it must wait for a time out. Phaser 3250 Laser Printer Service Manual... -
Page 129: Power Supply Troubleshooting
AC wall outlet? the outlet. 1. Check the power cord for defects or loose Replace or Replace the connection. reconnect the LVPS power cord. (page 8-67). 2. Is the power cord loose or defective? Phaser 3250 Laser Printer Service Manual... -
Page 130: No Power
2. Is the power fuse defective? (page 8-69). 1. Check the Main Control Board for correct Go to step 7. Complete. installation. Reseat the Main Control Board (page 8-62). 2. Does the error still occur? Phaser 3250 Laser Printer Service Manual... - Page 131 Check the Main Controller Board signal. Complete. Replace the Main 1. Is there +24 V across: Controller CN10-1, CN10-4, CN10-6, CN10-8, and Board CN10-10 pins (page 8-62). 2. Is there +5 V across: CN10-12, CN10-14, and CN10-16 pins 4-10 Phaser 3250 Laser Printer Service Manual...
-
Page 132: Print Cartridge Troubleshooting
General Troubleshooting Print Cartridge Troubleshooting Use only Xerox Print Cartridges in the printer. Non-Xerox or Third Party Print Cartridges are not guaranteed to work with the Phaser 3250 and can cause malfuntions, print-quality problems, and jam errors. Precautions for Print Cartridge Excessive exposure to direct light for more than a few minutes can cause damage to the Print Cartridge and degrade print quality. -
Page 133: Operating System And Application Problems
Billing cover sheet printing. page printing. Info field, are only allowed for printing on the cover page. Other characters will be broken on the printout. 4-12 Phaser 3250 Laser Printer Service Manual... -
Page 134: Common Linux Problems
SuSE Linux 9.2 (cups-1.1.21) has a the printer does not print. problem with IPP (Internet Printing Protocol) printing. Use the socket printing instead of IPP or install the later version of CUPS (cups-1.1.22 or higher). Phaser 3250 Laser Printer Service Manual 4-13... -
Page 135: Common Postscript Problems
Macintosh with the printer driver may not resolution setting in your Acrobat Reader 6.0 or higher, be matched with that in printer driver matches colors print incorrectly. Acrobat Reader. information in Acrobat Reader. 4-14 Phaser 3250 Laser Printer Service Manual... -
Page 136: Print-Quality Troubleshooting
Print-Quality Troubleshooting In this chapter... Print-Quality Problems Overview Checklist Before Troubleshooting Print-Quality Test Print Print-Quality Specifications Print-Quality Troubleshooting Chapter... -
Page 137: Print-Quality Problems Overview
Refer to “Media and Tray Specifications” on page 1-18 for supported and specialty media that have been tested and approved for use in the Phaser 3250. Use paper from a fresh ream that is acclimated to room temperature and humidity. - Page 138 Vertical Black Line and Band (page 5-27) Horizontal Black Line and Band (page 5-28) Black/White Spot (page 5-29) Stains on the Front of the Page (page 5-31) Blank Page (1) (page 5-33) Blank Page (2) (page 5-34) Phaser 3250 Laser Printer Service Manual...
-
Page 139: Checklist Before Troubleshooting Print-Quality
Cleaning Paper, toner, and dust particles can accumulate inside the printer and cause print-quality problems such as Smearing or Toner Specks. Clean the inside of the printer to prevent these problems. Phaser 3250 Laser Printer Service Manual... -
Page 140: Checklist Before Troubleshooting Image Quality
If you are printing on an uneven print surface, change the paper type settings. Verify that the correct type of paper is used. The Print Cartridge may need to be replaced. Replace the Print Cartridge. Phaser 3250 Laser Printer Service Manual... - Page 141 “Media and Tray Specifications” on page 1-18). Toner spots appear on the page and printing is blurred. Random Spots Check the Print Cartridge to make sure that it is installed correctly. Change the Print Cartridge. Phaser 3250 Laser Printer Service Manual...
- Page 142 Fuzzy Text If you are using downloaded fonts, verify that the fonts are supported by the printer, the host computer, and software application. From the Start menu, go to Settings > Printers and Faxes. Phaser 3250 Laser Printer Service Manual...
- Page 143 Print-Quality Troubleshooting Select Phaser 3250/Phaser 3250 PS. Right click on the printer icon and select Printing Preferences. Click the Graphic tab. Under Image Mode, select Text Enhancement. Click OK. Part or all the page prints. Partial Band Check the Print Cartridge to make sure it is installed correctly.
- Page 144 Printing on both ends of the transparencies is faded. This occurs when the printer is operating at a location where relative humidity reaches 85° or more. Light Print on Transparency Adjust the humidity or relocate the printer to an appropriate environment. Phaser 3250 Laser Printer Service Manual...
-
Page 145: Test Print
This section provides a sample of a test patterns. The life of the Print Cartridge and printing speed are measured with the pattern shown below 5%. The A4 ISO 19752 standard pattern samples are reproduced to 70% of the actual A4 size. s3250-027 5-10 Phaser 3250 Laser Printer Service Manual... -
Page 146: Print-Quality Specifications
The print-quality is best when quality paper is fed from the tray. The print quality is evaluated on the maximum size of each standard paper. Color Print Quality: Xerox-brand Color XPressions paper Black and White Quality: Xerox-brand 4200 paper Paper Condition Paper should be fresh and stored in the operating environment for 12 hours before use for printing. -
Page 147: Print-Quality Troubleshooting
Page stained. Blank Page (1) The entire image area is blank. page 5-33 Blank Page (2) The entire image area is blank. One or several page 5-34 blank pages are printed. 5-12 Phaser 3250 Laser Printer Service Manual... -
Page 148: Repeating Defect Measurement
Heat Roller 77.6 mm Black spots or Fuser PL9.1.0 (3.05 in) Vertical Black band Pressure Roller 62.8 mm Background Fuser PL9.1.0 (1st) (2.47 in) Pressure Roller 37.7 mm Background Fuser PL9.1.0 (2nd) (1.48 in) Phaser 3250 Laser Printer Service Manual 5-13... -
Page 149: Light Or Undertone Print
10° C? turn On the printer. 1. Check the inside of the printer for Clean the inside Go to step 5. toner spill. of the printer. 2. Is there toner spill inside the printer? 5-14 Phaser 3250 Laser Printer Service Manual... - Page 150 Print-Quality Troubleshooting Troubleshooting Procedure Table (continued) Step Actions and Questions 1. Check the HVPS for correct Complete. Replace the installation. Reseat the HVPS HVPS (page 8-64). (page 8-64). 2. Does the image quality improve? Phaser 3250 Laser Printer Service Manual 5-15...
-
Page 151: Black Print
1. Reseat the HVPS (page 8-64). Replace the Complete. HVPS 2. Does the error still occur? (page 8-64). Go to step 4. Does the error still occur? Replace the Complete. Laser Unit (page 8-57). Go to step 5. 5-16 Phaser 3250 Laser Printer Service Manual... - Page 152 Print-Quality Troubleshooting Troubleshooting Procedure Table (continued) Step Actions and Questions Does the error still occur? Replace the Complete. Main Controller Board (page 8-62). Phaser 3250 Laser Printer Service Manual 5-17...
-
Page 153: Uneven Density
Check the Print Cartridge. Is the Print Replace the Go to step 3. Cartridge empty? Print Cartridge (page 8-7). 1. Check the Print Cartridge for Replace the Complete. damage. Print Cartridge (page 8-7). 2. Is the Print Cartridge damaged? 5-18 Phaser 3250 Laser Printer Service Manual... -
Page 154: Background Contamination
Replace the Go to step 4. Cartridge empty? Print Cartridge (page 8-7). 1. Check the Transfer Roller Go to step 5. Clean the movement. Transfer Roller bushings. 2. Does the Transfer Roller rotate smoothly? Phaser 3250 Laser Printer Service Manual 5-19... - Page 155 Print-Quality Troubleshooting Troubleshooting Procedure Table (continued) Step Actions and Questions 1. Check the HVPS for correct Complete. Replace the installation. Reseat the HVPS HVPS (page 8-64). (page 8-64). 2. Does the image quality improve? 5-20 Phaser 3250 Laser Printer Service Manual...
-
Page 156: Ghosting (1)
Print Cartridge (page 8-7). 2. Is the Print Cartridge damaged? 1. Check the Transfer Roller life usage. Replace the Go to step 4. Transfer Roller 2. Is the Transfer Roller life expired? (page 8-10). Phaser 3250 Laser Printer Service Manual 5-21... - Page 157 2. Does the image quality improve? 1. Check the Main Controller Board for Complete. Replace the correct installation. Reseat the Main Main Controller Controller Board (page 8-62). Board (page 8-62). 2. Does the image quality improve? 5-22 Phaser 3250 Laser Printer Service Manual...
-
Page 158: Ghosting (2)
Applicable Parts Example Print Residual Image/Ghosting Troubleshooting Procedure Table Step Actions and Questions 1. Check the media type selection. Complete. Set the correct media type. 2. Is Thick Mode selected for paper type? Phaser 3250 Laser Printer Service Manual 5-23... -
Page 159: Ghosting (3)
Ensure to wait for the Fuser to cool down before starting the procedure. Troubleshooting Procedure Table Step Actions and Questions 1. Check the Fuser. Clean the Fuser. Replace the Fuser 2. Is there any contamination on the (page 8-13). Fuser? 5-24 Phaser 3250 Laser Printer Service Manual... -
Page 160: Vertical White Line
2. Are there any debris inside of the Laser Unit? 1. Check the OPC Drum on the Print Replace the Go to step 5. Cartridge for damage. Print Cartridge (page 8-7). 2. Is the OPC Drum damaged? Phaser 3250 Laser Printer Service Manual 5-25... - Page 161 Print-Quality Troubleshooting Troubleshooting Procedure Table (continued) Step Actions and Questions 1. Check the Transfer Roller surface for Replace the Complete. damage. Transfer Roller (page 8-10). 2. Is the Transfer Roller surface damaged? 5-26 Phaser 3250 Laser Printer Service Manual...
-
Page 162: Vertical Black Line And Band
Print Cartridge (page 8-7). 2. Is the Print Cartridge damaged? 1. Check the Transfer Roller surface for Replace the Complete. damage. Transfer Roller (page 8-10). 2. Is the Transfer Roller surface damaged? Phaser 3250 Laser Printer Service Manual 5-27... -
Page 163: Horizontal Black Line And Band
2. Are there any bands on the page? Measurement” on page 5-13. 1. Check the Gear of the OPC Drum Replace the Complete. (has a small tooth gap) for damage. Print Cartridge (page 8-7). 2. Is the Gear damaged? 5-28 Phaser 3250 Laser Printer Service Manual... -
Page 164: Black/White Spot
2. Are there any spots on the page? Defect Measurement” on page 5-13. 1. Check the Print Cartridge for Replace the Go to step 5. damage. Print Cartridge (page 8-7). 2. Is the Print Cartridge damaged? Phaser 3250 Laser Printer Service Manual 5-29... - Page 165 Print-Quality Troubleshooting Troubleshooting Procedure Table (continued) Step Actions and Questions 1. Check the Transfer Roller life usage. Replace the Complete. Transfer Roller 2. Is the Transfer Roller life expired? (page 8-10). 5-30 Phaser 3250 Laser Printer Service Manual...
-
Page 166: Stains On The Front Of The Page
2. Is the Transfer Roller surface dirty? to “Printing the Print Cleaning Page” on page 7-5). 1. Check the Print Cartridge for Replace the Complete. damage or leakage. Print Cartridge (page 8-7). 2. Is the Print Cartridge damaged? Phaser 3250 Laser Printer Service Manual 5-31... -
Page 167: Stains On The Back Of The Page
2. Is the Transfer Roller surface dirty? to “Printing the Print Cleaning Page” on page 7-5). 1. Replace the Transfer Roller Replace the Complete. (page 8-10). Fuser (page 8-13). 2. Does the error still occur? 5-32 Phaser 3250 Laser Printer Service Manual... -
Page 168: Blank Page (1)
2. Does the error still occur? 1. Check the Main Controller Board for Replace the Complete. correct installation. Reseat the Main Main Controller Controller Board (page 8-62). Board (page 8-62). 2. Does the error still occur? Phaser 3250 Laser Printer Service Manual 5-33... -
Page 169: Blank Page (2)
2. Does the error still occur? 1. Check the Main Controller Board for Replace the Complete. correct installation. Reseat the Main Main Controller Controller Board (page 8-62). Board (page 8-62). 2. Does the error still occur? 5-34 Phaser 3250 Laser Printer Service Manual... -
Page 170: Adjustments And Calibrations
Adjustments and Calibrations In this chapter... Adjustments Chapter... -
Page 171: Adjustments
Phaser 3250. Note Verify to ensure the Phaser 3250 printer driver has been installed. Altitude Specifications Prior to performing the altitude adjustment procedure, determine the altitude location of the printer and the appropriate value to be adjusted for the printer. -
Page 172: Adjusting Altitude
Altitude Adjustment window, from the pull-down menu, select the appropriate altitude information for the printer. Click the Apply button to change the altitude information. Click the Exit button to close the Printer Settings Utility window. Phaser 3250 Laser Printer Service Manual... - Page 173 Adjustments and Calibrations CentreWare IS Method (Network Connection) Open a web browser. Enter the printer’s IP address. CentreWare IS page is displayed. Click the Index button. Click the Altitude link. Phaser 3250 Laser Printer Service Manual...
- Page 174 Altitude Adj. From the pull down menu, select the appropriate altitude information for the printer. Click Save Changes to save the information. The Completion window is displayed. Click OK to close the window. Phaser 3250 Laser Printer Service Manual...
- Page 175 Adjustments and Calibrations Phaser 3250 Laser Printer Service Manual...
-
Page 176: Cleaning And Maintenance
Cleaning and Maintenance In this chapter... Service Maintenance Procedure Cleaning Maintenance Chapter... -
Page 177: Service Maintenance Procedure
Remove the Top Cover and clean the Main Fan to remove excess dust. Ensure that all cover vents are clean and free of obstructions. Remove any debris or foreign objects from the Print Cartridge, Fuser, Transfer Roller, Duplex Unit, and inside of the printer. Phaser 3250 Laser Printer Service Manual... -
Page 178: Cleaning The Print Cartridge
Print Cartridge to avoid damage. Open the Front Cover. Use a dry lint-free cloth to wipe any dust and/or spilled toner from the Print Cartridge area. Remove any paper debris from the area. s3250-036 Phaser 3250 Laser Printer Service Manual... -
Page 179: Cleaning The Laser Unit
Note It may be difficult to locate the strip of glass on the Laser Unit. Use a Q-tip to wipe the long strip of glass of the Laser Unit. Bottom of Laser Unit s3250-048 Phaser 3250 Laser Printer Service Manual... -
Page 180: Printing The Print Cleaning Page
Cleaning and Maintenance Printing the Print Cleaning Page There are two methods for printing the Print Cleaning page in Cleaning Mode. Control Panel Method CentreWare IS Method Phaser 3250 Laser Printer Service Manual... - Page 181 (in the User Guide) (in the Service Manual) s3250-074 A Cleaning Sheet is printed. CentreWare IS Method Open a web browser. Enter the printer’s IP address. CentreWare IS page is displayed. Click the Index button. Phaser 3250 Laser Printer Service Manual...
- Page 182 Click the Blue button. The status window is displayed. Click OK to close the window. Close the CentreWare IS window. The Green LED on the Control Panel starts blinking and a Cleaning Sheet a printed. Phaser 3250 Laser Printer Service Manual...
-
Page 183: Maintenance
Review proper printer operation using a customer file, if possible. Check with the customer regarding any special applications they may be using. Review with the customer all work that was performed and discuss proper printer care. Phaser 3250 Laser Printer Service Manual... -
Page 184: Service Parts Disassembly
Service Parts Disassembly In this chapter... Overview Maintenance Items and Consumables Covers Duplex Paper Feeder Xerographics Exit Guide Drive Electrical Options Chapter... -
Page 185: Overview
Transfer Roller (page 8-10) Pick-Up Roller (page 8-11) Fuser (page 8-13) Printer Assembly Covers (page 8-27) Duplex (page 8-37) Paper Feeder (page 8-38) Xerographics (page 8-57) Exit Guide (page 8-59) Drive (page 8-60) Electrical (page 8-62) Phaser 3250 Laser Printer Service Manual... -
Page 186: Standard Orientation Of The Printer
When needed, the orientation of the printer is called out in the procedure as an aid for locating the printer parts. The following illustration identifies the Front, Rear, Left, and Right sides of the printer. Rear Left Right Front s3250-037 Phaser 3250 Laser Printer Service Manual... -
Page 187: Preparation
Many parts are secured by plastic tabs. DO NOT over flex or force these parts. DO NOT over torque the screws threaded into plastic parts. Warning Unplug the AC power cord from the wall outlet before removing any printer part. Phaser 3250 Laser Printer Service Manual... -
Page 188: Notations In The Disassembly Text
Bold arrows in an illustration show direction of movement when removing or replacing a component. The notation “(tap, plastic, 10 mm)” or “(metal, 6 mm)” refer to the type of screw being removed. Note Provides information specific to the replacement of parts or assemblies. Phaser 3250 Laser Printer Service Manual... -
Page 189: Fastener Types
Always use the correct type and size screw. Using the wrong screw can damage tapped holes. Do not use excessive force to remove or install either a screw or a printer part. Phaser 3250 Laser Printer Service Manual... -
Page 190: Maintenance Items And Consumables
Print Cartridge to avoid damage. Do not touch the green surface underneath the Print Cartridge. Open the Front Cover. Push the Print Cartridge handle upward and pull the Print Cartridge out from the printer. s3250-038 Phaser 3250 Laser Printer Service Manual... -
Page 191: Tray Holder Pad (Pl11.1.14)
Press the Tray Holder Pad to the left and right to release the notches on the left and right sides. Notches s3250-039 Apply pressure on the Knock-Up P Plate while pressing the white tab to release Knock-Up P Plate. s3250-040 Phaser 3250 Laser Printer Service Manual... - Page 192 The Knock-Up P Plate is released from the hooks. s3250-041 While holding the Tray Holder Pad, use a flat tip screw driver to pry the Holder Pad notch up from the tray. Remove the Tray Holder Pad from the tray. s3250-047 Phaser 3250 Laser Printer Service Manual...
-
Page 193: Transfer Roller (Pl1.1.11)
Do not touch the sponge on the Transfer Roller area. Open the Front Cover. Push the Transfer Roller holder forward to release the Transfer Roller. s3250-049 Carefully lift the Transfer Roller up and remove it from the printer. s3250-144 8-10 Phaser 3250 Laser Printer Service Manual... -
Page 194: Mea Pick Up Unit (Pick-Up Roller) (Pl6.1.26)
Use a flat tip screwdriver to release the PMO Pick-Up Idle (PL6.1.23) latch from the Pick-Up Shaft (PL6.1.24). s3250-145 Slide the Pick-Up Idle toward the left side pass the groove on the shaft. Notch s3250-146 Phaser 3250 Laser Printer Service Manual 8-11... - Page 195 Slide the Pick-Up Stopper (PL6.1.25) toward the left side away from the Pick-Up Housing (PL6.1.26-3). Rotate the Pick-Up Rubber (PL6.1.26-1) and slide it out away from the shaft to remove the MEA Pick-Up Unit. s3250-147 8-12 Phaser 3250 Laser Printer Service Manual...
-
Page 196: Fuser (Pl9.1.0)
Remove the Duplex Unit (page 8-37). Remove the Rear Cover (page 8-28). Remove the Rear Guide Assembly (page 8-59). Remove the Top Cover (page 8-29). Disconnect the 3 wiring harness connectors. CN26 CN27 CN28 s3250-154 Phaser 3250 Laser Printer Service Manual 8-13... - Page 197 Service Parts Disassembly Remove the Rear Guide Assembly (page 8-59). Remove 4 screws securing the Fuser. Slide the Fuser out away from the printer. s3250-069 8-14 Phaser 3250 Laser Printer Service Manual...
-
Page 198: Thermistor Assembly (Pl9.1.5)
Remove the Rear Guide Assembly (page 8-59). Remove the Top Cover (page 8-29). Remove the Fuser (page 8-13). Remove the Thermistor’s wiring harness from the clips. Remove 1 screw securing the Thermistor. Remove the Thermistor Assembly. s3250-087 Phaser 3250 Laser Printer Service Manual 8-15... -
Page 199: Thermostat (Pl9.1.7)
Remove 2 screws securing the Thermostat to the Fuser Cover. Lift the Thermostat away from the Fuser Cover. Disconnect the left and right connectors from the wiring harnesses. Remove the Thermostat. Connectors s3250-088 8-16 Phaser 3250 Laser Printer Service Manual... -
Page 200: Heat Roller (Pl9.1.10)
Remove the Rear Cover (page 8-28). Remove the Rear Guide Assembly (page 8-59). Remove the Top Cover (page 8-29). Remove the Fuser (page 8-13). Release the latch to remove the Right Lamp Cap (PL9.1.32). s3250-089 Phaser 3250 Laser Printer Service Manual 8-17... - Page 201 User a pair of pliers to unhook the left and right ES Springs (PL9.1.29) securing the Fuser Frame (PL9.1.20) and the Fuser Cover (PL9.1.1). s3250-091 Remove the Fuser Frame with the Pressure Rollers (PL9.1.21/23) from the Fuser Cover. s3250-092 8-18 Phaser 3250 Laser Printer Service Manual...
- Page 202 Lamp, which could damage the Lamp. Slide the Halogen Lamp out away from the Heat Roller. s3250-094 Replacement Note Ensure the Bushings are placed in the correct position. Right Bushing s3250-095 Left Bushing s3250-096 Phaser 3250 Laser Printer Service Manual 8-19...
-
Page 203: Pressure Roller (#1) (Pl9.1.21)
Remove the Rear Cover (page 8-28). Remove the Rear Guide Assembly (page 8-59). Remove the Top Cover (page 8-29). Remove the Fuser (page 8-13). Release the latch to remove the Right Lamp Cap (PL9.1.32). s3250-089 8-20 Phaser 3250 Laser Printer Service Manual... - Page 204 On the wide open side of the Fuser Frame (PL9.1.20), slide the Pressure Roller out from the Fuser Frame. On the small open side of the Fuser Frame, slide the Pressure Roller out from the Bushing (PL9.1.22). s3250-097 Phaser 3250 Laser Printer Service Manual 8-21...
-
Page 205: Pressure Roller (#2) (Pl9.1.23)
Remove the Rear Cover (page 8-28). Remove the Rear Guide Assembly (page 8-59). Remove the Top Cover (page 8-29). Remove the Fuser (page 8-13). Release the latch to remove the Right Lamp Cap (PL9.1.32). s3250-089 8-22 Phaser 3250 Laser Printer Service Manual... - Page 206 User a pair of pliers to unhook the left and right ES Springs (PL9.1.29) securing the Fuser Frame (PL9.1.20) and the Fuser Cover (PL9.1.1). s3250-091 Slide the Pressure Roller #2 together with the Bushings (PL9.1.24) and the Springs (PL9.1.27) out away from the Fuser Frame. s3250-098 Phaser 3250 Laser Printer Service Manual 8-23...
-
Page 207: Halogen Lamp (Pl9.1.30)
Remove the Rear Cover (page 8-28). Remove the Rear Guide Assembly (page 8-59). Remove the Top Cover (page 8-29). Remove the Fuser (page 8-13). Release the latch to remove the Right Lamp Cap (PL9.1.32). s3250-089 8-24 Phaser 3250 Laser Printer Service Manual... - Page 208 User a pair of pliers to unhook the left and right ES Springs (PL9.1.29) securing the Fuser Frame (PL9.1.20) and the Fuser Cover (PL9.1.1). s3250-091 Remove the Fuser Frame with the Pressure Rollers (PL9.1.21/23) from the Fuser Cover. s3250-092 Phaser 3250 Laser Printer Service Manual 8-25...
- Page 209 Lamp, which could damage the Lamp. Slide the Halogen Lamp out away from the Heat Roller. s3250-094 Replacement Note Ensure the Bushings are placed in the correct position. Right Bushing s3250-095 Left Bushing s3250-096 8-26 Phaser 3250 Laser Printer Service Manual...
-
Page 210: Covers
Service Parts Disassembly Covers Front Cover (PL4.1.0) Remove Tray 1. Open the Front Cover. Carefully press the left or right latch inward to release the Front Cover from the notch. Remove the Front Cover. s3250-071 Phaser 3250 Laser Printer Service Manual 8-27... -
Page 211: Rear Cover (Pl5.1.0)
Rear Cover (PL5.1.0) Remove the Duplex Unit (page 8-37). Open the Rear Cover. Press the Rear Cover toward one side to release the notch from the printer frame. Remove the Rear Cover. Notches s3250-080 8-28 Phaser 3250 Laser Printer Service Manual... -
Page 212: Top Cover (Pl2.1.0)
Remove the Print Cartridge (page 8-10). Remove the Front Cover (page 8-27). Remove 2 screws securing the front side of the Top Cover. Release the left and right tabs on the Top Cover from the notches. s3250-081 Phaser 3250 Laser Printer Service Manual 8-29... - Page 213 Remove 2 screws securing the rear side of the Top Cover. s3250-082 Lift the Top Cover to release the right and left cover latches from the clips on the printer frame. Remove the Top Cover. Clips s3250-083 8-30 Phaser 3250 Laser Printer Service Manual...
- Page 214 Service Parts Disassembly Replacement Note Ensure that there are no wiring harnesses sitting in the clip area. s3250-084 Ensure the metal plate is seated behind the plastic tab of the Top Cover. Metal Plate s3250-085 Phaser 3250 Laser Printer Service Manual 8-31...
-
Page 215: Left Cover (Pl3.1.2)
Remove the Front Cover (page 8-27). Remove the Duplex Unit (page 8-37). Remove the Rear Cover (page 8-28). Remove the Top Cover (page 8-29). Release the 3 latches on the Left Cover from the printer frame. Latches s3250-086 8-32 Phaser 3250 Laser Printer Service Manual... - Page 216 Place the front side of the Left Cover at an angle to secure the latch of the Left Cover to the notch on the printer frame while sliding the Left Cover toward the printer. s3250-100 Phaser 3250 Laser Printer Service Manual 8-33...
-
Page 217: Right Cover (Pl3.1.3)
Remove the Front Cover (page 8-27). Remove the Duplex Unit (page 8-37). Remove the Rear Cover (page 8-28). Remove the Top Cover (page 8-29). Release the 3 latches on the Right Cover from the printer frame. Latches s3250-101 8-34 Phaser 3250 Laser Printer Service Manual... - Page 218 Place the front side of the Right Cover at an angle to secure the latch of the Right Cover to the notch on the printer frame while sliding the Right Cover toward the printer. s3250-103 Phaser 3250 Laser Printer Service Manual 8-35...
-
Page 219: Manual Feeder Cover (Pl4.1.3)
Open the Manual Feeder Cover. Push the Manual Feeder Cover at an angle toward the inside to release the left and right notches from the Front Cover. Remove the Manual Feeder Cover. s3250-104 8-36 Phaser 3250 Laser Printer Service Manual... -
Page 220: Duplex
Service Parts Disassembly Duplex Duplex Unit (PL1.1.13) Slide the Duplex Unit out of the printer. s3250-105 Phaser 3250 Laser Printer Service Manual 8-37... -
Page 221: Paper Feeder
Remove the Drive Assembly (page 8-60). Remove 3 screws securing the Feed Bracket (PL6.1.36). Remove the Feed Bracket. Disconnect the black and gray wiring harness connector CN32. Remove the black spacer and the Registration Clutch. CN32 s3250-106 8-38 Phaser 3250 Laser Printer Service Manual... -
Page 222: Pick-Up Solenoid (Pl6.1.37)
Remove the Drive Assembly (page 8-60). Remove the Registration Clutch (page 8-38). Disconnect the black and gray wiring harness connector CN33. Remove 1 screw securing the Pick-Up Solenoid and remove the Pick-Up Solenoid. CN33 s3250-108 Phaser 3250 Laser Printer Service Manual 8-39... -
Page 223: Feed Roller (Registration Roller) (Pl6.1.20)
Remove the Pick-Up Solenoid (page 8-39). Remove the HVPS (page 8-64). Remove the LVPS (page 8-67). Remove the LVPS Shield (page 8-69). Remove 3 screws securing the Swing Bracket (PL6.1.16). Remove the Swing Bracket. s3250-109 8-40 Phaser 3250 Laser Printer Service Manual... - Page 224 Remove the Swing Collar (PL6.1.15), the RDCN 23/23 Gear (PL6.1.14), and the MEA Swing Unit (PL6.1.13). s3250-110 Remove the Gear and 1 screw securing the Regi Holder (PL6.1.12) and remove the Regi Holder. s3250-111 Phaser 3250 Laser Printer Service Manual 8-41...
- Page 225 Remove 2 screws securing the Idle Feed Shaft (PL6.1.97) and remove the Feed Shaft together with the Springs and Bushings. s3250-112 Use a flat tip screw driver to pry the Feed Roller up and away from the printer. Remove the Feed Roller. s3250-113 8-42 Phaser 3250 Laser Printer Service Manual...
-
Page 226: Feed Roller (Pl6.1.83)
Remove the Top Cover (page 8-29). Remove the Left Cover (page 8-32). Remove the Right Cover (page 8-34). Remove the Drive Assembly (page 8-60). Remove 3 screws securing the Feed Bracket (PL6.1.36). Remove the Feed Bracket. s3250-115 Phaser 3250 Laser Printer Service Manual 8-43... - Page 227 Service Parts Disassembly Remove the Exit Idle Gear (PL6.1.34) and the RDCN 24/19 Fee Gear (PL6.1.35). Release the Feed Roller from the clips and remove the Feed Roller. s3250-114 8-44 Phaser 3250 Laser Printer Service Manual...
-
Page 228: Feed Actuator (Pl6.1.72)
Open the Front Cover. Remove the Print Cartridge (page 8-10). Remove the Duplex Unit (page 8-37). Place the printer on its right side. Remove 2 screws securing the Duplex Path Frame (PL6.1.77). s3250-117 Phaser 3250 Laser Printer Service Manual 8-45... - Page 229 Service Parts Disassembly Press the latch to release the Feed Actuator from the printer frame. Latch s3250-118 8-46 Phaser 3250 Laser Printer Service Manual...
-
Page 230: Duplex Actuator (Pl6.1.73)
Open the Front Cover. Remove the Print Cartridge (page 8-10). Remove the Duplex Unit (page 8-37). Place the printer on its right side. Remove 2 screws securing the Duplex Path Frame (PL6.1.77). s3250-117 Phaser 3250 Laser Printer Service Manual 8-47... - Page 231 Service Parts Disassembly Press the latch to release the Duplex Actuator from the printer frame. Latch s3250-119 8-48 Phaser 3250 Laser Printer Service Manual...
-
Page 232: Feed Sensor (Photo Interrupter) (Pl6.1.75)
Open the Front Cover. Remove the Print Cartridge (page 8-10). Remove the Duplex Unit (page 8-37). Place the printer on its right side. Remove 2 screws securing the Duplex Path Frame (PL6.1.77). s3250-117 Phaser 3250 Laser Printer Service Manual 8-49... - Page 233 Service Parts Disassembly Remove the Feed Actuator (page 8-45). Disconnect the Feed Sensor wiring harness connector. Remove the Feed Sensor. s3250-120 8-50 Phaser 3250 Laser Printer Service Manual...
-
Page 234: Empty Sensor (Photo Interrupter) (Pl6.1.75)
Open the Front Cover. Remove the Print Cartridge (page 8-10). Remove the Duplex Unit (page 8-37). Place the printer on its right side. Remove 2 screws securing the Duplex Path Frame (PL6.1.77). s3250-117 Phaser 3250 Laser Printer Service Manual 8-51... - Page 235 Service Parts Disassembly Remove the Duplex Actuator (page 8-47). Disconnect the Empty Sensor wiring harness connector. Remove the Empty Sensor. Latch s3250-121 8-52 Phaser 3250 Laser Printer Service Manual...
-
Page 236: Empty Actuator (Pl6.1.84)
Remove the Top Cover (page 8-29). Remove the Left Cover (page 8-32). Remove the Drive Assembly (page 8-60). Remove the Feed Roller (page 8-43). Slide the Empty Actuator out from the Feed Roller. s3250-150 Phaser 3250 Laser Printer Service Manual 8-53... -
Page 237: Exit Actuator (Pl9.1.19)
Remove the Duplex Unit (page 8-37). Remove the Rear Cover (page 8-28). Remove the Rear Guide Assembly (page 8-59). Remove the Top Cover (page 8-29). Remove the Fuser (page 8-13). Remove the Exit Actuator. s3250-149 8-54 Phaser 3250 Laser Printer Service Manual... -
Page 238: Exit Sensor (Photo Interrupter) (Pl9.1.37)
Remove the Rear Cover (page 8-28). Remove the Rear Guide Assembly (page 8-59). Remove the Top Cover (page 8-29). Remove the Fuser (page 8-13). Release the latch to remove the Right Lamp Cap (PL9.1.32). s3250-089 Phaser 3250 Laser Printer Service Manual 8-55... - Page 239 Service Parts Disassembly Release the latch securing the Exit Sensor and remove the Exit Sensor. s3250-148 8-56 Phaser 3250 Laser Printer Service Manual...
-
Page 240: Xerographics
Remove the Rear Cover (page 8-28). Remove the Top Cover (page 8-29). Remove the Right Cover (page 8-34). Disconnect the Laser Unit wiring harness CN1 connector. Remove 4 screws securing the Laser Unit. Remove the Laser Unit. s3250-122 Phaser 3250 Laser Printer Service Manual 8-57... -
Page 241: Crum Board (Pl6.1.53)
Remove the Top Cover (page 8-29). Remove the Right Cover (page 8-34). Remove the Laser Unit (page 8-57). Disconnect the CRUM Board wiring harness connector. Remove 1 screw securing the CRUM Board. Remove the CRUM Board. s3250-123 8-58 Phaser 3250 Laser Printer Service Manual... -
Page 242: Exit Guide
Open the Rear Guide Assembly. Push the Rear Guide Assembly toward one side to release the notch from the printer frame. Slide the Rear Guide Assembly out to remove the Guide Assembly. s3250-124 Phaser 3250 Laser Printer Service Manual 8-59... -
Page 243: Drive
Remove the Front Cover (page 8-27). Remove the Duplex Unit (page 8-37). Remove the Rear Cover (page 8-28). Remove the Top Cover (page 8-29). Remove the Left Cover (page 8-32). Remove 7 screws securing the Drive Assembly. s3250-046 8-60 Phaser 3250 Laser Printer Service Manual... - Page 244 Service Parts Disassembly Disconnect the Drive Assembly wiring harness connector and remove the Drive Assembly. CN19 s3250-125 Replacement Note Ensure to secure the 7 screws in the order (1-7). s3250-046 Phaser 3250 Laser Printer Service Manual 8-61...
-
Page 245: Electrical
Remove the Rear Cover (page 8-28). Remove the Top Cover (page 8-29). Remove the Right Cover (page 8-34). Disconnect all the wiring harness connectors. Remove 4 screws securing the Main Controller Board. Remove the Main Controller Board. s3250-126 8-62 Phaser 3250 Laser Printer Service Manual... -
Page 246: Controller Shield (Pl1.1.1)
Remove 2 screws securing the Controller Shield. s3250-127 Wiggle the Controller Shield to release the Controller Shield from the printer frame. Replacement Note Ensure to secure the ground wire between the Controller Shield and the screw. Phaser 3250 Laser Printer Service Manual 8-63... -
Page 247: High Voltage Power Supply (Hvps) (Pl1.1.3)
Remove the Front Cover (page 8-27). Remove the Duplex Unit (page 8-37). Remove the Rear Cover (page 8-28). Remove the Top Cover (page 8-29). Remove the Right Cover (page 8-34). Remove 6 screws securing the HVPS. s3250-128 8-64 Phaser 3250 Laser Printer Service Manual... - Page 248 Disconnect 1 wiring harness connector. Remove the HVPS. s3250-129 Replacement Note Ensure to secure the 6 screws in order (1-6). Be careful not to drop the 4 Contact Springs (PL6.1.6.2) on the printer frame. s3250-130 Phaser 3250 Laser Printer Service Manual 8-65...
- Page 249 Make sure the Switch Actuator does not interfere with the Link Cover Rear (PL6.6.111) 2 pt s3250-155 Rear Link Cover with MEA Unit Guide Rear in Down Position (Correct) s3250-132 Rear Link Cover with MEA Unit Guide Rear in Up Position (Incorrect) s3250-131 8-66 Phaser 3250 Laser Printer Service Manual...
-
Page 250: Low Voltage Power Supply (Lvps) (Pl1.1.4)
Remove the Right Cover (page 8-34). Remove the Main Controller Board (page 8-62). Remove the Controller Shield (page 8-63). Disconnect the 3 wiring harness connectors. Remove 4 screws securing the LVPS. Remove the LVPS. CON2 CON1 CON3 s3250-133 Phaser 3250 Laser Printer Service Manual 8-67... - Page 251 Service Parts Disassembly Replacement Note Ensure to attach the LVPS Insulation to the LVPS Shield prior to installing the LVPS. s3250-134 8-68 Phaser 3250 Laser Printer Service Manual...
-
Page 252: Lvps Shield (Pl6.1.64)
Remove the HVPS (page 8-64). Remove the LVPS (page 8-67). Remove the LVPS Insulation (PL6.1.65). Remove 1 screw (silver) securing the ground wire and 2 screws (black) securing the LVPS Shield. Remove the LVPS Shield. s3250-135 Phaser 3250 Laser Printer Service Manual 8-69... - Page 253 Service Parts Disassembly Replacement Note Ensure to attach the LVPS Insulation to the LVPS Shield. s3250-134 8-70 Phaser 3250 Laser Printer Service Manual...
-
Page 254: Main Fan (Pl6.1.5)
Remove the Rear Cover (page 8-28). Remove the Top Cover (page 8-29). Remove the Right Cover (page 8-34). Remove the Laser Unit (page 8-57). Disconnect the red and black wiring harness connector CN12. CN12 s3250-136 Phaser 3250 Laser Printer Service Manual 8-71... - Page 255 Service Parts Disassembly From the inside of the printer, push the Main Fan out and remove the Fan. s3250-137 8-72 Phaser 3250 Laser Printer Service Manual...
-
Page 256: Dc Fan (Laser Unit Fan) (Pl6.1.39)
Remove the Rear Cover (page 8-28). Remove the Top Cover (page 8-29). Remove the Left Cover (page 8-32). Remove the Laser Unit (page 8-57). Disconnect the red and black wiring harness connector CN20. CN20 s3250-138 Phaser 3250 Laser Printer Service Manual 8-73... - Page 257 Service Parts Disassembly From the inside of the printer, push the DC Fan out. s3250-139 Remove the DC Fan. CN20 s3250-138 8-74 Phaser 3250 Laser Printer Service Manual...
-
Page 258: Led Board (Pl6.1.44)
Remove the Duplex Unit (page 8-37). Remove the Rear Cover (page 8-28). Remove the Top Cover (page 8-29). Disconnect the LED Board wiring harness connector. Remove 1 screw securing the LED Board. Remove the LED Board. CN31 s3250-140 Phaser 3250 Laser Printer Service Manual 8-75... -
Page 259: Main Zener Board (Pl6.1.3)
Remove the Right Cover (page 8-34). Remove the Main Controller Board (page 8-62). Remove the Controller Shield (page 8-63). Remove 1 screw securing the Main ZENER Board. Remove the Main ZENER Board. s3250-143 8-76 Phaser 3250 Laser Printer Service Manual... -
Page 260: Options
Unplug all cables from the printer. Release the memory card cover latch and remove the Cover. s3250-141 Release the left and right latches securing the Memory Card and remove the Memory Card. s3250-142 Phaser 3250 Laser Printer Service Manual 8-77... -
Page 261: Optional 250-Sheet Feeder (Pl1.1.18)
Service Parts Disassembly Optional 250-Sheet Feeder (PL1.1.18) Caution Use care when removing the printer from the Optional 250-Sheet Feeder. Disconnect the Tray 2 cable. s3250-152 Carefully lift the printer from the Optional 250-Sheet Feeder. s3250-153 8-78 Phaser 3250 Laser Printer Service Manual... -
Page 262: Parts List
Parts List In this chapter... Serial Number Format Using the Parts List Print Engine Parts Options Xerox Supplies and Accessories Chapter... -
Page 263: Serial Number Format
Parts List Serial Number Format Changes to Xerox products are made to accommodate improved components as they become available. It is important when ordering parts to include the following information: Component's part number Product type or model number Serial Number of the printer The serial number is found on a label located on the frame of the printer.. - Page 264 Parts List Example MXV85501: Xerox Serial Number MVX: Product Code for the Phaser 3250, configuration D or DN, 110V printer 85501 = Serial Number for 3250_D Serial Number Label and Location Phaser™ 3250D Xerox Corporation Manufactured: JUNE 2008 CLASS 1 LASER PRODUCT Serial No.: MXV85501...
-
Page 265: Using The Parts List
J2 is attached to the other end that is plugged into P2. Note Only parts showing part numbers are available for ordering by support. Parts not showing part numbers are available on the parent assembly. Abbreviations Abbreviation Meaning C-ring E-ring K-clip Screw Phaser 3250 Laser Printer Service Manual... -
Page 266: Print Engine Parts
Parts List Print Engine Parts Parts List 1.1 Main 14-2 14-1 16-3 16-1 16-2 16-4 s3250-056 Phaser 3250 Laser Printer Service Manual... - Page 267 MEA Unit Cassette 050N00521 ELA Unit SCF (Optional Tray 2) 098N02194 CBF-Power Cord, 110V 105N02072 CBF-Power Cord, 220V 117N01769 ELA HOU-DEVE (Print Cartridge - 3.5K) 106R01373 ELA HOU-DEVE (Print Cartridge - 5K) 106R01374 Cover Top Upper Phaser 3250 Laser Printer Service Manual...
-
Page 268: Parts List 2.1 Top Cover
Parts List Parts List 2.1 Top Cover s3250-066 Phaser 3250 Laser Printer Service Manual... - Page 269 MEA Unit Cover Top (P3250DN) 002N02738 Cover Top Lower 002N02739 Stacker Large PMO Sub M-Stacker Stacker Small Cover Top Upper Badge Xerox Lens LED Spring CS Key On-Line Screw Taptite Sponge Cover Top (not shown) Phaser 3250 Laser Printer Service Manual...
-
Page 270: Parts List 3.1 Cover Assembly
Parts List Parts List 3.1 Cover Assembly s3250-067 Phaser 3250 Laser Printer Service Manual... - Page 271 MEA Unit Cover Front 002N02735 MEA Unit Cover Left 002N02731 MEA Unit Cover Right (P3250D) 002N02733 MEA Unit Cover Right (P3250DN) 002N02733 3-1. Cover Right 3-2. Cover Right DIMM MEA Unit Cover Rear 002N02734 9-10 Phaser 3250 Laser Printer Service Manual...
-
Page 272: Parts List 4.1 Front Cover
Parts List Parts List 4.1 Front Cover s3250-070 Phaser 3250 Laser Printer Service Manual 9-11... - Page 273 Parts List Parts List 4.1 Front Cover ID No. Name/Description Part Number MEA Unit Cover Front 002N02735 Cover Front Locker Latch Push Cover Manual Bracket Manual Screw Taptite 9-12 Phaser 3250 Laser Printer Service Manual...
-
Page 274: Parts List 5.1 Rear Cover
Parts List Parts List 5.1 Rear Cover s3250-065 Phaser 3250 Laser Printer Service Manual 9-13... - Page 275 Parts List Parts List 5.1 Rear Cover ID No. Name/Description Part Number MEA Unit Cover Rear 002N02734 Cover Rear Guide Change DUP 9-14 Phaser 3250 Laser Printer Service Manual...
-
Page 276: Parts List 6.1 Frame
Parts List Parts List 6.1 Frame 55 56 57 54-3 49 48 54-2 54-1 54-4 21-2 21-1 21-3 13-1 12 13 14 15 16 26-1 26-2 26-3 s3250-059 Phaser 3250 Laser Printer Service Manual 9-15... -
Page 277: Parts List 6.1 Frame (Continued)
Parts List Parts List 6.1 Frame (continued) s3250-060 9-16 Phaser 3250 Laser Printer Service Manual... - Page 278 PMO Idle Pick-Up Shaft-P Pick-Up Stopper-M Pick-Up R2 MEA Unit Pick-Up 130N01540 26-1. Rubber Pick-Up 26-2. Housing-M Pick-Up 2-R2 26-3. Housing-M Pick-Up R2 Bush-M Pick-Up R Shaft Feed Gear Feed DR 16 Ground Guide TR Phaser 3250 Laser Printer Service Manual 9-17...
- Page 279 Roller Exit Main 54-3. Roller Exit FR 54-4. Spring CS Gear-M Exit PMO Bearing Shaft Support Roller ----- Roller Exit F/Down ----- ----- ----- Shield Controller Shield SMPS (LVPS) Insulation SMPS (LVPS) Foot ML80 9-18 Phaser 3250 Laser Printer Service Manual...
- Page 280 Shaft Feed Idle Bush-M Feed Idle Spring ETC-TR 100. Plate-P Push Bushing 101. PMO Plate Guide DEVE-L 102. Spring ETC-Guide DEVE 103. PMO-Plate Guide DEVE-R 104. Spring TR 105. Bush TR-L 106. Terminal Spring TR Phaser 3250 Laser Printer Service Manual 9-19...
- Page 281 Spring ETC-ES (Guide Holder TR) 110. Holder Transfer 111. Link Cover Rear 112. Spring CS 113. ELA Unit Fuser (110V) 126N00295 ELA Unit Fuser (220V) 126N00296 114. MEA Unit Guide Rear 032N00491 115. Bush 4 9-20 Phaser 3250 Laser Printer Service Manual...
-
Page 282: Parts List 7.1 Main Drive
Parts List Parts List 7.1 Main Drive s3250-064 Phaser 3250 Laser Printer Service Manual 9-21... - Page 283 Gear Pick Up Idle 31 Gear RDCN 52/18 Gear OPC Clutch 29 Gear Fuser DR OUT 37 Washer Plain Bracket Motor Motor BLDC Screw Taptite ----- ----- Ring C Hub Clutch Spring Clutch 9-22 Phaser 3250 Laser Printer Service Manual...
-
Page 284: Parts List 8.1 Rear Guide
Parts List Parts List 8.1 Rear Guide s3250-062 Phaser 3250 Laser Printer Service Manual 9-23... - Page 285 Parts List Parts List 8.1 Rear Guide ID No. Name/Description Part Number MEA Unit Guide Rear 032N00491 Guide Rear Roller Idle Exit Bush TX Shaft Exit-F/Up Gear Exit Rubber Exit-F/Up 9-24 Phaser 3250 Laser Printer Service Manual...
-
Page 286: Parts List 9.1 Fuser
Parts List Parts List 9.1 Fuser 24 27 s3250-061 Phaser 3250 Laser Printer Service Manual 9-25... - Page 287 Spring CS Ring-C Spring ES Lamp Halogen, 110V 122N00269 Lamp Halogen, 220V 122N00270 CAP Lamp-L CAP Lamp-R Gear Fuser RDCN 28-20 Gear MPF 5 Washer Plain Ring CS Photo Interrupter (Exit Sensor) 130N01274 9-26 Phaser 3250 Laser Printer Service Manual...
-
Page 288: Parts List 10.1 Duplex Unit
Parts List Parts List 10.1 Duplex Unit 17 18 12-1 12-2 12-1 12-2 s3250-057 Phaser 3250 Laser Printer Service Manual 9-27... - Page 289 Gear Exit F/Down Belt Timing Gear Belt Timing Gear ELA Unit Roller-DUP 12-1. Roller Feed-DUP 12-2. Ring-C Bracket Duplex-Align Screw Tapping Guide Duplex-Upper Roller M-Idle-DUP PCT-SILP Washer Shaft Idle Roll, DUP Spring-TS Screw Taptite 9-28 Phaser 3250 Laser Printer Service Manual...
-
Page 290: Parts List 11.1 Tray 1
Parts List Parts List 11.1 Tray 1 14-4 14-3 14-2 14-1 14-5 14-6 s3250-058 Phaser 3250 Laser Printer Service Manual 9-29... - Page 291 RPR-Friction Pad 14-3. Plate Pad 14-4. Sheet Pad 14-5. Ground Pad 14-6. Spring ETC Exit Roll FD Housing Holder Pad Cover Handle-Cassette Spring-ES Roller-M Idle Feed Screw Taptite Indicator Paper Sheet Guide-Side-Far Sheet Guide-Side-Near 9-30 Phaser 3250 Laser Printer Service Manual...
-
Page 292: Options
11-5 11-28 11-8 11-25 11-9 11-27 11-10 11-7 11-26 11-20 11-30 11-11 11-9 11-21 11-5 11-29 10-1 11-19 11-18 10-2 11-22 11-10 11-13 11-18 11-23 10-3 11-15 11-14 11-24 11-19 11-17 11-12 s3250-063 Phaser 3250 Laser Printer Service Manual 9-31... - Page 293 Screw Taptite 11-5. PMO Locker CST 11-6. PMO Actuator Empty 11-7. Sheet Brush 11-8. MEC Brush Antistatic 11-9. Foot ML80 11-10. Foot Front 11-11. Cover Harness-SCF 11-12. Cover M-SIMM R2 11-13. PBA SCF 9-32 Phaser 3250 Laser Printer Service Manual...
-
Page 294: Parts List 12.1 Tray 2
11-24. PMO Bushing Feed 11-25. CAM M Pick-Up 11-26. Spring-TS 11-27. Gear Feed 2 11-28. Ring CS; ID3, OD3, T0.25, Black, SU 11-29. PMO Gear Pick-Up B 11-30. Gear Pick-Up A 11-31. Spring-TS Phaser 3250 Laser Printer Service Manual 9-33... -
Page 295: Xerox Supplies And Accessories
128 MB DDR2 Memory (1x 128 MB) 098N02195 PL12.1.0 Optional 250-Sheet Feeder 098N02194 Power Cords Description Part Number CBF-Power Cord, 110V 105N02072 CBF-Power Cord, 220V 117N01769 Tools Parts List Part Number Reference Description Toner Vacuum 003-1496-00 9-34 Phaser 3250 Laser Printer Service Manual... -
Page 296: Plug/Jack And Wiring Diagrams
Plug/Jack and Wiring Diagrams In this chapter... Plug/Jack Diagrams and Designators Plug/Jack Locators Notations Used in the Wiring Diagrams Print Engine Wiring Diagrams Chapter... -
Page 297: Plug/Jack Diagrams And Designators
Connects the the Main Controller Board and the Thermistor (part of the Fuser). Connects the Main Controller Board and the Exit Sensor. 1, 5 Connects the Main Controller Board and the Developer Unit CRUM. 10-2 Phaser 3250 Laser Printer Service Manual... - Page 298 Connects the Fuser and the Main Controller Board. CN28 Connects the Exit Sensor and the Main Controller Board. CN29 Connects the Developer Unit CRUM and the Main Controller Board. CN30 Connects the Optional Tray 2 and the Main Controller Board. Phaser 3250 Laser Printer Service Manual 10-3...
- Page 299 Connects the Pick-Up Solenoid and the Main Controller Board. CON1 Connects the LVPS and the AC Inlet. CON2 Connects the LVPS and the Fuser. CON3 Connects the LVPS and the Main Controller Board. 10-4 Phaser 3250 Laser Printer Service Manual...
-
Page 300: Plug/Jack Locators
Map 6 - Main Motor, Interlock Switch, Fans, and Sensors Map 7 - LVPS, HVPS, Fuser, Developer Unit CRUM, and Power Switch Map 8 - Laser Unit Map 9 - Optional Tray 2 and Control Panel Phaser 3250 Laser Printer Service Manual 10-5... -
Page 301: Map 1 - Main Controller Board
CN1 LSU CN6 Thermistor CN8 CRUM Exit Sensor CN12 Main Fan CN10 LVPS CN17 DCU Ethernet CN11 USB CN15 RAM DIMM CN2 Main Motor Pick Up Solenoid CN14 Optional Tray 2 Registration Clutch s3250-017 10-6 Phaser 3250 Laser Printer Service Manual... -
Page 302: Map 2 - Hvps
Plug/Jack and Wiring Diagrams Map 2 - HVPS CN1 Main Controller Board Front Cover Open Switch Rear Cover Open Switch Supply Developer Varistor s3250-019 Phaser 3250 Laser Printer Service Manual 10-7... -
Page 303: Map 3 - Lvps
Plug/Jack and Wiring Diagrams Map 3 - LVPS CON3 Main Board CON2 Fuser CON1 AC Inlet s3250-020 10-8 Phaser 3250 Laser Printer Service Manual... -
Page 304: Map 4 - Fuser
Plug/Jack and Wiring Diagrams Map 4 - Fuser CN26 CN27 CN28 s3250-068 Phaser 3250 Laser Printer Service Manual 10-9... -
Page 305: Notations Used In The Wiring Diagrams
Jumper Denotes the parts. PL X.Y.Z implies the item “Z” of plate (PL) “X.Y” Fuser in Parts List. PL X.Y.Z Subassembly 1 Denotes functional parts attached with functional parts name. Heater Subassembly 2 10-10 Phaser 3250 Laser Printer Service Manual... - Page 306 The given voltage is for signal in high status. The arrow indicates the direction of signal. Function Logic 2 Denotes a connection between wires. Connection of Wires Denotes a Clutch or Solenoid. Solenoid/Clutch Denotes a Motor. Motor Phaser 3250 Laser Printer Service Manual 10-11...
- Page 307 Interconnection, Conductive Part I/L +24 VDC Denotes DC voltage when the Interlock Switch in the MCU Board turns On. +5 VDC Denotes DC voltage. +3.3 VDC Denotes signal ground. Denotes analog ground. Denotes return. 10-12 Phaser 3250 Laser Printer Service Manual...
-
Page 308: Print Engine Wiring Diagrams
Developer Unit Paper Empty CN29 CN23 CRUM Sensor Ethernet Duplex CN13 CN24 Registration CN11 USB Sensor Optional CN14 CN30 Paper Feed Tray 2 CN25 Sensor CN15 RAM DIMM CN17 CN31 Control Panel CN18 s3250-029 Phaser 3250 Laser Printer Service Manual 10-13... -
Page 309: Map 6 - Main Motor, Interlock Switch, Fans, And Sensors
(Laser Unit Fan) Laser Unit Interlock Switch +5VDC LSU_5V +24VDC CN12 FAN_MAIN Main Fan +24VDC +3.3VDC CN13 CN23 +3.3VDC Paper Empty Sensor DUX_SENS CN24 +3.3VDC Duplex Registration REGI_SENS Sensor CN25 +3.3VDC Feed Sensor FEED_SENS s3250-030 10-14 Phaser 3250 Laser Printer Service Manual... -
Page 310: Map 7 - Lvps, Hvps, Fuser, Developer Unit Crum, And Power Switch
CN26 Fuser +5VDC +5VDC +5VDC CN27 THER1 THER2 Exit Sensor CN28 +3.3VDC PAPER_EXIT HVPS PWM_DEV_DC PWM_MHV THV_READ PWM_MHV nTHV_EN PWM_THV +5VDC +24VDC +24VDC Supply +24VDC CN29 Developer Unit DEV_CLK CRUM DEV_DIO +3.3VDC s3250-031 Phaser 3250 Laser Printer Service Manual 10-15... -
Page 311: Map 8 - Laser Unit
Board Laser Unit +24VDC +24VAC P_MOT_EN LSU_RDY P_MOT_CLK LD_EN LD_POWER1 HSYNC1 LSU_SH1 VDO1_minus VDO1_plus LSU_5V Ethernet +3.3VDC +3.3VAC +3.3VAC +3.3V P/U LED2 +3.3V P/U LED1 CN11 VBUS +3.3VDC CN17 +3.3VAC DCU_DATA DCU_CLK s3250-032 10-16 Phaser 3250 Laser Printer Service Manual... -
Page 312: Map 9 - Optional Tray 2 And Control Panel
Map 9 - Optional Tray 2 and Control Panel Main Controller Board +24VDC Optional Tray 2 CN14 CN30 +3.3VDC +24VAC +3.3VAC +3.3VAC SCF_RXD nSCF_DET SCF_TXD Control Panel CN18 CN31 KEYCLIK LED_T LED_E LED_R s3250-033 Phaser 3250 Laser Printer Service Manual 10-17... - Page 313 Plug/Jack and Wiring Diagrams 10-18 Phaser 3250 Laser Printer Service Manual...
- Page 314 Reference Contents... Phaser 3250 Menu Map Updating Firmware Resetting Firmware Acronyms and Abbreviations Appendix...
-
Page 315: Phaser 3250 Menu Map
PostScript (-) EPSON (-) Font: SANSERIF Print PS Error: On Typeface: PCL1 Character Set: USA Symbol: PC8 Character Tab: PC437US Courier: Regular Pitch: 10 Pitch: 10.00 LPI: 6 Lines: 60 Auto Wrap: On s3250-079 Phaser 3250 Laser Printer Service Manual... -
Page 316: Updating Firmware
Reference Updating Firmware Down load the applicable files from the Xerox support web site. Unzip (decompress) the files. Be sure your appropriate firmware updating option (Network or USB) is available and connected. Reboot the printer. Network Connection Ensure the printer is connected to the computer with a network connection. - Page 317 A processing window is displayed. Click OK to close the status window when the firmware upgrade is complete. Print a Configuration page and verify the firmware information. Phaser 3250 Laser Printer Service Manual...
-
Page 318: Usb Connection
On the printer’s Control Panel, the red LED starts blinking. When firmware update is complete, the red LED on the printer’s Control Panel stops blinking. The printer makes a “click” sound. Print a Configuration page and verify the firmware information. Phaser 3250 Laser Printer Service Manual... -
Page 319: Resetting Firmware
Turn the printer power Off and back On. Restoring Printer Setting and Network Setting (Network Connection) Two Restore options are available for the Phaser 3250: Restore Printer Default and Restore Network Default. Restore Printer Default – This funtion restores all printer related settings (Power Save, Print Mode Settings, PCL, PostScript, Epson Settings, Troubleshoot, Margins). - Page 320 Resets. Resets window is displayed. Select the appropriate option to restore the printer information. Click Restore Defaults. Microsoft Internet Explorer window is displayed confirming restoring the Printer Default/Network Default information. Click OK. Printer Default Phaser 3250 Laser Printer Service Manual...
- Page 321 Reference Network Default For Restoring Network Default, a message window is displayed. Click OK. The Completion window is displayed. Click OK to close the window. The printer is turned Off. Turn On the printer. Phaser 3250 Laser Printer Service Manual...
-
Page 322: Acronyms And Abbreviations
Machine converts AC power from power source to DC power. Diagnostic Control Unit DDR2 DIMM Double Data Rate Dual In-Line Memory Module DEVE Developer DHCP Dynamic Host Configuration Protocol DIMM Dual In-line Memory Module Phaser 3250 Laser Printer Service Manual... - Page 323 Humidity HVPS High-Voltage Power Supply Hertz (cycles per second) Integrated Circuit International Electrotechnical Commission Interface Image Processor Image Per Minute Internet Printing Protocol Image Quality Kilo Byte Local Area Network Liquid Crystal Display A-10 Phaser 3250 Laser Printer Service Manual...
- Page 324 Printer Job Language Parts List PostScript Printer Description Pages Per Minute Pulses Per Second PostScript Pre-Transfer Lamp Print Volume Management PWBA Printed Wiring Board Assembly Pulse Width Modulation Random Access Memory Relative Humidity Phaser 3250 Laser Printer Service Manual A-11...
- Page 325 Short-Edge Feed SMPS Switching Mode Power Supply Sensor Solenoid Start of Scan SPOOL Simultaneous Peripheral Operations Online Soft Touch Sensor SYNC Synchronous or Synchronization Transfer High Voltage Toner User Interface Universal Serial Bus A-12 Phaser 3250 Laser Printer Service Manual...
- Page 326 8-38 P/J location, 10-6 wiring diagram, 10-13, 10-14 part number, 9-18 Configuration page removal, 8-73 information, 1-34 wiring diagram, 10-13, 10-14 print method, 1-26 Demo page information, 1-32 print method, 1-26 Phaser 3250 Laser Printer Service Manual I – 1...
- Page 327 Open Heat, 2-25 Over Heat, 2-26 DC Fan recovery, 2-26 P/J location, 10-6 Heat Roller part number, 9-18 operation, 2-10, 2-25 removal, 8-73 part number, 9-26 wiring diagram, 10-14 removal, 8-17 I – 2 Phaser 3250 Laser Printer Service Manual...
- Page 328 P/J location, 10-8 removal, 8-77 part number, 9-6 specifications, 1-11, 2-15 removal, 8-67 supported types, 1-8, 1-11 wiring diagram, 10-13, 10-15 Menu Map LVPS Shield information, 1-33, A-2 removal, 8-69 print method, 1-26 Phaser 3250 Laser Printer Service Manual I – 3...
- Page 329 4-14 Laser Unit, 10-6 fonts, 1-3 LVPS, 10-8 power Main Controller Board, 10-6 consumption, 1-13, 2-23 Main Fan, 10-6 requirements, 1-13 Main Motor, 10-6 Save Mode, 1-21 Paper Empty Sensor, 10-6 I – 4 Phaser 3250 Laser Printer Service Manual...
- Page 330 2-10 resolution, 1-3, 1-11 Pressure Roller #1 restore setting, A-6 part number, 9-26 serial number, 9-2 removal, 8-20 Printer Settings Utility, 1-23 Pressure Roller #2 part number, 9-26 removal, 8-22 Phaser 3250 Laser Printer Service Manual I – 5...
- Page 331 9-34 maintenance items, 9-34 voltage options, 9-34 in-rush current, 1-13 Power Cords, 9-34 leakage current, 1-13 tools, 9-34 power consumption, 1-13, 2-23 World Kit, 9-34 power supply, 1-13 I – 6 Phaser 3250 Laser Printer Service Manual...
- Page 332 Control Panel, 10-17 Paper Empty Sensor, 10-14 CRUM Board, 10-15 Pick-Up Solenoid, 10-14 DC Fan, 10-14 power switch, 10-15 Duplex Registration Sensor, 10-14 Registration Clutch, 10-14 Exit Sensor, 10-15 symbols, 10-10 Phaser 3250 Laser Printer Service Manual I – 7...
- Page 333 I – 8 Phaser 3250 Laser Printer Service Manual...
- Page 335 701P47817...
Need help?
Do you have a question about the Phaser 3250 and is the answer not in the manual?
Questions and answers