Table of Contents
Advertisement
Advertisement
Table of Contents

Subscribe to Our Youtube Channel
Related Manuals for Epygi Quadro M32x


Summary of Contents for Epygi Quadro M32x
- Page 2 (ii) external power sources such as a power line, telephone line, or connected equipment; (iii) products that have been serviced or modified by a party other than Epygi or an authorized Epygi service center; (iv) products that have had their original manufacturer’s serial numbers altered, defaced, or deleted; (v) damage due to lightning, fire, flood, or other acts of God.
- Page 3 Quadro. User further acknowledges that any interruption in the supply or delivery of electricity or network availability is beyond Epygi's control and Epygi shall have no responsibility for losses arising from such interruption.
-
Page 4: Table Of Contents
Editing the E1/T1 Trunk ..................52 Signaling Type CCS ..................53 Signaling Type CAS ..................59 Step 3: Registering on Epygi’s Technical Support......66 Appendix: Changing the Admin Password ........67 Appendix: Configuring NAT Traversal ........... 69 Appendix: Registering on Epygi’s SIP Server......... 71 Appendix: Checking the Connections ........... - Page 5 QuadroM32x/8L/26x/12Li/26xi Manual I: Installation Guide Appendix: Pin Assignment of ISDN ..........77 Appendix: Pin Assignment of E1/T1 ..........78 Manual II: see Administrator's Guide This guide describes in detail the menus available for administrators only. Fur- thermore, it includes all the system’s default values at a glance. Manual III: see Extension User's Guide This guide describes in detail the menus available for extension users.
-
Page 6: About This Installation Guide
E1/T1 settings. Step 3: Registering on Epygi’s Technical Support shows you how to access the Epygi Technical Support Center and the Epygi SIP Server. Appendix: Changing the Admin Password explains how to change the default administra- tor password. -
Page 7: Requirements
QuadroM32x/8L/26x/12Li/26xi Manual I: Installation Guide Requirements Requirements • One 120/240 VAC power outlet in close proximity to the Quadro. • One RJ45 Ethernet 10/100 broadband Internet connection. • For QuadroM32x one E1/T1 cable to connect the Quadro with the CO or PBX. •... -
Page 8: Hardware Overview
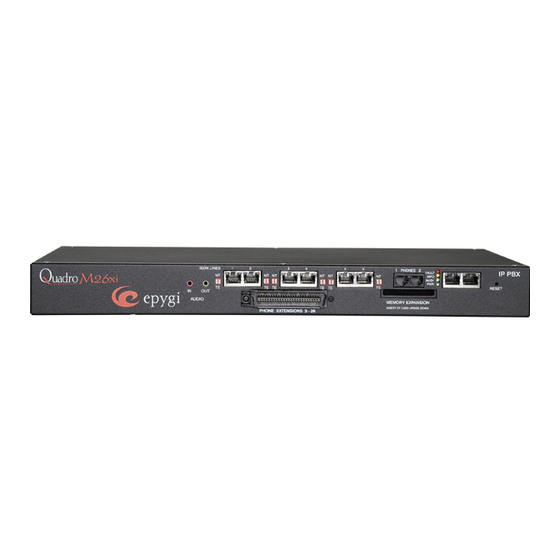
QuadroM32x/8L/26x/12Li/26xi Manual I: Installation Guide Hardware Overview Hardware Overview The Connectors Panel of QuadroM32x/8L/26x/12Li/26xi The illustration below includes the connector’s panel of QuadroM. Fig. I-1: QuadroM8L’s Connectors Panel Fig. I-2: QuadroM26x's Connectors Panel Fig. I-3: QuadroM Back Power Panel Fig. I-4: QuadroM12Li's Connectors Panel QuadroM32x/8L/26x/12Li/26xi;... - Page 9 QuadroM32x/8L/26x/12Li/26xi Manual I: Installation Guide Hardware Overview Fig. I-5: QuadroM32x's Connectors Panel For QuadroM8L/26x/12Li/26xi AUDIO IN connector connects Quadro to the radio or any other audio resource to be used for the hold music. For QuadroM8L/26x/12Li/26xi AUDIO OUT connector is used for Paging service. The Paging Group service is used to page a group of extensions by forcing extensions to go off-hook and opening one-way communication.
- Page 10 QuadroM32x/8L/26x/12Li/26xi Manual I: Installation Guide Hardware Overview • • Aastra 6730i Linksys SPA2002 • • Aastra 6731i Linksys SPAPAP2T • • Aastra 6739i Yealink SIP-T20P • • Aastra 480e (analog phone) Yealink SIP-T22P • • Thomson ST2030S Yealink SIP-T26P • •...
- Page 11 QuadroM32x/8L/26x/12Li/26xi Manual I: Installation Guide Hardware Overview toggled to the NT (Network Terminator) position. Otherwise, if the QuadroM12Li/26xi is connected in the middle of the S/T Bus, the switch should be toggled to the TE (Terminal Endpoint) position. S/T Bus is a full-duplex interface. It consists of two groups (one for transmit and the other one for receive) of two-wire interface and might support multiple devices (up to 8 devices can be attached to the S/T Bus).
-
Page 12: Quadrom32X/8L/26X/12Li/26Xi's Front Panel Leds
QuadroM32x/8L/26x/12Li/26xi Manual I: Installation Guide Hardware Overview QuadroM32x/8L/26x/12Li/26xi’s Front Panel LEDs Fig. I-6: QuadroM32x's Front Panel LEDs POWER on: power supply ok green off: no power supply or device is still booting Status of the Power Supply Busy off: no power green on or blinking: normal activity Status of CPU... - Page 13 QuadroM32x/8L/26x/12Li/26xi Manual I: Installation Guide Hardware Overview LED indication during a firmware update A firmware update is indicated by the red (Fault) and yellow (Info) LEDs. Both will blink si- multaneously for about two minutes while the firmware is being updated. The Quadro will then reboot automatically showing the boot LED sequence.
-
Page 14: Step 1: Installing The Quadro
In some scenarios, port forwarding on the router is required to make the Quadro accessible to other Quadro devices and the Epygi SIP Server on the Internet. Another configuration option is to use the Quadro as the Internet access router, connected directly to the WAN, eliminating the traverse to the local NAT firewall. -
Page 15: Lan/Wan Connection Options
QuadroM32x/8L/26x/12Li/26xi Manual I: Installation Guide Step 1: Installing the Quadro LAN/WAN Connection Options • A QuadroM32x IP PBX with an Ethernet WAN port behind a router, which is con- nected to a cable or xDSL modem. IP phones are placed on the WAN side of the QuadroM32x. - Page 16 QuadroM32x/8L/26x/12Li/26xi Manual I: Installation Guide Step 1: Installing the Quadro • A QuadroM12Li/26xi with an Ethernet WAN port behind a router, which is connected to a cable or xDSL modem. IP phones are placed on the WAN side of the QuadroM12Li/26xi. Fig.
- Page 17 QuadroM32x/8L/26x/12Li/26xi Manual I: Installation Guide Step 1: Installing the Quadro Fig. I-11: Configuration: QuadroM8L/26x behind a router with IP phones on LAN This configuration is identical to the previous configuration, with the difference that IP phones are connected to the LAN port of the QuadroM. The QuadroM can be configured as a DHCP server to provide the network parameters to the devices on its LAN.
- Page 18 QuadroM32x/8L/26x/12Li/26xi Manual I: Installation Guide Step 1: Installing the Quadro • A QuadroM32x IP PBX used as an Internet Access Router, connected di- rectly to the Internet. Fig. I-13: Configuration: QuadroM32x used as Internet Access Router The Admin PC is connected to the Quadro ETH port or WAN port to access the Web Man- agement of the Quadro.
- Page 19 QuadroM32x/8L/26x/12Li/26xi Manual I: Installation Guide Step 1: Installing the Quadro Fig. I-15: Configuration: QuadroM12Li/26xi used as Internet Access Router Please Note: The Admin PC is connected to the Quadro’s LAN port through a switch/hub to access the Web Management of the QuadroM. It is recommended to have Admin PC acting as a DHCP client and obtaining IP address from the Quadro.
-
Page 20: Connecting The Hardware
QuadroM32x/8L/26x/12Li/26xi Manual I: Installation Guide Connecting the Hardware Connecting the Hardware • QuadroM32x behind a router with IP phones connected to WAN Fig. I-16: Installation: QuadroM32x behind a router with IP phones on WAN • QuadroM8L/26x behind a router with IP phones connected to WAN Fig. - Page 21 QuadroM32x/8L/26x/12Li/26xi Manual I: Installation Guide Connecting the Hardware • QuadroM32x behind a router with IP phones connected to LAN Fig. I-19: Installation: QuadroM32x behind a router with IP phones on LAN • QuadroM8L/26x behind a router with IP phones connected to LAN Fig.
- Page 22 QuadroM32x/8L/26x/12Li/26xi Manual I: Installation Guide Connecting the Hardware • QuadroM32x used as Internet access router Fig. I-22: Installation: QuadroM32x used as an Internet Access Router • QuadroM8L/26x used as Internet access router Fig. I-23: Installation: QuadroM8L/26x used as an Internet Access Router •...
- Page 23 QuadroM32x/8L/26x/12Li/26xi Manual I: Installation Guide Connecting the Hardware • QuadroM26x additional analog lines connections Fig. I-25: Installation: QuadroM 26xi connected via RJ21 connectors • QuadroM26xi additional analog lines connections Fig. I-26: Installation: QuadroM 26xii connected via RJ21 connectors OR a multi-cable (RJ21 – RJ11) connection can be applied instead. QuadroM32x/8L/26x/12Li/26xi;...
- Page 24 QuadroM32x/8L/26x/12Li/26xi Manual I: Installation Guide Connecting the Hardware Wires are presented in the table below: Color Pin (Tip) Pin (Ring) Color FXS Port White/Blue Blue/White White/Orange Orange/White White/Green Green/White White/Brown Brown/White White/Slate Slate/White Red/Blue Blue/Red Red/Orange Orange/Red Red/Green Green/Red Red/Brown Brown/Red Red/Slate Slate/Red...
- Page 25 QuadroM32x/8L/26x/12Li/26xi Manual I: Installation Guide Connecting the Hardware Please Note: CAT 5 cables can be faulty without any visual indication. The LAN and WAN LEDs verify that the Ethernet connection is established between the end points. If these LEDs are not illuminated, there is a connection problem between the Quadro and the other device.
-
Page 26: Step 2: Configuring The Quadro
QuadroM32x/8L/26x/12Li/26xi Manual I: Installation Guide Step 2: Configuring the Quadro Step 2: Configuring the Quadro Verify functionality of both IP and PSTN calls: • PSTN telephony: If the Quadro is connected to the PSTN network via the E1/T1, FXO or ISDN interface, verify the functionality of PSTN calls: Make an outbound PSTN call by dialing 9 + PSTN number. -
Page 27: Step 2.1: Logging In To Quadro
QuadroM32x/8L/26x/12Li/26xi Manual I: Installation Guide Step 2: Configuring the Quadro Step 2.1: Logging in to Quadro • Start a browser (MS Internet Explorer, Netscape, Opera, Mozilla Firefox, etc.) on a PC connected to the QuadroM via the LAN or WAN interface. •... -
Page 28: Step 2.2: System Configuration Wizard
Next button to start. Enter into the Host Name field the unique name (top right corner, un- der Epygi logo) for the Quadro device. The Domain Name text field requires the LAN side domain name which the Quadro belongs to. -
Page 29: Dhcp Settings For The Lan Interface
QuadroM32x/8L/26x/12Li/26xi Manual I: Installation Guide Step 2: Configuring the Quadro DHCP Settings for the LAN Interface If the DHCP server is enabled, the Quadro will automatically assign dynamic IP addresses to the stations connected to its LAN port. If you didn’t change the default LAN IP address of the Quadro, you also may leave the de- fault values for the IP Address Range. -
Page 30: Emergency And Pstn Access Code Settings
QuadroM32x/8L/26x/12Li/26xi Manual I: Installation Guide Step 2: Configuring the Quadro The Quadro obtains the correct time automatically over the Internet from a time server. If you are not located in the US/Central standard time zone, you will need to change the Timezone to your region. -
Page 31: Finishing The System Configuration Wizard
QuadroM32x/8L/26x/12Li/26xi Manual I: Installation Guide Step 2: Configuring the Quadro Finishing the System Configuration Wizard Fig. I-33: System Configuration Wizard finishing page Click on Finish to complete the System Configuration Wizard. The Quadro will then stop in- ternal functions and apply the changes made in the Wizard. Fig. - Page 32 QuadroM32x/8L/26x/12Li/26xi Manual I: Installation Guide Step 2: Configuring the Quadro Fig. I-35: Confirm Settings page Please Note: You must confirm the settings within 20 minutes. Otherwise the device will revert back to the previous configuration and reboot. Please Note: If you do not use DHCP for your LAN and you have changed your LAN set- tings, make sure that the IP address of the PC connected to Quadro is still within the speci- fied IP address range, otherwise your PC may not establish a connection to Quadro.
-
Page 33: Step 2.3: Internet Configuration Wizard
QuadroM32x/8L/26x/12Li/26xi Manual I: Installation Guide Step 2: Configuring the Quadro Step 2.3: Internet Configuration Wizard Open the Internet Configuration Wizard by selecting the corresponding menu item on the System menu. The Internet Configuration Wizard is a tool for the administrator to config- ure the WAN settings and to adjust Quadro's connectivity in the global network. -
Page 34: Uplink Configuration
QuadroM32x/8L/26x/12Li/26xi Manual I: Installation Guide Step 2: Configuring the Quadro Uplink Configuration Select the desired WAN Interface Protocol and enter the WAN Interface Bandwidth to as- sure the quality of IP calls. Fig. I-37: Uplink Configuration If the available bandwidth is used to the point where the quality of an additional IP call would suffer, then new IP calls are rejected. -
Page 35: Wan Ip Configuration
QuadroM32x/8L/26x/12Li/26xi Manual I: Installation Guide Step 2: Configuring the Quadro WAN IP Configuration Your Internet Service Provider (ISP) should provide this information. • Assign automatically via DHCP - The parameters are set automatically by the ISP. This is common with cable modem and DSL service. •... -
Page 36: Ppp/Pptp Configuration
QuadroM32x/8L/26x/12Li/26xi Manual I: Installation Guide Step 2: Configuring the Quadro PPP/PPTP Configuration Enter the IP address of the PPTP server into the PPTP Server text field. Choose the encryption for the traffic over the PPTP interface from the Encryption drop down list. -
Page 37: Wan Interface Configuration
QuadroM32x/8L/26x/12Li/26xi Manual I: Installation Guide Step 2: Configuring the Quadro WAN Interface Configuration If your ISP requires a specific MAC address, (for example, for authentication), it can be en- tered on this page. The required MAC address can be entered into the User defined field. If a specific MAC address is not required, leave the default selection This device selected. -
Page 38: Finishing The Internet Configuration Wizard
QuadroM32x/8L/26x/12Li/26xi Manual I: Installation Guide Step 2: Configuring the Quadro If Fixed Nameserver Address is selected, manually enter the IP addresses provided by your ISP for the name server and the alternative name server. Clicking Next shows the summary page of the Internet Configuration Wizard. Finishing the Internet Configuration Wizard Fig. -
Page 39: Step 2-A: Using Ip Lines
QuadroM32x/8L/26x/12Li/26xi Manual I: Installation Guide Step 2: Configuring the Quadro Step 2-A: Using IP Lines Before starting the IP Lines specific configuration, the appropriate IP Phone (the list of SIP phones supported by Quadro is presented below) should be connected to the Quadro ei- ther through its LAN or WAN port. - Page 40 QuadroM32x/8L/26x/12Li/26xi Manual I: Installation Guide Step 2: Configuring the Quadro Fig. I-44: IP Line Settings page Select the SIP Phone radio button. Select the SIP IP phone model from the Phone Model drop down list. Insert the SIP Phone’s MAC address in the corresponding fields. The MAC address of an IP phone is usually printed on the back of the phone’s base unit.
- Page 41 SIP phone, and how to manipulate with the GUI. You may also find the detailed installation instructions of the Epygi’s supported and tested IP Phones in the “Configuring Epygi Supported IP Phones” and “Configuring Epygi Tested IP Phones”...
-
Page 42: Supported Sip Phones
Step 2: Configuring the Quadro Supported SIP Phones Below is the list of SIP phones that are officially supported by Epygi and can be configured to work with QuadroM using both Plug and Play and the automatically configuration op- tions, as well as the full set of advanced features, like paging and intercom: •... - Page 43 QuadroM32x/8L/26x/12Li/26xi Manual I: Installation Guide Step 2: Configuring the Quadro • • Polycom SoundStation IP 5000* Linksys SPA2002 • • Polycom SoundStation IP 6000* Linksys PAP2T • • POLYCOM VVX 1500* Yealink SIP-T20P • • POLYCOM KIRK wireless server 6000 Yealink SIP-T22P •...
-
Page 44: Step 2-B: Using Receptionist
The Receptionist related setup, with detailed instructions on how to configure the Quadro and the attached IP Phones, is described in the “Receptionist Setup on Quadro” docu- ment, which you can find at the Epygi’s Web portal. QuadroM32x/8L/26x/12Li/26xi; (SW Version 5.3.x) -
Page 45: Step 2-C: Using Isdn Lines
QuadroM32x/8L/26x/12Li/26xi Manual I: Installation Guide Step 2-C: Using ISDN Lines Step 2-C: Using ISDN Lines The basic configuration procedure for QuadroM IP PBXs that use ISDN lines is exactly the same as described in Step 2. As some ISDN providers require an outgoing MSN to be defined, go to the Telephony menu and open the ISDN Settings page. - Page 46 QuadroM32x/8L/26x/12Li/26xi Manual I: Installation Guide Step 2-C: Using ISDN Lines In case of connection to PBX (Network interface type is selected on the Quadro) choose this option if there can be other devices connected to the same ISDN trunk from Quadro except for the PBX. In both cases, with this selection Quadro sets the TEI to automatic mode.
- Page 47 QuadroM32x/8L/26x/12Li/26xi Manual I: Installation Guide Step 2-C: Using ISDN Lines For MSN service enabled, the Routing Settings page is used to assign MSN numbers to the certain destinations on the Quadro. The MSN number can be assigned to the Quadro’s extensions, to the Auto Attendant, or to the routing agent.
- Page 48 QuadroM32x/8L/26x/12Li/26xi Manual I: Installation Guide Step 2-C: Using ISDN Lines lected on the previous page of the wizard. This page contains the following components: Fig. I-49:ISDN Wizard – L2&L3 Settings ISDN L2 Timers: • Excessive Ack. Delay T200 configures the period in milliseconds (numeric values from 500 to 9999) between the transmitted signaling packet and its acknowledgement received.
- Page 49 QuadroM32x/8L/26x/12Li/26xi Manual I: Installation Guide Step 2-C: Using ISDN Lines The Switch Type is another configuration parameter that depends on the Service Provider. The Passive Mode checkbox is used to leave the ISDN Layer1 connection in the Slave mode. When this checkbox is selected, Layer1 remains idle when calls are not available. When this checkbox is not selected, Quadro keeps its Layer1 always active.
- Page 50 QuadroM32x/8L/26x/12Li/26xi Manual I: Installation Guide Step 2-C: Using ISDN Lines Asserted-Identity, then the CallerID on ISDN is sent with the value from the " P-Asserted- Identity" field, otherwise the CallerID on ISDN is sent with the value from the "From" field. For the calls from ISDN to SIP if the incoming CallerID from the ISDN network contains a restricted flag then the "P-Asserted-Identity"...
-
Page 51: Step 2-D: Configuring The E1/T1 Settings
QuadroM32x/8L/26x/12Li/26xi Manual I: Installation Guide Step 2-D: Configuring the E1/T1 Settings Step 2-D: Configuring the E1/T1 Settings The QuadroM32x has one E1/T1 trunk available. The QuadroM32x can be connected to a PBX or to the PSTN via E1/T1 lines, using E1/T1 CAS/CCS signaling. -
Page 52: Editing The E1/T1 Trunk
QuadroM32x/8L/26x/12Li/26xi Manual I: Installation Guide Step 2-D: Configuring the E1/T1 Settings Editing the E1/T1 Trunk Fig. I-51: Trunk Edit page Select Network as your Interface Type if your QuadroM32x is connected to a PBX, other- wise choose User. Next, you are required to enter the Signaling type (CAS or CCS), adjust the correct inter- face type (E1 or T1), and specify the requested settings of the selected interface type. -
Page 53: Signaling Type Ccs
QuadroM32x/8L/26x/12Li/26xi Manual I: Installation Guide Step 2-D: Configuring the E1/T1 Settings Signaling Type CCS Fig. I-52: Trunk T1 Signaling Type CCS page If you selected CCS as your Signaling Type, using the Trunk link will take you to the page shown above. - Page 54 QuadroM32x/8L/26x/12Li/26xi Manual I: Installation Guide Step 2-D: Configuring the E1/T1 Settings been disconnected. In the ISDN L2 Timers area the Excessive Ack. Delay T200 text field configures the pe- riod in milliseconds (digit values from 500 to 9999) between transmitted signaling packet and its acknowledgement received.
- Page 55 QuadroM32x/8L/26x/12Li/26xi Manual I: Installation Guide Step 2-D: Configuring the E1/T1 Settings The value for Switch Type depends on the CO when acting in the User mode and the pri- vate PBX capabilities when acting in the Network mode. Attention: A timeslot can be used either for voice or signaling data transfer. The configura- tion prevents the selection of a timeslot from the B channel list if it has already been se- lected from the D Channel receive/transmit drop down list.
- Page 56 QuadroM32x/8L/26x/12Li/26xi Manual I: Installation Guide Step 2-D: Configuring the E1/T1 Settings the End DID number text field, then DID numbers 1000 1001, 1002 and 1003 will be added to the table. • Delete is used to delete the DID numbers from the table with the selected range in the Start DID Number and End DID Number fields.
- Page 57 QuadroM32x/8L/26x/12Li/26xi Manual I: Installation Guide Step 2-D: Configuring the E1/T1 Settings IP (H.323 or SIP). If the Send ALERT Message on Call Ringing checkbox is selected, the system will send ALERT messages to callers from the PSTN/PBX on call ringing. If not, the system will send a PROGRESS message on receiving early media from the called party if the Generate Progress Tone to PSTN/PBX setting is not set to None.
- Page 58 QuadroM32x/8L/26x/12Li/26xi Manual I: Installation Guide Step 2-D: Configuring the E1/T1 Settings from B23/30 to B1. If your CO/PBX has Ascending B channels selection configured, it is recommended to use Descending B channels selection and vice versa. Please Note: A timeslot can be used either for voice or data transfer. The system prevents selecting a timeslot from the B channel list if it has already been selected from the D Chan- nel receive/transmit drop down list.
-
Page 59: Signaling Type Cas
QuadroM32x/8L/26x/12Li/26xi Manual I: Installation Guide Step 2-D: Configuring the E1/T1 Settings Signaling Type CAS Fig. I-56: Trunk T1 Signaling Type CAS page If you selected CAS as your Signaling Type on the Trunk Settings - Edit Entry page, you will get the page shown above using the Trunk link. The Incoming Interdigit Service link leads to the page where the dial plan for incoming E1/T1 calls from CO/PBX to the Quadro can be configured. - Page 60 QuadroM32x/8L/26x/12Li/26xi Manual I: Installation Guide Step 2-D: Configuring the E1/T1 Settings Fig. I-57: CAS Signaling Wizard - Page 1 From the first page, signaling type settings of the timeslot(s) might be configured: Allowed Call Type is used to select the allowed call directions: incoming, outgoing or both. Signaling Type allows selecting the CAS signaling type.
- Page 61 QuadroM32x/8L/26x/12Li/26xi Manual I: Installation Guide Step 2-D: Configuring the E1/T1 Settings will disconnect the call from PBX/CO and will stop playing the busy tone. Voice Establishment Procedure manipulation radio buttons group is used to select a me- thod of voice establishment on the trunk. •...
- Page 62 QuadroM32x/8L/26x/12Li/26xi Manual I: Installation Guide Step 2-D: Configuring the E1/T1 Settings Fig. I-59: CAS Signaling Wizard - Page 3 From this page, the destination for incoming calls to be routed to can be selected and other routing settings might be configured. Route Incoming Call to drop down appears when Both incoming and outgoing calls or Incoming calls only is selected from the Allowed Call Type list and allows selecting the destination where incoming calls should be routed.
- Page 63 QuadroM32x/8L/26x/12Li/26xi Manual I: Installation Guide Step 2-D: Configuring the E1/T1 Settings Press Next to move to the forth page of the CAS Signaling Wizard: Fig. I-60: CAS Signaling Wizard - page 4 This page only appears in E1 User mode when signaling selected from Signaling Type drop down list on the CAS Signaling Wizard –...
- Page 64 QuadroM32x/8L/26x/12Li/26xi Manual I: Installation Guide Step 2-D: Configuring the E1/T1 Settings This page only appears when Use Default Country Settings checkbox is not selected on the previous page and is used to configure advanced country settings. ANI Category drop down list appears only when R2 signaling selected from Signaling Type drop down list on the CAS Signaling Wizard –...
- Page 65 QuadroM32x/8L/26x/12Li/26xi Manual I: Installation Guide Step 2-D: Configuring the E1/T1 Settings Settings page where Receive Answer Signal and Receive Busy Signal should be defined. Use the checkboxes to select the Receive Answer Signal and Re- ceive Busy Signal values. Multiple values are allowed for each signal. Please Note: Warning appears if you have selected the same signal type both for receive answer and receive busy recognitions.
-
Page 66: Step 3: Registering On Epygi's Technical Support
To register, you need to know the serial number of your Quadro, which is located on a label on the bottom of Quadro. You will also need the date of purchase. Next, open the Epygi home page (www.epygi.com), select Support and click on Registration Form. The online registration page will appear: Fig. -
Page 67: Appendix: Changing The Admin Password
QuadroM32x/8L/26x/12Li/26xi Manual I: Installation Guide Appendix: Changing the Admin Password Appendix: Changing the Admin Password For security reasons, it is recommended that you change the default admin password. The username of the administrator (admin) cannot be changed. To change the administrator password, go to the System menu, User Rights Manage- ment. - Page 68 QuadroM32x/8L/26x/12Li/26xi Manual I: Installation Guide Appendix: Changing the Admin Password The Phone Access Password offers the following components: • The Old Password field requires the current password of the Administrator. An error message prevents entering the wrong password. • The New Password field requires a new password for the Administrator. Reen- tering the new password in the Confirm New Password field will confirm the new password.
-
Page 69: Appendix: Configuring Nat Traversal
QuadroM32x/8L/26x/12Li/26xi Manual I: Installation Guide Appendix: Configuring NAT Traversal Appendix: Configuring NAT Traversal NAT or Network Address Translation is a common feature used to expand the use of con- nected PCs and other networked devices without having to use multiple global Internet public IP addresses. - Page 70 6000 (Min) and 6199 (Max), respectively. Click the Save button to save the contents. The Quadro will activate the settings and register the extensions on the Epygi SIP Server after a few minutes. You can verify the settings from the main Quadro Management menu under Status in the SIP Registration Status section.
-
Page 71: Appendix: Registering On Epygi's Sip Server
QuadroM32x/8L/26x/12Li/26xi Manual I: Installation Guide Appendix: Registering on Epygi’s SIP Server Appendix: Registering on Epygi’s SIP Server Epygi maintains a SIP Server that can be used to call between Quadro devices. Quadro ex- tensions may already be defaulted to register to the SIP Server. To create additional regis- trations you may login directly to Epygi’s SIP Server if you have registered your Quadro at... - Page 72 QuadroM32x/8L/26x/12Li/26xi Manual I: Installation Guide Appendix: Registering on Epygi’s SIP Server Fig. I-71: SIP Services Add New Extension page The Authentication password validates the entry and must match the password entered on the Quadro later. Make sure to record the name, Authentication Password and SIP ex- tension number for entry into the Quadro later.
- Page 73 Go to the General Settings page and adjust the Display Name as needed. Fig. I-74: Extensions Management - Edit Entry – General Settings page Go to the SIP Settings page to enter the SIP Registration Settings you received from the Epygi SIP server. QuadroM32x/8L/26x/12Li/26xi; (SW Version 5.3.x)
- Page 74 Fig. I-75. Fig. I-76: Extensions Management page If you go back to Epygi’s SIP Server, you will find the value reg. for this number in the col- umn Stat. Reg. This indicates that the Quadro has successfully registered the new number.
-
Page 75: Appendix: Checking The Connections
DHCP Client is running Checking internet connectivity (ICMP ping): Gateway: reached Primary nameserver: reached Secondary nameserver: not configured www.epygi.com: reached STUN Network Address Translation (NAT) Check: External visibible address: 212.126.210.179 Detected NAT type : Restricted cone Performing MTU Discovery: preparing system... - Page 76 Configuring NAT Traversal. If you are unable to resolve your problems, please send us a technical support request on the Support section of http://www.epygi.com/. Please prepare a system log file and at- tach it to your request. To download the system logs, open the System Diagnostics page System menu item Di- agnostics and click Download System Logs.
- Page 77 QuadroM32x/8L/26x/12Li/26xi Manual I: Installation Guide Appendix: Pin Assignment of ISDN Appendix: Pin Assignment of ISDN Signal N.C. N.C. SSR1 SSX1 SSX2 SSR2 N.C. N.C. Fig. I-79: Pin Assignment of ISDN in User mode Signal N.C. N.C. SSX1 SSR1 SSR2 SSX2 N.C.
- Page 78 QuadroM32x/8L/26x/12Li/26xi Manual I: Installation Guide Appendix: Pin Assignment of E1/T1 Appendix: Pin Assignment of E1/T1 Signal RXRING RXTIP N.C. TXRING TXTIP N.C. N.C. N.C. Fig. I-81: Pin Assignment of E1/T1 QuadroM32x/8L/26x/12Li/26xi; (SW Version 5.3.x)
- Page 79 The information furnished in this document, believed by Epygi Technologies to be accurate as of the date of publication, is subject to change without notice. Epygi Technologies as- sumes no responsibility for any errors or omissions in this document and shall have no ob- ligation to you as a result of having made this document available to you or based upon the information it contains.
- Page 80 QuadroM32x/8L/26x/12Li/26xi Manual I: Installation Guide Appendix: Checking the Connections QuadroM32x/8L/26x/12Li/26xi; (SW Version 5.3.x)
Need help?
Do you have a question about the Quadro M32x and is the answer not in the manual?
Questions and answers