Table of Contents
Advertisement
Specifications
Wingspan: ............. 71.5 in (1816mm)
Length: ................... 54 in (1371mm)
Wing Area: ............ 965.2 sq in (66.27 sq dm)
WE GET PEOPLE FLYING
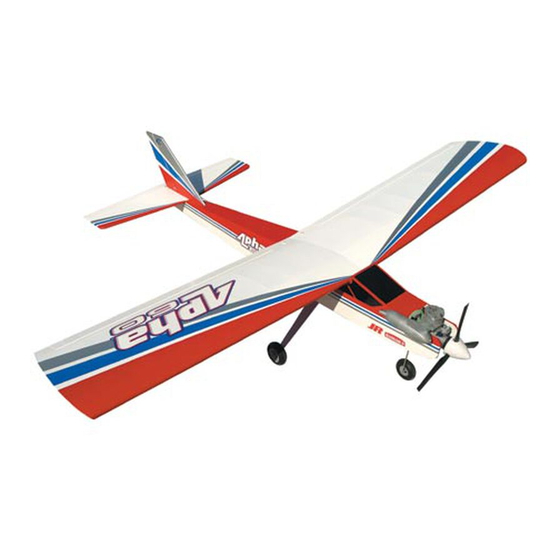
Alpha .60 ARF
ASSEMBLY MANUAL
®
TM
Weight: .................. 7.0–8.0 lb (3.2 kg–3.6 kg)
Engine: .................... .61 2-stroke
Radio: ..................... 4-channel w/4 servos
Advertisement
Table of Contents

Related Manuals for Hangar 9 Alpha.60 ARF


Summary of Contents for Hangar 9 Alpha.60 ARF
- Page 1 ® WE GET PEOPLE FLYING Alpha .60 ARF ASSEMBLY MANUAL Specifications Wingspan: ..... 71.5 in (1816mm) Weight: ....7.0–8.0 lb (3.2 kg–3.6 kg) Length: ....54 in (1371mm) Engine: .....61 2-stroke Wing Area: .... 965.2 sq in (66.27 sq dm) Radio: .....
-
Page 2: Table Of Contents
Table of Contents Covering Colors ................................2 Contents of Kit ................................3 Required Radio and Engine ............................3 Field Equipment Required ............................4 Optional Field Equipment ............................4 Additional Required Tools and Adhesives ........................4 Warning ..................................4 Before Starting Assembly ............................5 Using the Manual ................................ -
Page 3: Contents Of Kit
Contents of Kit Large Parts: Items Not Shown: A. Wing Set w/Alum. Tube HAN2601 Engine Mount HAM90M B. Fuselage HAN2602 Pushrod Set HAN2607 C. Tail Set HAN2603 Fuel Tank (assembled) HAN2606 D. Landing Gear Set HAN2604 Note: Wheels are shown installed. E. -
Page 4: Field Equipment Required
Field Equipment Required • Propeller (EVOE0610P recommended) • Glow Plug (HAN3001/3006) • Fuel (10%–15% nitro content) • Manual Fuel Pump (HAN118) • Glow Plug Wrench (HAN2510) • #64 Rubber Bands (ARC64) • Glow Plug Igniter with Charger (HAN7101) • Start-Up Field Pack (HANSTART) Optional Field Equipment •... -
Page 5: Before Starting Assembly
Before Starting Assembly Before beginning the assembly of the Alpha™, remove each part from its bag for inspection. Closely inspect the fuselage, wing panels, rudder, and stabilizer for damage. If you find any damaged or missing parts, contact the place of purchase. If you find any wrinkles in the covering, use a heat gun or covering iron to remove them. -
Page 6: Section 1: Joining The Wing Halves
Section 1: Joining the Wing Halves Required Parts Step 3 • Right wing panels • Left wing panel Apply the clear tape to the joint, starting at the front of the servo tray. Wrap the tape around the leading • Wing joiner tube edge, then onto the top of the wing. -
Page 7: Section 2: Gluing The Panels Together (Optional)
Section 2: Gluing the Panels Together (Optional) Required Parts Step 2 • Right wing panels • Left wing panel Mix 1/2 ounce of 30-minute epoxy. Apply the epoxy to the exposed wood at the root rib. • Wing joiner tube Required Tools and Adhesives •... -
Page 8: Section 3: Fuel Tank Assembly
Section 3: Fuel Tank Assembly Required Parts Step 2 • Clunk (fuel pickup) • Metal caps (2) Locate the rubber stopper. Insert the short metal tube into one of the holes in the stopper so that an • Fuel pickup tubing •... - Page 9 Section 3: Fuel Tank Assembly Step 4 Step 6 Locate the vent tube. It is the one that has a slight Carefully insert the stopper assembly into the fuel bend. Slide the longer end of the vent tube into the tank.
-
Page 10: Section 4: Fuel Tank Installation
Section 3: Fuel Tank Assembly Step 7 Step 8 Tighten the 3mm x 20mm screw carefully—do not Install the vent and pickup tubes. Use the red tube overtighten, as this can cause the the fuel tank to on the vent, and the green tube on the pickup. This split open. -
Page 11: Section 5: Radio Installation
Section 5: Radio Installation Required Parts Step 2 • Fuselage • Foam radio protector Test fit a servo into one of the openings in the fuselage. Use a small sander to make the opening • Radio tray (plywood) bigger if the servo does not fit. Check and fit •... - Page 12 Section 5: Radio Installation Step 3 Step 5 Position the three servos as shown. Use the screws Plug the servos, receiver and aileron extension into provided with the servos to secure them in position. the receiver. Use the radio instructions to make sure the servos are plugged into the correct channels.
- Page 13 Section 5: Radio Installation Step 7 Route the receiver antenna wire through the antenna DO NOT cut the antenna wire, as this will tube located on the right side of the fuselage. This significantly reduce the range and operation routes the antenna to the rear of the fuselage. of your radio system.
- Page 14 Section 5: Radio Installation Step 10 Step 13 Drill a 5/64" hole in the tray support using the hole in Remove the switch plate from the radio switch. the aft end of the tray as a guide. Attach the switch to the fuselage side using the switch hardware.
-
Page 15: Section 6: Tail Installation
Section 6: Tail Installation Required Parts Step 3 • Fuselage • Rudder/fin Slide a 3mm washer onto the fin bolts. Thread the wing nuts onto the bolts. Tighten the nuts • Stabilizer/elevator against the stabilizer. Do not crush the wood Required Tools and Adhesives when tightening the nuts. - Page 16 Section 6: Tail Installation Step 5 Step 6 Slide a #4 washer onto a 4-40 x 3/4" screw. Apply a Secure the stabilizer using the two screws prepared drop of threadlock to the screw. Prepare two screws in the previous step. using this method.
-
Page 17: Section 7: Tail Installation (Glue Attachment Option)
Section 7: Tail Installation (Glue Attachment Option) Required Parts Step 2 • Fuselage • Rudder/fin Use a felt-tipped pen to trace the outline of the fit onto the stabilizer. • Stabilizer/elevator Required Tools and Adhesives • Wing nut (2) • 30-minute epoxy •... - Page 18 Section 7: Tail Installation (Glue Attachment Option) Note: Read through and understand Steps 4 Step 7 through 7 before mixing any epoxy. Slide a 3mm washer onto the fin bolts. Thread the wing nuts onto the bolts. Tighten the nuts Step 4 against the stabilizer.
- Page 19 Section 7: Tail Installation (Glue Attachment Option) Note: Read through and understand Steps 11 Step 9 through 14 before mixing any epoxy. Trace the outline of the fuselage onto the bottom of the stabilizer using a felt-tipped pen. Step 11 Mix 1/2 ounce of 30-minute epoxy.
- Page 20 Section 7: Tail Installation (Glue Attachment Option) Step 13 Step 14 Secure the stabilizer using the two screws prepared in Remove any excess epoxy from the fuselage the previous step. and stabilizer using a paper towel soaked with rubbing alcohol.
-
Page 21: Section 8: Landing Gear Installation
Section 8: Landing Gear Installation Required Parts Step 2 • Main landing gear • Nose gear wire Install the 3/32" x 17 " wire into the outer hole in the steering arm. The Z-bend will be installed from • Steering arm •... - Page 22 Section 8: Landing Gear Installation Step 3 Step 5 Slide the wire into the steering pushrod tube. Apply a drop of threadlock on the 3mm x 8mm screw. Position the steering arm in the nose gear mount. Install the screw into the hole in the front of the steering arm.
- Page 23 Section 8: Landing Gear Installation Step 8 Step 9 Attach the main axles to the main landing gear using Install a 3" wheel onto the main landing gear. Secure the nuts provided with the axles. the wheel using a 3mm x 5mm screw and a 5/32" wheel collar.
-
Page 24: Section 9: Engine Installation
Section 9: Engine Installation Required Parts Step 2 • 8-32 x 1 ” bolt (4) • 8-32 x 1” bolt (4) Slide the engine into position onto the mount as shown. Position the engine on the mount so the drive •... - Page 25 Section 9: Engine Installation Step 5 Step 7 Install four 8-32 x 1 " screws, 8-32 locknuts and #8 Connect the fuel lines to the engine. The red line washers.Tighten the four screws evenly to secure the (vent) goes to the muffler, the green line (pickup) position of the engine.
-
Page 26: Section 10: Control Linkage Installation
Section 10: Control Linkage Installation Required Parts Step 3 • Nylon clevis (5) • Clevis retainer (5) Locate the 3/32" x 32" elevator pushrod wire inside the fuselage. • Nylon wire keeper (5) • Brass wire connector • Nylon control horn (2) •... - Page 27 Section 10: Control Linkage Installation Step 5 Place a clevis retainer onto a clevis. Thread the clevis Using the nylon wire keepers is simple, 12 turns onto the elevator pushrod wire. and they provide an excellent way to attach pushrod wires to servo arms. The first step is to have a 90-degree bend in the pushrod wire.
- Page 28 Section 10: Control Linkage Installation Step 9 There is a notch in the keeper that runs With the radio on, attach the clevis to the outside parallel to the main pushrod wire. This allows hole on the elevator control horn. you to snap the keeper onto the pushrod wire.
- Page 29 Section 10: Control Linkage Installation Step 11 Step 13 Drill a 3/32" hole in the outer hole in the rudder Slide the steering wire through the brass wire servo arm as shown. connector. Place the servo arm back onto the rudder servo.
- Page 30 Section 10: Control Linkage Installation Step 15 Step 19 Locate the 3/32" x 29 " rudder pushrod Secure the rudder pushrod wire to the servo arm wire inside of the fuselage. using a nylon wire keeper. Step 16 Install the rudder control horn using three 2mm x 18mm screws.
- Page 31 Section 10: Control Linkage Installation Step 21 Step 23 With the radio on, use a straight edge to make sure Locate the prebent 15 " throttle pushrod wire. Place the rudder is in line with the fin. If not, thread the a clevis retainer onto a clevis.
- Page 32 Section 10: Control Linkage Installation Note: The next few steps may take a bit of Step 26 trial and error to get the throttle operating Turn on both the transmitter and receiver. Move the correctly. It is suggested to work slowly until throttle stick to the fully open position.
- Page 33 Section 10: Control Linkage Installation Step 27 Move the throttle stick and trim to the closed This is all done to allow for a full range of position. The carburetor should move to the operation of the carburetor using the radio. fully closed position.
- Page 34 Section 10: Control Linkage Installation Step 28 Step 32 Once the throttle servo has been adjusted, install the Secure the aileron pushrod wire to the servo arm nylon wire clevis and screw in the servo arm. using a nylon wire keeper. Step 29 Place a clevis retainer onto a clevis.
-
Page 35: Section 11: Wing Installation (Rubber Band Option)
Section 11: Wing Installation (Rubber Band Option) Required Parts Hint: Apply a thin layer of CA to the exposed dowel to prevent fuel from soaking • Wing • Fuselage into the dowel. • Wing dowel (2) • Rubber band (10) Required Tools and Adhesives Step 3 •... -
Page 36: Section 11: Wing Installation (Bolt-On Option)
Section 11: Wing Installation (Rubber Band Option) A good general rule is using at least two rubber bands per pound of airplane. A 5-pound plane will use 10 rubber bands. Also note: When putting on the rubber Using more than the recommended amount bands, start from the front dowels at the is fine, just don’t go overboard. -
Page 37: Section 12: Control Throws
Section 11: Wing Installation (Bolt-On Option) Step 3 Position the wing onto the fuselage. Bolt the wing into position using the two 1/4-20 x 2" wing bolts. Section 12: Control Throws Step 1 Photo for Step 1 Check to make sure the controls move the right direction when using the transmitter. - Page 38 Section 12: Control Throws Photo for Step 1 The amount of control throw should be adjusted as closely as possible using mechanical means, rather than making large changes electronically at the radio. By moving the position of the clevis at the control horn toward the outermost hole, you will decrease the amount of control throw of the control surface.
-
Page 39: Section 13: Center Of Gravity
Section 13: Center of Gravity An important part of preparing the aircraft for flight is Step 2 properly balancing the model. Attach the wing as described in Section 11. Turn the Do not inadvertently skip this step! model upright and lift the model at the marks made This is especially important when various engines in the previous step. -
Page 40: Section 14: Range Testing The Radio
Section 14: Range Testing the Radio Before each flying session, range-check your radio. This is accomplished by turning on your transmitter with the antenna collapsed. Turn on the radio in your airplane. With your airplane on the ground, you should be able to walk 30 paces away from your airplane and still have complete control of all functions. -
Page 41: Glossary Of Terms
Glossary of Terms • Ailerons: Each side of this airplane has a hinged • Nose Gear: The part of the landing gear that is attached control surface (aileron), located on the trailing edge of to the nose of the fuselage. The nose gear is usually the wing. -
Page 42: 2004 Official Amanational Model Aircraft Safety Code
2004 Official AMA National Model Aircraft Safety Code Effective January 1, 2003 Model Flying MUST be in accordance with this Code in order for AMA Liability Protection to apply. GENERAL 7) I will not operate models with pyrotechnics (any device that explodes, burns, or propels a projectile 1) I will not fly my model aircraft in sanctioned of any kind) including, but not limited to, rockets, events, air shows or model flying demonstrations... - Page 43 2004 Official AMA National Model Aircraft Safety Code 5) Flying sites separated by three miles or more Organized RC Racing Event are considered safe from site-to site interference, 10) An RC racing event, whether or not an AMA Rule even when both sites use the same frequencies. Any Book event, is one in which model aircraft compete circumstances under three miles separation require in flight over a prescribed course with the objective of...
- Page 44 ® WE GET PEOPLE FLYING © 2004, Horizon Hobby, Inc. 4105 Fieldstone Road Champaign, Illinois 61822 (877) 504-0233 www.horizonhobby.com # 6140...
Need help?
Do you have a question about the Alpha.60 ARF and is the answer not in the manual?
Questions and answers