Subscribe to Our Youtube Channel
Summary of Contents for Kramer VP-501x1
- Page 1 Kramer Electronics, Ltd. Preliminary USER MANUAL Models: VP-501xl, UXGA Scan Converter VP-502xl, UXGA/HD Scan Converter...
-
Page 2: Table Of Contents
Contents Contents Introduction Getting Started Overview Your VP-501xl Your VP-502xl Connecting the VP-501xl Connecting the VP-502xl Operating the VP-501xl/VP-502xl Using the Quick-Set Buttons 8.1.1 Using the AUTO IMAGE Button 8.1.2 Using the FREEZE Button 8.1.3 Using the OS/US Button Adjusting the Display via the Menu Buttons Using the Menu Using Test Patterns Saving and Recalling... -
Page 3: Introduction
GROUP 7: Scan Converters and Scalers; GROUP 8: Cables and Connectors; GROUP 9: Room Connectivity; GROUP 10: Accessories and Rack Adapters; GROUP 11: Sierra Products 2 Download up-to-date Kramer user manuals from our Web site at http://www.kramerelectronics.com 3 The complete list of Kramer cables is on our Web site at http://www.kramerelectronics.com... -
Page 4: Overview
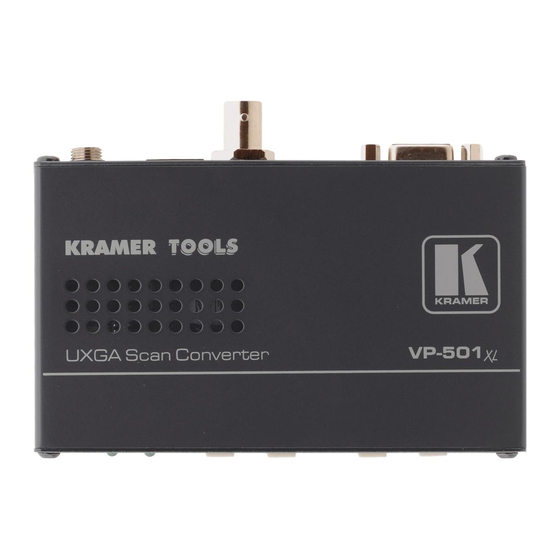
Overview Overview The Kramer VP-501xl is a high-quality scan converter for down-scaling computer graphics (VGA up to UXGA) to PAL or NTSC video. The Kramer VP-502xl is a high-quality scan converter for down-scaling computer graphics and HD to PAL or NTSC video. It supports VGA up to UXGA, as well as the HD resolutions: 480p, 576p, 720p and 1080i. -
Page 5: Your Vp-501Xl
Your VP-501xl Your VP-501xl Figure 1 Table 1 describe the VP-501xl. Figure 1: VP-501xl UXGA Scan Converter Table 1: VP-501xl Features Feature Function 12V DC +12V DC connector for powering the unit Y/C OUT 4-pin Connector Connect to the s-Video acceptor CV OUT BNC Connector Connect to the composite video acceptor PAL DIP-switch... -
Page 6: Your Vp-502Xl
2 This button has dual functionality. When in the MENU mode, it functions according to the labeling above the button. When not in the MENU mode, the labeling below the button takes precedence 3 The image is smaller than the screen, leaving a border around the image KRAMER: SIMPLE CREATIVE TECHNOLOGY... -
Page 7: Connecting The Vp-501Xl
Connecting the VP-501xl Connecting the VP-501xl To connect your VP-501xl as the example in Figure 3 illustrates, do the following 1. Connect a computer graphics source to the 15-pin HD INPUT connector. 2. Connect the Y/C OUT 4-pin connector to the Y/C acceptor (for example, an s-Video recorder) and/or the CV OUT BNC connector to the CV acceptor (for example, a composite video recorder). -
Page 8: Connecting The Vp-502Xl
1 Switch OFF the power on each device before connecting it to your VP-502xl. After powering up your VP-502xl, switch on the power on each device 2 To connect a high definition source, use a breakout cable such as the Kramer C-GM/3RVF. If you have a VGA to a 5BNC cable, use the RGB wires only... -
Page 9: Operating The Vp-501Xl/Vp-502Xl
Operating the VP-501xl/VP-502xl Figure 5: VP-502xl Alternate Connection Operating the VP-501xl/VP-502xl You can operate your VP-501xl/VP-502xl via the front panel buttons, which are dual-purpose buttons that function as: • Quick-set buttons: AUTO IMAGE, FREEZE and OS/US; or • Menu buttons: MENU, ENTER, – and + This section describes how to: •... -
Page 10: Using The Quick-Set Buttons
1 Making the data bigger and easier to read but running the risk of having some of it run off the edge of the screen 2 The image appears reduced in size with a margin around it so that none of the data gets lost KRAMER: SIMPLE CREATIVE TECHNOLOGY... -
Page 11: Adjusting The Display Via The Menu Buttons
Operating the VP-501xl/VP-502xl Adjusting the Display via the Menu Buttons The set of menu buttons (MENU, ENTER, − and +) let you adjust the screen settings. Use the menu buttons as follows: • Press the MENU button to display the menu on the screen •... -
Page 12: Using Test Patterns
2. In the Advanced menu, select Save and set to number 1. 3. Press ENTER. The setup is saved. 1 The Save mode saves the Picture setup, the TV Output setup, the VGA Input Setup, the Zoom setup, and the advanced setup (test patterns) KRAMER: SIMPLE CREATIVE TECHNOLOGY... -
Page 13: Saving When Exiting The Menu
Operating the VP-501xl/VP-502xl When disconnecting the unit, the setup that was saved last will be stored and will reappear when connecting the unit once again. Consider the following sequence, for example: • A certain setup is saved to 1 • A different setup is saved to 2 •... -
Page 14: Setting The Dip-Switches
Set to ON (down) to select PAL Set to OFF (up) to select NTSC YUV/RGB Determines the input color space to be used: Set to ON (down) to select YUV Set to OFF (up) to select RGB KRAMER: SIMPLE CREATIVE TECHNOLOGY... -
Page 15: Technical Specifications
Technical Specifications Technical Specifications Table 6 includes the technical specifications. Table 6: Technical Specifications of the VP-501xl/VP-502xl INPUTS: VP-501xl: 1 x VGA/ UXGA on an 15-pin HD connector VP-502xl: 1 x VGA/ UXGA, analog component HD on an 15-pin HD connector OUTPUTS: 1 composite video 1Vpp/75Ω... - Page 16 KRAMER: SIMPLE CREATIVE TECHNOLOGY...
- Page 17 For the latest information on our products and a list of Kramer distributors, visit our Web site: www.kramerelectronics.com where updates to this user manual may be found. We welcome your questions, comments and feedback. Safety Warning: Disconnect the unit from the power supply before opening/servicing.


Need help?
Do you have a question about the VP-501x1 and is the answer not in the manual?
Questions and answers