Xerox 6204 User Manual
Wide format solution sereis
Hide thumbs
Also See for 6204:
- Installation manual ,
- Copy/scan operation manual (226 pages) ,
- User manual (156 pages)
Table of Contents
Advertisement
Quick Links
Advertisement
Table of Contents

Related Manuals for Xerox 6204


Summary of Contents for Xerox 6204
- Page 1 User Guide 701P44973 Xerox 6204 Wide Format Solution User Guide Vers. 2.0...
- Page 2 All product/brand names are trademarks or registered trademarks of the respective holders. Damage related to computer viruses: Xerox is not responsible for any machine breakdown or software malfunction caused by a computer virus. Important (1) This manual is copyrighted with all rights reserved. Under the copyright laws, this manual may not be copied or modified, in whole or in part, without the written consent of the publisher.
-
Page 3: Table Of Contents
Xerox 6204 Wide Format Solution series ........ - Page 4 Mirror Image (Making Reverse Copies of Images) ....... . . 65 Xerox 6204 Wide Format Solution...
- Page 5 Stored Programming Overview ..........96 Xerox 6204 Wide Format Solution...
- Page 6 Custom Buttons ............126 Xerox 6204 Wide Format Solution...
- Page 7 Troubleshooting ............. 162 Xerox 6204 Wide Format Solution...
- Page 8 Notes and Restrictions on Use of the Machine ........193 Xerox 6204 Wide Format Solution...
-
Page 9: Before Using The Machine
This chapter contains descriptions about how to use this document, as well as cautions on using the product safely and legally. Preface......................2 Xerox 6204 Wide Format Solution series .............3 Related Information Sources and CD ............4 Using This Guide ..................5 Safety Notes ....................7 Operational Safety Information ..............9... -
Page 10: Preface
After reading this guide, be sure to keep it handy for quick reference on how to perform different operations or solve a problem with the machine. In this manual, the Xerox 6204 Wide Format Solution may be called the machine, the Xerox 6204 Wide Format, or the Xerox 6204 WF depending on space considerations. -
Page 11: Xerox 6204 Wide Format Solution Series
Xerox 6204 Wide Format Solution series Xerox 6204 Wide Format Solution series The Xerox 6204 Wide Format Solution series has two models as follows: Name Notes Xerox 6204 Wide This model has copy/print/scan functions. Format Copier/ Printer (WFCP) Xerox 6204 Wide This model has only print functions. -
Page 12: Related Information Sources And Cd
Scanner Driver: The scanner driver is software that enables you to import data that has been scanned into the machine to your computer. Xerox 6204 WF Scan Service: This is software that enables you to import scanned data on the machine to your computer without using application software. -
Page 13: Using This Guide
Using This Guide This section describes the organization of this guide. This guide has been produced for people who operate the Xerox 6204 WF Solution on a regular basis. When using this guide, read the chapter related to the specific operation you are performing for a broader understanding of the process. -
Page 14: Conventions
< > button : Indicates a hardware button on the control panel. < > key : Indicates a key on the keyboard of the computer. Xerox 6204 Wide Format Solution... -
Page 15: Safety Notes
Read these Safety Notes carefully before using this product, to ensure you operate the equipment safely. Your Xerox product and recommended supplies have been designed and tested to meet strict safety requirements. These include safety agency approval and compliance to established environmental standards. Please read the following instructions carefully fefore operating the product and refer to them as needed to ensure the continued safe operation of your product. - Page 16 If you do not know whether or not an outlet is grounded, consult a qualified electrician. If this machine needs to be moved to a different location, contact a Xerox service representative or your authorized local representative or service support organization.
-
Page 17: Operational Safety Information
Safety Notes Operational Safety Information To ensure the continued safe operation of your Xerox equipment, follow these safety guidelines at all times. Do These: Always connect equipment to a correctly grounded power outlet. If in doubt, have the outlet check by a qualified electrician. -
Page 18: Ozone Safety Information
This product will produce ozone during normal operation. The ozone produced is heavier than air and is dependent on copy volume. Providing the correct environmental parameters as specified in the Xerox Installation procedurre will ensure that the concentration levels meet safe limits. -
Page 19: Regulatory Information
Xerox ENERGY STAR equipment is preset at the factory to enter a "low power" state and/or shut off completely after a specified period of use. The energy-saving features can reduce product energy consumption in helf when compared to conventional equipment. -
Page 20: Illegal Copies And Printouts
Further information of these provisions may be obtained from the Copyright Office, Library of Congress, Washington, D.C. 20559. Ask for Circular R21. Certificates of Citizenship or Naturalization. (Foreign Naturalization Certificates may be photographed.) Passports. (Foreign Passports may be photographed.) Immigration Papers. Draft Registration Cards. Xerox 6204 Wide Format Solution... - Page 21 The above list is provided for your convenience and assistance, but it is not all- inclusive, and no liability is assumed for its completeness or accuracy. In case of doubt, consult your solicitor. Xerox 6204 Wide Format Solution...
-
Page 22: Other Countries
Copyrighted material or trademarks without the consent of the owner. Postage stamps. Other negotiable instruments. This list is not all-inclusive and no liability is assumed for either its completeness or accuracy. In case of doubt, contact your legal counsel. Xerox 6204 Wide Format Solution... -
Page 23: Product Recycling And Disposal
Product Recycling and Disposal Product Recycling and Disposal If you are managine the disposal of your Xerox product, please note that the product contains lead, mercury, and other materials whose disposal may be regulate due to environmental considerations in certain countries or states. The presence of lead and mercury is fully consistent with global regulations applicable at the time that the product was placed on the market. -
Page 24: Warning And Caution Label Locations
1 Before Using the Machine Warning and Caution Label Locations These are the locations where warning and caution labels are located on the Xerox 6204 Wide Format Solution. Xerox 6204 Wide Format Solution... -
Page 25: Product Overview
Machine Components .................18 Power On / Off ....................25 Circuit Breaker ....................26 Power Saver Mode ..................27 Using Originals....................30 Size Series Settings for Originals ...............31 Media Types and Loading................32 Media Settings ....................39 Xerox 6204 Wide Format Solution... -
Page 26: Machine Components
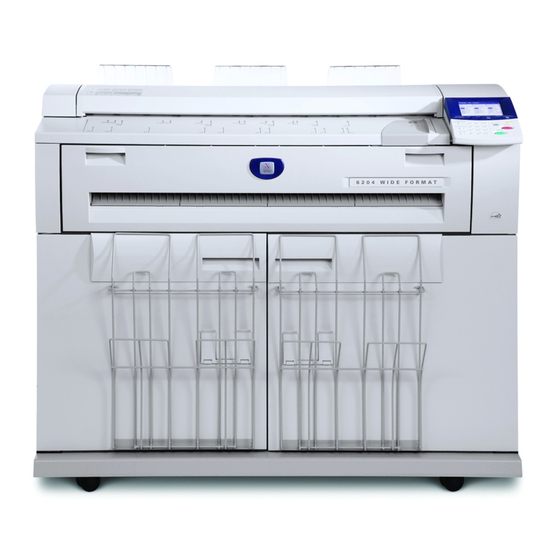
2 Product Overview Machine Components This section describes the main components and their functions of the Xerox 6204 Wide Format Solution (hereafter called "the machine"). Machine Components Front (Xerox 6204 Wide Format Copier/Printer - WFCP) Front (Xerox 6204 Wide Format Printer - WFP) - Page 27 Used for locking the wheels of the machine. Lock these casters after moving the machine to its installation site. Warning Never touch a labeled area on hot or sharp parts of the machine. You could get burned or incur other injuries. Xerox 6204 Wide Format Solution...
- Page 28 Cutter button Cuts the lead edge of roll media. Cutter cover Covers the cutter to cut media. Normally, do not open this cover. Roll 1 Load roll media here. Roll 2 (optional) Load roll media here. Xerox 6204 Wide Format Solution...
-
Page 29: Control Panel
Machine Components Control Panel The following describes the names and functions of components on the control panel. Control Panel (Xerox 6204 Wide Format Copier/Printer) Scan Control Panel (Xerox 6204 Wide Format Printer) Language Note: Buttons 9, 12, 13, and 16 are not used on the 6204 Wide Format Printer model. - Page 30 <Custom 2> button (which you can set to Scan, for example). The factory default settings for the Xerox 6204 Wide Format Printer (WFP) model for these buttons: Language selection for <Custom 1> button, none for <Custom 2> button.
-
Page 31: Using The Touch Screen
The parentheses( ) indicate ranges to be set. Scroll buttons Use the arrow buttons [ ] to scroll, and select a value or feature. The items and buttons that cannot be selected are displayed in light gray. Xerox 6204 Wide Format Solution... -
Page 32: Entering Text
Select [Alphanumeric]. When selecting [Shift], uppercase characters appear. To return to lowercase, select [Shift] again. Entering Specific Symbols Select [Symbol]. Entering Space Select [Space]. Deleting a character Select [BS]. This deletes one character at a time. Xerox 6204 Wide Format Solution... -
Page 33: Power On / Off
• Do not turn off the circuit breaker (main power switch) while the power switch is on. It may cause the machine to malfunction. Note • Before you turn the power back on after turning it off, first make sure that the touch screen has gone out. Xerox 6204 Wide Format Solution... -
Page 34: Circuit Breaker
[ ] position. Check the Circuit Breaker once a month for proper operation. If you notice any unusual conditions, contact your Xerox Customer Support Center. Note • Before setting the Circuit Breaker to the down position (Off), set the Power Switch (also called the Stand-by Switch) to Off. -
Page 35: Power Saver Mode
Note • The time to activation of Low Power Mode and Sleep Mode can each be set in 1 minute increments, from 5 to 240 minutes. Press the <Log In/Out> button. Scan <Log In/Out> button Xerox 6204 Wide Format Solution... - Page 36 From Last Selection to Low Power Mode Set the time to move to the [Low Power Mode] after the last operation. Note • The default for [From Last Selection to Low Power Mode] is [15] minutes. Xerox 6204 Wide Format Solution...
-
Page 37: Exiting The Power Saver Mode
• When Print Data is received (automatic) Press the <Power Saver> button. Scan <Power Saver> button. When Print Data is received while the machine is in Power Saver mode, the machine automatically exits the Power Saver mode. Xerox 6204 Wide Format Solution... -
Page 38: Using Originals
See the Original Size Series table on the next Flat paper (0.05 - 3.2 mm) page for a list of the sizes of originals that can be used with the Xerox 6204 Wide Format Solution. Non-standard Width : 7.2 - 36 inches (182 - 914.4 mm) Length : 8.3 - 59 inches (210-15000 mm) -
Page 39: Size Series Settings For Originals
880x1, 230mm, 620x871mm, 440x625mm, A3, A4 SP.A-2 series 860x1,210mm, 620x871mm, A2, A3, A4 Arch-1 series 36x48", 24x36", 18x24", 12x18", 9x12" Arch-2 series 30x42", 24x36", 18x24", 12x18", 9x12" ANSI series 34x44", 22x34", 17x22", 11x17", 8.5x11" Select [Close]. Xerox 6204 Wide Format Solution... -
Page 40: Media Types And Loading
To make the most effective use of the machine's capability, we recommend using only media recommended by Xerox. If you want to use media not recommended by Xerox, contact your Xerox Customer Support Center. Media Type... -
Page 41: Handling And Storing Paper Media
Tracing paper especially should be put in a plastic or moisture-proof bag that contains desicant. When the machine is not used for a long period of time, remove the media and store it accordingly. Xerox 6204 Wide Format Solution... -
Page 42: Loading Media
Pinch the lever at the end of the shaft, and remove the shaft from the core of the roll media. Note • Pinching the lever releases the lock of the roll media, and you can remove the shaft. Xerox 6204 Wide Format Solution... - Page 43 The roll media is cut at the point that the cutter button is released. Remove the piece of paper that was cut. Xerox 6204 Wide Format Solution...
- Page 44 • Hold the media while it is being fed. If you release the media before it stops, it may result in paper jams. Xerox 6204 Wide Format Solution...
-
Page 45: Cutting Roll Media
The media is cut when the cutter button is released. Remove the piece of paper that was cut. Gently slide the Roll 1 or Roll 2 drawer into the machine until it stops and latches. Xerox 6204 Wide Format Solution... - Page 46 2 Product Overview Close the front doors. Xerox 6204 Wide Format Solution...
-
Page 47: Media Settings
SP.A-1 series 880x1230mm, 620x871mm, 440x625mm, A3, SP. A-2 series 860x1210mm, 620x871mm, A2, A3, A4 Arch-1 series 36x48", 24x36", 18x24", 12x18", 9x12" Arch-2 series 30x42", 24x36", 18x24", 12x18", 9x12" ANSI series 34x44", 22x34", 17x22", 11x17", 8.5x11" Xerox 6204 Wide Format Solution... - Page 48 20 lb. Premium Tints 80g/m Premium Fluorescent 80g/m Vellum Premium Tracing 90 90g/m Film Premium Translucent 75 micron 75µm Heavy Bond Presentation 110g/m Vellum Premium Tracing 112gsm 112g/m Film Premium Translucent 100 micron 100µm Select [Save]. Xerox 6204 Wide Format Solution...
-
Page 49: Copy
Stopping a Copy Job...................45 Copying Multiple Originals (Collated Output)..........46 Manual Feed Copies...................48 Interrupting a Copy Job................49 Copying from Memory (Reprinting).............50 Copy Features ....................52 Copy - Basic Copy ..................53 Copy - Image Quality ..................58 Copy - More Features .................60 Xerox 6204 Wide Format Solution... -
Page 50: Copying Procedure
For more information about this tab, refer to the section listed below (later in this chapter): Scan Start Position Lead & Trail Margins 0 mm Lead : 0 mm "Copy - More Features" (P.60) Trail : 0 mm Xerox 6204 Wide Format Solution... -
Page 51: Step 2 Entering The Quantity
(to avoid minor "crinkles" that can cause dark areas in the copy). If you release the original before it stops feeding, it may result in a jam. Xerox 6204 Wide Format Solution... - Page 52 Solve the Copy Close problem as instructed in the message. For information about the manual start, refer to "Scan Quantity Pages Start Mode" (P.127). 100.0% Uncollated Remove the ejected original. Xerox 6204 Wide Format Solution...
-
Page 53: Stopping A Copy Job
The current scanned job will be deleted from memory. All scanned original images are deleted, and the copy job Select OK to cancel the current job. is canceled. Cancel To Continue a Copy Job Select [Cancel]. The copy job is continued. Xerox 6204 Wide Format Solution... -
Page 54: Copying Multiple Originals (Collated Output)
Enter the number of copies needed (1 to 99) Copy from Memory Transmitting using the numeric keypad. Power Saver Copy Scan Menu Jobs in Memory Original/ Media Settings Clear All Interrupt Stop Machine Status Start Log In/Out Numeric keypad Xerox 6204 Wide Format Solution... -
Page 55: Change Settings
Original/ Media Settings Clear All ascending order or descending order in the Interrupt system setting features. For information about Stop Machine Status the output order, refer to "Collation Order" (P.136). Start Log In/Out <Start> button Xerox 6204 Wide Format Solution... -
Page 56: Manual Feed Copies
For information about the procedure to set the paper media, refer to "Using the Manual Feed Tray (Bypass)" (P.36). When the copy job is completed, close the manual feed tray (bypass). Xerox 6204 Wide Format Solution... -
Page 57: Interrupting A Copy Job
When the new job (interrupt job) is completed, press the <Interrupt>button again. The interrupt mode is cancelled, and the suspended job restarts. Note • The interruption mode will be automatically canceled after 30 seconds has elapsed without copy operation. Xerox 6204 Wide Format Solution... -
Page 58: Copying From Memory (Reprinting)
• If the <Clear All> button is pressed during copying from the memory, the settings returns to the settings specified when the Copy from Memory feature was activated, not to the initial settings specified with the system settings feature. Xerox 6204 Wide Format Solution... - Page 59 The Copy from Memory mode is canceled. Note • The Copy from Memory mode is automatically canceled after a predetermined period of time has elapsed without copy operation. For details about the Auto clear, refer to "Auto Clear" (P.124). Xerox 6204 Wide Format Solution...
-
Page 60: Copy Features
3 Copy Copy Features The Xerox 6204 Wide Format Solution has the following copy features: Original Type Copy density Selects the suitable image quality for Adjusts the copy density. the type of original used. Darken Lighten Normal Original Background Suppression Contrast Adjusts the contrast of the original. -
Page 61: Copy - Basic Copy
Supply] at the same time. Reduce/Enlarge (3rd Button) Select from preset ratios. You can change the indicated ratios. For information about the change procedure, refer to "Reduce/ Enlarge - 3rd Button" (P.132). [More...] Display the [Reduce/Enlarge] screen. Xerox 6204 Wide Format Solution... -
Page 62: Variable Ratios
If you specify both the original size and the copy size, the copy ratios for the height and width are calculated automatically according to the sizes that you entered. The calculation results are indicated by copy ratios within the range from 25% to 400%. Xerox 6204 Wide Format Solution... -
Page 63: Media Supply (Selecting Media Supply To Use For Copying)
You can change the media sizes/trays to display. For information about the setting procedure, refer to "Media Supply - 2nd, 3rd Buttons" (P.132). [More...] Display the [Media Supply] screen. For more details, refer to the next page. Xerox 6204 Wide Format Solution... -
Page 64: Media Type (Selecting The Media Type To Use For Copying)
• When [Tray] is selected, the media type loaded Reduce / Enlarge Media Supply Media Type in the tray is automatically selected. Auto 100.0% Bond Select 1 A0 Auto % Vellum Bond 50.0% 2 A1 Film Bond More... More... Media Cut Mode Standard Xerox 6204 Wide Format Solution... -
Page 65: Media Cut Mode (Selecting The Media Cut Mode)
Select the media cut mode. Media Cut Mode Cancel Save Standard Standard Cuts the roll media to a standard size. Synchro- nized Synchronized Cuts the roll media to the same size as the original. Select [Save]. Xerox 6204 Wide Format Solution... -
Page 66: Copy - Image Quality
Select this option to make copies of photos and other pictures. Text / Line (clear) Select this option to make copies of transparent (clear) originals. This option is suitable for film and vellum originals where the background color is water-clear, white, bluish, or brown. Xerox 6204 Wide Format Solution... -
Page 67: Copy Density (Adjusting The Copy Density)
The closer the level is to [Highest], the greater the difference between the light and dark parts as the lighter portions become lighter and the darker Lowest portions become darker. Choosing [Lowest] results in the least contrast. Xerox 6204 Wide Format Solution... -
Page 68: Copy - More Features
Copies are made without the position of the Image Location Cancel Save original image being shifted. No Shift Auto Center Auto Center Copies are made so that the center of the original Justification matches the center of the paper media. Shift Adjustment Xerox 6204 Wide Format Solution... -
Page 69: Edge Erase (Erasing The Edges And Margin Shadows Of The Original)
Normal original are erased with the same edge erase Erase (0-50) measurements. You can set the edge erase width within the range of 0 to 50 mm in 1 mm Border Erase increments. Edge Erase Xerox 6204 Wide Format Solution... -
Page 70: Edge Erase
You can set the Erase edge erase width within the range from 0 to 50 Left Right (0 - 50) (0 - 50) mm in 1 mm increments. Border Erase Bottom (0 - 50) Edge Erase Select [Save]. Xerox 6204 Wide Format Solution... -
Page 71: Scan Start Position (Shifting The Start Position For Scanning The Original)
Set the lead and trail margins within the range from 0 to 999mm in 1 mm increments. Trail Select [Lead & Trail Margins]. Lead & Trail Margins Cancel Save Set the margins using the numeric keypad or Lead (0-999) ], [ ], and select [Save]. Trail (0-999) Xerox 6204 Wide Format Solution... -
Page 72: Collation (Building Sets)
You can set the print order to either the ascending order or descending order in the system setting features. For information about the output order, refer to "Collation Order" (P.136). Select [Save]. Xerox 6204 Wide Format Solution... -
Page 73: Mirror Image (Making Reverse Copies Of Images)
Original Output paper When the original image is slightly larger than the original detection width, the protruding part of the right side of the original image is omitted. Original detection width Original detection width Magnification:100% Xerox 6204 Wide Format Solution... -
Page 74: Invert Image (Making Reverse Copies Of Negative Images)
Roll 1, Roll 2, or Manual Feed and still have the feature work. * The code that you enter for the orientation of the original (input detection) under the Detail Settings must be Auto (0) or Portrait (1) but not Landscape (2) to work correctly. Xerox 6204 Wide Format Solution... - Page 75 Copy - More Features Illustrations of the Auto Rotate feature: Xerox 6204 Wide Format Solution...
- Page 76 3 Copy Xerox 6204 Wide Format Solution...
-
Page 77: Scan
4 Scan This chapter describes the scan features of the Xerox 6204 Wide Format Copier/Printer model. Important • Scan features are not available for some models. An optional package is necessary. For more information, contact your Xerox Customer Support Center. -
Page 78: Preparation For Scanning
This section describes the basic steps you need to take before you start scanning on the Xerox 6204 Wide Format Copier Printer. Items you set on the Xerox 6204 WF Solution Set the network settings on the machine. Set up a mailbox to receive the scanned documents - which are saved to the designated mailbox in the machine first. -
Page 79: Mailbox Name
If you choose the Off setting, then the document is left strored in the mailbox. If you choose On, then the document will be automatically deleted from the mailbox after it is imported. Xerox 6204 Wide Format Solution... -
Page 80: Scanning Procedure
] to display the previous screen and select [ ] to display the next screen. You can also directly access a Mailbox by entering a two-digit mailbox number in [Go to] using the numeric keypad. Xerox 6204 Wide Format Solution... -
Page 81: Step 2 Selecting Features
"Scan - Image Quality" (P.83) "Scan - More Features" (P.85) For the information about how to store multiple originals as a single document (data), refer to "Scanning Multiple Originals as One Set of Data" (P.75). Xerox 6204 Wide Format Solution... -
Page 82: Step 3 Starting A Scan Job
Import the Scanned Data Using Wide Format Scan Service You can create files directly from the scan data that is stored on the machine’s mailbox. Import the Scanned Data Using the Application You can import using the network scan driver. Xerox 6204 Wide Format Solution... -
Page 83: Scanning Multiple Originals As One Set Of Data
When not changing scan settings for the next originals. Set the next original. When changing scan settings for the next originals. Select [Change Settings]. The [Scan] screen appears. Change the scan settings if necessary. Set the original in place. Xerox 6204 Wide Format Solution... - Page 84 • To delete the most recently scanned original, select [Delete Prev. Image]. When all originals have been scanned, select [Last Original]. Xerox 6204 Wide Format Solution...
-
Page 85: Stopping A Scan Job
If an original jams, solve the problem in accordance with the message displayed. Stop Scanning Multiple Originals All the originals scanned are deleted and the scan job is stopped. Select [Stop] on the touch screen. Select [OK]. Xerox 6204 Wide Format Solution... -
Page 86: Interrupting A Scan Job
When the interrupt is completed, press the <Interrupt> button again. The interruption mode is cancelled, and the suspended job resumes. Note • The interruption mode will be automatically cancelled after 30 seconds has elapsed without scan operation. Xerox 6204 Wide Format Solution... -
Page 87: Scan Features
Scan Features Scan Features The Xerox 6204 Wide Format Copier/Printer model has the following scan features: Scan Resolution Halftone Sets the resolution for the original to Sets the halftone type for the original be scanned. to be scanned. Scan Density... -
Page 88: Scan - Basic Scan
Select [More...] for [File format]. Select the file format. Multi-page TIFF Saves multiple pages as 1 TIFF file. Single page TIFF Saves each page as a TIFF file. Multi-page PDF Saves multiple pages as 1 PDF file. Xerox 6204 Wide Format Solution... -
Page 89: Scan Resolution (Selecting The Scan Resolution)
"Scan Resolution (1st, 2nd buttons)" (P.140). More... Display the [Scan Resolution] screen. [Scan Resolution] screen Select [More...] for [Scan Resolution]. Select a scan resolution from 150dpi, 200dpi, 300dpi, 400dpi, and 600dpi. Select [Save]. Xerox 6204 Wide Format Solution... -
Page 90: Halftone (Selecting The Halftone Type For Scanning The Original)
Scanned image will be the same size as the original. Presets (Six Types) Select from six preset scan ratios. You can change the ratios displayed. For information about this procedure, refer to "Reduce / Enlarge Buttons (Changing Preset Values)" (P.136). Xerox 6204 Wide Format Solution... -
Page 91: Scan - Image Quality
Text / Line (clear) Select this option when scanning transparent (clear) originals. This item is suitable for originals which background color is clear, white, bluish, or brown. Note • Use this option when scanning film and vellum originals. Xerox 6204 Wide Format Solution... -
Page 92: Scan Density (Adjusting The Scan Density)
The nearer the level is to [Highest], the greater the difference between the light and dark parts as light parts become lighter and dark parts become darker. Choosing [Lowest] results in the least contrast between light and dark areas. Select [Save]. Xerox 6204 Wide Format Solution... -
Page 93: Scan - More Features
"Custom Size Buttons" (P.142). Variable Size You can set the width in the range 100 to 1230 mm , and the height in the range 100 to 914 mm, in 1 mm increments. Select [Save]. Xerox 6204 Wide Format Solution... -
Page 94: Edge Erase (Erasing Edges And Margin Shadows Of The Original)
Set the scan start position using the numeric keypad or [ ], [ Note • When Reduce/Enlarge is set, the scan start position is also enlarged or reduced in proportion to the scan ratio. Select [Save]. Xerox 6204 Wide Format Solution... -
Page 95: Mirror Image (Scanning Images Reversed)
Scan Size • When the original image is slightly larger than the original detection width, protruded part of the right side of the original image is omitted. Original detection width Original detection width Magnification:100 % Xerox 6204 Wide Format Solution... -
Page 96: Invert Image (Scanning With Inverted Images)
• When [Negative Image] and [Edge Erase] are set simultaneously, the edge erase area turns to white. • When the original size is smaller than the scan size, white colored margins appear. Scan Size Original Xerox 6204 Wide Format Solution... -
Page 97: Deleting Documents In A Mailbox
[Go to] using the numeric keypad. • You can select more than one document. • To cancel the selection you’ve made, select the document again. • To select all documents, select [Select/Deselect all]. Select [Delete]. Xerox 6204 Wide Format Solution... - Page 98 4 Scan Select [OK]. Note • Once the document is deleted, it cannot be recovered. Xerox 6204 Wide Format Solution...
-
Page 99: Creating / Deleting / Changing A Mailbox
] to display the previous screen and select [ ] to display the next screen. • By entering a two-digit number in [Go To] using the numeric keypad, you can specify the mailbox directly. Enter the correct password, the select [Save].. Xerox 6204 Wide Format Solution... - Page 100 There is no password. To Scan When scanning documents to a mailbox, a password must be entered. To Retrieve When retrieving data from a mailbox on a computer, a password must be entered. Xerox 6204 Wide Format Solution...
-
Page 101: Deleting A Mailbox
] to display the next screen. The screen that requests a password appears. Enter the password, and select [Confirm]. Note • When [Password Settings] for the mailbox is set to [Off], this screen does not appear. Xerox 6204 Wide Format Solution... -
Page 102: Changing Mailbox Settings
Enter the password, and select [Confirm]. Note • When [Password Settings] for the mailbox is set to [Off], this screen does not appear. Select the items to be changed (as needed), and then change the settings. Select [Save]. Xerox 6204 Wide Format Solution... -
Page 103: Stored Programming
5 Stored Programming This chapter describes the Stored Programming features of the Xerox 6204 Wide Format Solution. Stored Programming Overview..............96 Registering/Deleting/Renaming Stored Programming ........97 Recalling Stored Programming ..............100... -
Page 104: Stored Programming Overview
5 Stored Programming Stored Programming Overview The [Create/Delete] screen for Stored Programming allows you to set the following items. Frequently used features can be registered as Stored Programming and recalled by a single button operation. In addition, you can also register a screen to open from a shortcut button. -
Page 105: Registering/Deleting/Renaming Stored Programming
Registering/Deleting/Renaming Stored Programming Registering/Deleting/Renaming Stored Programming You can set the following items on the [Create/Delete] screen for Stored Programming. Registering Stored Programming ....................97 Naming/Renaming Stored Programming ................... 98 Confirming Stored Programming Settings ................. 99 Deleting Stored Programming....................99 Press the <Menu> button. Select [Create/Delete]. -
Page 106: Naming/Renaming Stored Programming
5 Stored Programming Select [Copy] or [Scan]. The current selections are displayed, and can be changed if necessary. Press the <Start> button. Note • To cancel the registration, press the <Stop> button. Naming/Renaming Stored Programming This is the procedure for naming and renaming Stored Programming. Up to 20 characters are allowed in a Stored Programming name. -
Page 107: Confirming Stored Programming Settings
Registering/Deleting/Renaming Stored Programming Confirming Stored Programming Settings This is the procedure for confirming that Stored Programming information is registered. Note • You can also confirm the Stored Programming settings from [Stored Programming] on [Menu] screen. Select the item to be confirmed, and select [Confirm Settings]. -
Page 108: Recalling Stored Programming
5 Stored Programming Recalling Stored Programming This is the procedure for recalling [Stored Programming]. When recalling a specified Stored Programming, the last screen shown during Stored Programming registration appears. Press the <Menu> button. Copy from Memory Transmitting Power Saver Copy Scan Menu Jobs in Memory... -
Page 109: Computer Operations
Note • Features described in this section are not available for some models. An optional package is necessary. For more information, contact your Xerox Customer Support Centre. About the CD-ROM Provided with the Machine........102 Preparation for Printing ................103 Printing.................... -
Page 110: About The Cd-Rom Provided With The Machine
6 Computer Operations About the CD-ROM Provided with the Machine The CD-ROM that came with the machine contains the following: Print Driver The printer driver is software to print on the machine from your computer. Wide Format Network TWAIN Source The Wide Format Network TWAIN Source (network scan driver) is software to import scanned data on the machine to your computer. -
Page 111: Preparation For Printing
Preparation for Printing Preparation for Printing The following describes the preparations you need to make before printing from your computer, as well as the data formats that can be printed from the Xerox 6204 Wide Format Solution. Printable Data Formats The following data formats can be printed on the machine from your computer after the appropriate preparations have been completed. -
Page 112: Network Settings
6 Computer Operations Network Settings Set the network settings on the machine. For the procedure to set your network settings, refer to "Network Settings" in the chapter on Administration. Browser Settings Print Services on Web enables you to check the machine status and job status and to change the settings from the computer using a web browser. -
Page 113: Installing Software
Preparation for Printing Installing Software To print from your computer, you must install printing software on your computer beforehand. There are two methods to print from your computer: Using Printer Driver Install the printer driver to your computer to print. DocuWide Printer Driver is included on the CD-ROM that provided with the machine. -
Page 114: Printing
6 Computer Operations Printing The following describes the print procedures. Using the Print Driver In order to print from your computer, a print driver must be installed on the computer. The print driver is software that converts print and print command data from your computer into forms usable by the machine. -
Page 115: Using The Bt-Plotassistant
For information about the file formats that BT-PlotAssistant supports, refer to the BT-PlotAssistant online help. For information about the features of BT-PlotAssistant, refer to the BT-PlotAssistant online help. Click [Start] > [Program] > [Xerox] > [BT-PlotAssistant] > [BT-PlotAssistant 3.4]. Select a printer from [Printer Name] list. -
Page 116: Checking Print Status And Machine Status (Print Services On Web)
6 Computer Operations Checking Print Status and Machine Status (Print Services On Web) Print Services On Web enables you to check the machine status and job status and to change the settings from the computer via a web browser. To learn about the procedure to change settings, click on [Help] in the Web browser screen and refer to the Print Services On Web online help. -
Page 117: Checking Job Status
"URL". For example, if the host name is "6204wf", and the domain name is [xerox.com], then the "URL" becomes "6204wf.xerox.com". • Contact your system administrator for the IP address or Internet address to enter. -
Page 118: Stopping A Print Job
Enter the device IP address or Internet address in the browser address field and press the <Enter> key. The machine status is displayed. Xerox 6204 WF Stopping a Print Job Pressing the <Stop> button of the machine allows you to stop the print job. -
Page 119: Importing Scanned Documents
Note • If no items are shown in the list, click [New Search]. The application searches for scanners. Xerox 6204 WF 129.249.150.78 • Only scanners connected to a uniform network are automatically shown in the list. To view scanners from other network, click on [Search Conditions] and change the settings. - Page 120 6 Computer Operations In the [Mailbox No.] field, enter the mailbox number (01-50) that contains the desired document to be imported, or select it from [Mailbox List]. Enter a password (4 digits) into the [Password] field. Note • When checking the [Save Password] check box, you can skip steps 5-8 the next time you select the same mailbox.
-
Page 121: Using Wide Format Scan Service
To learn about the field in the displayed dialog box, click on [Help] and refer to the Wide Format Scan Service online help. Click [Start] > [Program] > [Xerox] > [Wide Format Scan Service] > [Wide Format Scan Service]. Note •... - Page 122 6 Computer Operations...
-
Page 123: System Administration
7 System Administration The machine has factory default (initial) settings, but you can customize the system settings. To change the settings, enter System Administration mode, and use the [System Settings] screen. This chapter describes the settings that can be changed by the system administrator, and the procedures for doing so. -
Page 124: Procedure For Changing System Settings
7 System Administration Procedure for Changing System Settings To establish or change system settings that differ from the factory default settings, it is necessary to be in System Administration mode. This section describes the basic procedure for changing system settings. The following are the required steps: Step 1 Entering System Administration Mode .................116 Step 2 Entering the System Administrator Password ...............116... -
Page 125: Step 3 Selecting The Items From The [System Settings] Screen
Procedure for Changing System Settings Step 3 Selecting the Items from the [System Settings] Screen Select the items on the [System Settings] screen. For the items that can be selected in the system settings, refer to "Menu List for System Settings" (P.119). -
Page 126: Step 4 Selecting The Features
7 System Administration Step 4 Selecting the Features Set any feature. After setting the feature, select [Save]. Step 5 Exiting System Administration Mode When the settings are completed, select [Save] and the [System Settings] screen will be displayed. Select [Save]. -
Page 127: Menu List For System Settings
Menu List for System Settings Menu List for System Settings The following table shows a list of the items that can be set. Note that the items displayed depend on the configuration of your machine. System Settings Common Settings List For more information, refer to "Common Settings"... - Page 128 7 System Administration Copy Settings List For more information, refer to "Copy Settings" (P.131). Preset Buttons Reduce/Enlarge - 3rd Button Media Supply - 2nd, 3rd Buttons Basic Copy - Upper Right Button Copy Defaults Reduce / Enlarge Media Supply Media Type Media Cut Mode Original Type Copy Density...
- Page 129 Menu List for System Settings Scan Settings List For more information, refer to "Scan Settings" (P.139). Preset Buttons File Formats (1st, 2nd buttons) Scan Resolution (1st, 2nd buttons) Scan Defaults File Format Scan Resolution Halftone Reduce / Enlarge Original Type Scan Density Background Suppression Contrast...
-
Page 130: Common Settings
7 System Administration Common Settings You can change settings relating to the machine itself on [Common Settings] screen. These are the reference locations for detailed information about each option: Machine Clock ..........................123 Timers ............................123 Audio Tones..........................125 Custom Buttons.........................126 Default Language........................127 Scan Start Mode ........................127 Toner Density..........................128 Metric / Inch System .........................128... -
Page 131: Machine Clock
Common Settings Machine Clock You can set the date and time. Select [Machine Clock]. Select the item to be set, and enter the numeric values using numeric keypad or [ Select [Save]. Timers You can set the intervals of time when various power saving or reset features take effect. -
Page 132: Auto Clear
7 System Administration Auto Clear If a given time period elapses with no operation, the machine automatically returns to the initial screen and to the default settings. The factory default value is [Off]. Select [Auto Clear]. Configure the Auto Clear setting. If you selected [On], set the time. -
Page 133: Audio Tones
Common Settings Audio Tones You can select whether or not to have a sound that confirms an operation and an alarm when there is a fault. All default values when shipped from the factory are [On]. Select [Audio Tones]. Select the items to be set or changed. Select [Off] or [On]. -
Page 134: Custom Buttons
Wide Format Copier/Printer (WFCP) model for these buttons: Copy for the <Custom 1> button, Scan for the <Custom 2> button. The factory default settings of the Xerox 6204 Wide Format Printer (WFP) model: Language selection for the <Custom 1> button, none for the <Custom 2 > button. -
Page 135: Default Language
Common Settings Default Language You can select the language displayed on the machine. The factory default value is [English]. There are two ways of selecting the language: one is from the System Administration mode, and the other is for ordinary users to use. Process from System Administration mode: This sets the standard language when the machine is turned on, and it is maintained when the machine is turned off and on again. -
Page 136: Toner Density
7 System Administration Select [Save]. Toner Density Set the toner density. The factory default value is [Normal]. Select [Toner Density]. Toner Density Cancel Save Select from the toner density levels between Light [Lighten] and [Darken] using [ Select [Save]. Normal Dark Metric / Inch System Select whether dimensions on the screen are shown in millimeters or inches. -
Page 137: Detailed Settings
Common Settings Detailed Settings This feature allows you to set all other common settings. Enter the [Code] and [Value] parameters using the following table for reference purposes to set up the other system presets. Select [Detailed Settings]. Enter [Code]. Select [Save/Next]. Enter [New Value]. - Page 138 7 System Administration Default when Code Item Notes New Value shipped form the factory Initial tab display of the Machine Information:0 Machine Machine Status screen Billing Meters:1 Information:0 Media Status:2...
-
Page 139: Copy Settings
Copy Settings Copy Settings You make settings relating to the copy feature on [Copy Settings]. The following are the places to reference for information about each item. Preset Buttons........................... 131 Copy Defaults........................... 134 Media Size Buttons ........................135 Reduce / Enlarge Buttons (Changing Preset Values)............... 136 Collation Order......................... - Page 140 7 System Administration Reduce/Enlarge - 3rd Button You can set the magnification for the third row, which is displayed in [Reduce/Enlarge] in the [Basic Copy] screen. The factory default value is [70.7%]. Variable ratios Preset Ratios Variable ratios Select any magnification from 25% to 400%. Preset Ratios Select from the nine preset ratios: [25.0%], [33.3%], [36.3%], [50.0%], [66.6%], [70.7%], [133.3%], [141.1%], and [200.0%]...
- Page 141 Copy Settings Media Source Select from [Roll1], [Roll2], and [Manual Feed]. Note • Roll 2 is optional. Basic Copy - Upper Right Button You can set the items that are displayed on the upper right of the [Basic Copy] screen. Select [Media Type] or [Media Cut Mode].
-
Page 142: Copy Defaults
7 System Administration Copy Defaults You can set the default copy features. When the Copy Defaults Save power is turned on or the machine returns from a Items Current Settings power-saving state, or when the <Clear All> 1. Reduce / Enlarge 100.0% button is pressed, these default settings take 2. -
Page 143: Media Size Buttons
Copy Settings Default when Items Notes shipped form the factory Media Cut Mode Set the default value for [Media Cut Mode] on the Standard [Basic Copy] screen. Select the media cut mode from [Standard] and [Synchronized]. Original Type Set the default value for [Original Type] on the Text / Line [Image Quality] screen. -
Page 144: Reduce / Enlarge Buttons (Changing Preset Values)
7 System Administration Select [Media Size Buttons]. Select the media size. Select [Save]. Reduce / Enlarge Buttons (Changing Preset Values) You can set the magnifications for [More...] displayed in [Reduce/Enlarge] one the [Basic Copying Tab] screen. The factory default values are [25.5%], [36.3%], [50.0%], [70.7%], [141.1%] and [200.0%]. -
Page 145: Detailed Settings
Copy Settings Reverse Prints in the reverse order of how the originals were scanned. Select [Save]. Detailed Settings You can set other detailed copy presets. Enter the [Code] and [Value] parameters using the following table for reference purposes to set up the other system presets. Select [Detailed Settings]. -
Page 146: Network Settings
7 System Administration Network Settings You can set the IP address and Subnet Mask on the [Network Settings] screen. The values set become registered after the power has been turned off and on again. Note • The other network settings are configured on Print Services On Web. For more details, refer to the Print Services On Web online help. -
Page 147: Scan Settings
Note • The scan feature is not included on some models. An optional package is necessary. For more information, contact your Xerox Customer Support Center. The following are the places to reference for information about each setting. Preset Buttons........................... 131 Scan Defaults.......................... -
Page 148: Preset Buttons
7 System Administration Preset Buttons You can set the items related to the [Basic Scan] screen display. Select [Preset Buttons]. Select the items to be set or changed. Select the value to be set (usually the default value). Select [Save]. Select [Close]. -
Page 149: Scan Defaults
Scan Settings Scan Defaults You can set the default values for the scanner feature. These default settings take effect when the power is turned on, when the machine returns from a power-saving state, or when the <Clear All> button is pressed. By setting the defaults to commonly used features, you can reduce the number of settings you need to change when using the machine. -
Page 150: Custom Size Buttons
7 System Administration Default when Setting item Notes shipped form the factory Background Set the default value for [Background Suppression Suppression] on the [Image Quality] screen. Contrast Set the default value for [Contrast] on the [Image Normal Quality] screen. Scan Size Set the default value for [Scan Size] on the [More Auto Select Features] screen. -
Page 151: Reduce / Enlarge Buttons
Scan Settings Select [Customize]. Set the scan size using the numeric keypad or ], [ Select [Save]. Select [Close]. Reduce / Enlarge Buttons You can set the default value for [Reduce / Enlarge] on the [Basic Scan] screen. The factory default values are [25.5%], [35.3%], [50.0%], [70.7%], [141.1%] and [200.0%]. - Page 152 7 System Administration Default when Code Item Notes New Value shipped form the factory Standard size For each size & each Left, right, top adjustment resolution: -100 to +100 and bottom 0 pixels pixel...
-
Page 153: Delete Mailbox
Delete Mailbox Delete Mailbox You can delete the mailboxes selected on [Delete Mailbox]. If there are documents in the mailbox, they are all deleted. Note • There are two ways to delete a mailbox: a method used from System Administration mode, and a method for ordinary users to use. -
Page 154: System Administrator - Password
7 System Administration System Administrator - Password You can change theSystem Administrator password on the [System Administrator - Password] screen. Note • The default setting of the system administrator password is "11111". Select [System Administrator - Password] on the [System Settings] screen. For the method of displaying the [System Settings] screen, refer to "Procedure for Changing System Settings"... -
Page 155: Machine Status
8 Machine Status This chapter describes the features for checking the machine status. Overview of Machine Status ..............148 Machine Information .................149 Billing Meter ....................151 Media Status .....................152... -
Page 156: Overview Of Machine Status
8 Machine Status Overview of Machine Status You can check the machine status and meter readings on the screen. Press the <Machine Status> button. Copy from Memory Transmitting Power Saver Copy Scan Menu Jobs in Memory Original/ Media Settings Clear All Interrupt Stop Machine Status... -
Page 157: Machine Information
Machine Information Machine Information You can check the serial number, machine configuration, and software version on the [Machine Information] screen. You can also set the print mode. Refer to the following sections for the features in the [Machine Info.] screen. Machine Configuration ...................... -
Page 158: Software Version
8 Machine Status Software Version You can check the software version. Select [Software Version]. You can check the following items on the [Software Version] screen. TEXT ICON Controller Printer Scanner Print Mode You can set the print mode. Note • The items appearing vary depending on the options installed. Select [Print Mode]. -
Page 159: Billing Meter
Billing Meter Billing Meter You can check the total printed area on the [Billing Meters] screen. Press the <Machine Status> button. Select the [Billing Meters] tab. Save Meter 1 The counters for copier and printer are displayed. METER 1 The total area in units of square feet (or square meters) of paper printed up until now. -
Page 160: Media Status
8 Machine Status Media Status You can check the media status. Press the <Machine Status> button. Select the [Media Status] tab. Save Source Roll 1, Roll 2 The status is displayed in three degrees: Full, Low, and No Media. "Low" appears when amount of paper remaining equals about 1/4 full. -
Page 161: Maintenance
9 Maintenance This chapter describes how to replace consumables and clean the machine. Replacing Consumables ................154 Cleaning the Machine ................158... -
Page 162: Replacing Consumables
Important • The use of consumables not recommended by Xerox may impair quality and performance. Use only consumables recommended by Xerox for the machine. - Page 163 Replacing Consumables Make sure that the machine has stopped, and oner Supply Port open the back cover. Shake the toner cartridge well to load toner smoothly. Note • You should shake the toner cartridge about 20 times. Attach the toner cartridge to the toner supply port.
-
Page 164: Replacing The Waste Toner Bottle
9 Maintenance Slide the lever to the right, and align it with the triangular symbol. Remove the toner cartridge. Important • Toner may adhere to the bottom face of the toner bottle used. Take care not to get toner on your hands or clothes. •... - Page 165 Replacing Consumables Make sure that the machine has stopped, and pper nit Releasing Lever open the upper unit with the upper unit releasing lever. Remove the waste toner bottle gently. Cover the hole of the removed waste toner bottle with the provided cap. Important •...
-
Page 166: Cleaning The Machine
If the dirt is difficult to remove, try gently wiping with a firmly wrung soft cloth moistened with a small amount of Xerox lens/glass cleaner. Then, wipe again with a dry cloth. Important • Do not use cleaning agents other than water, a neutral detergent, or Xerox lens/glass cleaner. - Page 167 Cleaning the Machine Replace the document handler.
- Page 168 9 Maintenance...
-
Page 169: 10 Problem Solving
10 Problem Solving This chapter describes problems that may occur with the machine and the recommended solutions. Troubleshooting ..................162 General Problems ..................163 Problems during Copying................164 Problems during Scanning................169 Problems during Printing................171 Error Messages..................174 Original Document Jams................175 Paper Jams....................176... -
Page 170: Troubleshooting
Trouble during scanning Action Refer to "Problems during Scanning" (P.169). Trouble during printing Action Refer to "Problems during Printing" (P.171). If the machine does not work properly even after performing the troubleshooting recommended above, then contact your Xerox Customer Support Center. -
Page 171: General Problems
Did a paper jam occur? Refer to "Paper Jams" (P.176). displayed. Did the original jam? Refer to "Original Document Jams" (P.175). Is the message "Please If the message is displayed for more than 3 wait..." displayed? minutes, contact your Xerox Customer Support Center. -
Page 172: Problems During Copying
10 Problem Solving Problems during Copying The following helps you solve problems encountered during copying. Symptoms Check Remedy Copy does not Did you select the original Select the original size series properly to print at the size series properly? match with the original size. desired size. - Page 173 Problems during Copying Symptoms Check Remedy Paper media is Is the correct type of paper Load a correct type of paper media. often jammed or media used? Refer to "Media Type" (P.32). wrinkled. Is the paper media loaded Correctly set the paper media. correctly? Refer to "Loading Media"...
- Page 174 Refer to "Loading Media" (P.34).. Dirt appears at Dirt on the paper feed path. Copy a few pages. equal intervals. Internal components are Contact your Xerox Customer Support dirty. Center. Black dots are Internal components are Contact your Xerox Customer Support printed.
- Page 175 Is the scanning area of Clean the platen glass. printed. original dirty? Refer to "Cleaning the Machine" (P.158). Internal components are Contact your Xerox Customer Support dirty. Center. White dots Is the correct type of paper Load appropriate paper media properly.
- Page 176 Nothing is Is the original placed face Place the original face down to start. copied. A probable cause is an Contact your Xerox Customer Support internal machine error. Center. Part of the Is the original at the correct Load the original correctly.
-
Page 177: Problems During Scanning
The following helps you solve problems encountered during scanning. Note • Scan features are not available for some models. For more information, contact your Xerox Customer Support Center. To learn about scan features, click on [Help] in the scan driver screen and refer to the network scan driver's online help. - Page 178 10 Problem Solving Symptoms Check Remedy The scanned Is the density of the original Adjust the scan density. image is too light. too light? Refer to "Scan Density (Adjusting the Scan Density)" (P.84). Is the scan density set to [Lighten]? Is the original type settings Select the original type again correctly.
-
Page 179: Problems During Printing
Problems during Printing Problems during Printing The following helps you solve problems encountered during printing. Symptoms Check Remedy Unable to print. Is the circuit breaker or the Turn on the circuit breaker (main power power switch of the machine switch) and the power switch. off? Refer to "Power On / Off"... - Page 180 Refer to "Loading Media" (P.34). Dirt appears at Dirt on the paper feed path. Print a few pages. equal intervals. Internal components are Contact your Xerox Customer Support dirty. Center. The print has Internal components are Contact your Xerox Customer Support black dots.
- Page 181 Load a correct type of paper media. appear in black media used? Refer to "Loading Media" (P.34). filled areas. Internal components are Contact your Xerox Customer Support dirty. Center. Printed toner Is the paper media damp? Replace with paper media from a new smudges when ream.
-
Page 182: Error Messages
If the message persists, record the displayed contents for [(XXX-XXX)]. Switch off the machine immediately, wait for the touch screen to go dark, and contact your Xerox Customer Support Center. A fault has occurred. [Cause] An internal error occurred. -
Page 183: Original Document Jams
Original Document Jams Original Document Jams If the orginal gets jammed in the scanner, the machine stops and an error message is displayed on the touch screen. Clear the jammed original according to the instructions displayed, and the reload the original. Pull the document handler toward you until it stops, and lift up to remove it. -
Page 184: Paper Jams
10 Problem Solving Paper Jams If paper jams occur, the machine stops and an alarm sounds. An error message also is displayed on the touch screen. Remove the jammed paper according to the message displayed. Paper Jams in Roll 1 or Roll 2 (P.177) Roll 1 Roll 2. -
Page 185: Paper Jams In Roll 1 Or Roll 2
Doing so can cause injuries or burns. Switch off the machine immediately, and contact your Xerox Customer Support Center. Important • When a paper jam occurs, paper is sometimes torn and remains inside the machine if you draw out a media tray without checking the paper jam position. - Page 186 10 Problem Solving Pull out Roll 1 or Roll 2. Check the state of the jammed paper, and remedy as follows. When the jammed paper is already cut. Remove the jammed paper. Important • Gently remove the paper taking care not to tear it.
-
Page 187: Paper Jams In Manual Feed Tray (Bypass)
Paper Jams Gently slide Roll 1 or Roll 2 until it is firmly in position. Close the front cover. Paper Jams in Manual Feed Tray (Bypass) The following describes how to clear paper jams that occur in the Manual Feed Tray (Bypass). -
Page 188: Paper Jams In Upper Unit
10 Problem Solving Paper Jams in Upper Unit The following describes how to clear paper jams that occur in the upper unit. Lift up the upper unit release lever to open the pper nit Releasing Lever upper unit. Check the state of the jammed paper, and solve the problem as follows. The following message is displayed. - Page 189 Paper Jams The following message is displayed. Lift up the green knob (lever [A]), and remove the jammed paper around the paper feed path. Lower the knob (lever [A]) to its original position. Close the upper unit.
-
Page 190: Paper Jams In Fuser Unit
10 Problem Solving Paper Jams in Fuser Unit The following describes how to clear paper jams that occur in the fuser unit. Lift up the upper unit releasing lever to open the pper nit Releasing Lever upper unit. Remove the jammed paper through the opening area from the machine. - Page 191 Paper Jams Lower the baffle. Close the fuser cover and the manual feed tray. Close the upper unit.
- Page 192 10 Problem Solving...
-
Page 193: 11 Appendix
11 Appendix This chapter contains descriptions about the following: Specifications....................186 List of Options ...................192 Cautions and Limitations................193... -
Page 194: Specifications
11 Appendix Specifications This section lists the specifications of the Xerox 6204 Wide Format Solution. In the interests of product development, product specifications and external appearance are subject to change without prior notice. Xerox 6204 Wide Format Solution Specifications Type... - Page 195 Minimum length is 11" (279.4 mm). Important • We advise you to use Xerox recommended papers to achieve the best results. Other papers may not perform as well, depending on the printing conditions.
- Page 196 11 Appendix Note • The machine consumes electricity less than 1.5 watt while the power switch is off. Switching off the circuit breaker or disconnecting the power connector is necessary to cut off the electricity consumption. Copy Feature Specifications Original positioning Original transfer type method Original size...
-
Page 197: Print Feature Specifications
Specifications Original scanning speed 76.2mm/second (100%) Important • Scanning speed may vary depending on magnification and resolution. Interface Ethernet (10Base-T / 100Base-TX) Scan to mailbox Supported Protocol :TCP/IP Output format : Monochrome 2 colors :TIFF, PDF, CALS Driver : TWAIN, Wide Scanner Client Tool Supported OS : Windows 98/ME Windows 2000/XP Windows Server 2003... - Page 198 11 Appendix Expanded Expanded Standard Roll media width / Media type memory memory (256MB) (512 MB) (1.25 GB) A0 width / Tracing paper, Film 7.8 ft. 2,378 mm A1 width / Tracing paper, Film 5.5 ft. 1,682 mm A2 width / Tracing paper, Film 3.9 ft.
- Page 199 Specifications Copy Original ARCH A 400.0% 266.7% 200.0% 133.3% 100.0% Copy Original IS0 A0 100.0% 70.7% 50.0% 35.4% 25.0% IS0 A1 141.4% 100.0% 70.7% 50.0% 35.4% IS0 A2 200.0% 141.4% 100.0% 70.7% 50.0% IS0 A3 282.8% 200.0% 141.4% 100.0% 70.7% IS0 A4 400.0% 282.8% 200.0% 141.4% 100.0%...
-
Page 200: List Of Options
Wide Format Scan Service Makes importing and editing scanned data easier on the Xerox 6204 Wide Format Solution. Windows-supported print Allows you to print on the Xerox 6204 Wide Format Solution driver from Windows on a computer. HDI print driver for AutoCAD Allows you to print on the Xerox 6204 Wide Format Solution from AutoCAD. -
Page 201: Cautions And Limitations
Notes and Restrictions on Use of the Machine Installing and Moving the Machine When moving the machine outside the building, contact your Xerox Customer Support Center. When moving the machine, be careful not to touch or do anything that could cause electricity to surge through the machine - as this could damage the machine and cause a shock to the person moving it. - Page 202 11 Appendix...
- Page 203 Index Index Symbols CALS ................81 Caster ................19 <C> button ..............22 Catch tray..............19 <Clear All> button............22 Cautions and Limitations ......... 193 <Copy from Memory> button/indicator....22 Changing Mailbox Settings ........94 <Interrupt> button / indicator........22 Changing the Onset Position for Scanning the <Job in Memory>...
- Page 204 Index Delete Mailbox (System Settings) ......145 Deleting Documents in Mailbox ....... 89 Image loss width............187 Deleting Mailbox ............93 Image Quality............58, 83 Deleting Stored Programming........99 Importing Scanned Data ..........111 Detailed Settings ..........129, 137 Importing Using Network Scan Driver....111 Development method..........
- Page 205 Index Media Supply -2nd, 3rd Buttons (System Power consumption when Power breaker Settings) ..............132 (Main power switch) is off........187 Media Type............32, 56 Power source ............187 Media Type (System Settings) ....... 134 Power switch ............... 20 Memory capacity............189 Preset Buttons (System Settings)....131, 140 Message area .............
- Page 206 Index Scan Size (System Settings)........142 Supported OSs ............189 Scan Start Mode (System Settings) ...... 127 Supported protocols..........189 Scan to mailbox ............189 System Administrator - Password (System Scroll button ..............23 Settings)..............146 Selecting Media Supply to Use for Copying ..55 Selecting the image Quality Type for the Original.................
Need help?
Do you have a question about the 6204 and is the answer not in the manual?
Questions and answers