Advertisement
Quick Links
Day One+
JSI on Juniper Support Portal Quick Start (LWC)
IN THIS GUIDE
Step 1: Begin | 1
Step 2: Up and Running | 12
Step 3: Keep Going | 23
Step 1: Begin
IN THIS SECTION
Meet Juniper Support Insights | 2
Install the Lightweight Collector | 3
Mount a Lightweight Collector on Two Posts in a Rack | 4
Power On | 5
Connect the Lightweight Collector to the Networks | 5
Configure the Lightweight Collector | 6
In this guide, we provide a simple, three-step path, to quickly get you up and running with the Juniper Support Insight
(JSI) solution. We've simplified and shortened the installation and configuration steps.
Advertisement

Related Manuals for Juniper Day One+ LWC


Summary of Contents for Juniper Day One+ LWC
- Page 1 Connect the Lightweight Collector to the Networks | 5 Configure the Lightweight Collector | 6 In this guide, we provide a simple, three-step path, to quickly get you up and running with the Juniper Support Insight (JSI) solution. We’ve simplified and shortened the installation and configuration steps.
- Page 2 NOTE: This Quick Start guide assumes that you have ordered the JSI-LWC solution, which is available as part of Juniper Care support service, and that you have an active contract. If you have not ordered the solution, please contact your Juniper Account or Services teams. Accessing and using JSI is subject to the Juniper Purchase and License Agreement (JPLA).
-
Page 3: What's In The Box
What Else Do I Need? | 3 The Lightweight Collector (LWC) is a data collection tool that gathers operational data from Juniper devices on customer networks. JSI uses this data to provide IT and network operations teams with actionable operational insights into the onboarded Juniper devices on customer networks. - Page 4 Mount a Lightweight Collector on Two Posts in a Rack You can mount a Lightweight Collector (LWC) on two posts of a 19-in. rack (either a two-post or a four-post rack). Here's how to mount the LWC on two posts in a rack: 1.
- Page 5 10. Verify that the power LED on the LWC front panel is green. Connect the Lightweight Collector to the Networks The Lightweight Collector (LWC) uses an internal network port to access the Juniper devices on your network, and an external network port to access Juniper Cloud.
- Page 6 (ZTE) process to provision the device is initiated. Successful completion of the ZTE results in the device establishing IP connectivity on both the ports. It also results in the external port on the device establishing connectivity to Juniper Cloud via. discoverable reachability to the Internet. If the device fails to automatically establish IP connectivity and reachability to the Internet, you must configure the LWC device manually, by using the LWC captive portal.
- Page 7 • IP connectivity to the Domain Name Server (DNS), all the direct devices on the network, and bastion hosts used (if applicable) to access the devices. • Enabled NETCONF in the Junos OS configuration of all target Juniper devices. The LWC uses SSH credentials to connect to the devices on the network and, if used, bastion hosts.
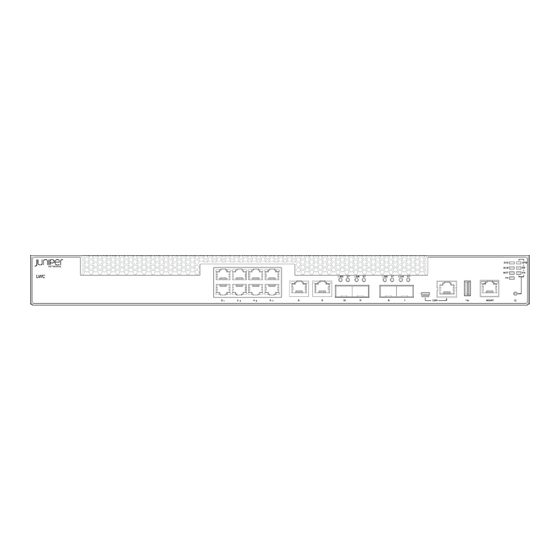
- Page 8 1. Disconnect your computer from the Internet. 2. Connect the computer to the port ge-0/0/0 on the LWC (labeled as 1 in the image below) using an Ethernet cable (RJ-45). The LWC assigns an IP address to the Ethernet interface of your computer through DHCP. 3.
- Page 9 Supports DHCP and static addressing. The External Network configuration is used to perform device provisioning. • Internal Networks—Lets you configure the internal network port that connects the LWC to the Juniper devices on your network. Supports DHCP and static addressing.
- Page 10 Connected with green tick marks against them. The JSI Data Collector homepage displays the Connection Status as: • Juniper Cloud Connected if the external connectivity to the Juniper Cloud is established and the active proxy (if applicable) settings are correctly configured.
- Page 11 The following image displays the JSI Data Collector page when the LWC is connected successfully (releases earlier than version 1.0.43).
-
Page 12: Step 2: Up And Running
Juniper Support Portal, and attach the downloaded RSI file to the case. In some cases, the Juniper support engineer might ask you to attach the Extensive RSI file to the case. To download it, click the Download Extensive RSI. - Page 13 User Role Management page. Here's how to access JSI: 1. Log in to Juniper Support Portal (supportportal.juniper.net) by using your Juniper Support Portal credentials. 2. On the Insights menu, click: • Dashboards to view of a set of operational dashboards and reports.
-
Page 14: Onboard Devices
Onboard Devices You'll need to onboard devices to initiate a periodic (daily) data transfer from the devices to the Juniper Cloud. Here's how to onboard devices in a JSI setup that uses an LWC: NOTE: You must be an admin user to onboard a device. - Page 15 JSI user need in Junos to operate JSI? Here's how to onboard devices to JSI: 1. On Juniper Support Portal, click Insights > Device Onboarding. 2. Click New Device Group. The following image represents the device onboarding page with some sample data filled 3.
-
Page 16: View Notifications
View Notifications Juniper Cloud notifies you about the device onboarding and data collection status. Notification could also contain information about errors that need to be addressed. You can receive notifications in your email, or view them on Juniper Support Portal. - Page 17 1. Click Insights > Dashboard. The Operational Daily Health Dashboard is displayed. This dashboard includes charts that summarize the KPIs associated with the account, based on the last collection date. 2. From the Reports menu on the left, select the dashboard or report you want to view. The reports typically consist of a set of filters, an aggregated summary view, and a detailed tabular view based on the data collected.
- Page 18 If you consent to share the device data, click the link in the email, and approve the request. 4. The RCS request will be scheduled for a specified time and the device data is securely relayed to Juniper support.
- Page 19 View RCS Requests Here's how to view RCS requests on Juniper Support Portal: 1. On Juniper Support Portal, click Insights > Remote Connectivity to open the Remote Connectivity Requests Lists page. The Remote Connectivity Requests Lists page lists all the RCS requests made. You can use the drop-down list on the top left corner of the page to customize your viewing preference.
- Page 20 You can configure both RCS collection and core file collection preferences from the RCS settings page. Here's how to configure the Remote Connectivity RSI Collection settings on Juniper Support Portal: 1. On Juniper Support Portal, click Insights > Remote Connectivity to open the Remote Connectivity Requests Lists page.
- Page 21 4. To configure global collection permission, click Edit in the Global Collection Permissions section and change permission to one of the following: • Ask Approval—An approval request is sent to the customer when Juniper support initiates an RCS request. This is the default setting when no permission is explicitly selected.
- Page 22 You can configure an exception based on days and duration, and click Save to save the exception and return to the Remote Connectivity RSI Collection Settings page. NOTE: Before configuring collection rules for device groups, ensure that a device group already exists for the account.
- Page 23 7. To create separate collection rules for individual devices, click Add in the Device List Rules section. The Device List Rules Settings page opens. You can configure the collection rule for individual devices, and click Save to save the rule and return to the Remote Connectivity RSI Collection Settings page.
-
Page 24: What's Next
View the operational dashboards and reports. "View Operational Dashboards and Reports" on page 16 Manage your notifications and email subscriptions. Log into the Juniper Support Portal, navigate to My Settings and select Insights to manage your notifications and email subscriptions. - Page 25 Juniper Learning Portal Juniper Juniper Networks, the Juniper Networks logo, Juniper, and Junos are registered trademarks of Juniper Networks, Inc. in the United States and other countries. All other trademarks, service marks, registered marks, or registered service marks are the property of their respective owners.
Need help?
Do you have a question about the Day One+ LWC and is the answer not in the manual?
Questions and answers