Table of Contents
Advertisement
Quick Links
Quick Start
SSR130
IN THIS GUIDE
Step 1: Begin | 1
Step 3: Keep Going | 16
Step 1: Begin
IN THIS SECTION
Meet the SSR130 | 2
Add the Network | 4
Create Policies | 11
This guide walks you through the simple steps to get a new cloud-ready SSR130 up and running in the Juniper Mist AI
cloud portal. You can onboard a single device using your mobile phone, or one or more devices using your computer.
Once onboarded, we'll walk you through the steps to create a basic configuration.
Advertisement
Table of Contents

Related Manuals for Juniper SSR130


Summary of Contents for Juniper SSR130
-
Page 1: Table Of Contents
Assign the SSR130 to a Site | 14 This guide walks you through the simple steps to get a new cloud-ready SSR130 up and running in the Juniper Mist AI cloud portal. You can onboard a single device using your mobile phone, or one or more devices using your computer. -
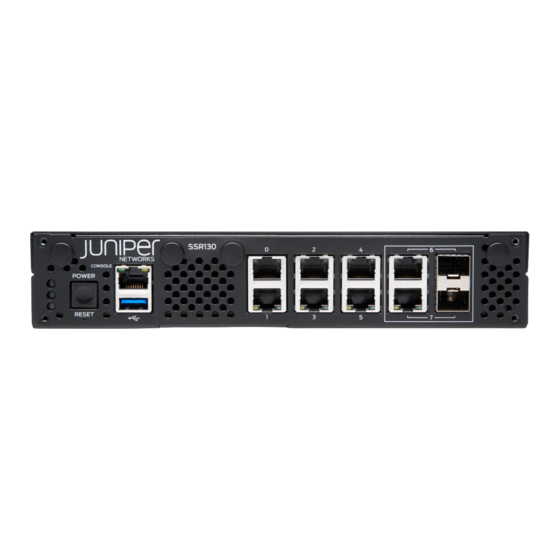
Page 2: Meet The Ssr130
Meet the SSR130 The Juniper Networks SSR130 network appliance is part of the SSR portfolio. The SSR130 features four 1 GbE ports, two 1 GbE RJ-45/SFP combo ports, 8 GB of memory, and a 120 GB enterprise-grade solid-state drive (SSD) for storage. - Page 3 NOTE: You can download the Mist Application from the following mobile app stores: For Apple Devices For Android Devices Scan the QR Code 1. Open your MistAI App. 2. Select Claim Devices to Org. 3. Scan the QR code.
-
Page 4: Add The Network
6. Click the Claim button to claim the SSR into your inventory. Onboarding Complete! Fantastic, the SSR130 is in your inventory! To provision the SSR130 with ZTP, log in to Mist and continue with WAN configuration. Add the Network... - Page 5 1. From the Mist dashboard, navigate to the WAN section of the organization sidebar menu, and select Networks. 2. Select Add Networks in the upper right. 3. Give the network a name.
-
Page 6: Add An Application
4. Configure the network subnet as 192.168.1.0/24. 5. Click Save at the bottom of the Edit Network side panel. Excellent! You have now defined this network for use across the entire organization, including the template you will apply to your new SSR130. Add an Application SUMMARY Next, define the applications for the WAN to deliver, starting with the Internet. -
Page 7: Create A Template
4. Enter 0.0.0.0/0, or an IPv4 address space in the IP Addresses configuration. 5. Click Save at the bottom of the Add Application side panel. Nice! Your organization is set up to provide access to the Internet using the WAN. Create a Template IN THIS SECTION Define the WAN Port | 9... - Page 8 2. Select Create Template in the upper right. 3. Name the template. 4. Click Create.
- Page 9 2. Name the WAN port wan1. 3. Since you already plugged port 0 on the SSR130 into the Internet, enter ge-0/0/0 to designate it as a WAN port. 4. Make sure IP Configuration is set to DHCP, and that Source NAT is enabled.
- Page 10 5. Click Add at the bottom of the Edit WAN Configuration side panel. Define the LAN Port Next, associate your LAN with the appropriate port on the SSR, and give the LAN additional network services such as DHCP. Scroll to the LAN section of the template, and select Add LAN. From the Network drop-down menu, select your network segment to associate it with the LAN.
-
Page 11: Create Policies
Enter /24 for the Prefix Length. Enable the DHCP Server button to provide DHCP services to endpoints on this network. Give your DHCP server an address pool starting with 192.168.1.100 and ending with 192.168.1.200. Enter 192.168.1.1 as the Gateway to be assigned to DHCP clients. Finally, enter 1.1.1.1,8.8.8.8 as DNS Servers to be assigned to clients on the network. - Page 12 Your template has WANs and LANs; now you need to tell the SSR130 how to use them to connect users to applications. This is done using Traffic Steering and Application Policies. Define the Traffic Steering Policy 1. Scroll to the Traffic Steering section of the template, and select Add Traffic Steering.
-
Page 13: Assign The Template To A Site
Define the Application Policy The Application Policy ties the networks and applications together. 1. Scroll to the Application Policy section of the template, and select Add Policy. 2. Enter a string in the name column, and click the check box to the right of your entry. 3. -
Page 14: Assign The Ssr130 To A Site
Manage Configuration from Mist under Manage Configuration. 5. Select Assign to Site. Congratulations you now have a Mist-claimed SSR130 with a basic configuration ready to send to your device! Step 2 will get your SSR130 rack or wall mounted, powered up, and connected to your network. -
Page 15: Step 2: Up And Running
Connect your SSR130 to the Mist Cloud Your SSR130 uses port 0 (ge-0-0) as a default WAN port to contact Mist for zero-touch provisioning (ZTP). You'll need to set up port 3 (ge-0-3) with a LAN network. 1. Connect SSR port 0 to an Ethernet WAN link that can provide:... -
Page 16: Step 3: Keep Going
• User devices Great job, your SSR130 is now connected to the Mist cloud! In just a few minutes, Mist will send the template-driven configuration down to your device. Once the configuration has been applied, it will begin forwarding sessions from LAN to WAN as described by your policy. - Page 17 Learn with Videos | 17 Congratulations! Now that you've done the initial configuration, your SSR130 is ready to use. Here are some things you can do next: What's Next? If you want to Then Get an overview of the SSR configuration and how it is...
- Page 18 Juniper Learning Portal Juniper Networks, the Juniper Networks logo, Juniper, and Junos are registered trademarks of Juniper Networks, Inc. in the United States and other countries. All other trademarks, service marks, registered marks, or registered service marks are the property of their respective owners.
Need help?
Do you have a question about the SSR130 and is the answer not in the manual?
Questions and answers