Table of Contents
Advertisement
Available languages
Available languages
Quick Links
Advertisement
Chapters
Table of Contents
Troubleshooting

Related Manuals for Avaya AWH-55USB


Summary of Contents for Avaya AWH-55USB
- Page 1 USER GUIDE A V A YA AWH55/65-USB WIRELESS HEADSET SySTEm...
-
Page 2: Table Of Contents
WELCOME PACKAGE CONTENTS This User Guide provides instructions on the setup and usage of the Avaya AWH 55/65-USB wireless headset system. Before getting started, please review the safety booklet included Headset and Wearing Options in your package. For additional help, service or support information,refer to the product warranty card or visit www.avayaheadsets.com. T ABLE OF CONTENTS Headband Package Contents Headset Features Setup Charging Positioning Installing PerSonoCall Software Earloops Configuration and Status Adjusting Fit Base Making/Answering/Ending Calls Adjusting Volume, Initiating Flash Muting a Call, Initiating Smart Button Traveling with AWH 55/65-USB Headset Controls AC Charger Base Indicator Lights Troubleshooting for AWH 55/65-USB Subscription System Reset Battery Replacement Technical Assistance ... -
Page 3: Features
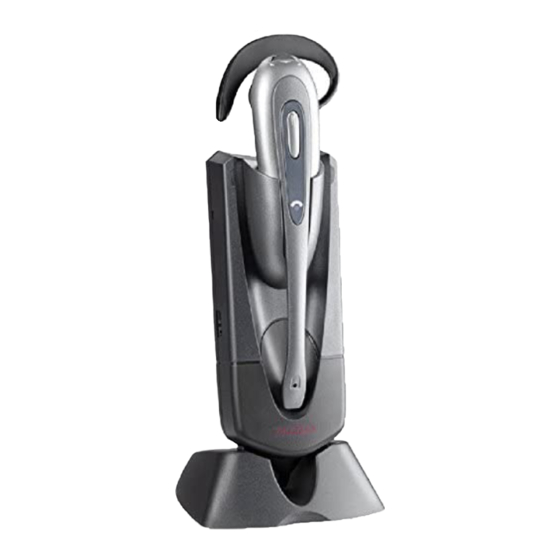
FEA TURES Base Back and Side Ringer Switch (On = up position) (Off = down position) Subscription Stand Pegs Button Access Hole (paperclip required) AC Charger Port USB Connector Base - Bottom View Front Headset Telephone Handset Jack Handset Lifter Jack Charge Indicator Light (red) Status Indicator Light (green) Front: AC Charging Jack Listening Volume/Mute/ Flash/Smart Button Call Control Button Telephone Cord Jack Talk Indicator Light... -
Page 4: Setup
SETUP CHARGING 1 hour = minimum charge to continue setup 3 hours = full charge To install base unit, first thread the USB cable through the bottom of the base so it rests in notch. Then attach the stand by inserting the stand pegs into the holds on the underside of the base unit. 1. Slide headset into charging cradle. 2. Gently press down on the headset to ensure that headset is in correct position. Red charge indicator light on base will illuminate while charging and will go completely off when fully charged. AC Charging Only: When your computer is powered off, the AWH 55/65-USB will not charge, and the headset standby time will decrease. Using the optional AC adapter will ensure your headset remains charged. USB Charging Only: When your computer is powered on, the AWH 55/65-USB will charge via the USB connection. Connect USB connector to a free USB port on your computer. A USB hub can be used but be sure it can supply sufficient power (250mA) to charge the headset. Alternatively, the velcro strips included can be used to attach the base unit to a PC monitor. POSITIONING However, if that causes noise or interference problems, see “Positioning” on page 7. The minimum recommended separation distance is shown above. IMPORTANT: Incorrect positioning can cause noise and interference. The optional AC charger can be used. ... -
Page 5: Installing Personocall Software
2. Your softphone may require you to choose which audio device you wish to use. Please refer to softphone documentation for details. CONFIGURA TION AND ST A TUS NOTE: Once the AWH 55/65-USB is installed, it becomes the default audio device in your Right click on the headset system tray icon and choose “Options” . This will bring computer. You can set preferences manually in the Windows operating system through the ®... -
Page 6: Adjusting Fit
When using PerSonoCall, the radio link between the headset and the base will only be active during a call. This is the default setting intended to preserve the battery life of the headset. However, you may wish to have the radio link active when not on a call so you can listen to other audio sources, such as streaming audio on your PC. You can open the radio link at any time by pressing the call control button on the headset. NOTE: Locking the radio link on for extended periods of time will significantly reduce the standby and talk time of the headset. For Softphones Not Compatible with PerSonoCall Check the PerSonoCall compatibility list at www.plantronics.com/personocall for the most current information on softphone compatibility. If your softphone is not currently supported by PerSonoCall, remote detection and answer/ end via the headset does not function. Pressing the call control button on the headset ... -
Page 7: Adjusting Volume, Initiating Flash
Telephone Cord Jac Speaking Volume NOTE: Once turned off, a single press on any button will turn the headset back on. Beware that Major Adjust Charging Cradle if not stowed properly, the AWH 55/65-USB headset may inadvertently turn back on. -
Page 8: Headset Controls
1 tone every 10 seconds (5 minutes of talk to charging cradle Problem Solution time remaining) I plugged everything in but the • Check that the USB cable is connected to a Out of range warning 2 tones before range limit. indicator lights won’t come on. powered computer. Move closer to base –... - Page 9 USB charger back in first, then AC adapter (if used) • Headset battery needs to be charged. If you are to power back up. using a laptop that regularly goes into standby or hibernation, the AC power supply is available to • Reset the whole system as described on page 18. ensure the headset can be continuously charged. • AWH 55/65-USB may not be set as the default audio People I talk to can hear a buzz • Move the AWH 55/65-USB base further away from your device in your softphone application. phone. in the background. • AC charger is plugged into a power strip. Plug the I cannot hear caller. • Check that all cords are connected correctly. AC charger into the wall directly. • Check that the base has power (green indicator light) The other headset I was using • The AWH 55/65-USB will set itself as the default audio ...
-
Page 10: Subscription
SUBSCRIPTION BA TTERY REPLACEMENT The headset and base unit are supplied subscribed to each other. However, if you wish to use The custom battery inside the headset should last 2-3 years. When talk time decreases a replacement headset with the base unit, then the units must be re-subscribed as follows: significantly, you should replace the battery. -
Page 11: Technical Assistance
This equipment has been tested and found to comply with the limits for a Class B digital device, pursuant to Part 15 of the FCC Rules. These limits are designed to provide reasonable protection devices does not exceed five. against harmful interference in a residential installation. This equipment generates, uses, and can radiate radio frequency energy and, if not installed and used in accordance with the instructions, may cause harmful interference to radio communications. However, there is no guarantee that interference will not occur in a particular installation. If this equipment does cause harmful interference to radio or television reception which can be determined by turning the radio or television off and on, the user is encouraged to try to correct interference by one or more of the following measures: 1. Reorient or relocate the receiving antenna. 2. Increase the separation between the equipment and receiver. 3. Connect the equipment into an outlet on another circuit. 4. Consult the dealer or an experienced radio/TV technician for help. NOTE: Modifications not expressly approved by Plantronics, Inc. could void the user’s authority to operate the equipment. FCC REGISTRATION INFORMATION - Part 68 This equipment complies with Part 68 of the FCC rules and the requirements adopted by ACTA. On the exterior of this equipment is a label that contains a product identifier in the format US: AAAEQ##TXXXX. If requested, this information must be provided to your telephone company. A plug and jack used to connect this equipment to the premises wiring and telephone network must comply with the applicable FCC Part 68 rules and requirements adopted by ACTA. A compliant telephone cord and modular plug is provided with this product. It is designed to be connected to a compatible jack that is also compliant. See installation instructions for details. The REN is useful to determine the quantity of devices you may connect to your telephone line. Excessive RENs on a telephone line may result in the devices not ringing in response to an incoming call. In most, but not all areas, the sum of the RENs should not exceed five (5.0). To be certain of the number of devices you may connect to your line, as determined by the REN, contact your local telephone company. For product approved after July 23, 2001, the REN for this product is part of the product identifier that has the format US:AAAEQ##TXXXX. The digits represented by ### are the REN without the decimal point. (For example, 03 represents a REN of 0.3.) For earlier producers, the REN is separately shown on the label. If this telephone equipment causes harm to the telephone network, the telephone company will ... - Page 12 BRUGERVEJLEDNING A V A YA AWH 55/65-USB TRÅDLØST HEADSET-SySTEm...
- Page 13 Knapper på headsettet Indikatorlamper på baseenheden Fejlfinding i forbindelse med AWH55/65-USB Lysnetoplader AC Charger Abonnement Nulstilling af systemet Udskiftning af batteri Vedligeholdelse Læs den separate brochure med sikkerhedsinstruktioner for at få vigtige sikkerhedsoplysninger inden installation eller brug. Software PerSonoCall ® software-cd...
-
Page 14: Funktioner
FUNKTIONER Baseenhed Bagfra og fra siden Kontakt til ringetone (Tændt = oppe) (Slukket = nede) Abonnering Holderklemmer Adganghul til knap (der kræves en papirklips) Lysnetoplader- port USB-stik Forfra Headset Opladningsindikator (rød) Statusindikator (grøn) Front: Lyttevolumen/Mikrofonaf- bryder/Flash/Funktionsknap Knap til opkaldsstyring Indikatorlampe for tale... -
Page 15: Installation
1. Sæt headsettet i opladningsgaflen. 2. Tryk forsigtigt headsettet nedad, for at sikre at det er korrekt placeret. Den røde opladningsindikator på baseenheden lyser, mens opladningen er i gang, og slukkes helt, når enheden er fuldt opladet. -
Page 16: Installation Af Personocall-Software
PerSonoCall, henvises du til side 11. : Headset blev registreret, og radiolink til baseenhed er låst som aktivt 1. Sørg for, at cd'en er isat, og gå derefter til hovedskærmbilledet i PerSonoCall og klik på "Installer PerSonoCall-softwaren". -
Page 17: Ændring Af Pasform
Det kan alligevel være, du ønsker at have radiolinket aktiveret, når du ikke ringer, så du kan lytte til andre lydkilder såsom streaming af lyd på din PC. Du kan når som helst åbne radiolinket ved at trykke på knappen til opkaldsstyring på... -
Page 18: Volumenregulering, Start Af Flash
BEMÆRK: Hvis headsettet er slukket, tændes det igen ved tryk på en vilkårlig knap. Vær opmærksom på, at AWH55/65-USB-headsettet kan tænde utilsigtet, hvis det ikke nedpakkes på den rigtige måde. -
Page 19: Knapper På Headsettet
Advarsel om uden for Gå tættere på 3 toner uden for rækkevidde – under baseenheden • Kontroller, at computeren er tændt, og at den ikke er i rækkevidde, og et aktivt et aktivt opkald standby- eller dvaletilstand. opkald afsluttes • Hvis du bruger en USB-hub, skal du kontrollere, midlertidigt. - Page 20 Jeg kan høre bip i headsettet. • Et bip hvert 10. sekund er en advarsel om fladt batteri. • Talelydstyrken er for lav. Øg talevolumenn på Genoplad batteriet ved at sætte headsettet tilbage i...
-
Page 21: Abonnement
Specialbatteriet i headsettet er beregnet til 2-3 års brug. Når taletiden bliver mærkbart et reserveheadset sammen med baseenheden, skal der abonneres på enhederne igen ved at kortere, skal du udskifte batteriet. Ring til Plantronics på tlf. 8088 4610 for at bestille et. gøre følgende: Når du modtager det, skal du følge vejledningen nedenfor for at udskifte det. -
Page 22: Vedligeholdelse
PerSonoCall og Sound Innovation er varemærker eller registrerede varemærker, der tilhører Plantronics, Inc. Microsoft og Windows er enten registrerede varemærker eller varemærker, der tilhører Microsoft Corporation i USA og/eller i andre lande. Alle andre varemærker er de respektive ejeres ejendom. - Page 23 BENUTZERHANDBUCH A V A YA AWH 55/65-USB SCHNURLOSES HEADSET-SYSTEM...
- Page 24 INHALTSVERZEICHNIS PAKETINHALT Headset und Trageoptionen Paketinhalt Merkmale Installation Kopfbügel Laden Headset Positionierung Installieren der PerSonoCall-Software Konfiguration und Status Anpassen des Kopfbügels Tätigen, Annehmen und Beenden von Anrufen Ohrbügel Lautstärkeregelung, Flash-Initiierung Stummschalten eines Anrufs, Initiierung der Smart-Taste Base Unterwegs mit dem AWH55/65-USB Headset-Regler Leuchtanzeigen an der Basisstation Fehlerbehebung für AWH55/65-USB AC Charger Anmeldung Ladegerät Zurücksetzen des Systems Austauschen des Akkus Pflege Lesen Sie vor der Installation oder Verwendung die wichtigen Sicherheitsinformationen in der separaten Broschüre zu diesem Thema durch. Software PerSonoCall ® Software-CD...
- Page 25 FUNKTIONEN Base Rückseite und Seite Ruftonschalter (Ein = Position „oben“) (Aus = Position „unten“) Kleine Öffnung der Taste zur Ständerklammern Anmeldung (Büroklammer erforderlich) Anschluss für das Ladegerät USB-Anschluss Base - Bottom View Vorderseite Headset Telephone Handset Jack Vorderseite: Handset Lifter Jack Ladeleuchtanzeige (rot) Statusleuchtanzeige (grün) Hörlautstärke-/ Stummschaltungstaste AC Charging Jack Flash-/Smart-Taste Annehmen und Beenden von Gesprächen Telephone Cord Jack Gesprächsleuchtanzeige...
-
Page 26: Installation
Headset vollständig aufgeladen. Laden des Akkus nur mit Wechselstrom: Wenn Ihr Computer ausgeschaltet ist, lädt das AWH55/65-USB nicht auf und die Standby- Zeit des Headsets verringert sich. Mithilfe des optionalen Ladegeräts stellen Sie sicher, dass Ihr Headset aufgeladen bleibt. Laden des Akkus nur über USB: Wenn Ihr Computer eingeschaltet ist, lädt das AWH55/65-USB über die USB-Verbindung auf. Schließen Sie den USB-Anschluss an einen freien USB-Anschluss an Ihrem Computer an. Sie können auch einen USB-Hub verwenden. Sie sollten jedoch sicherstellen, dass dieser zum Laden des Headsets eine ausreichende Stromversorgung (250 mA) bietet. POSITIONIERUNG Die im Lieferumfang enthaltenen Klettverschlüsse können dazu verwendet werden, die Basisstation am PC-Monitor zu befestigen. Wenn dies jedoch zu Störungen und Interferenzen führt, siehe „Positionierung“ auf Seite 7. Der empfohlene Mindestabstand wird oben angegeben. WICHTIG: Eine falsche Positionierung kann zu Störgeräuschen und Interferenzen führen. Sie können das optionale Ladegerät verwenden. -
Page 27: Installieren Der Personocall-Software
: Headset registriert und Funkverbindung zur Basisstation aktiv lassen 1. Legen Sie die CD ein, öffnen Sie den PerSonoCall-Hauptbildschirm und klicken Sie auf „PerSonoCall-Software installieren“. 2. Sie werden ggf. aufgefordert, das zu verwendende Audiogerät auszuwählen. Weitere Informationen finden Sie in der Softphone-Dokumentation. KONFIGURA TION UND ST A TUS HINWEIS: Bei der Installation des AWH55/65-USB wird dieses als Standard-Audiogerät auf dem Klicken Sie mit der rechten Maustaste auf das Headset-Symbol in der Taskleiste und Computer festgelegt. Sie können in der Systemsteuerung von Windows auf der Registerkarte ® wählen Sie „Optionen“. Die PerSonoCall-Bildschirme „Grundoptionen“ und „Aktueller „Audio“... -
Page 28: Anpassen Des Kopfbügels
Initiierung“ auf Seite 12. Bei PerSonoCall ist die Funkverbindung zwischen dem Headset und der Basisstation nur während eines Gesprächs aktiv. Dies ist die Standardeinstellung, die darauf ausgelegt ist, die Nutzungsdauer der Akkus im Headset zu verlängern. Unter Umständen soll die Funkverbindung jedoch auch ohne Gespräch aktiv bleiben, damit Sie andere Audioquellen hören können, z. B. Audio-Streaming am PC. Zum Beibehalten der Funkverbindung stehen zwei Verfahren zur Auswahl: HINWEIS: Wenn Sie die Funkverbindung über einen längeren Zeitraum hinweg aktiv lassen, werden die Standby- und Gesprächszeit des Headsets drastisch verkürzt. Für Softphones, die nicht mit PerSonoCall kompatibel sind: In der PerSonoCall-Kompatibilitätsliste unter www.plantronics.com/personocall finden Sie die neuesten Informationen zur Kompatibilität von Softphones. Falls Ihr Softphone derzeit nicht durch PerSonoCall unterstützt wird, sind die Fernerkennung und das Annehmen/Beenden von Gesprächen über das Headset nicht funktionsfähig. Durch Drücken der Gesprächstaste auf dem Headset wird lediglich... -
Page 29: Stummschalten Eines Anrufs, Initiierung Der Smart-Taste
Telephone Cord Jac grüne Gesprächsleuchtanzeige am Headset blinkt, lassen Sie beide Tasten los. Speaking Volume Major Adjust Charging Cradle HINWEIS: Wenn das Headset ausgeschaltet ist, kann es durch Drücken einer beliebigen Taste wieder eingeschaltet werden. Bei unsachgemäßem Verstauen kann sich das AWH55/65-USB Headset versehentlich wieder einschalten! Drücken Sie zum Stummschalten des Headsets einfach kurz auf die Taste für die Telephone Hörlautstärke/Stummschaltung. Drücken Sie die Taste erneut, um die Stummschaltung... -
Page 30: Headset-Regler
Statusleuchtanzeige (grün) Ladeleuchtanzeige (rot) Taste Funktion Aktion Tonregler Lauter bzw. leiser Drehen Sie das Rad werdende Pieptöne, Hörlautstärke hin und her 2 Töne bei den Minimal-/ Maximalwerten Aktion Beleuchtung Halten Sie die Taste Smart-Taste länger als 2 Sekunden Laden Rotes Licht leuchtet hell gedrückt Vollständig geladen Rotes Licht erlischt Drücken Sie kurz auf... -
Page 31: Fehlerbehebung Für Awh55/65-Usb
PROBLEM Lösung PROBLEM Lösung Mein Headset funktioniert nicht • Das Headset befindet sich möglicherweise außerhalb Der Klang im Headset ist • Reduzieren Sie die Hörlautstärke an Ihrem Softphone, der Reichweite der Basisstation. Bewegen Sie das bis die Verzerrung nicht mehr zu hören ist. mit der Basisstation. verzerrt. Ich höre ein Echo im Headset näher an die Basisstation, bis es sich innerhalb Headset. • Ist der Empfang weiterhin verzerrt, verringern Sie die der Reichweite befindet. Die Reichweite hängt von der Hörlautstärke am Computer. Büroumgebung ab. • Passen Sie die Lautstärke am Headset an. Siehe Seite 12. • Der Akku des Headsets muss geladen werden. Siehe Seite 7. Wenn Sie einen Laptop verwenden, der regelmäßig Ich höre zu viele Hintergrund- • Die Sprechlautstärke ist zu hoch. Reduzieren Sie die... -
Page 32: Anmeldung
Sprechzeit deutlich abnimmt, sollte der Akku ausgetauscht werden. Rufen Sie Plantronics folgendermaßen neu angemeldet werden: in Deutschland 0800 9323 400, Österreich 0800 242 500, Schweiz 0800 9232 40 an, um einen neuen Akku zu bestellen. Sobald Sie einen neuen Akku erhalten haben, befolgen Sie zum Austauschen des Akkus die nachstehenden Schritte. -
Page 33: Pflege
PFLEGE 1. Trennen Sie vor der Reinigung das Gerät vom Computer und das Ladegerät von der Stromversorgung. 2. Reinigen Sie das Gerät mit einem feuchten (nicht nassen) Tuch. 3. Verwenden Sie keine Lösungsmittel oder anderen Reinigungsmittel. AUT, BEL, DEU, DNK, ESP, FRA, GRC, ITA, IRL, LUX, NLD, PRT, SWE, FIN, CYP, CZE, EST, HUN, LVA, LTU, MLT, POL, SVK, SVN. Avaya Corporate Headquarters 211 Mt Airy Road Basking Ridge, NJ 07920 USA www.avaya.com © 2005-2006 Plantronics, Inc. Alle Rechte vorbehalten. Plantronics, das Logo, CS60, PerSonoCall und Sound Innovation sind Marken oder eingetragene Marken von Plantronics, Inc. Microsoft und Windows sind Marken oder eingetragene Marken der Microsoft Corporation in den USA und/oder anderen Ländern. Alle anderen Markennamen sind Eigentum ihrer jeweiligen Besitzer. - Page 34 GUÍA DEL USUARIO A V A YA AWH 55/65-USB SISTEMA DE AURICULARES INALÁMBRICOS...
-
Page 35: Contenido Del Paquete
Ajuste Realización, respuesta y fin de llamadas Ganchos Ajuste del volumen e inicio de la función instantánea Activación de la función Mute durante una llamada e inicio del botón inteligente Base Uso de AWH55/65-USB en viajes Controles del auricular Luces indicadoras de la base Resolución de problemas de AWH55/65-USB... -
Page 36: Características
Botón de control de llamada Telephone Cord Jack Luz indicadora de conversación Speaking Volume Contactos de carga Major Adjust Parte posterior: Horquilla de la base del auricular Headset Altavoz Front: Cubierta de la batería Micrófono Listening Volume/Mute Call Control Button... -
Page 37: Configuración
El tiempo de carga total es de tres horas Para instalar la unidad base, pase primero el cable USB por la parte inferior de la base para que esté situado en la muesca. A continuación, ajuste el soporte insertando los ganchos (del soporte) en los orificios que se encuentran en la parte inferior de la unidad base. -
Page 38: Instalación Del Software Personocall
Después de instalar y ejecutar el software, aparecerá uno de los cuatro iconos de la bandeja del sistema en la barra de la bandeja de la parte inferior de la pantalla, que aplicación del teléfono Softphone mediante el botón de control de llamada del auricular. -
Page 39: Ajuste
Al pulsar el botón de control de llamada del auricular, sólo se abrirá y cerrará el enlace de radio que proporciona audio; deberá responder a la llamada desde el teléfono Softphone. -
Page 40: Ajuste Del Volumen E Inicio De La Función Instantánea
Para ajustar el volumen de escucha o de conversación del teléfono Softphone, consulte la documentación del teléfono Softphone. Para ajustar el volumen de escucha o de conversación del dispositivo de audio en el orde- nador, utilice la sección Dispositivos de sonido y audio del Panel de control de Windows ®... -
Page 41: Controles Del Auricular
250 mA para cargar el auricular. si no han transcurrido más • Si utiliza el cargador de CA, compruebe que la clavija de 15 minutos esté conectada a la unidad base, que el cargador Pulse el botón de de CA esté... -
Page 42: Resolución De Problemas De Awh55/65-Usb
Problema Solución El auricular no funciona con • Puede que el auricular esté fuera del alcance de la base. El sonido del auricular está • Baje el volumen de escucha del teléfono Softphone Acérquese a la unidad base hasta que el auricular vuelva a hasta que desaparezcan las distorsiones. -
Page 43: Registro
El auricular y la unidad base se proporcionan ya registrados. Por tanto, si desea utilizar otro auricular La batería personalizada del auricular tiene una vida media de dos a tres años. Si el tiempo de con la unidad base, deberá volver a registrar las unidades como se describe a continuación: conversación disminuye considerablemente, cambie la batería. -
Page 44: Mantenimiento
MANTENIMIENTO 1. Desconecte la unidad del ordenador y el cargador de CA de la red de alimentación eléctrica antes de limpiarlo. 2. Limpie el equipo con un paño húmedo (no mojado). 3. No utilice disolventes ni otros productos de limpieza. - Page 45 KÄYTTÖOPAS A V A YA AWH 55/65-USB LANGATON KEVYTKUULOKEJÄRJESTELMÄ...
- Page 46 Tukiasema Matkustaminen ja AWH55/65-USB-kevytkuuloke Kevytkuulokkeen ohjaimet Tukiaseman merkkivalot AWH55/65-USB-kevytkuulokkeen vianmääritys Laturi AC Charger Liittäminen Järjestelmän nollaaminen Akun vaihtaminen Huolto Laitteen mukana toimitetussa Turvallisuusohjeet-kirjasessa on tärkeitä tietoja laitteen turvallisesta käytöstä. Lue kirjanen ennen laitteen asentamista tai käyttöönottoa. Tukiasema PerSonoCall ® Ohjelmisto-CD...
-
Page 47: Ominaisuudet
OMINAISUUDET Tukiasema Näkymä edestä ja sivusta Soittoäänen kytkin (käytössä = yläasento) (ei käytössä = ala-asento) Liittämispainikkeen Pidikkeen tapit liitinaukko (paperiliitin tarvitaan) Laturin liitäntä USB-liitin Näkymä edestä Kuuloke Latauksen merkkivalo Tilan merkkivalo (vihreä) (punainen) Näkymä edestä Kuunteluvoimakkuus, mykistys, vaihto ja älypainike... -
Page 48: Asentaminen
(250mA) kevytkuulokkeelle. SIJOITTAMINEN Tukiaseman voi liittää tietokoneen näyttöön myös kevytkuulokkeen mukana toimitetuilla tarranauhoilla. Jos tästä aiheutuu kohinaa tai häiriöitä, katso lisätietoja sivulta 7 kohdasta Sijoittaminen. Suositeltava vähimmäisetäisyys näkyy yllä. TÄRKEÄÄ: väärä sijoituspaikka voi aiheuttaa kohinaa ja häiriöitä. -
Page 49: Personocall-Ohjelmiston Asentaminen
Avaya PerSonoCall® -ohjelmisto muodostaa yhteyden AWH55/65-USB-kevytkuulokkeen ja yhteensopivan tietokoneen puhelinohjelmiston välille. PerSonoCall-puhelinohjelmiston Kun ohjelmisto on asennettu ja sitä käytetään, jokin neljästä kuvakkeesta näkyy näytön avulla kevytkuuloke havaitsee ja lopettaa puhelun tai vastaa puheluun, kun kuulokkeen alareunan ilmaisinalueella. Ne ilmaisevat yhteyden tilan kevytkuulokkeenja PerSonoCall- puhelunhallintapainiketta painetaan. -
Page 50: Säätäminen
Vaihtaminen puhelujen välillä Jotkin puhelinohjelmistot tukevat niin sanottua vaihtotoimintoa, jolla voit siirtää nykyisen puhelun pitoon tai pois pidosta tai vaihtaa puheluiden välillä. Voit ottaa toiminnon käyttöön liikuttamalla kevytkuulokkeen äänenvoimakkuuden säädintä jompaankumpaan suuntaan yli 2 sekuntia. Lisätietoja on sivulla 12 luvussa Äänenvoimakkuuden säätäminen, vaihtotoiminnon ottaminen käyttöön. -
Page 51: Äänenvoimakkuuden Säätäminen, Vaihtotoiminnon Ottaminen Käyttöön
Voit säätää tietokoneen äänilaitteen kuuntelun tai puheen äänenvoimakkuutta Windowsin ® Ohjauspaneelin kohdassa Ääni ja äänilaitteet. Voit ottaa vaihtotoiminnon käyttöön liikuttamalla äänenvoimakkuuden säädintä jompaankumpaan suuntaan yli 2 sekuntia. (Lisätietoja on sivulla 11 kohdassa Vaihtaminen puhelujen välillä.) PUHELUN MYKISTÄMINEN, ÄLYPAINIKKEEN OTTAMINEN KÄYTTÖÖN Headset Mute Virta on hyvä... -
Page 52: Kevytkuulokkeen Ohjaimet
3 äänimerkkiä • Tarkista, että tietokone on päällä eikä valmius- tai aikana kuuluvuusalueen ylittämisen lepotilassa. jälkeen, puhelu keskeytyy. • Jos käytät USB-keskitintä, varmista, että 1 äänimerkki verkkovirtalähde on oikein liitetty ja että keskitin antaa kuuluvuusalueelle paluun kuulokkeelle 250 mA:n virtaa. - Page 53 • Kevytkuuloke on ehkä liitettävä uudelleen. Katso sivu 18. Akun puheaika on lyhentynyt • Akku on liian vanha, vaihda akku. Katso sivu 19. huomattavasti, vaikka se oli Soittajat eivät kuule ääntäni. • Kuuloke on mykistetty. Poista mikrofonin mykistys täyteen ladattu.
-
Page 54: Liittäminen
Kevytkuulokkeen oman akun käyttöikä on 2–3 vuotta. Kun puheaika lyhenee huomattavasti, tukiaseman kanssa muuta kuuloketta, laitteet on liitettävä toisiinsa uudelleen seuraavasti: akku on vaihdettava. Soittamalla Plantronicsin numeroon 0800 117 095 voit tilata uuden akun. Kun olet saanut uuden akun, asenna se noudattamalla seuraavia ohjeita. -
Page 55: Huolto
Sound Innovation ovat Plantronics, Inc:n tavaramerkkejä tai rekisteröityjä tavaramerkkejä. Microsoft ja Windows ovat Microsoft Corporationin tavaramerkkejä tai rekisteröityjä tavaramerkkejä Yhdysvalloissa ja/tai muissa maissa. Kaikki muut tavaramerkit ovat tavaramerkkien omistajien omaisuutta. Patentit Yhdysvalloissa: 5 210 791, 6 735 453, D492 667, EM 6910 ja patentteja haetaan. 74776-05 (11/06) - Page 56 GUIDE DE L'UTILISATEUR A V A YA AWH 55/65-USB SYSTEME D'OREILLETTE SANS FIL...
- Page 57 Configuration et état Réglage du port de l'oreillette Passer/prendre/terminer des appels Réglage du volume, utilisation de la fonction Flash Activation du mode secret pendant un appel, utilisation du bouton Smart Contours d'oreille Voyager avec votre AWH55/65-USB Base Commandes de l'oreillette Indicateurs d'appel sur la base Dépannage de l'oreillette AWH55/65-USB...
-
Page 58: Caractéristiques
CARACTERISTIQUES Base Vues arrière et latérale Activation/désactivation de la sonnerie (Activation = position haute) (Désactivation = position basse) Fiches du porte oreillette Orifice d'accès au bouton de connexion (se munir d'un trombone) Port du chargeur secteur Connecteur USB Base - Bottom View... -
Page 59: Installation
3 heures = chargement complet Pour installer la base, faites passer le câble USB dans le socle de la base afin qu'il reste dans l'encoche. Fixez ensuite le support de l'oreillette en insérant les fiches dans les supports situés sous la base. -
Page 60: Installation Du Logiciel Personocall 8 Oreillette
® de détecter un appel émis par le softphone et de décrocher/raccrocher, le tout à distance, Une fois le logiciel installé, l'une des quatre icônes s'affiche dans la barre système en bas à l'aide du bouton de contrôle d'appel. de votre écran, indiquant l'état de la communication entre votre oreillette et PerSonoCall. -
Page 61: Réglage Du Port De L'oreillette
Toutefois, vous pouvez activer la liaison radio lorsque aucun appel n'est en cours de façon à pouvoir écouter les autres sources audio, telles que la diffusion audio, sur votre ordinateur. Vous pouvez activer la liaison radio à tout moment en appuyant sur le bouton de contrôle d'appel de l'oreillette. -
Page 62: Réglage Du Volume, Utilisation De La Fonction Flash
® Pour utiliser la fonction Flash (voir page 11 « Pour passer d'un appel à l'autre »), tournez le bouton de contrôle du volume vers le haut ou vers le bas pendant plus de 2 secondes. Base - Top View... -
Page 63: Commandes De L'oreillette
• Si vous utilisez un hub USB, vérifiez que l'alimentation conversation) est suspendu. 1 tonalité est bien branchée et que le hub fournit 250 mA à indique le retour dans le l'oreillette. rayon de portée ; l'appel •... - Page 64 à l'émission de votre softphone jusqu'à ce • Le volume à l'écoute est trop faible. Appuyez sur que le bruit de fond disparaisse. Si le bruit de fond ne le bouton permettant d'augmenter le volume sur disparaît pas, baissez le volume du microphone sur l'oreillette.
-
Page 65: Connexion
2. Appuyez à nouveau sur le bouton de puis rebranchez le chargeur secteur (s'il Après avoir remplacé la batterie, n'oubliez pas qu'il faut compter trois heures pour un contrôle d'appel. Le témoin d'appel est en cours d'utilisation). -
Page 66: Entretien
Innovation sont des marques commerciales ou des marques déposées de Plantronics, Inc. Microsoft et Windows sont des marques déposées ou des marques commerciales de Microsoft Corporation aux Etats-Unis et/ou dans d'autres pays. Toutes les autres marques sont la propriété de leurs détenteurs respectifs. - Page 67 GUIDA DELL'UTENTE A V A YA AWH 55/65-USB SiStema aURiCOLaRe WiReLeSS...
-
Page 68: Contenuto Della Confezione
Configurazione e stato Regolazione Esecuzione/risposta/termine delle chiamate Supporti per orecchio Regolazione del volume e inizializzazione della funzione Flash Esclusione del microfono durante una chiamata e inizializzazione del pulsante Smart 12 Base In viaggio con l'auricolare AWH55/65-USB Controlli dell'auricolare Indicatori luminosi della base... -
Page 69: Caratteristiche
CARATTERISTICHE Base Retro e lato Selettore della suoneria (On = verso l'alto) (Off = verso il basso) Ganci del supporto Registrazione Foro di accesso al pulsante di Porta del collegamento caricabatterie CA (è necessario utilizzare una Connettore USB Base - Bottom View... -
Page 70: Ricarica
Quando il computer è acceso, l'auricolare AWH55/65-USB viene caricato tramite il collegamento USB. Collegare il connettore USB a una porta USB libera sul computer. Se si utilizza un hub USB, verificare che l'energia erogata (250 mA) sia sufficiente a caricare l'auricolare. -
Page 71: Installazione Del Software Personocall
: Auricolare rilevato e collegamento radio alla base attivo : Auricolare rilevato e collegamento radio alla base bloccato 1. Dopo aver inserito il CD, passare alla schermata principale di PerSonoCall e fare clic su "Installa il software PerSonoCall". 2. Potrebbe essere necessario scegliere il dispositivo audio da utilizzare. Fare riferimento alla documentazione del softphone per i dettagli. -
Page 72: Regolazione
Alcuni softphone supportano una funzione nota come "Flash", che consente di sospendere o riprendere una chiamata in corso o passare da una chiamata a un'altra. Per far ciò, è sufficiente spostare il controllo del volume dell'auricolare in una delle due direzioni per più di 2 secondi. -
Page 73: Regolazione Del Volume Einizializzazione Della Funzione Flash
Suoni e periferiche audio del pannello di controllo di Windows ® Per inizializzare la funzione Flash (vedere pagina 11 “Per passare da una chiamata a un’altra”), spostare il controllo del volume in una delle due direzioni per più di 2 secondi. ESCLUSIONE DEL MICROFONO Base - Top View... -
Page 74: Indicatori Luminosi Della Base
250 mA per la ricarica dell’auricolare. la comunicazione viene ripristinata entro 15 minuti • Se si utilizza un caricabatterie CA, verificare che il jack sia inserito nella base, che il caricabatterie sia Premere il pulsante di collegato correttamente a una presa a muro... -
Page 75: Risoluzione Dei Problemi Dell'auricolare Awh55/65-Usb
Avvicinarsi alla base finché l'auricolare non rientra nel raggio la propria eco d'azione. La portata varia a seconda dell'ambiente lavorativo. • Se il problema persiste, abbassare il volume di ascolto sul computer. nell'auricolare. • È necessario caricare la batteria dell'auricolare. Vedere •... -
Page 76: Ripristino Del Sistema
REGISTRAZIONE SOSTITUZIONE DELLA BATTERIA L'auricolare e la base sono già collegati al momento dell'acquisto. Tuttavia, se si desidera utilizzare La durata della batteria in dotazione e di circa 2-3 anni. Quando l'autonomia di conversazione un auricolare di ricambio con la base, sarà necessario effettuare nuovamente il collegamento delle si riduce notevolmente, è... -
Page 77: Manutenzione
Basking Ridge, NJ 07920 USA www.avaya.com © 2006 Plantronics, Inc. All rights reserved. Avaya and the Avaya logo are trademarks by Avaya, Inc. and may be registered in certain jurisdictions. CS60, PerSonoCall and Sound Innovation are trademarks or registered trademarks of Plantronics, Inc. Microsoft and Windows are either registered trademarks or trademarks of Microsoft Corporation in the United States and/or other countries. - Page 78 USER GUIDE A V A YA AWH 55/65-USB WIRELESS HEADSET SySTEm...
- Page 79 WELCOME PACKAGE CONTENTS This User Guide provides instructions on the setup and usage of the Avaya AWH 55/65-USB wireless headset system. Before getting started, please review the safety booklet included Headset and wearing options in your package. For additional help, service or support information,refer to the product warranty card or visit www.avayaheadsets.com. Headband TABLE OF CONTENTS Headset Package contents Features Setup Charging Earloops Positioning Installing PerSonoCall software Base Adjusting fit Making/answering/ending calls Adjusting volume, initiating flash Muting a call, initiating smart button Travelling with AWH55/65-USB AC Charger Headset controls Base indicator lights Troubleshooting for AWH55/65-USB Subscription System reset Battery replacement Technical Assistance Software Maintenance ...
-
Page 80: Features
FEATURES Base Back and side Ringer switch (On = up position) (Off = down position) Subscription Stand pegs button access hole (paperclip required) AC charger port USB connector Base - Bottom View Front Headset Telephone Handset Jack Handset Lifter Jack Charge indicator light (red) Status indicator light (green) Front: AC Charging Jack Listening volume/mute/flash/ smart button Call control button Telephone Cord Jack Talk indicator light Charge contacts... -
Page 81: Setup
SETUP CHARGING 1 hour = minimum charge to continue setup 3 hours = full charge To install base unit, first thread the USB cable through the bottom of the base so it rests in the notch. Then attach the stand by inserting the stand pegs into the holds on the underside of the base unit. 1. Slide headset into charging cradle. 2. Gently press down on the headset to ensure that headset is in correct position. Red charge indicator light on base will illuminate while charging and will go off completely when fully charged. AC charging only: When your computer is powered off, the AWH55/65-USB will not charge and the headset standby time will decrease. Using the optional AC adapter will ensure your headset remains charged. USB charging only: When your computer is powered on, the AWH55/65-USB will charge via the USB connection. Connect USB connector to a free USB port on your computer. A USB hub can be used but ensure that it can supply sufficient power (250 mA) to charge the headset. POSITIONING Alternatively, the velcro strips included can be used to attach the base unit to a PC monitor. However, if that causes noise or interference problems, see “Positioning” on page 7. The minimum recommended separation distance is shown above. IMPORTANT: Incorrect positioning can cause noise and interference. The optional AC charger can be used. ... -
Page 82: Installing Personocall Software
PerSonoCall Software”. 2. Your softphone may require you to choose which audio device you wish to use. Please refer to softphone documentation for details. CONFIGURA TION AND ST A TUS NOTE: Once the AWH55/65-USB is installed, it becomes the default audio device in your Right click on the headset system tray icon and choose “Options” . This will bring computer. You can set preferences manually in the Windows operating system through the ®... -
Page 83: Adjusting Fit
Flash” on page 12. When using PerSonoCall, the radio link between the headset and the base will only be active during a call. This is the default setting intended to preserve the battery life of the headset. However, you may wish to have the radio link active when not on a call so you can listen to other audio sources, such as streaming audio on your PC. You can open the radio link at any time by pressing the call control button on the headset. NOTE: Locking the radio link on for extended periods of time will significantly reduce the standby and talk time of the headset. For softphones not compatible with PerSonoCall Check the PerSonoCall compatibility list at www.plantronics.com/personocall for the most current information on softphone compatibility. If your softphone is not currently supported by PerSonoCall, remote detection and answer/end via the headset does not function. Pressing the call control button on the ... -
Page 84: Adjusting Volume, Initiating Flash
Speaking Volume Major Adjust Charging Cradle NOTE: Once turned off, a single press on any button will turn the headset back on. Beware that if not stowed properly, the AWH55/65-USB headset may inadvertently turn back on. Headset Telephone To mute headset, briefly press the listening volume/mute button straight in. Press again ... -
Page 85: Headset Controls
HEADSET CONTROLS BASE INDICATOR LIGHTS Status indicator light (green) Charge indicator light (red) Feature Action Tone Ascending/descending Rock back and forth Listening volume tones, 2 tones at limit Action Light Press straight in and Smart button hold for more than Charging Red light illuminates brightly 2 seconds Fully charged Red light goes off... - Page 86 • Headset battery needs to be charged. If you are used) to power back up. using a laptop that regularly goes into standby or hibernation, the AC power supply is available to • Reset the whole system as described on page 18. ensure the headset can be continuously charged. • AWH55/65-USB may not be set as the default audio People I talk to can hear a buzz • Move the AWH55/65-USB base further away from your device in your softphone application. phone. in the background. • AC charger is plugged into a power strip. Plug the I cannot hear caller. • Check that all cords are connected correctly. AC charger into the wall directly. • Check that the base has power (green indicator light) The other headset I was using • The AWH55/65-USB will set itself as the default audio ...
-
Page 87: Subscription
SUBSCRIPTION BATTERY REPLACEMENT The headset and base unit are supplied subscribed to each other. However, if you wish to use The custom battery inside the headset should last 2-3 years. When talk time decreases a replacement headset with the base unit, then the units must be re-subscribed as follows: significantly, you should replace the battery. -
Page 88: Technical Assistance
The Avaya Headset Helpdesk is ready to assist you! Dial 01793 842370, or visit the support section of our website at www.avayaheadsets.com. MAINTENANCE MAINTENANCE 1. Unplug the unit from the computer and the AC charger from the power source before cleaning. 2. Clean the equipment with a damp (not wet) cloth. 3. Do not use solvents or other cleaning agents. AUT, BEL, DEU, DNK, ESP, FRA, GRC, ITA, IRL, LUX, NLD, PRT, SWE, FIN, CYP, CZE, EST, HUN, LVA, LTU, MLT, POL, SVK, SVN. Avaya Corporate Headquarters 211 Mt Airy Road Basking Ridge, NJ 07920 USA www.avaya.com... - Page 89 GUÍA PARA EL USUARIO A V A YA AWH 55/65-USB SISTEMA DE AURICULAR INALÁMBRICO...
- Page 90 Sustitución de la batería Mantenimiento Asistencia técnica Garantía Avisos sobre normativas Software Antes de instalar o utilizar el producto, consulte el folleto de instrucciones de seguridad (aparte) para obtener información importante acerca de la seguridad del producto. CD del software PerSonoCall ®...
-
Page 91: Características
Luz indicadora de carga Luz indicadora de estado (roja) (verde) Frente: AC Charging Jack Volumen de escucha/Silencio/ Flash/Botón inteligente Botón de control de llamadas Telephone Cord Jack Luz indicadora de conversación Speaking Volume Contactos de carga Major Adjust Base del auricular Posterior:... -
Page 92: Configuración
(250 mA) para cargar el auricular. COLOCACIÓN O bien, use las tiras de velcro incluidas para pegar la unidad base al monitor de la PC. No obstante, si eso ocasiona problemas de ruidos o interferencias, consulte “Colocación”, en la página 7. -
Page 93: Instalación Del Software Personocall
Después de instalar y ejecutar el software, aparecerá uno de los siguientes cuatro iconos su aplicación de teléfono, a través del botón de control de llamadas del auricular. en la bandeja del sistema de la parte inferior de la pantalla, para indicar el estado de la comunicación del auricular con PerSonoCall. -
Page 94: Ajuste
Si su aplicación de teléfono no es compatible con PerSonoCall, no funcionará la detección remota ni podrá contestar o colgar a través del auricular. Al presionar el botón de control de llamadas del auricular, simplemente se abre o se cierra la comunicación por radio que... -
Page 95: Ajustar El Volumen, Iniciar Flash
Mueva el control de volumen del auricular hacia atrás y hacia adelante para ajustar el volumen de escucha. Para viajar, puede desmontar fácilmente el AWH55/65-USB. Para ajustar el volumen de escucha o de conversación de la aplicación de teléfono, consulte la documentación para el usuario. -
Page 96: Controles Del Auricular
250 mA para cargar el auricular. 15 minutos • Si usa el cargador de CA, compruebe que el cargador de CA está conectado a la unidad base, que el Aviso de llamada Presione el botón de 3 tonos repetitivos cargador de CA está... -
Page 97: Solución De Problemas Con El Awh55/65-Usb
El auricular no funciona con El sonido del auricular • Baje el volumen de escucha de la aplicación de • Es posible que el auricular esté fuera del alcance de teléfono hasta que la distorsión desaparezca. la unidad base. está distorsionado. -
Page 98: Suscripción
SUSCRIPCIÓN SUSTITUCIÓN DE LA BATERÍA El auricular y la unidad base se suministran con una suscripción mutua. Sin embargo, si desea La batería interna personalizada del auricular debe durar de 2 a 3 años. Cuando disminuya utilizar otro auricular con la unidad base, debe volver a suscribir las unidades como se indica notablemente el tiempo de conversación, debe cambiar la batería. -
Page 99: Mantenimiento
El radio inalámbrico interno funciona dentro de las especificaciones de los estándares y recomendaciones de seguridad para radiofrecuencia, que reflejan el consenso de la comunidad científica. Estudios independientes demuestran que el uso del radio inalámbrico interno es seguro para los consumidores. Si desea obtener más información, visite www.plantronics.com. - Page 100 GUIDE DE L'UTILISATEUR A V A YA AWH 55/65-USB SYSTÈME DE MICRO-CASQUE SANS FIL...
- Page 101 Réinitialisation du système Remplacement de la pile Entretien Soutien technique Garantie Avis réglementaires Logiciel Veuillez lire les consignes de sécurité fournie séparément avant d'installer ou d'utiliser CD du logiciel ce produit. Elles contiennent des renseignements importants relatifs à la sécurité. PerSonoCall ®...
- Page 102 CARACTÉRISTIQUES Socle Arrière et côté Commutateur de sonnerie (Position allumée = vers le haut) (Position éteinte = vers le bas) Orifice d'accès au Pattes bouton d'association (munissez-vous d'un trombone) Port du chargeur c.a. Connecteur USB Base - Bottom View Avant...
-
Page 103: Installation
3 heures = Charge complète Pour installer le socle, faites d'abord passer le câble USB dans la base du socle de sorte qu'il soit fixé dans l'encoche. Ensuite, fixez le socle en insérant les pattes dans les orifices situés sous le socle. -
Page 104: Installation Du Logiciel Personocall
CONFIGURA TION ET ÉT A T REMARQUE : Une fois le micro-casque AWH55/65-USB installé, il devient le périphérique Cliquez avec le bouton droit de la souris sur l'icône du micro-casque dans la zone de audio par défaut sur votre ordinateur. Vous pouvez paramétrer manuellement vos préférences notification et choisissez Options. La fenêtre qui s'affiche contient les onglets Options dans le système d'exploitation Windows... -
Page 105: Ajustement Du Micro-Casque
Certains logiciels de téléphonie prennent en charge une fonction de commutation, ou « flash ». Elle permet de mettre l'appel en cours en attente ou de passer d'un appel à l'autre. Pour utiliser cette fonction, faites tourner la molette de réglage du volume pendant au moins 2 secondes. -
Page 106: Réglage Du Volume, Activation De La Fonction De Commutation
® Pour activer la fonction de commutation (voir page 11 « Pour passer d'un appel à l'autre »), faites tourner la molette de réglage de volume dans un sens ou dans l'autre pendant plus de 2 secondes. Base - Top View Base - Bottom View FONCTION DE DISCRÉTION... -
Page 107: Commandes Du Micro-Casque
Problème Solution Avertissement 2 tonalités avant de J'ai effectué tous les • Vérifiez que le câble USB est branché sur un Rapprochez-vous de branchements, mais aucun ordinateur sous tension. d'utilisation hors du la base dépasser le rayon de portée. voyant ne s'allume. - Page 108 La portée varie plus lorsque j'appuie sur des selon le type de bureau. • Vous devez charger la pile du micro-casque. Voir page 7. boutons. • Réglez le volume de réception du micro-casque (voir • Si vous utilisez un ordinateur portatif qui se met page 12), dans le logiciel de téléphonie et dans les...
-
Page 109: Association
4. Rebranchez d'abord le chargeur USB, 2. Appuyez à nouveau sur le bouton de puis le chargeur c.a. (le cas échéant). Une fois la pile remplacée, n'oubliez que la charge complète prend 3 heures. contrôle des appels. Le voyant de conversation se remet à clignoter La réinitialisation du système est terminée. -
Page 110: Entretien
Ce produit est conforme à la section 68 des règles de la FCC et aux exigences de l'ACTA. Sur cet équipement se trouve une étiquette contenant un identifiant de produit au format : US: AAAEQ##TXXXX. Si nécessaire, cet 2. - Page 111 GUIA DO USUÁRIO A V A YA AWH 55/65-USB SiStema de FONe de OUVidO Sem FiO...
- Page 112 Vinculação Reinicialização do sistema Troca da bateria Manutenção Assistência técnica Garantia Avisos de regulamentação Software Consulte o folheto Instruções sobre Segurança para obter informações importantes de segurança do produto antes da instalação ou do uso. CD do software PerSonoCall ®...
-
Page 113: Recursos
RECURSOS Base Parte traseira e lateral Controle de campainha (Ligado = posição para cima) (Desligado = posição para baixo) Orifício de acesso Cavilha da estação ao botão de vinculação (requer clipe de papel) Porta do carregador CA Conector USB Base - Bottom View... -
Page 114: Montagem
3 horas = carga completa Para instalar a unidade de base, passe o cabo USB pelo fundo da base, de forma que se encaixe na fenda. Em seguida, conecte a estação inserindo as cavilhas da estação nos receptáculos na parte inferior da unidade de base. -
Page 115: Instalação Do Software Personocall
: Fone de ouvido detectado e vínculo de rádio ativo com a base : Fone de ouvido detectado; o vínculo de rádio com a base está mantido ativo 1. Depois de inserir o CD, vá para a tela principal do PerSonoCall e clique em “Install the PerSonoCall Software” (Instalar o software PerSonoCall). -
Page 116: Ajuste Do Encaixe
áudio, como o fluxo de áudio no PC. Você poderá abrir o vínculo de rádio a qualquer momento pressionando o botão de controle de chamadas no headset. -
Page 117: Ajuste De Volume, Ativação Do Flash
Balance o controle de volume do fone de ouvido para frente e para trás a fim de acertar o volume de audição. Você tem a opção de desmontar com facilidade o AWH55/65-USB para viagens. -
Page 118: Controles Do Fone De Ouvido
• Se estiver usando um hub USB, verifique se a fonte de alimentação CA está conectada corretamente e se o hub 1 tom ao retornar ao limite pode fornecer 250mA para carregar o fone de ouvido. -
Page 119: Solução De Problemas No Awh55/65-Usb
Problema Solução Meu fone de ouvido não funciona • O fone de ouvido pode estar fora de alcance da base. O som no fone de ouvido está • Diminua o volume de audição no softphone até que Mova o fone de ouvido para mais perto da unidade de desapareça a distorção. -
Page 120: Vinculação
O fone de ouvido e a unidade de base são fornecidos vinculados um ao outro. No entanto, A bateria personalizada dentro do fone de ouvido deve durar de 2 a 3 anos. Quando o tempo se você quiser usar um fone de ouvido substituto com a unidade de base, as unidades de conversação diminuir significativamente, você... -
Page 121: Manutenção
O rádio sem fio interno opera dentro das diretrizes definidas pelas normas e recomendações de segurança em radiofreqüência, que refletem o consenso da comunidade científica. Estudos independentes mostraram que o uso de rádio sem fio interno é seguro para os consumidores. Visite www.plantronics.com para obter mais informações. - Page 122 GEBRUIKERSHANDLEIDING A V A YA AWH 55/65-USB DRAADLOOS HEADSETSYSTEEM...
- Page 123 Het volume uitschakelen voor een oproep, slimme knop inschakelen Basisstation Op reis met de AWH55/65-USB Headsetbediening Waarschuwingslampjes basisstation Problemen oplossen voor de AWH55/65-USB Wisselstroomoplader AC Charger Afstemmen Systeemreset Batterijen vervangen Onderhoud Raadpleeg voorafgaand aan de installatie en het gebruik het boekje met belangrijke veiligheidsinformatie. Software PerSonoCall ® software-cd...
-
Page 124: Kenmerken
KENMERKEN Basisstation Achterkant en zijkant Schakelaar belsignaal (Aan = omhoog) (Uit = omlaag) Koppelen Gaatje Statiefsteunen voor afstemknop (paperclip nodig) Poort voor wisselstroomoplader USB- aansluiting Voorkant Headset Oplaadindicatielampje (rood) Statuslampje (groen) Voorkant: Luistervolume/Mute/ Flash/Slimme knop Gespreksknop Spraakindicatielampje Oplaadcontactpunten Headsethouder Achterzijde:... -
Page 125: Installatie
1. Plaats de headset in de oplader/houder. basisstation. 2. Druk de headset zachtjes aan om ervoor te zorgen dat deze zich in de juiste positie bevindt. Het rode oplaadindicatielampje op het basisstation brandt tijdens het opladen en gaat uit als de headset volledig opgeladen is. -
Page 126: Personocall-Software Installeren
PerSonoCall wordt ondersteund. : Headset gedetecteerd en radioverbinding met basisstation is vergrendeld 1. Plaats de cd, ga naar het hoofdscherm van PerSonoCall en klik op “De PerSonoCall- software installeren”. 2. Voor de softphone moet u mogelijk het audioapparaat kiezen dat moet worden gebruikt. -
Page 127: Pasvorm Afstellen
Druk op de gespreksknop op de headset. Het statusindicatielampje op het basisstation 2. Draai het spreekbuisje in de (hoofdbeugel of oorhaakje). en op de headset moet nu gaan branden, wat aangeeft dat er verbinding is. Toets op de bevestigingsring tot de microfoon naar softphone het gewenste nummer in. -
Page 128: Volume Instellen, Flash-Functie Gebruiken
Denk eraan dat wanneer de AWH55/65-USB-headset niet goed is opgeborgen, deze mogelijk ongewenst opnieuw wordt ingeschakeld. Als u de headset wilt dempen, drukt u kort de volume-/muteknop in. Druk nogmaals op de knop om de microfoon weer in te schakelen. -
Page 129: Headsetbediening
• Als u een USB-hub gebruikt, ga dan na of de onderbroken. 1 signaal netvoeding juist is aangesloten en dat de hub 250 mA wanneer u weer binnen het kan leveren om de headset op te laden. -
Page 130: Problemen Oplossen Voor De Awh55/65-Usb
• Het luistervolume is te laag. Druk op de knop voor het verhogen van het volume op de headset. Zie pagina 12. Ik hoor ruis die de communicatie •... -
Page 131: Afstemmen
2. Druk nogmaals op de gespreksknop. 4. Sluit eerst de USB-oplader aan en Nadat u de batterij hebt vervangen, dient u er rekening mee te houden dat deze 3 uur nodig Het spraakindicatielampje knippert vervolgens de wisselstroomoplader heeft om volledig op te laden. -
Page 132: Onderhoud
ONDERHOUD 1. Koppel het basisstation los van de telefoon en de wisselstroomoplader van de voeding voordat u het apparaat schoonmaakt. 2. Neem de apparatuur af met een vochtige, niet te natte doek. 3. Gebruik geen oplos- of schoonmaakmiddelen. AUT, BEL, DEU, DNK, ESP,... - Page 133 BRUKERHÅNDBOK A V A YA AWH 55/65-USB TRÅDLØST HODESETTSYSTEM...
- Page 134 Dempe en samtale, bruke Smart-knappen Baseenhet Reise med AWH55/65-USB Hodesettkontroller Lampene på baseenheten Feilsøking for AWH55/65-USB AC Charger Vekselstrømslader Tilknytning Tilbakestilling av systemet Bytte batteri Vedlikehold Se viktig produktsikkerhetsinformasjon i det separate heftet om sikkerhetsinstruksjoner før installering eller bruk. Programvare PerSonoCall ® Programvare-CD...
-
Page 135: Funksjoner
FUNKSJONER Baseenhet Bakside og side Ringebryter (På = peker oppover) (Av = peker nedover) Holderpinner Adkomsthull for tilknytningsknapp (binders kreves) Port for vekselstrømslader USB-kabel Base - Bottom View Front Forside Hodesett Telephone Handset Jack Handset Lifter Jack Ladeindikatorlampe (rød) Statusindikatorlampe (grønn) -
Page 136: Oppsett
1. Skyv hodesettet inn i ladeholderen. 2. Trykk forsiktig ned på hodesettet for å sikre at det sitter i riktig posisjon. Rød ladeindi- katorlampe på baseenheten lyser når det lades og slås helt av når ladingen er fullført. -
Page 137: Installere Personocall-Programvaren
PerSonoCall, kan du se side 11. : Fant hodesett. Radiolink til basestasjon er låst i på-stilling. 1. Når CDen er satt i, går du til hovedskjermbildet for PerSonoCall og klikker på Install the PerSonoCall Software (Installer PerSonoCall-programvaren). 2. Det kan hende at PC-telefonen krever at du velger hvilken lydenhet du vil bruke. -
Page 138: Justere Tilpasning
Dette er standardinnstillingen som skal bevare hodesettets batterilevetid. Men det kan være ønskelig at radiolinken er aktiv når du ikke sitter i en samtale slik at du kan lytte til andre lydkilder, for eksempel streaming av lyd til PCen. Du kan åpne radiolinken når som helst ved å... -
Page 139: Justere Volumet, Starte Flash
Telephone Cord Jac Speaking Volume MERK: Når hodesettet er slått av, kan du slå det på igjen ved å trykke én gang på hvilken som Major Adjust Charging Cradle helst knapp. Vær oppmerksom på at dersom CS60-USB-hodesettet ikke oppbevares riktig, kan det slå... -
Page 140: Lampene På Baseenheten
• Hvis du bruker vekselstrømsladeren, må du kontrollere at laderens kontakt er koblet til baseenheten, enn 15 minutter at laderen er koblet til et uttak i veggen, og at det Varsling om Trykk på er modellen som leveres av Plantronics. - Page 141 Se side 18. Hodesettet er ukomfortabelt når • Prøv å bytte ørebøyler. Prøv deg frem for å finne den De som ringer, kan ikke • Hodesettet er dempet. Trykk på demp-knappen beste tilpasningen eller bruk den medfølgende bøylen det brukes over øret.
-
Page 142: Tilknytning
Originalbatteriet i hodesettet varer i to-tre år. Når taletiden reduseres betraktelig, bytter et nytt hodesett med baseenheten, må enhetene tilknyttes på nytt på følgende måte: du batteri. Ring Plantronics på 800 113 36 for å bestille et. Når du mottar batteriet, følger du fremgangsmåten nedenfor for å bytte det. -
Page 143: Vedlikehold
Plantronics, Inc. Microsoft og Windows er enten registrerte varemerker eller varemerker for Microsoft Corporation i USA og/eller andre land. Alle andre varemerker eies av sine respektive eiere. Amerikanske patenter 5 210 791, 6 735 453, D492,667, EM 69109 og patenter under godkjenning. 74776-13 (11/06) - Page 144 MANUAL DO UTILIZADOR A V A YA AWH 55/65-USB SiStema de aURiCULaR Sem FiOS...
- Page 145 Resolução de Problemas para o AWH55/65-USB AC Charger Carregador de CA Subscrição Reposição do Sistema Substituição da Bateria Manutenção Antes da instalação ou utilização do produto, consulte o folheto de Instruções de Segurança para obter informação de segurança. Software CD de Software PerSonnoCall ®...
-
Page 146: Características
CARACTERÍSTICAS Base Vista traseira e lateral Interruptor de toque (Ligado = voltado para cima) (Desligado = voltado para baixo) Subscrição Cavilhas do suporte Acesso aos botões Orifício (necessário clipe de papel) Porta para o carregador de CA Conector USB Base - Bottom View... -
Page 147: Instalação
3 horas = carregamento completo Para instalar a unidade de base, introduza o cabo USB na parte inferior da base, de modo a que encaixe na posição correcta. Depois, prenda o suporte, introduzindo as cavilhas do suporte nos orifícios de localização da parte inferior da unidade de base. -
Page 148: Instalar O Software Personocall
Após a instalação e execução do software, poderá ver um dos quatros ícones do tabuleiro através do botão de controlo de chamadas. do sistema na barra de tarefas na base do ecrã; o ícone reflecte o estado da comunicação do auricular com o PerSonoCall. -
Page 149: Ajustes
Prima o botão de conversação no auricular para atender uma chamada. Quando interruptor de toque na parte lateral da base está ligado (voltado para cima), a base toca quando chega uma chamada; deste modo, é notificado da chegada de uma chamada mesmo que não esteja a utilizar o auricular. -
Page 150: Ajustar O Volume, Iniciar Flash
Não se esqueça de que se for guardado de forma inadequada, o auricular AWH55/65-USB poderá ligar-se inadvertidamente. Headset Para tirar o som ao auricular, prima o botão de controlo do volume de audição/corte de som durante breves instantes. Volte a premir o botão para desactivar o corte de som. Telephone... -
Page 151: Controlos Do Auricular
1 tom assinala o • Se estiver a utilizar um hub USB, verifique se a corrente regresso ao intervalo de de alimentação está correctamente ligada e se o hub alcance; chamada pode fornecer 250mA para carregar o auricular. - Page 152 CA para assegura um ruído de fundo. o carregamento do auricular. • O carregador de CA está ligado a uma extensão. Ligue o carregador de CA directamente a uma tomada de parede. • O AWH55/65-USB poderá não estar configurado como o dispositivo de áudio predefinido da aplicação do softphone.
-
Page 153: Subscrição
SUBSCRIÇÃO SUBSTITUIÇÃO DA BATERIA O auricular e a unidade de base são fornecidos subscritos um ao outro. No entanto, se desejar utilizar A bateria fornecida com o auricular deverá durar entre 2 a 3 anos. Quando o tempo de um auricular de substituição com a base, deverá voltar a efectuar a subscrição das unidades: conversação diminuir consideravelmente, deverá... -
Page 154: Manutenção
© 2005-2006 Plantronics, Inc. Todos os direitos reservados. Plantronics, o design do logótipo, CS60, PerSonoCall e Sound Innovation são marcas comerciais ou marcas registadas da Plantronics, Inc. Microsoft e Windows são marcas comerciais ou marcas registadas da Microsoft Corporation nos Estados Unidos e/ou noutros países. - Page 155 ANVÄNDARHANDBOK A V A YA AWH 55/65-USB WIRELESS HEADSET-SySTEm...
- Page 156 Resa med AWH55/65-USB Headsetreglage Basenhetens indikatorlampor Felsökning av AWH55/65-USB AC Charger Laddare Matchning Systemåterställning Byta batteri Underhåll Innan du installerar eller börjar använda produkten bör du läsa i broschyren Säkerhetsanvisningar, som innehåller viktig produktsäkerhetsinformation. Programvara CD-skiva med programmet PerSonoCall ®...
-
Page 157: Funktioner
FUNKTIONER Basenhet Baksida och sida Reglage för ringsignal av/på (På = uppåt) (Av = nedåt) Ställpluggar Åtkomsthål för matchningsknapp (använd ett gem) Port för laddare USB-kontakt Base - Bottom View Framsida Headset Telephone Handset Jack Handset Lifter Jack Indikatorlampa för Indikatorlampa för status (grön) -
Page 158: Installation
När datorn är påslagen laddas AWH55/65-USB via USB-anslutningen. Sätt in USB-kontakten i en ledig USB-port på datorn. Du kan använda ett USB-nav, men då måste du se till att det har tillräckligt med ström (250 mA) så att headsetet kan laddas. PLACERING Alternativt kan du fästa basenheten vid datorskärmen med hjälp av de kardborrband... -
Page 159: Installera Programmet Personocall
Grundläggande alternativ för PerSonoCall och Aktuell status. alternativet Ljud och ljudenheter och sedan fliken Ljud. Läs i onlinehjälpen för programmet för information om PerSonoCall-programvaran. Obs! När du har installerat PerSonoCall bör du ange att det ska startas när du startar Windows ®... -
Page 160: Ställa In Passformen
Svara på ett samtal genom att trycka på headsetets samtalsknapp. När reglaget för ringsignal på sidan av basenheten är på (uppåt) ringer basenheten vid ett inkommande samtal så att du aviseras om samtal även när du inte har headsetet på dig. Funktionen är avaktiverad när reglaget för ringsignal är av (nedåt). -
Page 161: Justera Volymen, Aktivera Flash
Obs! När headsetet är avstängt slås det på igen om du trycker en gång på vilken knapp som helst. Tänk på att AWH55/65-USB-headsetet kan slås på av misstag om du inte har packat det på... -
Page 162: Headsetreglage
är påslagen. – vid pågående samtal basenheten räckviddsgränsen. Tre toner utanför • Kontrollera att datorn är påslagen och inte i räckviddsgränsen – det viloläge eller energisparläge. pågående samtalet försätts • Om du använder ett USB-nav kontrollerar du att i viloläge. - Page 163 Se sidan 12. Pipljud hörs i headsetet. • Ett pip var 10:e sekund är en varning för låg batterinivå. • Mikrofonbommen på headsetet är felaktigt justerad. Ladda batteriet genom att placera headsetet i Justera headsetbommen till samma läge som din mun.
-
Page 164: Matchning
Det anpassade batteriet i headsetet bör räcka i två-tre år. Om taltiden minskar markant bör du annat headset tillsammans med basenheten måste enheterna matchas om på följande sätt: byta ut batteriet. Ring Plantronics på 02002 14681 och beställ ett. När du fått batteriet byter du ut det enligt anvisningarna nedan. -
Page 165: Underhåll
Microsoft och Windows är antingen registrerade varumärken eller varumärken som tillhör Microsoft Corporation i USA och/eller andra länder. Alla andra varumärken tillhör respektive ägare. Patent i USA 5 210 791, 6 735 453, D492 667, EM 69109. Sökta patent finns. 74776-15 (11/06) - Page 166 ユーザーガイド A V A YA AWH 55/65-USB ワイヤレスヘッドセットシステム...
- Page 167 はじめに パッケージの内容 本ユーザーガイドでは、 Avaya AWH 55/65-USBワイヤレスヘッドセットシステ ムのセットアップおよび使用方法を説明します。 ヘッドセットをお使いになる前 ヘッドセッ トと装着オプション に、 本製品パッケージに付属している安全に関するパンフレットをお読みくださ い。 さらにヘルプ、 サービス、 またはサポートが必要な場合は、 製品の保証書または 弊社Webサイト ( www.avayaheadsets.com) をご覧ください。 Headband ヘッ ドバンド 目次 ヘッ ドセッ ト Headset パッケージの内容 各部名称 セッ トアッ プ 充電 イヤループ 設置位置 Earloops PerSonoCallソフトウェアのインストール ベースユニッ ト...
-
Page 168: 各部名称
ベースユニット 背面および側面 着信音スイ ッチ オン=上) (オフ=下) スタンド取り付け用ペグ ペアリングボタンへ のアクセスホール (クリッ プが必要) ACアダプター 充電器接続ポ ート USBコネクタ Base - Bottom View 前面 ヘッドセット Telephone Handset Jack Handset Lifter Jack 充電インジケーターライト (赤) ステータスインジケーターライト (緑) 前面 : 受話音量調節/ミュート/フラッシ AC Charging Jack ュ/スマートボタン コールコントロールボタン Telephone Cord Jack 通話インジケーターライト... -
Page 169: セットアップ
ッ ドセッ トは常時充電されます。 USBによる充電 : コンピュータの電源が入っている状態では、 AWH55/65-USBは、 USB接続により充 USBコネクタを、 コンピュータの空いているUSBポートに差し込みます。 電されます。 USBハブを使用する場合は、 ヘッドセットを充電するのに十分な電力 (250 mA) を供給できるものを使用してください。 設置位置 付属のテープを使って、 コンピュータのモニターにベースユニットを取り付けることも できます。 ただし、 モニターに取り付けると、 ノイズや電波干渉が発生することがあり ます。 その場合は、 「 設置位置」 ( 7ページ) をお読みください。 ベースユニッ トは、 最低でも上図に示す距離をあけて設置してください。 重要 : 設置位置が正しくないと、 ノイズや電波干渉が発生することがあります。 ACアダプター充電器 (オプション) を使用することもできます。... -
Page 170: Personocallソフトウェアのインストール
1. CDを入れ、 PerSonoCallのメイン画面で [Install the PerSonoCall Software] ( PerSonoCallソフトウェアのインストール) をクリックします。 設定とステータス 2. オーディオデバイスの選択画面が表示される場合があります。 詳しくは、 ソフト フォ ンの説明書を参照してください。 ヘッ ドセッ トのシステムトレイにあるアイコンを右クリックし、 [ Options] ( オプシ ョン) を選択します。 これにより、 PerSonoCallの基本オプションと現在の状態の 画面が表示されます。 注 : AWH55/65-USBをインストールすると、 コンピュータ上でデフォルトのオーディ オデバイスになります。 このデフォルト設定は、 Windows ® オペレーティングシステム PerSonoCallソフトウェアについて詳しくは、 アプリケーションのオンラインヘ... -
Page 171: ヘッドセットの装着
鳴り、 ヘッ ドセッ トを装着していなくても着信があったことがわかります。 この機能は、 スイ ッチが下側になっている間は無効になります。 通話を終了するには ヘッ ドセッ トのコールコントロールボタンを押します。 通話を切り替えるには 一部のソフト フォ ンでは、 「 フラッシュ」 機能を使用できます。 これは、 通話中に保留の オン/オフを切り替えたり、 複数の通話を切り替えたりする機能です。 フラッシュ機能 を使用するには、 ヘッ ドセッ トの音量コントロールをどちらかに2秒以上動かします。 「 音量の調節とフラッシュ機能の使用」 ( 12ページ) の図を参照してください。 PerSonoCallを使用する場合は、 ヘッ ドセッ トとベースユニッ ト間のラジオリンクが 通話中のみアクティブになります。 これは、 ヘッ ドセッ トの電池を長持ちさせるための... -
Page 172: 音量の調節とフラッシュ機能の使用
Telephone Cord Jac トが緑で点滅したら、 両方のボタンを 離します。 Speaking Volume Major Adjust Charging Cradle ヘッ ドセットをミュートに切り替えるには、 音量調節/ミュートボタンを短く押します。 Headset ミュートを解除するには、 もう一度ボタンを押します。 注 : いったん電源をオフにすると、 ボタンを1回押すだけで、 ヘッ ドセッ トの電源がオン Telephone ミュートがオンになっている間は、 3回の短いビープ音が15秒置きに鳴ります。 になります。 収納の仕方によってはAWH55/65-USBヘッ ドセッ トの電源がオンにな Configuration Dial Front: ることがありますので注意してください。 スマートボタンを使用するには、 音量調節/ミュートボタンを2秒以上押します。 Listening Volume/Mute... -
Page 173: ヘッドセットのコントロール部
ーン音2回 ボタンを2秒 操作 ライト スマートボタン 以上押し続ける 充電中 赤いライトが明るく点灯 充電終了 赤いライトが消灯 ボタンを短く押す ミュート 15秒置きにトーン音3回 ミュート 緑のライトが短く点滅 ヘッ ドセッ トがベースユニッ トから外れている 赤いライトが暗めに点灯 どちらか一方 フラッシュ機能 ヘッ ドセッ トのラジオリンクがアクティブ 緑のライトがゆっく り点滅 に2秒以上動かす ヘッ ドセッ トのラジオリンクが非アクティブ 緑のライトが点灯 電話の発信/着 ボタンを短く押す 中く らいのトーン音 信応答/通話終了 電池残量不足の ヘッドセットを のトラブルシューティング... -
Page 174: Awh55/65-Usbのトラブルシューティング
通信可能な範囲までヘッ ドセッ トをベースユニッ トに近づ • 使用するラッ プトッ プがスタンバイ (スリープ) 状態になる けてください。 通信可能な範囲は、 周囲の環境によって異 ことが多い場合は、 オプションのACアダプター充電器を なります。 使ってヘッ ドセッ トを継続的に充電することができます。 • ヘッ ドセット、 ソフト フォ ン、 PCのオーディオコントロールで フル充電しても通話時間が • バッテリーが古くなっているので、 新しいものと交換して 音量を調節してください。 ヘッ ドセッ トの音量調節について 大幅に短くなった。 ください (19ページを参照) 。 は、 12ページを参照してください。... -
Page 175: ペアリング
ペアリング バッテリーの交換 ヘッ ドセットとベースユニットは、 出荷時にペアリングされています。 ただし、 お手持ち ヘッ ドセッ トに付属している専用バッテリーの寿命は、 2~3年です。 通話時間が大 のベースユニッ トで新しいヘッ ドセットを使用する場合は、 次の手順に従って、 ペアリ 幅に短くなったら、 バッテリーを交換してください。 バッテリーのご注文については、 ングし直す必要があります。 Plantronics社 (英国フリーダイヤル0800 410 014) にお問い合わせください。 バッテリーを入手したら、 次の手順に従って交換します。 ヘッ ドセットを充電用クレードルに戻 再ペアリングが正常に終了すると、 ス します。 テータスインジケーターが点灯し、 通 話インジケーターライトが消灯します。 1. クリッ プをベースユニッ トのアクセス... -
Page 176: 保守
Corporate Headquarters 211 Mt Airy Road Basking Ridge, NJ 07920 USA www.avaya.com © 2006 Plantronics, Inc. All rights reserved.AvayaとAvayaのロゴは、 Avaya, Inc.の商標であり、 特定の司法管轄 区で登録されている場合があります。 CS60、 PerSonoCall、 およびSound Innovationは、 Plantronics, Inc.の商 標または登録商標です。 MicrosoftおよびWindowsは、 Microsoft Corporationの米国およびその他の国におけ る登録商標または商標です。 その他すべての商標は、 該当する所有者により所有されています。 米国特許 5,210,791、 6,923,688、 7,075,270、 D512,984、 D519,498、 D521,492、 オーストラリア特許... - Page 177 使用者指南 A V A YA AWH 55/65-USB 無線耳機系統...
- Page 178 歡迎使用 包裝內容 本使用者指南提供有關設定與使用 Avaya AWH 55/65-USB 無線耳機系統 的說明。開始使用前,請閱讀包裝內附的安全小手冊。若要取得其他說明、 耳機及配戴選用配件 服務或支援資訊,請參閱產品保固卡或造訪 www.avayaheadsets.com。 頭帶 Headband 目錄 耳機 Headset 包裝內容 功能 設定 充電 耳掛 Earloops 調整位置 安裝 PerSonoCall 軟體 基座 配戴調整 撥打/接聽/結束通話 調整音量,啟動插撥 通話靜音,啟動智慧按鈕 帶著 AWH55/65-USB 旅行 交流電充電器 AC Charger 耳機控制 基座指示燈 AWH55/65-USB 疑難排解 登錄 系統重設 更換電池 維護...
-
Page 179: 功能
基座 功能 背面及側面 鈴聲開關 (開啟 = 向上) (關閉 = 向下) 立座支架 登錄按鈕存取孔 (需使用迴紋針) AC 充電器連接埠 USB 接頭 Base - Bottom View 正面 耳機 Telephone Handset Jack Handset Lifter Jack 充電指示燈 (紅色) 狀態指示燈 (綠色) 正面: AC Charging Jack 收聽音量/靜音/插撥/智慧按鈕 通話控制鈕 Telephone Cord Jack 通話指示燈 Speaking Volume 充電接點 Major Adjust 耳機置放座... -
Page 180: 設定
設定 充電 20 分鐘 = 最低充電量 3 小時 = 完全充電 如果要安裝基座,請先將 USB 線穿過基座底部,線才會落在凹槽上。 然後將立座支架插入基座底部的支點,將支架固定。 1. 將耳機滑入充電座。 2. 輕壓耳機以確認耳機的位置正確。充電時,紅色充電指示燈會亮起, 完成充電後,燈號會完全熄滅。 僅適用於 AC 充電器充電: 當您的電腦關機時,AWH55/65-USB 不會充電,而且耳機的待機時間會減少。 使用選購的 AC 變壓器,能確保您的耳機持續充電。 僅適用於 USB 充電: 當您的電腦關機時,AWH55/65-USB 會透過 USB 連線充電。 將 USB 接頭連接至電腦上的 USB 連接埠。您也可以使用 USB 集線器, 但請確認 USB 集線器可供應足夠電力 (250 毫安培) 為耳機充電。 調整位置 此外,隨附的魔鬼沾帶也能用於將底座固定在電腦螢幕上。但是,如果這樣會造 成雜音或干擾問題,請參閱第 7 頁的「調整位置」。 最低建議距離如上圖所示。 重要:位置不正確可能會產生噪音及干擾問題。 您也可以使用選購的 AC 充電器。... -
Page 181: 安裝 Personocall 軟體
安裝並執行軟體後,四個系統匣圖示之一會顯示 話應用程式從遠端偵測並接聽/結束通話。 在螢幕底部的系統匣列上,顯示耳機與 PerSonoCall 的通訊狀態。 此外,PerSonoCall 並提供有關系統的基本設定及狀態資訊。詳情請參閱第 10 頁。 :未偵測到耳機 :偵測到耳機,但偵測不到基座的無線連結 請上網至 www.plantronics.com/personocall 查閱 PerSonoCall 的相容性清單, 瞭解有關軟體電話相容性的最新資訊。如果您的軟體電話目前不在 PerSonoCall :偵測到耳機,且基座的無線連結已啟動 支援的範圍內,請參閱第 14 頁。 :偵測到耳機,且鎖定接通基座的無線連結 1. 放入 CD 後,移至 PerSonoCall 主畫面並按一下「安裝 PerSonoCall 軟 體」。 設定與狀態 2. 軟體電話應用程式可能會要求您選擇所要使用的音訊裝置。詳情請參閱軟體電 話應用程式說明文件。 在耳機系統匣圖示上按滑鼠右鍵,並選擇「選項」。 隨即開啟「PerSonoCall 基本選項」及「目前狀態」畫面。 注意:一旦安裝了 AWH55/65-USB,它會自動成為電腦上的預設音訊裝置。您 可以在 Windows 作業系統中,透過控制台「音訊」索引標籤中的「聲音和音訊 ® 請參閱線上應用程式說明,以取得 PerSonoCall 軟體的詳細說明。 裝置」選項,手動進行喜好設定。 注意:安裝完成後,建議您設定讓 PerSonoCall 於 Windows 作業系統啟動時 ® 自動啟動。詳情請參閱第 10 頁。... -
Page 182: 配戴調整
配戴調整 撥打/接聽/結束通話 W earing Options Retaining 固定扣環 Ring 選擇您想要的配戴配件 (頭帶或耳掛), 1. 適度調整頭環。 然後將固定扣環扣在喇叭上。 2. 利用扣環調整耳機,直到麥克風對準您 撥打電話 : 的下巴。 按下耳機上的通話控制鈕。基座和耳機上的狀態指示燈應同時亮起,表示連結成 功。使用軟體電話撥號。 接聽通話 : 按下耳機上的通話控制鈕來接聽通話。當您開啟基座側邊的鈴聲開關 (向上),來 電時基座會響鈴,這樣即使您沒戴耳機,也能收到來電通知。當鈴聲開關的位置 向下時,則此功能停用。 若要結束通話: 按下耳機上的通話控制鈕。 若要切換通話: 某些軟體電話支援「插撥」功能。這能讓您保留目前通話,並在通話間切換。如 果您要啟動此功能,請來回撥動耳機的音量控制鈕超過 2 秒。請參閱第 12 頁中 「調整音量,啟動插撥」的圖表。 使用 PerSonoCall 時,耳機與基座之間的無線連結只會在通話期間接通。此為預 設設定,用意在於節省耳機的電池電力。不過,若要收聽其他音訊來源例如 PC 上的串流音訊時,便需要在沒有通話時讓無線連結保持接通。任何時候您都可以 按下耳機的通話控制鈕來開啟無線連結。 注意:長時間鎖定接通無線連結,將大幅減少耳機的待機和通話時間。 軟體電話與 PerSonoCall 不相容 請上網至 www.plantronics.com/personocall 查閱 PerSonoCall 的相容性清單, 瞭解有關軟體電話相容性的最新資訊。 如果 PerSonoCall 目前不支援您的軟體電話,則無法透過耳機遠端偵測及接聽/ 結束通話。按下耳機上的通話控制鈕,只能開啟並關閉提供音訊的無線連結;... -
Page 183: 調整音量,啟動插撥
Minor Adjust Major Adjust 往兩側輕推以拆 拆解零件 解裝置 來回撥動耳機的音量控制鈕,以調整收聽音量。 您可以輕鬆拆解 AWH55/65-USB 以便外出使用。 若要調整軟體電話的收聽或發話音量,請參閱軟體電話的使用者說明文件。 若要調整電腦上音訊裝置的收聽或發話音量,請利用 Windows ® 控制台中的「 聲音和音訊裝置」設定。 要開啟插撥功能 (請參閱第 11 頁「若要切換通話」), Base - Top View Base - Bottom View 通話靜音,啟動智慧按鈕 Headset Mute Telephone Handset Front: CS55 Indicator Lights Talking (Green) Handset Lifter Jack 為了節省耳機電力並符合航空法規, 要重新開啟耳機,請按下通話控制... -
Page 184: 基座指示燈
提示音 提高/降低提示音, 來回撥動 收聽音量 達到限制時發出 2 聲提示音 操作 指示燈 智慧按鈕 直接按住超過 2 秒 充電 紅色指示燈明顯亮起 充電完成 紅色指示燈熄滅 靜音 直接按下短按鍵 每 15 秒 3 聲提示音 靜音 綠色指示燈快速閃爍 紅色指示燈微微亮起 耳機不在基座上 朝某個方向來回 耳機連線啟動 綠色指示燈緩慢閃爍 插撥 撥動超過 2 秒 耳機連結未啟動 綠色指示燈持續亮起 撥打/接聽/結束通話 短時間按下按鍵 中提示音... - Page 185 基座,直到耳機在傳輸範圍內。範圍大小因辦公室 環境而異。 按下按鈕後,耳機沒有反應。 • 您可能需要重設耳機。請參閱第 18 頁。 • 在耳機上 (參閱第 12 頁) 調整收聽音量、軟體電 • 耳機電池需要充電。請參閱第 7 頁。 話、以及電腦音訊控制。 • 如果您使用的筆記型電腦會定期進入待機或休眠 • 確定耳機的喇叭緊密地貼附在 狀態,選購的 AC 電源供應器能夠確保耳機持續 您的耳朵上。 充電。 • 選擇的軟體電話機型不正確。請確認您在軟體中所 選擇的軟體電話機型正確。 即使在充飽電後,電池的通話 • 電池老化,請更換新電池組。請參閱第 19 頁。 時間仍然明顯變短。 • 您可能需要重新登錄耳機。請參閱第 18 頁。 如果以越過耳朵的模式配戴耳 • 請嘗試變更耳掛大小。嘗試一下,找出最合適的尺 來電者聽不到我的聲音。 機會感覺不舒服。 • 耳機靜音。按下耳機上的靜音鈕,取消麥克風靜 寸,或使用提供的頭帶。 音。請參閱第 12 頁。 • 耳機麥克風吊桿未適當對準。請將耳機吊桿對到您 耳機裡會聽到嗶聲。 的嘴部。 • 每 10 秒嗶一聲是電池電量不足的警示。將電池放回 基座充電座約 1 到 3 小時,直到充電指示燈持續亮 • 發話音量太小。調高軟體電話上的發話音量,直到 起或停止閃爍。 對方聽得到您的聲音為止。如果音量仍然太小,請 調高電腦的麥克風音量。 • 嗶兩聲是超出範圍警示。移近基座。 • 耳機電池需要充電。請參閱第 7 頁。 • 每 15 秒嗶三聲表示靜音開啟。 請按一下靜音鈕以解除靜音。...
-
Page 186: 登錄
登錄 更換電池 隨附的耳機與基座是一起登錄的。但是,如果您想要在基座上使用不同的耳機, 耳機內的專用電池,壽命約 2 到 3 年。當通話時間大幅減少,即應更換電池。請 您必須先依照下列方式重新登錄產品: 撥打 Plantronics 專線:0800 410 014,進行訂購。在您收到新電池後,請依照 以下說明進行更換。 將耳機放回充電座。 當狀態指示燈完全亮起,且通話指示 燈不亮時,代表重新登錄成功。 1. 使用迴紋針壓住基座存取孔中的登 錄鈕,至少 5 秒。狀態指示燈會閃 3. 先拔下 USB 充電器,接著從 AC 爍。 充電器插孔拔下 AC 充電器 (如果 有使用),至少 5 秒。 2. 按住耳機靜音開關至少 5 秒。 耳機指示燈會亮起 4. 先重新接上 USB 充電器,接著連 接 AC 充電器 (如果有使用)。 如果重新登錄在 2 分鐘內失敗,耳機 以兩根手指輕夾電池蓋的兩側,然後 將電池取出,並輕輕地與接頭分離。 會回到未登錄的狀態。請嘗試再次進 打開蓋子。 不要拉扯線路以拔出電池。 行重新登錄程序,或洽詢技術支援。 系統重設 若要從錯誤狀況中復原 (請參閱「疑難排解」一頁),可能需要執行系統重設。 3. 先拔下 USB 充電器,接著從 AC 1. 按下通話控制鈕與收聽音量/靜音... -
Page 187: 維護
MLT, POL, SVK, SVN. Avaya Corporate Headquarters 211 Mt Airy Road Basking Ridge, NJ 07920 USA www.avaya.com © 2006 Plantronics, Inc. All rights reserved. Avaya 和 Avaya 標誌為 Avaya, Inc. 的商標,在特定轄區內可 能已註冊。CS60、PerSonoCall 和 Sound Innovation 為 Plantronics, Inc. 的商標或註冊商標。Microsoft 和 Windows 為 Microsoft Corporation 在美國及/或其它國家中的商標或註冊商標。所有其他商標隸屬各自所 有人擁有。 美國專利 5,210,791; 6,923,688; 7,075,270; D512,984; D519,498; D521,492; 澳洲 303054; 74776-17 (11/06) - Page 188 用户指南 A V A YA AWH 55/65-USB 无线耳机系统...
- Page 189 欢迎 包装内的物品 本用户指南提供了关于 Avaya AWH 55/65-USB 无线耳机系统的设置和使用说明。开始 使用之前,请阅读包装中附带的安全小手册。有关其它帮助、服务或支持信息,请参阅 耳机和佩戴方式 产品保修卡或访问 www.avayaheadsets.com. 头带 Headband 目录 耳机 Headset 包装内的物品 部件 设置 充电 耳套 Earloops 定位 安装 PerSonoCall 软件 底座 调整佩戴 拨打/接听/结束通话 调整音量,启动 flash 通话静音,启动智能按钮 交流电源充电器 AC Charger 旅行时可方便携带 AWH55/65-USB 耳机控制 底座指示灯 AWH55/65-USB 故障诊断 配置 系统重置 更换电池 软件...
-
Page 190: 部件
部件 底座 背面和侧面 响铃开关 (开 = 向上位置) (关 = 向下位置) 配置按钮检查孔 支架钉 (需要使用纸夹) 交流电源充电器端口 连接器 Base - Bottom View 正面 耳机 Telephone Handset Jack Handset Lifter Jack 充电指示灯(红色) 状态指示灯(绿色) 正面: 接听音量/静音/闪烁/智能按钮 AC Charging Jack 通话控制按钮 Telephone Cord Jack 通话指示灯 Speaking Volume 充电触点 Major Adjust 背面:... -
Page 191: 设置
设置 充电 20 分钟 = 最低电量 3 小时 = 充满电 要安装底座设备,请先将 USB 线缆从底座底部穿过去,使其位于槽口中。 然后将支架钉插入底座设备下侧的支撑点固定住支架。 1. 将耳机滑入充电支架。 2. 将耳机小心地向下按,确保耳机处于正确的位置。底座上的红色充电指示灯在充 电时将会亮起,并将在充满电后完全熄灭。 仅限于交流电源充电: 您的电脑关机后, AWH55/65-USB 将不会进行充电,因此耳机待时间将缩短。 使用可选交流电源适配器将确保您的耳机保持充电状态。 仅限于 USB 充电: 您的电脑开机后, AWH55/65-USB 将通过 USB 连接进行充电。 将 连接器连接至您的电脑上的空闲 USB 端口。可以使用 USB 集线器, 但必须确保它能够提供充足电源(250 毫安),以便为耳机充电。 定位 另外,也可以使用附带的魔术贴将底座设备连接至 PC 显示器。但是,如果这样 做导致出现噪音或干扰问题,请参阅第 7 页的“定位”。 建议的最小间隔距离如上所示。 重要:定位不正确可能会导致出现噪音和干扰问题。 可以使用可选交流电源充电器。... -
Page 192: 安装 Personocall 软件
PERSONOCALL ® 安装 软件 系统托盘图标 ® 软件在您的 AWH55/65-USB 耳机与电脑上的兼容网络电 Avaya PerSonoCall 话应用程序之间提供了链接。PerSonoCall 软件使您可以通过耳机通话控制按 安装和运行软件之后,四个系统托盘图标的其中一个将出现在 钮,远程检测并应答/结束来自网络电话应用程序的呼叫。 屏幕底部的托盘栏中,表示耳机与PerSonoCall 的通讯状态。 此外,PerSonoCall 还提供了一些基本配置以及关于系统的状态信息。 有关详情,请参阅第 10 页。 :未检测到耳机 :检测到耳机,但是没有与基站的无线链接 在 www.plantronics.com/personocall 上查看 PerSonoCall 兼容性列表,了解关 于网络电话兼容性的最新信息。如果 PerSonoCall 目前不支持您的网络电话,请 :检测到耳机,与基站的无线链接已激活 参阅第 14 页。 :检测到耳机,与基站的无线链接已锁定 1. 插入 CD 之后,进入 PerSonoCall 主屏幕,然后单击“安装 PerSonoCall 软 件”。 配置和状态 2. 您的网络电话可能需要您选择希望使用哪种音频设备。有关详情,请参阅网络 电话的文档。 右键单击耳机系统托盘图标,然后选择“选项”。这样将打开 PerSonoCall“基 本选项”和“当前状态”屏幕。 注:AWH55/65-USB 在安装之后,将变成电脑中的默认音频设备。您可以在 ® 操作系统中,通过“控制面板”中的“声音和音频设备”选项下面的“音 Windows 有关 PerSonoCall 软件的详细使用说明,请参阅应用程序的联机帮助。 频”选项卡来手动设置首选项。 注:完成安装之后,我们建议您将 PerSonoCall 设置为在启动 Windows ® 操作... -
Page 193: 调整佩戴
调整佩戴 拨打/接听/结束通话 W earing Options Retaining 扣环 Ring 将扬声器卡入所需佩戴方式(头带或 1. 调整头带以方便佩戴。 耳套)的扣环。 要拨打电话: 2. 旋转扣环中的耳机,直至麦克风指 向您的下颚。 按下耳机上的通话控制按钮。底座和耳机上的状态指示灯会亮起,表示链接成 功。使用软电话拨号。 要接听电话: 按下耳机上的通话控制按钮,以便接听电话。如果底座一侧的响铃开关打开(处 于向上位置),有来电时底座会发出铃声 — 这样,即使您未佩戴耳机也可以接 收来电通知。如果响铃开关处于向下位置,此功能将被禁用。 要结束通话: 按下耳机上的通话控制按钮。 要在通话之间来回切换: 某些网络电话支持称为“flash”的功能。此功能允许您搁置或取消搁置当前通话, 或者在通话之间来回切换。要执行该功能,请来回滚动耳机音量控制并保持 2 秒 钟以上。请参阅第 12 页中的“调整音量,启动 Flash”下面的图示。 在使用 PerSonoCall 时,耳机与基站之间的无线链接只有在通话期间才会激活。 这是默认设置,目的在于保持耳机的电池使用时间。但是,您也许希望在不通话 时也使无线链接保持激活,以便能够听到其它音频源,例如 PC 上的流式音频。 您可以随时按下耳机上的通话控制按钮来打开无线链接。 注:如果长时间锁定无线链接,可能会大大缩短耳机的待机和通话时间。 对于与 不兼容的网络电话 PerSonoCall 在 www.plantronics.com/personocall 上查看 PerSonoCall 兼容性列表,了解关 于网络电话兼容性的最新信息。 PerSonoCall 如果 目前不支持您的网络电话,则不能通过耳机实现远程检测和应答/结束通 话功能。按下耳机上的通话控制按钮只会打开和关闭提供音频的无线链接;您必须通过网络... -
Page 194: 调整音量,启动 Flash
Major Adjust 轻推侧边进行 拆解部件 拆解 来回滚动耳机音量控制以调整接听音量。 您可以选择轻松拆解 AWH55/65-USB 以方便旅行时携带。 要调整网络电话的接听或说话音量,请参阅网络电话的用户文档。 要在电脑上调整音频设备的接听或说话音量,请使用 Windows 中控制面板上 ® 的“声音和音频设备”部分。 要启动 flash 功能(请参阅第 11 页的“要在通话之间来回切换”),ro Base - Top View Base - Bottom View 通话静音,启动智能按钮 Headset Mute Telephone Handset Front: CS55 Indicator Lights Talking (Green) Handset Lifter Jack 为节约耳机电量并遵守空中旅行规 要重新开启耳机,请按下通话控制按 Power (Red) 定,您应同时按下通话控制按钮和接... -
Page 195: 底座指示灯
耳机控制 底座指示灯 状态指示灯(绿色) 充电指示灯(红色) 指示灯 操作 充电 红灯明亮地亮起 已充满电 红灯熄灭 已静音 绿灯快速闪烁 耳机不在底座中 红灯柔和地亮起 耳机链接激活 绿灯缓慢闪烁 耳机链接未激活 一直亮起绿灯 故障诊断 AWH55/65-USB 问题 解决方法 我已插入所有部件,但是指 • 检查 USB 线缆是否已连接至接通了电源的电脑。 示灯仍然没有亮起。 • 检查电脑是否已开机,并且电脑不处于待机或休眠 模式。 • 如果使用的是 USB 集线器,请检查是否已正确连接 交流电源,并检查集线器是否能够提供 250 毫安的 电流来为耳机充电。 • 如 果使用的是交流电源充电器,请检查是否已将交 流电源充电器插孔连接至底座设备、是否已将交流 电源充电器牢固地连接至工作正常的墙上插座,并 检查该交流电源充电器是不是由 Plantronics 提供 的型号。... -
Page 196: Awh55/65-Usb 故障诊断
• 如果您使用的是会定时进入待机或休眠模式的膝上 办公室环境不同,有效范围也有所不同。 型电脑,则将提供可选交流电源,以确保可持续为 耳机充电。 • 调整耳机(请参阅第 12 页)、网络电话和 PC 音频 控制上的接听音量按钮。 即使是在充满电之后,电池通 • 电池即将失效,请更换为新的电池包。参阅第 话时间或待机时间也仍然明显 19 页。 • 确保耳机扬声器舒适地安置在 缩短。 您的耳朵上。 • 尝试更改耳套大小。尝试寻找最舒适的佩戴方式或 采用耳挂式佩戴耳机时觉得不 • 选定的网络电话型号不正确。确保您通过软件选择 使用附带的头戴式头带。 舒服。 的网络电话型号正确无误。 • 电池低电量警告会导致每 10 秒钟发出一声哔声。 • 您可能需要重新配置耳机。参阅第 18 页。 我听到耳机中的哔声。 将耳机放回底座充电支架一至三个小时以对其充 对方听不到我的声音。 • 耳机已静音。按下耳机上的静音按钮,取消麦克风 电,直至充电指示灯一直亮起或停止闪烁。 静音。参阅第 12 页。 • 两声哔声表示超出有效范围警告。 • 耳机麦克风杆未对准位置。将耳机麦克风杆对准您 移近底座位置。 的嘴部。 • 每 15 秒钟发出三声哔声表示已启用静音。 请按下一次静音按钮,关闭静音。 • 说话音量太低。在网络电话上调大说话音量,直至 对方能听到您说话。如果音量仍然太小,请在电脑 上调大麦克风音量。 • 耳机电池需要充电。参阅第 7 页。... -
Page 197: 配置
配置 更换电池 附带的耳机与底座设备是相互配置好的。但是,如果您希望将另一部耳机用于该 耳机内的定制电池应该能维持使用 2 至 3 年。如果通话时间明显缩短,则应该更 底座设备,则必须如下所示重新对它们进行配置: 换电池。请致电 Plantronics 订购电池:0800 410 014。收到订购的电池后,请 按照以下说明更换。 将耳机放回充电支架。 当状态指示灯完全亮起而通话指示灯 熄灭时,表示重新配置成功。 1. 使用纸夹,穿过底座设备上的检查 孔,按住配置按钮并至少保持 5 秒 3. 先断开 USB 充电器连接,然后再 钟。随后状态指示灯将闪烁。 断开交流电源充电器(如有使用) 与交流电源充电插孔的连接并保持 2. 按住耳机静音开关并至少保持 5 秒 5 秒钟。 钟。随后耳机指示灯将亮起。 4. 先重新连接 USB 充电器,然后再 重新连接交流电源充电器(如有使 用)。 捏压电池盖的两端并提起以取下电池。 将电池滑出,然后在连接处轻轻分开。 如果在 2 分钟内未能进行重新配置, 请勿通过拉扯电池线来取出电池。 则耳机将恢复至未配置状态。再次 尝试该重新配置过程或致电获取技 术支持。 系统重置 要在出现某些故障时恢复(参见“故障诊断”页),您可能需要执行系统重置。 1. 同时按下通话控制按钮和接听音 3. 先断开 USB 充电器连接,然后再 重新连接并安装新电池。 捏压电池盖的两端并进行更换。 量/静音按钮并保持 5 秒钟。当通 断开交流电源充电器(如有使用)... -
Page 198: 维护
维护 1. 在清洁之前,请从电脑中拔下设备,并从电源插座中拔下交流电源充电器。 2. 请使用微湿(而不是浸水)的抹布清洁。 3. 请勿使用溶剂或其它清洁剂。 AUT, BEL, DEU, DNK, ESP, FRA, GRC, ITA, IRL, LUX, NLD, PRT, SWE, FIN, CYP, CZE, EST, HUN, LVA, LTU, MLT, POL, SVK, SVN. Avaya Corporate Headquarters 211 Mt Airy Road Basking Ridge, NJ 07920 USA www.avaya.com... - Page 199 사용 설명서 A V A YA AWH 55/65-USB 무선 헤드셋 시스템...
- Page 200 이 사용 설명서는 Avaya AWH 55/65-USB 무선 헤드셋 시스템의 설치 및 사용에 대한 지침을 제공합니다. 시작하기 전에 패키지에 들어있는 안전 헤드셋 및 착용 옵션 정보 책자를 읽어 보십시오. 추가 도움말, 서비스 또는 지원 정보는 제품 보 증 카드를 참조하거나 www.avayaheadsets.com을 방문하십시오. 헤드밴드...
-
Page 201: 기능
기능 본체 뒷면 및 옆면 벨소리 조절 스위치 (켜짐 = 위쪽 위치) (꺼짐 = 아래쪽 위치) 스탠드 페그 가입 버튼 액세스 구멍 충전 포트 (클립 필요) 커넥터 Base - Bottom View 앞면 헤드셋 Telephone Handset Jack 앞면: Handset Lifter Jack 충전... -
Page 202: 설치
20 분 = 최소 충전 3 시간 = 완전 충전 본체를 설치하려면 먼저 USB 케이블을 본체의 바닥으로 통과해 홈에 장착합니 다. 그런 다음 스탠드 페그를 본체 아래쪽의 고정 장치에 넣어 스탠드를 부착합 니다. 1. 헤드셋을 충전 크래들로 밀어 넣습니다. 2. 헤드셋을 조심스럽게 눌러 정확한 연결 위치에 놓이도록 합니다. 충전되는 도... -
Page 203: Personocall 소프트웨어 설치
참고: 설치되면 AWH55/65-USB는 컴퓨터의 기본 오디오 장치로 설정됩니다. 오 PerSonoCall 소프트웨어에 대한 자세한 설명은 온라인 응용 프로그램 도움 디오 탭 아래의 제어판에서 사운드 및 오디오 장치 옵션을 통해 Windows ® 운영 말을 참조하십시오. 체제의 기본 설정을 수동으로 설정할 수 있습니다. -
Page 204: 맞춤 조정
헤드셋의 통화 컨트롤 버튼을 눌러 전화에 응답합니다. 본체 측면에 있는 벨소 리 조절 스위치가 켜져 있는 경우(위쪽 위치) 통화가 수신되면 본체에서 벨소리 가 울려 헤드셋을 착용하고 있지 않은 경우에도 통화 알림을 받을 수 있습니다. 이 기능은 벨소리 조절 스위치가 아래쪽 위치에 있는 경우 비활성화됩니다. -
Page 205: 볼륨 조절, 플래시 작동
이 깜박이면 두 버튼을 놓습니다. Telephone Cord Jac Speaking Volume Major Adjust Charging Cradle 참고: 헤드셋을 끈 후 아무 버튼이나 한 번 누르면 헤드셋이 다시 켜집니다. 올 바르게 보관하지 않은 경우 AWH55/65-USB 헤드셋이 우연히 다시 켜질 수 있습 Headset 니다. Telephone 헤드셋을... -
Page 206: 본체 표시등
모두 꽂았는데도 표시등이 • USB 케이블이 전원이 공급되는 컴퓨터에 연결되어 켜지지 않습니다. 있는지 확인하십시오. • 컴퓨터가 켜져 있고 대기 모드나 최대 절전 모드에 있지 않은지 확인하십시오. • USB 허브를 사용하는 경우 AC 전원 공급 장치가 올바르게 연결되어 있으며 허브에서 헤드셋 충전... -
Page 207: Awh55/65-Usb 문제 해결
• 헤드셋의 청취 볼륨(12페이지 참조), 소프트폰 및 • 규칙적으로 대기 모드 또는 최대 절전 모드로 들어 PC 오디오 컨트롤을 조절하십시오. 가는 노트북을 사용하는 경우 헤드셋을 지속적으 로 충전할 수 있도록 옵션 AC 전원 공급 장치가 제 • 헤드셋 스피커가 귀에 편안하게 꽂혀 있는지 공됩니다. 확인하십시오. -
Page 208: 시스템 다시 설정
시스템 다시 설정 헤드셋과 본체는 서로 가입된 상태로 제공됩니다. 하지만 교체 헤드셋을 본체와 헤드셋 내의 전용 배터리 수명은 2-3년입니다. 통화 시간이 상당히 줄어들면 배 사용하려면 본체를 다음과 같이 다시 가입해야 합니다. 터리를 교체해야 합니다. 배터리를 주문하려면 0800 410 014로 Plantronics에 문... -
Page 209: 유지 관리
Basking Ridge, NJ 07920 USA www.avaya.com © 2006 Plantronics, Inc. All rights reserved. Avaya 및 Avaya 로고는 Avaya, Inc.의 상표이며 특정 관할권에 서 등록되어 있을 수 있습니다. CS60, PerSonoCall 및 Sound Innovation은 Plantronics, Inc.의 상표 또는 등 록 상표입니다. Microsoft 및 Windows는 미국 및/또는 기타 국가에서 Microsoft Corporation의 등록 상표 또...
Need help?
Do you have a question about the AWH-55USB and is the answer not in the manual?
Questions and answers