
Subscribe to Our Youtube Channel
Related Manuals for Nexcom DNA 140


Summary of Contents for Nexcom DNA 140
- Page 1 NEXCOM International Co., Ltd. Network and Communication Solutions Desktop Network Appliance DNA 140 User Manual NEXCOM International Co., Ltd. www.nexcom.com Published July 2024...
-
Page 2: Table Of Contents
DNA 140 .....................1 Clear CMOS ...................18 Key Features ..................1 Mini PICe Conector ................19 Hardware Specifications ................2 Knowing Your DNA 140 .................3 Front Panel ..................3 Rear Panel ...................5 Copyright © 2024 NEXCOM International Co., Ltd. All Rights Reserved. DNA 140 User Manual... - Page 3 Default Configuration ................33 Entering Setup ..................33 Legends ....................33 BIOS Setup Utility ..................35 Main ....................35 Advanced ..................36 Security .....................61 Boot ....................62 Save & Exit ..................63 Appendix A: NEXBOOT Configuration Copyright © 2024 NEXCOM International Co., Ltd. All Rights Reserved. DNA 140 User Manual...
-
Page 4: Preface
Acknowledgements The product(s) described in this manual complies with all applicable DNA 140 is a trademark of NEXCOM International Co., Ltd. All other product European Union (CE) directives if it has a CE marking. For computer systems names mentioned herein are registered trademarks of their respective owners. -
Page 5: Rohs Compliance
0.1% or 1,000ppm, and Polybrominated diphenyl Ethers (PBDE) < 0.1% or 1,000ppm. In order to meet the RoHS compliant directives, NEXCOM has established an engineering and manufacturing task force in to implement the introduction of green products. The task force will ensure that we follow the standard... -
Page 6: Warranty And Rma
(manuals, cable, etc.) and any components from the card, such as CPU and RAM. If the components were suspected as part of the problems, ▪ If RMA goods can not be repaired, NEXCOM will return it to the customer please note clearly which components are included. Otherwise, NEXCOM without any charge. - Page 7 ESD workstation. If no such station is available, you can provide some ESD protection by wearing an antistatic wrist strap and attaching it to a metal part of the computer chassis. Copyright © 2024 NEXCOM International Co., Ltd. All Rights Reserved. DNA 140 User Manual...
-
Page 8: Safety Information
Using your fingers can disconnect most of the connections. It is recommended that you do not use needle-nose pliers to disconnect connections as these can damage the soft metal or plastic parts of the connectors. viii Copyright © 2024 NEXCOM International Co., Ltd. All Rights Reserved. DNA 140 User Manual... -
Page 9: Safety Precautions
RECOMMENDED BY THE MANUFACTURER. DISCARD USED BATTERIES ACCORDING TO THE MANUFACTURER’S INSTRUCTIONS. 10. All cautions and warnings on the equipment should be noted. Copyright © 2024 NEXCOM International Co., Ltd. All Rights Reserved. DNA 140 User Manual... -
Page 10: Technical Support And Assistance
Preface Technical Support and Assistance Conventions Used in this Manual 1. For the most updated information of NEXCOM products, visit NEXCOM’s Warning: website at www.nexcom.com. Information about certain situations, which if not observed, can cause personal injury. This will prevent injury to yourself 2. -
Page 11: Global Service Contact Information
Tel: +886-2-8976-3077 Tel: +886-2-8226-7786 Beitun District, Email: sales@diviotec.com Fax: +886-2-8226-7782 Taichung City, 406, Taiwan, R.O.C. www.diviotec.com Email: services@tmrtek.com Tel: +886-4-2249-1179 www.tmrtek.com Fax: +886-4-2249-1172 Email: jacobhuang@nexaiot.com www.nexaiot.com Copyright © 2024 NEXCOM International Co., Ltd. All Rights Reserved. DNA 140 User Manual... - Page 12 GanKeng Community, Buji Street, 4-11-5, Shiba Minato-ku, LongGang District, Tokyo, 108-0014, Japan ShenZhen, 518112, China Tel: +81-3-5419-7830 Tel: +86-755-8364-7768 Fax: +81-3-5419-7832 Fax: +86-755-8364-7738 Email: sales@nexcom-jp.com Email: steveyang@nexcom.com.tw www.nexcom-jp.com www.nexcom.cn Copyright © 2024 NEXCOM International Co., Ltd. All Rights Reserved. DNA 140 User Manual...
-
Page 13: Package Contents
Preface Package Contents Ordering Information Before continuing, verify that the DNA 140 package that you received is The following below provides ordering information for DNA 140. complete. Your package should have all the items listed in the following DNA 140 (P/N: 10L00014000X0) table. -
Page 14: Key Features
▪ 2 x M.2 3042/3052 for LTE/5G FR1 modules ▪ 1 x mini-PCIe for AI card or Wi-Fi module ▪ 1 x M.2 2242 SATA SSD ▪ TPM 2.0 onboard Copyright © 2024 NEXCOM International Co., Ltd. All Rights Reserved. DNA 140 User Manual... -
Page 15: Overview
- 2 x PoE+ ports, supports up to 30W (802.3at) (optional) ▪ Relative humidity: 10%~90% non-condensing ▪ 1 x 1GbE management port ▪ 2 x SIM slots Certifications ▪ CE/FCC Class B (without Wi-Fi, 5G modules) Copyright © 2024 NEXCOM International Co., Ltd. All Rights Reserved. DNA 140 User Manual... -
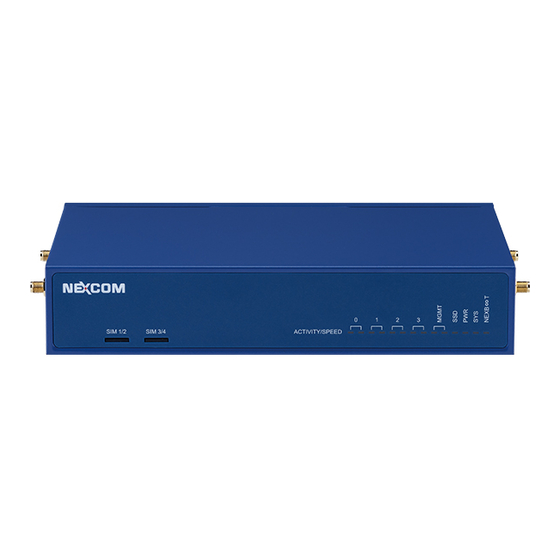
Page 16: Knowing Your Dna 140
Steady green System power is in S0 state Power Steady orange System power is in S5 state Power off Green and Orange On/Off/Blinking Programmable dual color LED Copyright © 2024 NEXCOM International Co., Ltd. All Rights Reserved. DNA 140 User Manual... - Page 17 Disable 2xFM / Power off Fail (200ms) Green Blinking Steady Blinking Blinking (Blinking in switching green and orange) Orange Blinking Steady Refer to Appendix A for more detailed configurations. Copyright © 2024 NEXCOM International Co., Ltd. All Rights Reserved. DNA 140 User Manual...
-
Page 18: Rear Panel
Plug in this power adapter for additional power supply when using PoE functionality ( ). Note that to power the system, the original power adapter ( ) must remain connected. Copyright © 2024 NEXCOM International Co., Ltd. All Rights Reserved. DNA 140 User Manual... -
Page 19: Chapter 2: Jumpers And Connectors
Static electricity can damage many of the electronic ▪ Use correct screws and do not over tighten screws. components. Humid environments tend to have less static electricity than Copyright © 2024 NEXCOM International Co., Ltd. All Rights Reserved. DNA 140 User Manual... -
Page 20: Jumper Settings
(on) and open (off). Two-Pin Jumpers: Open (Left) and Short (Right) Three-Pin Jumpers: Pins 1 and 2 are Short Copyright © 2024 NEXCOM International Co., Ltd. All Rights Reserved. DNA 140 User Manual... -
Page 21: Locations Of The Jumpers And Connectors
The following figure shows the motherboard of DNA140 and indicates the locations of jumpers and connectors. Refer to this chapter for detailed pin setting and definitions of connectors marked in pink on this figure. 5G_2 DIMM1 FAN1 5G_1 WIFI1 SYS BAT COM1 LAN1 LAN2 Copyright © 2024 NEXCOM International Co., Ltd. All Rights Reserved. DNA 140 User Manual... -
Page 22: Connector Pin Definitions
Chapter 2: Jumpers and Connectors Connector Pin Definitions External Connectors 12V Power Connector 54V Power Connector Connector location: CN1 Connector location: CN6 Definition Definition DC_IN POE_AGND PGND P54V_POE PGND Copyright © 2024 NEXCOM International Co., Ltd. All Rights Reserved. DNA 140 User Manual... -
Page 23: Connector Pin Definitions
Connector location: 5G_1 Definition Definition Definition Definition 5G_1_CONFIG_3 +P3V3_5G +P3V3_5G 5G_1_CONFIG_0 5G_1_POWER_OFF_R_N 5G_1_WAKE_N USB2_P7_5G_C_DP 5G_1_WWAN_DIS_N 5G_1_GNSS_DIS_N USB2_P7_5G_C_DN USB32_P1_5G_RXN 5G_1_SIM1_RST USB32_P1_5G_RXP 5G_1_SIM1_CLK 5G_1_SIM1_DATA USB32_P1_5G_TXN 5G_1_SIM1_VDD_F Continued on next page Copyright © 2024 NEXCOM International Co., Ltd. All Rights Reserved. DNA 140 User Manual... - Page 24 Chapter 2: Jumpers and Connectors Definition Definition Definition Definition USB32_P1_5G_TXP 5G_1_SIM2_DET PIN59 5G_1_SIM2_DATA 5G_1_SIM2_CLK 5G_1_SIM2_RST PIN65 5G_1_SIM1_DET 5G_1_SIM2_VDD_F 5G_1_OD_RST_N 5G_1_CONFIG_1 +P3V3_5G +P3V3_5G +P3V3_5G 5G_1_CONFIG_2 Copyright © 2024 NEXCOM International Co., Ltd. All Rights Reserved. DNA 140 User Manual...
-
Page 25: Key B Conector
Connector location: 5G_2 Definition Definition Definition Definition 5G_2_CONFIG_3 +P3V3_5G +P3V3_5G 5G_2_CONFIG_0 5G_2_POWER_OFF_R_N 5G_2_WAKE_N USB2_P5_5G_C_DP 5G_2_WWAN_DIS_N 5G_2_GNSS_DIS_N USB2_P5_5G_C_DN USB32_P2_5G_RXN 5G_2_SIM1_RST USB32_P2_5G_RXP 5G_2_SIM1_CLK 5G_2_SIM1_DATA USB32_P2_5G_TXN 5G_2_SIM1_VDD_F Continued on next page Copyright © 2024 NEXCOM International Co., Ltd. All Rights Reserved. DNA 140 User Manual... - Page 26 Chapter 2: Jumpers and Connectors Definition Definition Definition Definition USB32_P2_5G_TXP 5G_2_SIM2_DET 5G_2_SIM2_DATA 5G_2_SIM2_CLK 5G_2_SIM2_RST 5G_2_SIM1_DET 5G_2_SIM2_VDD_F 5G_2_OD_RST_N 5G_2_CONFIG_1 +P3V3_5G +P3V3_5G +P3V3_5G 5G_2_CONFIG_2 Copyright © 2024 NEXCOM International Co., Ltd. All Rights Reserved. DNA 140 User Manual...
-
Page 27: Battery Conector
Chapter 2: Jumpers and Connectors Battery Conector Connector location: BAT1 Definition BATT Copyright © 2024 NEXCOM International Co., Ltd. All Rights Reserved. DNA 140 User Manual... -
Page 28: M.2 Key M Conector
M.2 Key M Conector Connector type: M.2 2242 Key M slot for SSD module Connector location: CN2 Definition Definition Definition Definition +P3V3 +P3V3 Continued on next page Copyright © 2024 NEXCOM International Co., Ltd. All Rights Reserved. DNA 140 User Manual... - Page 29 Chapter 2: Jumpers and Connectors Definition Definition Definition Definition M.2_SSD_DEVSLP SATA_P0_M.2_RXP SATA_P0_M.2_RXN SATA_P0_M.2_C_TXN SATA_P0_M.2_C_TXP +P3V3 +P3V3 +P3V3 Copyright © 2024 NEXCOM International Co., Ltd. All Rights Reserved. DNA 140 User Manual...
-
Page 30: Fan Conector
Chapter 2: Jumpers and Connectors Fan Conector MCU UART Header Connector location: FAN1 Connector location: JP1 Definition Definition Definition +P3V3_AUX MCU_UART2_TX +P12V MCU_UART2_RX SIO_FAN_TACH_R SIO_FAN_PWM_R Copyright © 2024 NEXCOM International Co., Ltd. All Rights Reserved. DNA 140 User Manual... -
Page 31: 2Xfm Mcu Programm Header
Chapter 2: Jumpers and Connectors 2xFM MCU Programm Header MCU Programm Header Connector location: JP2 Connector location: JP3 Definition Definition Definition Definition +P3V3_AUX SWCLK +P3V3_AUX SWCLK SWDIO_2xFM SWDIO 2xFM_MCU_RST_B MCU_RST_B Copyright © 2024 NEXCOM International Co., Ltd. All Rights Reserved. DNA 140 User Manual... -
Page 32: Power Button Header (For Debug)
Chapter 2: Jumpers and Connectors Power Button Header (for debug) Clear CMOS Connector location: JP4 Connector location: JP5 Definition Definition FP_PWRBTN_N_R RTC_RST_N Copyright © 2024 NEXCOM International Co., Ltd. All Rights Reserved. DNA 140 User Manual... -
Page 33: Mini Pice Conector
Connector type: Mini PCIe slot for Wi-Fi module Connector location: WIFI1 Definition Definition Definition Definition WLAN_WAKE_N +P3V3 PCIE3_WIFI_C_TXN CLKREQ2_WIFI_R_N PCIE3_WIFI_C_TXP USB2_P1_WIFI_R_DN CLK2_WIFI_DN USB2_P1_WIFI_R_DP CLK2_WIFI_DP +P3V3 +P3V3 WLAN_DIS_R_N WIFI_RST_N PCIE3_WIFI_RXN +P3V3 PCIE3_WIFI_RXP +P3V3 Copyright © 2024 NEXCOM International Co., Ltd. All Rights Reserved. DNA 140 User Manual... -
Page 34: Chapter 3: System Setup
Remove the screws located on the side panels and bottom, then place them in a safe location for later use. Copyright © 2024 NEXCOM International Co., Ltd. All Rights Reserved. DNA 140 User Manual... - Page 35 Loosen the screws on the heatsink module, place them in a safe location for later use, then lift up the heatsink module. Copyright © 2024 NEXCOM International Co., Ltd. All Rights Reserved. DNA 140 User Manual...
-
Page 36: Installing A So-Dimm Memory Module
The ejector tabs at the ends of the socket will automatically snap into the locked position to hold the module in place. Copyright © 2024 NEXCOM International Co., Ltd. All Rights Reserved. DNA 140 User Manual... -
Page 37: Installing An M.2 Key M Module
Insert the M.2 module into the M.2 slot at a 45 degrees angle until the gold-plated connector on the edge of the module completely disappears inside the slot. Copyright © 2024 NEXCOM International Co., Ltd. All Rights Reserved. DNA 140 User Manual... - Page 38 Chapter 3: System Setup Push the M.2 module down and fasten an M.2 mounting screw into the mounting hole to secure the module. Copyright © 2024 NEXCOM International Co., Ltd. All Rights Reserved. DNA 140 User Manual...
-
Page 39: Installing M.2 Key B Module(S)
M.2 modules. The flexibility of these slots accommodates M.2 modules of sizes 3042 and 3052, enabling versatile usage depending on specific requirements and form factor constraints. Copyright © 2024 NEXCOM International Co., Ltd. All Rights Reserved. DNA 140 User Manual... - Page 40 Chapter 3: System Setup Push the M.2 module down and fasten an M.2 mounting screw into the mounting hole to secure the module. 3042 3052 Copyright © 2024 NEXCOM International Co., Ltd. All Rights Reserved. DNA 140 User Manual...
-
Page 41: Installing A Mini Pcie Module
Insert the mini PCIe module into the mini-PCIe slot at a 45-degree angle until the gold-plated connector on the edge of the module completely disappears into the slot. Copyright © 2024 NEXCOM International Co., Ltd. All Rights Reserved. DNA 140 User Manual... - Page 42 Chapter 3: System Setup Push the module down and secure it with a screw. Copyright © 2024 NEXCOM International Co., Ltd. All Rights Reserved. DNA 140 User Manual...
-
Page 43: Installing Antenna Cables And Jacks
Remove the gaskets (ring 1 and ring 2) on the SMA antenna jack of the RF cable. Ring 2 Ring 1 SMA Antenna Jack Antenna Connector Antenna Connector Copyright © 2024 NEXCOM International Co., Ltd. All Rights Reserved. DNA 140 User Manual... - Page 44 Ring 2 Ring 1 Repeat the previous steps to install the other SMA antenna jacks and follow the numbers indicated below to install them into the Copyright © 2024 NEXCOM International Co., Ltd. All Rights Reserved. DNA 140 User Manual...
- Page 45 Chapter 3: System Setup corresponding antenna holes. Copyright © 2024 NEXCOM International Co., Ltd. All Rights Reserved. DNA 140 User Manual...
-
Page 46: Chapter 4: Bios Setup
This chapter describes how to use the BIOS setup program for the The settings made in the setup program affect how the computer performs. DNA 140. The BIOS screens provided in this chapter are for reference only It is important, therefore, first to try to understand all the setup options, and and may change if the BIOS is updated in the future. -
Page 47: Default Configuration
Powering on the computer and immediately pressing allows you to enter Setup. Load optimized default values. Saves and exits the Setup program. Press <Enter> to enter the highlighted sub-menu Copyright © 2024 NEXCOM International Co., Ltd. All Rights Reserved. DNA 140 User Manual... - Page 48 When “” appears on the left of a particular field, it indicates that a submenu which contains additional options are available for that field. To display the submenu, move the highlight to that field and press Copyright © 2024 NEXCOM International Co., Ltd. All Rights Reserved. DNA 140 User Manual...
-
Page 49: Bios Setup Utility
The Main menu is the first screen that you will see when you enter the BIOS hours from 00 to 23. Minute displays minutes from 00 to 59. Second displays Setup Utility. seconds from 00 to 59. Copyright © 2024 NEXCOM International Co., Ltd. All Rights Reserved. DNA 140 User Manual... -
Page 50: Advanced
This is allows you to select the number of E-cores to enable in each processor package. BIST Enable or disable BIST (Built-in Self Test) on reset. AP Threads Idle Manner AP Threads Idle Manner for waiting signal to run. Copyright © 2024 NEXCOM International Co., Ltd. All Rights Reserved. DNA 140 User Manual... - Page 51 CPU - Power Management Control Enter the CPU - Power Management Control submenu. GT - Power Management Control Enter the GT - Power Management Control submenu. Copyright © 2024 NEXCOM International Co., Ltd. All Rights Reserved. DNA 140 User Manual...
- Page 52 Enable or disable Intel Speed Shift Technology support. Enabling it will average power of given time window. expose the CPPC v2 interface to allow hardware controlled P-states. Copyright © 2024 NEXCOM International Co., Ltd. All Rights Reserved. DNA 140 User Manual...
- Page 53 Enable or disable EC turbo control mode. Energy Performance Gain Enable or disable Energy Performance Gain. Power limit 3 settings Enter the Power limit 3 settings submenu. Copyright © 2024 NEXCOM International Co., Ltd. All Rights Reserved. DNA 140 User Manual...
- Page 54 RC6 (Render Standby) Check to enable render standby support. Maximum GT frequency Configure the Maximum GT frequency. Disable Turbo GT frequency Enable or disable Disable Turbo GT frequency. Copyright © 2024 NEXCOM International Co., Ltd. All Rights Reserved. DNA 140 User Manual...
- Page 55 Enter the Memory Configuration submenu. Graphics Configuration Enter the Graphic Configuration submenu. DMI/OPI Configuration Enter the DMI/OPI Configuration submenu. TCSS setup menu Enter the TCSS setup menu submenu. Copyright © 2024 NEXCOM International Co., Ltd. All Rights Reserved. DNA 140 User Manual...
- Page 56 Enter the Memory Train Algorithms submenu. Debug Value Configure a debug value. MRC ULT Safe Config Enable or disable MRC ULT Safe Config. LPDDR DqDqs Enable or disable LPDDR DqDqs. Copyright © 2024 NEXCOM International Co., Ltd. All Rights Reserved. DNA 140 User Manual...
- Page 57 Configure the primary display. External Gfx Card Primaty Display Configuration Enter the External Gfx Card Primaty Display Configuration submenu. Internal Graphics Enable or disable the internal graphics. Copyright © 2024 NEXCOM International Co., Ltd. All Rights Reserved. DNA 140 User Manual...
- Page 58 Configure the DMI Gen3 Eq Phase 2. DMI Gen3 Eq Phase 3 Configure the DMI Gen3 Eq Phase 3. DMI Gen3 ASPM Configure DMI Gen3 ASPM. DMI ASPM Configure DMI ASPM. Copyright © 2024 NEXCOM International Co., Ltd. All Rights Reserved. DNA 140 User Manual...
- Page 59 Chapter 4: BIOS Setup TCSS setup menu Display Configuration TCSS xHCI Support Enable or disable TCSS xHCI. Copyright © 2024 NEXCOM International Co., Ltd. All Rights Reserved. DNA 140 User Manual...
- Page 60 Enable or disable CDR Relock. Assertion on Link Down GPIOs Enable or disable Assertion on Link Down GPIOs. PCI Express Slot Selection Select a PCI express slot. Copyright © 2024 NEXCOM International Co., Ltd. All Rights Reserved. DNA 140 User Manual...
- Page 61 Enable or disable PCI Express Clock Gating. EDPC Enable or disable the EDPC. PCI Express Power Gating Enable or disable PCI Express Power Gating. ASPM Support Select the ASPM level. Copyright © 2024 NEXCOM International Co., Ltd. All Rights Reserved. DNA 140 User Manual...
- Page 62 TSN GBE Configuration Select a desired option and then press <Enter> to enter their respective submenu. Skip VCCIN AUX Configuration Enable or disable the Skip VCCIN AUX Configuration. Copyright © 2024 NEXCOM International Co., Ltd. All Rights Reserved. DNA 140 User Manual...
- Page 63 Compliance Test Mode Enable or disable the Compliance Test Mode. PCI function swap Enable or disable PCI function swap. PCI EQ settings Enter PCI EQ setting submenu. Copyright © 2024 NEXCOM International Co., Ltd. All Rights Reserved. DNA 140 User Manual...
- Page 64 Enable or disable USB2 PHY Sus Well Power Gating. USB PDO Programming Enable or disable USB PDO Programming. USB Overcurrent Enable or disable USB Overcurrent. USB Overcurrent Lock Enable or disable USB Overcurrent Lock. Copyright © 2024 NEXCOM International Co., Ltd. All Rights Reserved. DNA 140 User Manual...
- Page 65 Enable or disable RTC Memory Lock. BIOS Lock Enable or disable BIOS Lock. Force unlock on all GPIO pads Enable or disable Force unlock on all GPIO pads. Copyright © 2024 NEXCOM International Co., Ltd. All Rights Reserved. DNA 140 User Manual...
- Page 66 Enable: HDA will be unconditionally enable. Audio DSP Enable or disable Audio DSP. Audio DSP Compliance Mode Configure the Audio DSP Compliance Mode. HDA Link Enable or disable HDA Link. Copyright © 2024 NEXCOM International Co., Ltd. All Rights Reserved. DNA 140 User Manual...
- Page 67 I2C0 / I2C1 / I2C2 / I2C3 / I2C4 / I2C5 / I2C6 / I2C7 / SPI0 / SPI1 / SPI2 / SPI3 / SPI4 / SPI5 / SPI6 / UART0 / UART1 Controller Assign Port to THC. Enable or disable the selected item above. Copyright © 2024 NEXCOM International Co., Ltd. All Rights Reserved. DNA 140 User Manual...
- Page 68 Enable HS400 software turning Enable or disable the Enable HS400 software turning. Driver Strength Configure the Driver Strength. UFS 2.0 Controller 1 Enable or disable UFS 2.0 Controller 1. Copyright © 2024 NEXCOM International Co., Ltd. All Rights Reserved. DNA 140 User Manual...
- Page 69 Thermal Throttling Level / Enable Rail in Sx/S0ix DMI Thermal Setting / Enable external V1P05/Vnn Rail in corresponding Sx/S0ix. SATA Thermal / Determine if use Intel suggested setting. Copyright © 2024 NEXCOM International Co., Ltd. All Rights Reserved. DNA 140 User Manual...
- Page 70 Configure the PCH TSN Port Link Speed. ADR timer 1 time unit PCH TSN Multi-Vc Configure a ADR timer 1 time unit. Enable or disable PCH TSN Multi-Vc. Copyright © 2024 NEXCOM International Co., Ltd. All Rights Reserved. DNA 140 User Manual...
- Page 71 Chapter 4: BIOS Setup SATA Configuration SATA Controller Enable or disable SATA device. SATA Test Mode Enable or disable the SATA test mode. Copyright © 2024 NEXCOM International Co., Ltd. All Rights Reserved. DNA 140 User Manual...
- Page 72 Security Device. TCG EFI protocol and INT1A interface will not be available. SHA256 PCR Bank Enable or disable SHA256 PCR Bank. Pending operation Schedule an operation for the security device. Platform Hierarchy Enable or disable platform hierarchy. Copyright © 2024 NEXCOM International Co., Ltd. All Rights Reserved. DNA 140 User Manual...
- Page 73 Detect and display the current CPU fan speed. Configure the Boundary 1/2/3/4. Vcore Voltage Speed 1/2/3/4/5 Detect and display the output voltages. Configure the speed 1/2/3/4/5. P5V (VCC5) Detect and display 5V voltages. Copyright © 2024 NEXCOM International Co., Ltd. All Rights Reserved. DNA 140 User Manual...
- Page 74 Enable or disable the console redirection. Console Redirection Settings Enter the Console Redirection Settings submenu. Legacy Console Redirection Settings Enter the Legacy Console Redirection Settings submenu. Copyright © 2024 NEXCOM International Co., Ltd. All Rights Reserved. DNA 140 User Manual...
-
Page 75: Security
Chapter 4: BIOS Setup Security Setup Administrator Password Select this to reconfigure the administrator’s password. Copyright © 2024 NEXCOM International Co., Ltd. All Rights Reserved. DNA 140 User Manual... -
Page 76: Boot
Adjust the boot sequence of the system. Boot Option #1 is the first boot device that the system will boot from, next will be #2 and so forth. Copyright © 2024 NEXCOM International Co., Ltd. All Rights Reserved. DNA 140 User Manual... -
Page 77: Save & Exit
To save the changes and reset, select this field then press <Enter>. A dialog box will appear. Confirm by selecting Yes. You can also press <F4> to save and exit Setup. Copyright © 2024 NEXCOM International Co., Ltd. All Rights Reserved. DNA 140 User Manual... -
Page 78: Appendix A: Nexboot Configuration
BIOS. Immediately press the <Del> button when powering on the system, then navigate using the arrow keys to select the BOOT section. Copyright © 2024 NEXCOM International Co., Ltd. All Rights Reserved. DNA 140 User Manual... - Page 79 Note that the FIXED BOOT ORDER Priorities in the BOOT section and BOOT Override in the Save & Exit section will gray out and become unavailable for configuration. Copyright © 2024 NEXCOM International Co., Ltd. All Rights Reserved. DNA 140 User Manual...
- Page 80 NEXBOOT WDT Minutes & NEXBOOT WDT Seconds are features designed to set a timer for triggering NEXBOOT WDT when entering the OS without clearing the WDT. You can adjust the minutes and seconds separately. Copyright © 2024 NEXCOM International Co., Ltd. All Rights Reserved. DNA 140 User Manual...
- Page 81 If the clear WDT is failed to work in the operating system on the primary device, the NEXBOOT WDT will be triggered to reboot the system into the golden device. Copyright © 2024 NEXCOM International Co., Ltd. All Rights Reserved. DNA 140 User Manual...
- Page 82 If there is only one disk available on the system and the WDT is not cleared in the OS on that device, it will trigger a boot into the Built-in Shell by default. Copyright © 2024 NEXCOM International Co., Ltd. All Rights Reserved. DNA 140 User Manual...
Need help?
Do you have a question about the DNA 140 and is the answer not in the manual?
Questions and answers