Table of Contents
Advertisement
Quick Links
Advertisement
Table of Contents

Related Manuals for Lincoln SKF CLP


Summary of Contents for Lincoln SKF CLP
- Page 1 Assembly Instructions CLP pump Smart Pump for progressive lubrication systems Created on: 20.11.2023 Document no.: 951-171-079-EN Version: Read these instructions be- fore installation or start-up of the product and keep them readily available for consultation.
-
Page 2: Original Ec Declaration Of Incorporation In Accordance With Directive 2006/42/Ec, Appendix Ii Part 1 B
Original EC Declaration of Incorporation in accordance with Directive 2006/42/EC, Appen- dix II Part 1 B The manufacturer hereby declares at its sole responsibility that the partly completed machinery conforms to the essential health and safety requirements of the Machinery Directive 2006/42/EC, Annex I, marked in the Annex to the EC Declaration of Incorporation as applicable and fulfilled at the time of placing on the market. - Page 3 Appendix to Declaration of Incorporation in accordance with 2006/42/EC, Annex II, No. 1 B Description of the essential health and safety requirements according to 2006/42/EC, Annex I, which have been applied and fulfilled. Any essential health and safety requirements not listed here are not relevant to this product. Table 1 Appendix to Declaration of Incorporation Valid for: CLx lubricant feed pumps...
-
Page 4: Masthead
SKF (U.K.) Limited, 2 Canada Close, Banbury, Oxfordshire, OX16 2RT, GBR. - North America - SKF Lubrication Business Unit Lincoln Industrial 5148 North Hanley Road, St. Louis, MO. 63134 USA - South America - SKF Argentina Pte. Roca 4145, CP 2001 Rosario, Santa Fe... -
Page 5: Table Of Contents
5.5.1 Storage period up to 6 months ......21 Table of contents 5.5.2 Storage period between 6 and 18 months ..21 5.5.3 Storage period more than 18 months ..... 21 Original EC Declaration of Incorporation in accordance 5.6 Declaration of decontamination ........21 with Directive 2006/42/EC, Appendix II Part 1 B .. - Page 6 15.4 Terminal diagram for 7-pin bayonet connector with CS* ....................41 15.5 Terminal diagram for 4-pin bayonet connector ..42 15.6 Terminal diagram for rectangular connector ..43 15.7 Terminal diagram for M12x1 socket, A-coded ..44 15.8 Terminal diagram for M12x1 socket, B-coded ..45 15.9 Terminal diagram for M12x1 plug, A-coded .....46 15.10 China RoHS Table ............
-
Page 7: Safety Alerts, Visual Presentation, And Layout
1. Instruction steps: These indicate a chronological se- Safety alerts, visual presen- quence of instruction steps. The numbers of the steps are in bold and are followed by a period. If a new activ- tation, and layout ity follows, the numbering starts again at “1.” –... -
Page 8: Safety Instructions
1.3 General behaviour when handling 1 Safety instructions the product 1.1 General safety instructions • Familiarize yourself with the functions and operation of the product. The specified assembly and operating • Putting the products into operation or operating them steps and their sequences must be observed. without having read the instructions is prohibited. -
Page 9: Foreseeable Misuse
1.6 Foreseeable misuse 1.10 Safety markings on the product Any usage of the product other than as specified in this NOTE manual is strictly prohibited. Particularly prohibited are: Further to the findings of the workplace risk evalua- • Use of non-specified consumables, contaminated lubri- tion the operating company has to attach additional cants, or lubricants with air inclusions. -
Page 10: Note On Ece Mark
1.14 Note on ECE mark 1.18 Emergency shutdown The ECE test mark (E1) confirms that an ECE This is done by a course of action to be defined by the op- type approval (components requiring ap- erator. proval on motor vehicles) has been granted 1.19 Assembly, maintenance, fault, re- for a product which bears this mark on its type plate. -
Page 11: Residual Risks
1.21 Residual risks Table 2 Residual risks Residual risk Possible in lifecycle Avoidance / Remedy Personal injury / property damage A B C G H K Unauthorized persons must be kept away. No- due to falling of hoisted parts. body is allowed to be present below hoisted parts. Lift parts using suitable lifting gear. -
Page 12: Lubricants
2 Lubricants 2.6 Solid lubricants Solid lubricants may only be used after prior consultation 2.1 General information with SKF. When solid lubricants are used in lubrication systems, the following rules generally apply: Lubricants are selected specifically for the relevant appli- Graphite: cation. -
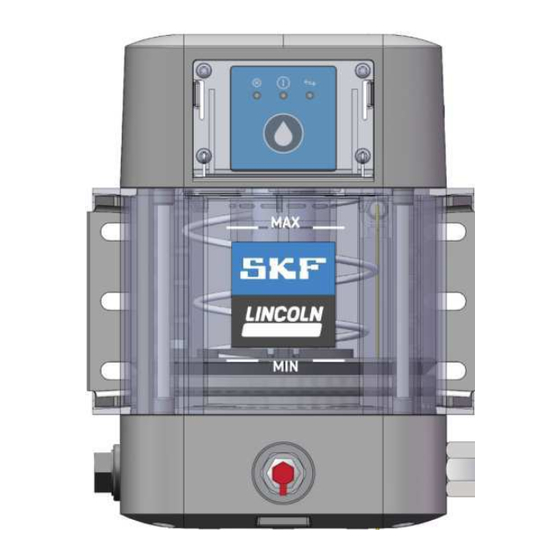
Page 13: Overview, Functional Description
3 Overview, functional NOTE The backup battery of the Bluetooth module (type description CR 1632) has a lifetime of more than 10 years and does not normally need to be replaced within the In the following you will find an overview of the most im- technical product lifetime of the pump. -
Page 14: Triggering Additional Lubrication
3.1.1 Triggering additional lubrication Fig. 7 Briefly pressing the multifunction pushbutton (15.1) dur- ing the pause time triggers an additional lubrication. The pump runs until the set number of metering device cycles are completed. The pump then returns to pause time. 3.1.2 Reseting a warning/error message If there is an active warning (e.g., reservoir low-level sig- nal) or error message (no signal from the piston detector),... -
Page 15: Reservoir
3.3 Reservoir 3.4 Pump housing, lower part The reservoir (1) stores the lubricant. The follower plate The lower part of the pump housing contains: (2) is positioned on top of the lubricant and presses it with spring force in the direction of the pump elements. Pump elements This improves the suction characteristics of the pump, The pump can be fitted with up to two pump elements (5) -
Page 16: Technical Data
4 Technical data Table 4 General technical data Operating pressure Max. 270 bar Mounting position Vertical Ambient temperature -25 °C to 65 °C Sound pressure level < 70 dB (A) Pump elements Max. 2 Weight (empty) 5 kg Reservoir capacity 1 liter nominal Feedable lubricants Lubrication greases from NLGI 0 up to and including NLGI 2... -
Page 17: Diagram Relative Duty Cycle
4.1 Diagram relative duty cycle Table 5 A = Pump runtime in minutes B = Minimum pause time in minutes 4.2 Hydraulic connection diagrams Fig. 9 Pump with follower plate Pump with follower plate and low-level signal Table 6 Hydraulic connection diagram following ISO 1219-1:2019-01 1 = Reservoir 5 = Low-level signal 2 = Pump... -
Page 18: Tightening Torques
4.3 Tightening torques Fig. 10 Table 7 Tightening torques Pump at the place of use 10 Nm ± 1.0 Nm 7.40 ft.lb. ± 0.74 ft.lb. Plug screw in housing 10 Nm ± 1.0 Nm 7.40 ft.lb. ± 0.74 ft.lb. Grease fitting in housing 10 Nm ±... -
Page 19: Type Identification Code
4.4 Type identification code PUMP - CLP - E G 1 C M 2 - T 3 F X - 7 S 7 X - M X A X 4 X X Pump type: Compliance: CE + E1 Lubricant: Lubrication greases NLGI 0 up to and including NLGI 2 Fill level monitoring: Low-level signal... - Page 20 None Table 8 Outlets/Inlets Code Outlet/Inlet Code Outlet/Inlet Grease fitting Pump element K5 Cartridge filling Pump element K6 Lincoln cartridge filling Pump element K7 Closed (plug screw) Pump element KR Table 9 Electrical connections (left/right top) Code Connection Code Connection...
-
Page 21: Delivery, Returns, Storage
5 Delivery, returns, storage 5.5 Storage conditions for products filled with lubricant 5.1 Delivery For products filled with lubricant, the permitted storage After receipt of the shipment, it must be inspected for any temperature range is: shipping damage and for completeness according to the minimum + 5 °C [+41 °F]... -
Page 22: Assembly
The pump should be mounted at the mounting points (A) 6 Assembly using: • 2 mounting brackets (B) Observe the safety instructions and the technical data in • 4 screws M8 (8.8) and 4 washers to DIN 7349 this manual. Additionally, during assembly pay attention •... -
Page 23: Setting The Delivery Rate On Pump Element R
6.4 Installing the pressure relief valve 6.3 Setting the delivery rate on pump Each pump element must be secured with a pressure re- element R lief valve that is suitable for the projected maximum ap- proved operating pressure of the centralized lubrication NOTE system. -
Page 24: Connection Of The Lubrication Line
6.6 Electrical connection 6.5 Connection of the lubrication line < WARNING CAUTION Electric shock Risk of slipping Work on electrical components may be per- Exercise caution when handling lubricants. formed only by qualified electricians. Immediately remove and bind any leaked lub- At a minimum, the following safety measures ricants. -
Page 25: First Start-Up
7 First start-up In order to warrant safety and function, a person assigned by the operator must carry out the following inspections. Immedi- ately eliminate detected deficiencies. Deficiencies may be remedied by an authorized and qualified specialist only. Table 11 7.1 Inspections before first start-up YES NO □... -
Page 26: Operation
Fig. 17 8 Operation SKF products operate largely automatically. The activities required during normal operation are lim- ited primarily to checking the pump for damage and proper functioning. < NOTICE Possible damage to the pump and air in the lubrica- tion system In the case of pumps without a low-level signal, the fill level must be checked regularly and topped up... -
Page 27: Regular Filling With Cartridge
8.3 Regular filling with cartridge 8.5 Triggering an additional lubrication cycle 1. Connect the cartridge to the fill connection (7.1). 2. Fill the reservoir up to just below the - MAX - marking. To trigger an additional lubrication cycle, proceed as fol- 3. -
Page 28: Maintenance
9 Maintenance 9.1 Maintenance Careful and regular maintenance is required in order to detect and remedy possible faults in time. The specific intervals must always be determined by the operator according to the operating conditions and regularly reviewed and adapted where necessary. -
Page 29: Cleaning
10 Cleaning 10.4 Cleaning the vent pipe 10.1 Basics NOTE The vent pipe is an option that cannot be selected in Cleaning should be carried out in accordance with the op- SKF's online product customization tool, and it is not erator's own company rules, and cleaning agents and de- present in all pumps. -
Page 30: Faults, Causes, And Remedies
11 Faults, causes, and remedies Table 13 Fault table Fault Possible cause Remedy • Power supply to pump interrupted – Main machine is switched off – Pump power cable detached or defective – External fuse defective • The pump is in pause time Pump does not run •... -
Page 31: Repairs
13 Shutdown, disposal 12 Repairs < 13.1 Temporary shutdown WARNING Risk of injury Temporary shutdowns should be done by a course of ac- At a minimum, the following safety tion to be defined by the operator. measures must be taken before any repairs: 13.2 Permanent shutdown, disas- •... -
Page 32: Spare Parts And Accessories
14 Spare parts and accessories Spare parts may be used exclusively for replacement of identical defective parts. Modifications with spare parts on existing products are not allowed. Accessories are used to extend, supplement the functional range or to assemble the product. Table 14 14.1 Pump elements Designation... -
Page 33: Adapter With Filler Nipple
Table 17 14.4 Adapter with filler nipple Designation Pcs. Item number Figure Adapter with filler nipple ST 1/4 acc. to NPTF, incl. seal 519-33840-1 Adapter with filler nipple A2 AR 1/4, incl. seal 519-33959-1 Adapter with filler nipple ST AR 1/4, incl. seal 519-33955-1 Protective cap for filler nipple (red) 898-210-050... -
Page 34: Grease Port, Plug-In
Table 21 14.8 Grease port, plug-in Designation Pcs. Item number Figure Optional grease port for filling with lubrication grease 5590-00000002 from below via the lower part of the housing Table 22 14.9 Filling connection, screwable Designation Qty. Part number Fig. Optional filling connection for filling with lubrication 538-36763-1 grease from the bottom via the lower housing part (con-... -
Page 35: Grease Port Without Lubricant Return
Table 24 14.11 Grease port without lubricant return Designation Pcs. Item number Figure Optional grease port for filling with lubricant from below 995-997-301 via the lower part of the housing, with R1/4 grease fit- ting to DIN 71412. Table 25 14.12 Vent pipe assy Designation Pcs. -
Page 36: Protective Cover
Tabelle 27 14.14 Protective cover Designation Pcs. Item number Figure Protective cover for pumps with operating console 5590-00000024 Table 28 14.15 Power lead Designation Feature* Pc Item number Figure Power lead 10 m with bayonet socket (4-pin) 664-34167-9 Power lead 10 m with bayonet socket (7-pin) with CS** 1 6640-00000182 Power lead 10 m with bayonet socket (7-pin) 664-34428-3... -
Page 37: Backup Battery Spare Part Kit
Table 29 14.16 Backup battery spare part kit Designation Pcs. Item number Figure Backup battery spare part kit 5590-00000025 Comprising: 1 x button cell battery CR 1632 2 x screw for fastening the Bluetooth module 4 x screw for fastening the service compartment lid 1 x service instructions for replacing the backup battery... -
Page 38: Appendix
15 Appendix 15.1 Connection diagrams Table 30 Cable colors in accordance with IEC 60757 Abbreviation Color Abbreviation Color Abbreviation Color Abbreviation Color Black Green White Pink Brown Yellow Orange Turquoise Blue Violet Gray GNYE Green/Yellow RDWH Red/White Gold Silver Not all cable colors need to be used in the terminal diagrams. -
Page 39: Overview Of Cables And Possible Connections
15.2 Overview of cables and possible connections Table 31 Plug Color Item number Length Cross-section Enclosure rating 664-34428-3* 10 m 7 x 1.5 mm IP69K Bayonet, 7-pin, A-coded *) With piston detector signal lead RD/BK 6640-00000182 10 m 7 x 1.5 mm IP69K VT/GN Bayonet, 7-pin, A-coded... -
Page 40: Terminal Diagram For 7-Pin Bayonet Connector
15.3 Terminal diagram for 7-pin bayonet connector NOTE The following terminal diagrams all display the specifications for a single electrical connection only. Therefore, in the case of pumps with multiple electrical connections, it is always necessary to refer to multiple terminal diagrams. The assignment of the terminal diagrams to the electrical connection of a specific pump can be made based on the specifi- cations for the connection plugs and sockets. -
Page 41: Terminal Diagram For 7-Pin Bayonet Connector With Cs
15.4 Terminal diagram for 7-pin bayonet connector with CS* Table 33 Terminal diagram valid for pumps with the following equipment features Mobile applications Additional lubrication (J16) Fault signal (J5) 12/24 VDC 7-pin bayonet connector Ignition (J18) *) With piston detector signal lead Fig. -
Page 42: Terminal Diagram For 4-Pin Bayonet Connector
15.5 Terminal diagram for 4-pin bayonet connector Table 34 Terminal diagram valid for pumps with the following equipment features Mobile applications Fault signal (J5) 12/24 VDC 4-pin bayonet connector, A-coded Fig. 26... -
Page 43: Terminal Diagram For Rectangular Connector
15.6 Terminal diagram for rectangular connector Table 35 Terminal diagram valid for pumps with the following equipment features Industry Ignition (J18) 12/24 VDC Rectangular connector Fig. 27... -
Page 44: Terminal Diagram For M12X1 Socket, A-Coded
15.7 Terminal diagram for M12x1 socket, A-coded Table 36 Terminal diagram valid for pumps with the following equipment features 5-pin M12 socket, A-coded Additional lubrication (J16) Fault signal (J5) Fig. 28... -
Page 45: Terminal Diagram For M12X1 Socket, B-Coded
15.8 Terminal diagram for M12x1 socket, B-coded Table 37 Terminal diagram valid for pumps with the following equipment features 5-pin M12 socket, B-coded Cycle switch (J19) Fig. 29... -
Page 46: Terminal Diagram For M12X1 Plug, A-Coded
15.9 Terminal diagram for M12x1 plug, A-coded Table 38 Terminal diagram valid for pumps with the following equipment features 4-pin M12 plug, A-coded Fault signal (J5) Fig. 30... -
Page 47: China Rohs Table
15.10 China RoHS Table Table 39... - Page 48 skf.com/lubrication ® SKF is a registered trademark of the SKF Group. ™ eLube is a trademark of the SKF Group. © SKF Group 2024 Reprint or reproduction of the contents of this information - even in part - is permitted only with SKF's prior written consent.
Need help?
Do you have a question about the SKF CLP and is the answer not in the manual?
Questions and answers