Table of Contents
Advertisement
Quick Links
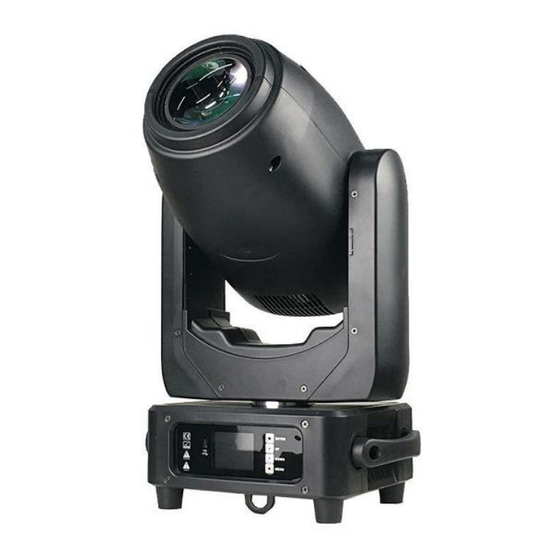
200W LED 3in1 BSW Moving Head
This product manual contains important information about the safe installation and
use of this projector. Please read and follow these instructions carefully and keep
this manual in a safe place for future reference.
User manual
Please read the instructions carefully before use
(ML-BSW200)
Advertisement
Table of Contents

Subscribe to Our Youtube Channel
Related Manuals for RIUKOE ML-BSW200


Summary of Contents for RIUKOE ML-BSW200
- Page 1 200W LED 3in1 BSW Moving Head (ML-BSW200) This product manual contains important information about the safe installation and use of this projector. Please read and follow these instructions carefully and keep this manual in a safe place for future reference.
-
Page 2: Table Of Contents
INDEX 1.STATEMENT ..................... 2 2.ACCESSORIES ..................2 3.SAFETY INSTRUCTION................2 4.INSTALLATION ..................4 5.TECHNICAL SPECIFICATION..............7 6.PANEL OPTATION ................... 9 7.CHANNEL DESCRIPTION (17/20CHS) ..........12 8.TROUBELSHOOTING ................15 9.CLEANING AND MAINTENANCE ............17... -
Page 3: Statement
1.STATEMENT product well capability intact packing when leave factory. All of the user should comply with warning item and manual, any misuse cause of the damages are not included in our guarantee, and also cannot be responsible for any malfunction & problem owing to ignore the manual. - Page 4 Review the following safety precautions carefully before installing or operating the fixture. This fixture must be installed in accordance with the applicable installation code by a person familiar with the construction and operation of the fixture and the hazards involved. Preventing electric shock WARNING! Risk of electric shock.
-
Page 5: Installation
Avoid personal injury WARNING! Take measure to prevent personal injury. Do not look directly at the light source from close range. ⚫ Take precautions to prevent injury due to falls when working at height. ⚫ For permanent installation, ensure that the fixture is securely fastened to ⚫... - Page 6 mounting this fixture to truss be sure to sere to secure an appropriately rated clamp to the included Omega Bracket using a M10 screw fitted through the center hole of the ‘omega bracket’. As an added safety measure be sure to attached at least one properly rated Safety Cable to the fixture using one of the safety cable rigging point integrated in the base assembly.
- Page 7 DMX-512 connection with DMX terminator: For installations where the DMX cable has to run a long distance or is in an electrically noisy environment, such as in a discotheque, it is recommended to use a DMX terminator. This helps in preventing corruption of the digital control signal by electrical noise. The DMX terminator is simply an XLR plug with a 120 resistor connected between pins 2 and 3,which is then plugged into the output XLR socket of the last fixture in the chain.
-
Page 8: Technical Specification
DMX Address Setting: By using a universal DMX controller to control the units, you will need to set DMX address from 1 to 512 so that the units can receive DMX signal. Press the MENU button up to when the DMX Address is showing on the display. Pressing the ENTER button and the display will blink. - Page 9 Protocols - Control mode: DMX512/Master-Slave/Auto run/ RDM - Channel mode: 17CH/ 20CH Display/Case/Base - Display mode: LCD display, lamp temperature display, Chinese and English display, reverse display - High temperature resistant engineering plastic case + aluminum base Color Wheel - Color plate: 9 colors + open Gobo Wheel - Static Gobo Wheel: 10 gobos + open - Rotation gobo wheel: 7 gobos + open...
-
Page 10: Panel Optation
- Strobe: 0-20 Hz Synchronous pulse strobe, random pulse strobe IP Rated - IP20, indoor only Weigh & Size - N.W: 13.5kg - G.W: 15.5kg - Package size:520*415*370 Please Note: Specifications and improvements in the design of this unit and this manual are subject to change without any prior written notice. - Page 11 Auto Scene Mode Scene 1- 10 Auto M/S Choose Slave Master 中文 Language English mode 1 mode 2 Screen saver mode 3 close DISP Forward Screen Rot Reverse mode 1 DMX indicate mode 2 mode 3 Screen light 0-10 Scene select Scene 1- 10 Scene Time 000-255...
- Page 12 Fixed gobo wheel 000-255 Rotation gobo wheel 000-255 Gobo rotating 000-255 Focus 000-255 Focus fine 000-255 Zoom 000-255 Prism 000-255 Prism rotation 000-255 Frost 000-255 Reset 000-255 Pan invert Open Tilt invert Open P/T Rectify Open ADUA Pan offset Tilt offset Data hold Open Scene Time...
-
Page 13: Channel Description (17/20Chs)
7.CHANNEL DESCRIPTION (17/20CHs) 17 CH 20 CH Name Value Function 0-255 0-540 degree Pan Fine 0-255 0-2 degree Tilt 0-255 0-270 degree Tilt Fine 0-255 0-1 degree XY speed 0-255 From fast to slow Dimmer 0-255 0-100% dimmer Dimmer 0-255 Dimmer fine fine Close... - Page 14 60-64 Color 6 65-69 Color 6+color7 70-74 Color 7 75-79 Color 7+color8 80-84 Color 8 85-89 Color 8+color9 90-94 Color 9 95-99 Color 9+color10 100-180 Forward flow from fast to slow 181-185 Stop 186-255 Reverse flow from slow to fast CH10 Color Fine 0-255...
- Page 15 180-189 Shake from slow to fast gobo8 190-223 Reverse flow from fast to slow 224-255 Forward flow from slow to fast White 10-19 Gobo 1 20-29 Gobo 2 30-39 Gobo 3 40-49 Gobo 4 50-59 Gobo 5 60-69 Gobo 6 70-79 Gobo 7 Rotation...
-
Page 16: Troubelshooting
0-127 0-360 degree 128-187 Forward flow from fast to slow prism CH15 CH18 rotating 188-195 stop 196-255 Reverse flow from slow to fast 0-127 empty CH16 CH19 Frost 128-255 Frost 0-209 Empty 210-215 Reset XY motor after 3 seconds 216-219 Empty Reset effect motor after 3 CH17... - Page 17 2. If the DMX LED is on and no response to the channel, check the address settings and DMX polarity. 3. If you have intermittent DMX signal problems, check the pins on connectors or on PCB of the unit or the previous one. 4.
-
Page 18: Cleaning And Maintenance
9.CLEANING AND MAINTENANCE Following are a few common problems that may occur during operation. Here are some suggestions for easy troubleshooting: CLEANING Frequent cleaning is recommended to insure proper function, optimized light output, and an extended life. The frequency of cleaning depends on the environment in which the fixture operates: damp, smoky or particularly dirty environments can cause greater accumulation of dirt on the fixture’s optics. - Page 19 Factory: No.31 Zhongxing Road Baiyun District Guangzhou,China +86-20-2904 6476 info@ricostagelight.com YouTube www.riukoe.com Facebook...
Need help?
Do you have a question about the ML-BSW200 and is the answer not in the manual?
Questions and answers