Table of Contents
Advertisement
Quick Links
Advertisement
Table of Contents

Subscribe to Our Youtube Channel
Related Manuals for RIUKOE Hybrid BSW250


Summary of Contents for RIUKOE Hybrid BSW250
- Page 1 Hybrid BSW250 This product manual contains important information about the safe installation and use of this projector. Please read and follow these instructions carefully and keep this manual in a safe place for future reference. User manual Please read the instructions carefully before use...
-
Page 2: Table Of Contents
INDEX 1.STATEMENT ..................... 2 2.ACCESSORIES ..................2 3.SAFETY INSTRUCTION................2 4.INSTALLATION ..................4 5.TECHNICAL SPECIFICATION..............7 6.HOW TO SET THE UNIT ................ 10 7.CHANNEL DESCRIPTION (17/20CHS) ..........14 8.TROUBELSHOOTING ................18 9.CLEANING AND MAINTENANCE ............19... -
Page 3: Statement
1.STATEMENT product well capability intact packing when leave factory. All of the user should comply with warning item and manual, any misuse cause of the damages are not included in our guarantee, and also cannot be responsible for any malfunction & problem owing to ignore the manual. - Page 4 installation code by a person familiar with the construction and operation of the fixture and the hazards involved. Preventing electric shock WARNING! Risk of electric shock. Always power off/unplug the fixture before removing any covers. Ensure that the power is turned off when connecting the fixture to the AC ...
-
Page 5: Installation
WARNING! Take measure to prevent personal injury. Do not look directly at the light source from close range. Take precautions to prevent injury due to falls when working at height. For permanent installation, ensure that the fixture is securely fastened to ... - Page 6 clamp to the included Omega Bracket using a M10 screw fitted through the center hole of the ‘omega bracket’. As an added safety measure be sure to attached at least one properly rated Safety Cable to the fixture using one of the safety cable rigging point integrated in the base assembly.
- Page 7 DMX-512 connection with DMX terminator: For installations where the DMX cable has to run a long distance or is in an electrically noisy environment, such as in a discotheque, it is recommended to use a DMX terminator. This helps in preventing corruption of the digital control signal by electrical noise. The DMX terminator is simply an XLR plug with a 120 resistor connected between pins 2 and 3,which is then plugged into the output XLR socket of the last fixture in the chain.
-
Page 8: Technical Specification
Please refer to the following diagram to address your DMX512 channel for the first 4 units: CHs Mode Unit 1 Adds Unit 2 Adds Unit 3 Adds Unit 4 Adds 17CH 20CH 5.TECHNICAL SPECIFICATION Power Supply - Voltage:AC100-240V,50/60Hz - Power:320W Light Source - Lamp source: White LED 250W - Color temperature: 7500k-8500k... - Page 9 display, reverse display - High temperature resistant engineering plastic case + aluminum base Color Wheel - Color plate: 7colors + open, with rainbow effect Gobo Wheel - Static Gobo Wheel: 7 gobos + open, with rotation and running water effect - Rotation gobo wheel: 6 gobos + open Prisms - 3 facet prism with bi-direction rotating...
- Page 10 - Product size: 296 * 224 * 492 - Package size:420*400*530 Photometric Diagram: Please Note: Specifications and improvements in the design of this unit and this manual are...
-
Page 11: How To Set The Unit
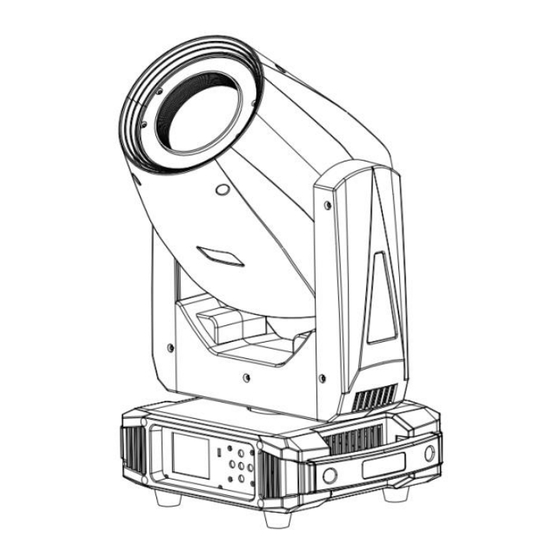
subject to change without any prior written notice. 6.HOW TO SET THE UNIT 6.1 Fixture Overview 1. Display: To show the various menus and the selected functions 2. Button:... - Page 12 1. DMX IN: DMX512 link, use 3/5‐pin XLR cable to link the fixture and the DMX controller DMX OUT: DMX512 link, use 3/5‐pin XLR cable to link the next fixture 2. Power Cable:IN/OUT 3. Fuse (T 6.3A): Protects the unit from over‐voltage or short circuit 4.
- Page 13 6.3 Main Function To select any of the given functions, press the MENU button until the required function is showing on the display. Select the function by pressing the ENTER button and the display will blink. Use the DOWN/UP buttons to change the mode. Once the required mode has been selected, press the ENTER button to setup, to go back to the functions without any change press the MENU button again.
- Page 14 Zoom 0 - 255 Focus 0 - 255 Frost 0 - 255 Prism 0 - 255 PrismRot 0 - 255 Reset 0 - 255 Current Time:xxx H Total Time:xxx H Information Time Power Count:xxx Sensor Type Information Temperature xxx℃ Panel:Vx.xxx XY Motor:Vx.xxx Software Version Motor:Vx.xxx...
-
Page 15: Channel Description (17/20Chs)
Factory Off/on Language CH/EN Display Display Flip Close/Open Display Mode Show/60s 7.CHANNEL DESCRIPTION (17/20CHs) 20 CH 17 CH Value Function 000 - 255 000 - 255 X Fine 3 CH 3 CH 000 - 255 4 CH 4 CH 000 - 255 Y Fine 5 CH 5 CH... - Page 16 Color Color 010-019 White+Color 1 wheels wheels 020-029 Color 1 030-039 Color 1+ Color 2 040-049 Color 2 050-059 Color 2+Color3 060-069 Color3 070-079 Color3+Color4 080-089 Color4 090-099 Color4+Color5 100-109 Color5 110-119 Color5+Color6 120-129 Color6 130-139 Color6+Color7 140-149 Color7 150-159 Color7+White 160-205 From fast to slow water effect...
- Page 17 070-079 Gobo7 080-094 Gobo1 shaking ( from slow to fast ) 095-109 Gobo2 shaking ( from slow to fast ) 110-124 Gobo3 shaking ( from slow to fast ) 125-139 Gobo4 shaking ( from slow to fast ) 140-154 Gobo5 shaking ( from slow to fast ) 155-169 Gobo6 shaking (...
- Page 18 Gobo Positive water effect (from fast 130-189 to slow) 190-195 Water effect stop 196-255 Gobo Reverse water effect ( from slow to fast ) 000-063 Rotation map rotation linear positioning Gobo Positive water effect (from fast 064-126 to slow) 127-128 Water effect stop 11CH 13CH...
-
Page 19: Troubelshooting
000-199 Empty 17CH 20CH 200 - 250 Light reset 251-255 Empty 8.TROUBELSHOOTING Following are a few common problems that may occur during operation. Here are some suggestions for easy troubleshooting: A. The unit does not work, no light and the fan does not work 1. -
Page 20: Cleaning And Maintenance
D. The lamp is cutting out intermittently 1. The lamp is not working well. Check the mains voltage either too high or too low. 2. Internal temperature may be too high. Check if replacement of fan is needed on the head. E. - Page 21 Clean the external lens surface at least every 20 days with a soft cloth to avoid dirt/debris accumulation. Never use alcohol, solvents, or ammonia based cleaners. MAINTENANCE Regular inspections are recommended to insure proper function and extended life. There are no user serviceable parts inside this fixture, please refer all other service issues to an authorized service technician.
- Page 22 Factory: Room 220, Building 3, Seiko Creative Park, Huadu District, GZ +86-20-2904 6476 info@riukoe.com YouTube www.riukoe.com Facebook...
Need help?
Do you have a question about the Hybrid BSW250 and is the answer not in the manual?
Questions and answers