
Related Manuals for GVS H Series


Summary of Contents for GVS H Series
- Page 1 User Manual Outdoor Station H Series-Outdoor Station User Manual_V1.0 Model Number: H-OS08...
-
Page 3: Table Of Contents
Contents Unit 1 Overview..........................1 1.1 Functions and Characteristics..................1 1.2 Parameters........................1 Unit 2 Appearance and Interface....................2 2.1 Front View........................2 2.2 Rear View........................3 Unit 3 Installation......................... 4 3.1 Height Installation......................4 3.2 Installation Illustration....................5 Unit 4 Operation Instructions..................... 6 4.1 Call Indoor Monitor....................... -
Page 4: Unit 1 Overview
Unit 1 Overview The Outdoor station is one of the main parts in the digital video door phone system. It is connected with indoor stations, guard units and other devices in the system by standard CAT5 cables. And it supports RFID access control (IC or ID). 1.1 Functions and Characteristics 4.3’’... -
Page 5: Unit 2 Appearance And Interface
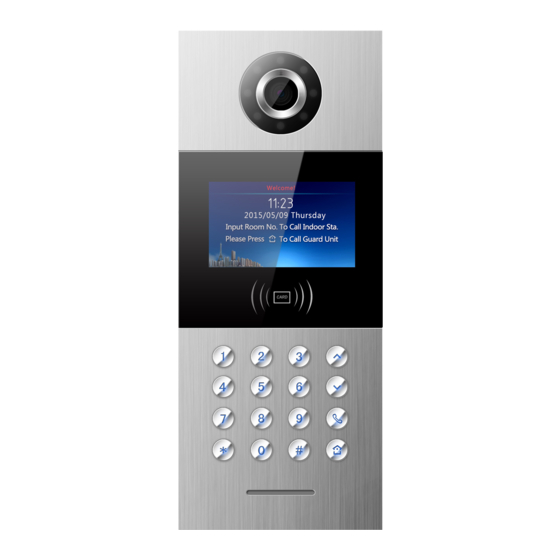
Unit 2 Appearance and Interface 2.1 Front View Carema Angle Adjustment Display Area Card Reading Area Keypad Area Wring Area Speaker... -
Page 6: Rear View
2.2 Rear View 1. Network Interface (Non-standard PoE 24V power supply; if power is needed for gate lock or low temperature heating function is required, outdoor station must be supplied independently).) 2. Interface for input power: DC 24 V (interface for independent power supply) 3. -
Page 7: Unit 3 Installation
Unit 3 Installation 3.1 Height Installation Notes for Installation : 1. The depth of the groove should be well measured. Too much space between the wall and the embedded is prohibited. 2. Do not install on the wall that have much contact with rain, moisture or dust. -
Page 8: Installation Illustration
3.2 Installation Illustration Step 1: Put the embedded box into the preformed groove. After getting the cable out through the opening, Embedded box fasten the box with nails or by Preformed groove cement. Embedded box dimension (W/H/D): 132 x 340x 50mm Opening for cable Snap Wall... -
Page 9: Unit 4 Operation Instructions
Unit 4 Operation Instructions 4.1 Call Indoor Monitor Visitors make a call via inputting building number, unit number and room number, then press # to start the call. There will be ring back tones on this station, during ringing, press * to cancel the call. If there is no any answer within 30 seconds, call will be ended automatically . -
Page 10: Unit 5 Entry Settings
Unit 5 Entry Settings 5.1 Standby Interface Standby page 5.2 Login for Engineering Settings On standby interface Press "#" and then "*" key, enter into the login interface for engineering settings. Default password is "801801" Login for Engineering Settings. -
Page 11: Setting Interface
5.3 Setting interface Input the correct password then press "#" key to confirm and enter it. You can press the up/down key to choose the item of setting, or press the corresponding number (shown on the icon) directly. Engineering Settings... -
Page 12: Unit 6 System Settings
Unit 6 System Settings System settings, including time setting, volume setting, language setting, password setting, unlock time setting, card management, and elevator setting. You can press the up/down key to choose the item of setting, or press the corresponding number (shown on the icon) directly. -
Page 13: Sound Setting
6.2 Sound Setting Use the up/down key or number keys to select the item, and "#" key to adjust. After adjusting finished, press "*" key and it will save and return. Sound Setting 6.3 Language Setting Use the up/down key or number keys to choose the language, press "#" key to confirm. Language Setting... -
Page 14: Password Setting
6.4 Password Setting Password setting includes 3 items: On and Off for user password and public password, and change of public password. Use the up/down key or number keys to adjust or set. Password Setting 6.5 Unlocked-Time Setting Unlocked-time setting is to set the duration of the unlocked time after door opened. When the time is out, the door will lock again automatically. -
Page 15: Card Management
6.6 Card Management Card management includes registration, check(card information), delete, clear(delete all) and copy card . Card Management On registration interface,and register by a card or by inputting the card number. Press " # " key to confirm or press " * " key back to previous menu . You can press " * " key to delete the input numbers if needed. - Page 16 Enter “check” and you can check all card numbers and the quantity of registered cards. Card Information If you choose the “clear”, a message will come out for you to confirm the operation(delete all). Press "#" key to confirm, press "*" key to return. The function of “copy card”...
-
Page 17: Unit 7 Configuration Settings
Unit 7 Configuration Settings Configuration settings includes device property, dialing setting, alarm setting, factory test, configuration password, company info, device info. Use up/down key to choose or directly press corresponding number to a particular setting. Configuration Settings 7.1 Device property The device can either be used as outdoor station or gate station, depending on the definition of device property. - Page 18 If it is a outdoor station, you will find there are setting for building number( 1-99), unit number (1-9) and entrance number of the building (1-10) Outdoor Station Number Setting If it is a gate station, you only need to input the number of the gate( 1-32). Gate Station Number Setting...
-
Page 19: Dialing Settings
7.2 Dialing Settings Dialing setting interface are different with different device property. If it is outdoor station, the dialing setting interface is as below: If you choose “3”, you should dial 3 numbers (3digit)to call. For example, to call room 18 floor 8, you should dial 818;... - Page 20 Gate Station Dialing Setting...
-
Page 21: Alarm Setting
7.3 Alarm Setting Enter the alarm setting and choose “on” or “off” for each items. When the alarm is triggered, it will send information to management center/guard unit. Alarm Setting 7.4 Factory Test There are various testing programs on FACTORY TEST interface, most frequently use are Reboot System and Reset To Factory. -
Page 22: Configuration Password
7.5 Configuration Password The default configuration password is 801801. And here you can change the password :Input the current password. The text frame will move to new password if the password you input is correct. Then Input your new password(6 digit) twice. Engineering Password Setting 7.6 Device Information In “Device Information”...
Need help?
Do you have a question about the H Series and is the answer not in the manual?
Questions and answers