
Related Manuals for GVS H Series


Summary of Contents for GVS H Series
- Page 1 User Manual Mini Outdoor Station H Series Digital System Mini Outdoor Station Manual_V1.0 H-VS07-IC...
-
Page 3: Table Of Contents
Content Chapter 1 Function Overview ..................1 1.1 Function ......................1 1.2 Parameter ......................1 Chapter 2 Product Introduction ................2 2.1 Product appearance ..................2 2.2 Interface description ..................3 Chapter 3 Installation ....................4 3.1 Installation Height ....................4 3.2 Installation Steps ..................... 5 Chapter 4 Settings ...................... -
Page 4: Chapter 1 Function Overview
Chapter 1 Function Overview The product is the mini outdoor station of the H Series Digital System VDP. By using standard CAT5 cables, it makes visual intercom call to indoor monitor and guard station possible. Besides, it supports IC access control. -
Page 5: Chapter 2 Product Introduction
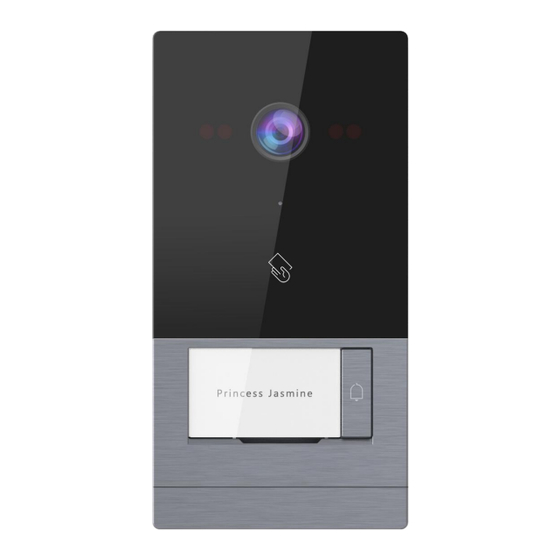
Chapter 2 Product Introduction 2.1 Product appearance... -
Page 6: Interface Description
2.2 Interface description ① ② +24V GND NO COM NC GS GND Interface Description① RJ45 interface: connecting standard 48V POE switch (1236 communication, 4578 power supply) Interface Description② +24V GND: independent power supply interface; NO, COM, NC: normal open/close interface; GS, GND: door status detection interface;... -
Page 7: Chapter 3 Installation
Chapter 3 Installation 3.1 Installation Height Suggested Installation Height: camera is 1.6m above the ground... -
Page 8: Installation Steps
3.2 Installation Steps Step 1: Drilling holes in the wall of installation size (149.5×64.5mm). Fixing the screw plug on the wall (installation size recommended to refer the center of slot hole), fix the outdoor station on the wall, and fix it with self-tapping screws (as shown in Figure 2) Picture 1 Picture 2 Step 2:Writing something on business card and fasten it to the name tag. -
Page 9: Chapter 4 Settings
Chapter 4 Settings 4.1 Paring of Mini Outdoor Station and Indoor Monitor Within 3 minutes after powering the mini outdoor station, long press the keypad until 3 times short beeps, then short press the keypad with a long beep to enter setting. Press in indoor monitor project setting (code: 801801), then choose mini... -
Page 10: Card Management
4.2 Card Management Press in indoor monitor Mini Outdoor Station setting, input the password to access to setting, choose card management to entering card management interface. Card Management Interface Choose the mini outdoor station needs to be set, details of functions of icon below: Delete all registered card;... -
Page 11: Key Synchronization
Interface of registered card (with card number) 4.3 Key Synchronization In the case of multiple extension of indoor monitors in one apartment, if only one indoor monitor has been paired with the mini outdoor station, then that’s the only indoor monitor which unlocks the door and owns the admins rights, in which case, only this indoor monitor shows a highlighted mini outdoor station icon in relevant page while other indoor monitors not. -
Page 12: Unlock Time Setting
4.4 Unlock Time Setting Enter interface of mini outdoor station management to set unlock time, range: 1~30 seconds. 4.5 Interaction with Disarming Choose disarming interaction function of mini outdoor station. When indoor monitor is armed successfully, the indoor monitor will disarm automatically if the access card opened the door successfully. -
Page 13: Door Status Warning Tone
4.7 Door Status Warning Tone When door status warning tone is chosen, Check the door status alarm tone. If the time of opening the door is longer than 120 seconds, the alarm will sound automatically. Prompt the occupant to close the door. When door status warning tone is not chosen. -
Page 14: Chapter 5 User Instruction
Chapter 5 User Instruction 5.1 Calling Resident By short press the call button of outdoor station, visitor starts to call the indoor monitor, whose ringtone will echo back. If the button is short pressed again during the call, then the waiting time will be recounted (each call waits for 30 seconds); if the call button is long pressed during the call, the call will be diverted to the guard unit/management center;...
Need help?
Do you have a question about the H Series and is the answer not in the manual?
Questions and answers