Table of Contents
Advertisement
Quick Links
Advertisement
Table of Contents

Related Manuals for IKEA TORSBODA


Summary of Contents for IKEA TORSBODA
- Page 1 TORSBODA...
-
Page 3: Table Of Contents
Declaration of Conformity .......... 36 Switching off the water softening system...... 18 Regeneration of the water softening system .... 18 IKEA guarantee ............ 37 Rinse aid system ............ 18 After-sales service............ 38 Rinse aid ............... 18 Setting the amount of rinse aid ........ -
Page 4: Safety
Safety Observe the following safety instructions. General information Read this instruction manual carefully. ● Keep the instruction manual and the product information safe for future reference or for ● the next owner. Do not connect the appliance if it has been damaged in transit. ●... -
Page 5: Safe Use
● If built-under or integrable appliances are not in a cavity so that one side is accessible, ● the hinge area must be covered at the side. Covers are available from IKEA or Customer Service. WARNING ‒ Risk of tipping! Improper installation may cause the appliance to tip up. -
Page 6: Damaged Appliance
Knives and utensils with sharp points can cause injuries. ● Arrange knives and utensils with sharp points in the cutlery basket with the points ● downwards, on the knife shelf or in the cutlery drawer. WARNING ‒ Risk of scalding! If you open the appliance door while the programme is running, hot water may splash ●... - Page 7 WARNING ‒ Risk of harm to health! Children can lock themselves in the appliance, thereby putting their lives at risk. ● With redundant appliances, unplug the power cord. Then cut through the cord and ● damage the lock on the appliance door beyond repair so that the appliance door will no longer close.
-
Page 8: Preventing Material Damage
● them separately. Aqua sensor Information about current disposal methods is available from IKEA or your local authority. The aqua sensor is an optical measuring device (light bar- rier) which measures the turbidity of the washing water. You Saving energy can save water with the aqua sensor. -
Page 9: Automatic Door Opening
After unpacking all parts, check for any damage in transit and completeness of the delivery. Connect your appliance to a drinking water connection. If you have any complaints, contact IKEA or our Customer Installing the drinking water connection Service. Note Note: The appliance has been tested at the factory to check... -
Page 10: Product Description
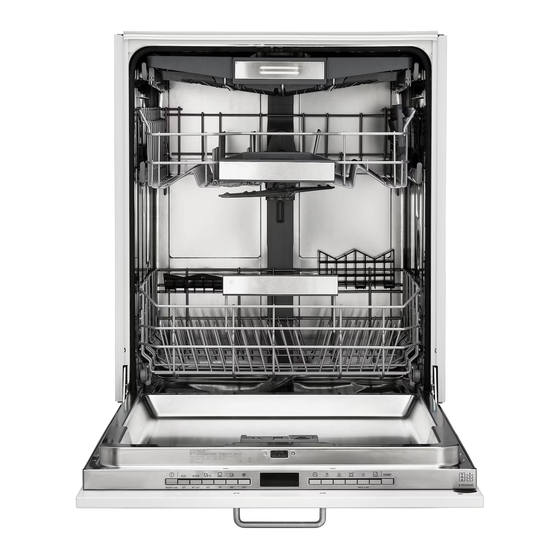
Product description Product description Product description Appliance You can find an overview of the parts of your appliance here. Rating plate Rating plate with E number and FD number. The data you need for Customer Service. Detergent dispenser Add detergent to the detergent dispenser. → "Detergent", Page 19 Bottom basket "Bottom basket"... -
Page 11: Control Panel
Lower spray arm The lower spray arm washes the tableware in the bottom basket. If the tableware has not been washed properly, clean the spray arms. → "Cleaning spray arms", Page 26 Tablet collecting tray During the wash cycle tablets automatically fall out of the deter- gent dispenser into the tablet collecting tray where they can fully dissolve. - Page 12 Programme buttons and additional functions Programmes → "Overview of programmes", Page 13 Additional functions → "Additional functions", Page 14 "Starting the programme" → Page 22 Start button button If you press for approx. 3 seconds, you can open the basic settings. → "Changing basic settings", Page 24 Timer programming "Setting timer programming"...
-
Page 13: Overview Of Programmes
Overview of programmes Overview of programmes You can find an overview of the programmes that can be se- Additional function selected. The running time will change if Overview of programmes lected here. Different programmes, which can be found on the rinse aid system is switched off or rinse aid needs to be the control panel of your appliance, are available depending added. -
Page 14: Additional Functions
Additional functions Additional functions You can find an overview of the additional functions that can Additional functions ADDITIONAL FUNCTION be selected here. Different additional functions, which can Switch on with mixed loads con- ● be found on the control panel of your appliance, are avail- taining tableware with different IntensiveZone able depending on the appliance configuration. -
Page 15: Bottom Basket
Release the levers. Arrange cutlery with the points and sharp edges down- wards. The basket clicks into position. You can reorganise the cutlery drawer to make more space Slide the basket back in. for longer/wider items of cutlery. Bottom basket Reorganising cutlery drawer You can fold down the side shelves and front prongs to Arrange pans and plates in the bottom basket. -
Page 16: Etagere
You can fold the prongs down to position pans, bowls and glasses better. Folding down prongs If you do not need the prongs, fold them down. Push the lever forwards and fold down the prongs . Etagere Use the cutlery shelf and space underneath for small cups and glasses or for large items of cutlery, e.g. -
Page 17: Basket Heights
Basket heights Set the baskets at the right height. Appliance height 86.5 cm with cutlery drawer LEVEL TOP BASKET BOTTOM BASKET 1 max. ø 18 cm 33 cm/"34 cm" → Page 15 2 max. ø 20.5 cm 30.5 cm 3 max. ø 23 cm 28 cm Before first use Before first use... -
Page 18: Special Salt
Special salt Switching off the water softening system You can use special salt to soften water. If you find the special salt refill indicator irritating, e.g. when using combined detergents with salt replacement sub- Adding special salt stances, you can switch the indicator off. If the special salt refill indicator lights up, add special salt to Note the dispenser for special salt just before the programme... -
Page 19: Setting The Amount Of Rinse Aid
Setting the amount of rinse aid If there are streaks or water marks on tableware, change the amount of rinse aid. Press . To open the basic settings, press for 3 seconds. The display shows Hxx. The display shows ... -
Page 20: Unsuitable Detergents
Adding detergent With powder and liquid detergent the dosage can be indi- vidually adjusted to the level of soiling of the tableware. To open the detergent dispenser, press the locking latch. For better washing and drying results and to avoid damage to the appliance, please additionally use "Special salt"... -
Page 21: Tableware
Tableware Tableware Only clean tableware that is suitable for dishwashers. For better washing and drying results, position items with Tableware ● curves or recesses at an angle so water can run off. Note: Decorated glassware and parts made of aluminium or silver may fade or discolour with dishwashing. -
Page 22: Removing Tableware
Removing tableware To prevent water dripping on the tableware, unload it starting at the bottom and working up. Check the washing tank and accessories for soiling and WARNING clean if necessary. Risk of injury! → "Cleaning and servicing", Page 24 Hot tableware can cause burns to the skin. When hot, ●... -
Page 23: Basic Settings
Basic settings Basic settings You can configure the basic settings for your appliance to meet your needs. Basic settings Overview of basic settings The basic settings depend on the features of your appliance. BASIC SETTING DISPLAY TEXT SELECTION DESCRIPTION Water hardness H00 - H07 Set the water softening system to your water hardness. -
Page 24: Changing Basic Settings
BASIC SETTING DISPLAY TEXT SELECTION DESCRIPTION Automatic door opening o00 - o02 Activate or deactivate automatic opening of the appliance door during the drying phase. If the function has been activated, the run- ning time may increase. The following settings are possible: With the setting "o00"... -
Page 25: Filter System
PHASE REMOVAL OF DETERGENT PLACEMENT Food remnants and deposits Machine cleaner Detergent dispenser Filter system To ensure optimum cleaning performance, the programme doses the detergents independently of each another during The filter system removes coarse soiling from the dishwash- the relevant cleaning phase. Correct placement of the deter- ing cycle. -
Page 26: Cleaning Spray Arms
Cleaning spray arms Limescale and soiling in the dishwashing water may block the nozzles and bearings on the spray arms. Clean the spray arms regularly. Unscrew the upper spray arm and pull down to re- move . Press the locking catches together and lift the coarse filter out ... -
Page 27: Troubleshooting
Troubleshooting Troubleshooting You can rectify minor faults on your appliance yourself. Read the troubleshooting information before contacting after-sales Troubleshooting service. This will avoid unnecessary costs. WARNING Risk of electric shock! Incorrect repairs are dangerous. ● Repairs to the appliance should only be carried out by trained specialist staff. ●... - Page 28 FAULT CAUSE TROUBLESHOOTING E:32-00 will light up alternately or The flow rate must be at least 10 l/min when indicator for water supply lights up. the water supply is open. The filters in the water connection Switch off the appliance. of the supply or AquaStop hose are Pull out the mains plug.
-
Page 29: Washing Results
FAULT CAUSE TROUBLESHOOTING A different error code appears in A technical fault is present. Press the display window. Unplug the appliance or switch off the fuse. Wait at least 2 minutes. E:01-00 to E:90-10 Insert the mains plug of the appliance in a socket or switch on the fuse. - Page 30 FAULT CAUSE TROUBLESHOOTING Cutlery is not dry. Cutlery not arranged properly in Droplets can form on the cutlery contact points. the cutlery basket or cutlery "Arrange cutlery individually where possible." drawer. → Page 21 Avoid points of contact. Appliance interior still wet after Not a fault.
- Page 31 FAULT CAUSE TROUBLESHOOTING Water marks on plastic parts. Due to laws of physics droplet Select a more intensive programme. ● formation on plastic surfaces is un- → "Overview of programmes", Page 13 avoidable. After drying water marks Position tableware at an angle. ●...
- Page 32 FAULT CAUSE TROUBLESHOOTING Coloured deposits (yellow, orange, The formation of films is due to in- Check the setting of the water softening sys- brown) that are easy to remove are gredients of food remnants and tap tem. present inside the appliance water (limescale) "soaplike".
-
Page 33: Information On Display Panel
FAULT CAUSE TROUBLESHOOTING Detergent residue is present in the Spray arms were blocked by table- Check that the spray arms are not blocked ● detergent dispenser or the tablet ware so detergent was not rinsed and can rotate freely. collecting tray. out. -
Page 34: Mechanical Damage
FAULT CAUSE TROUBLESHOOTING Appliance stops during the pro- Arrange the tableware so that no parts pro- ● gramme or cuts out. ject beyond the basket and prevent the appli- ance door from closing properly. All LEDs lit up or flashing. Electronics have detected a fault. -
Page 35: Clean Wastewater Pump
Clean wastewater pump Lift the pump cover inwards at an angle and remove. You can now reach the impeller with your hand. Large remnants of food or foreign bodies can block the Remove any remnants of food and foreign bodies in the waste water pump. -
Page 36: Disposing Of Old Appliance
2.4 GHz band (2400–2483.5 MHz): Max. 100 mW 5-GHz band (5150–5350 MHz + 5470–5725 MHz): max. 150 mW Hereby, IKEA of Sweden AB declares that the appliance is in compliance with relevant statutory requirements. UK (NI) 5 GHz WLAN (Wi-Fi): For indoor use only. -
Page 37: Ikea Guarantee
This warranty is valid for five (5) years from the original date will be covered by IKEA . of purchase of your appliance at IKEA. The original sales re- Cost of carrying out initial installation of the IKEA appli- ●... -
Page 38: After-Sales Service
Note: It is your proof of purchase and required for the war- your appliance, please contact the hotline of your nearest ranty to apply. The sales receipt also shows the IKEA desig- IKEA store. Before contacting us, please read the appliance nation and article number (8-digit code) for each of the ap- documentation carefully. - Page 39 Po - Čt 8.30 - 18.00 Pá 8.30 - 17.00 Danmark 70150909 Lokal takst Mandag - fredag 9.00 - 20.00 Lørdag (Åbent udvalgte søndage, se IKEA.dk) 9.00 - 18.00 Deutschland 08912475328 Ortstarif 7 Tage die Woche 7.00 - 22.00 Ελλάδα...
- Page 40 23320 © Inter IKEA Systems B.V. 2023 AA-2361317-1...
Need help?
Do you have a question about the TORSBODA and is the answer not in the manual?
Questions and answers