
Subscribe to Our Youtube Channel
Related Manuals for ADIC SNC 6101


Summary of Contents for ADIC SNC 6101
- Page 1 6101 ® Installation and Maintenance Guide ADVANCED DIGITAL INFORMATION CORPORATION www.adic.com...
- Page 2 Copyright © 2003-2004 ADIC The information contained in this document is subject to change without notice. This document contains proprietary information which is protected by copyright. All rights are reserved. No part of this document may be photocopied, reproduced, or translated to another language without prior written consent of ADIC. ADIC shall not be liable for errors contained herein or for incidental or consequential damages (including lost profits) in connection with the furnishing, performance or use of this material whether based on warranty, contract, or other legal theory.
-
Page 3: Table Of Contents
SNC 6101 Front Panel Components ........ - Page 4 Before Changing the WWN on a Replacement SNC 6101 .......
-
Page 5: Introduction
This manual provides information and instructions that support the installation and operation of the Storage Networking Controller (SNC) 6101. Intended Audience This guide is intended for operators, administrators, and maintenance personnel who interact with the SNC 6101 hardware. Associated Documents The following documents are associated with this guide: •... -
Page 6: Environmental Notices And Statements
IEC 825-1 and FDA 21 CFR 1040.10 and 1040.11. This transceiver must be operated under recommended operating conditions. Usage Restrictions The optical ports on your SNC 6101 must be terminated with either the optical connectors on a Fiber Channel cable or a dust plug. Handling Electrostatic Discharge-Sensitive Parts You must follow established industry practices when handling Electrostatic Discharge (ESD) Sensitive Parts. -
Page 7: Getting More Information
If problems cannot be solved with the aid of this document or if training is desired, contact the ADIC Technical Assistance Center (ATAC). In the USA: In Europe and Japan: For other contact numbers: To open a Service Request online: SNC 6101 User’s Guide 800-827-3822 00-800-9999-3822 www.adic.com/contact www.adic.com/techsup... - Page 8 Introduction...
-
Page 9: Description
This chapter provides a basic overview of the SNC 6101. It describes its main features, illustrates a typical installation in a Scalar 100, identifies all user components available on its front panel, and lists important mechanical and electrical specifications. Overview An integrated SNC 6101 enables Scalar 100 customers to use and manage their library in a storage area network (SAN). -
Page 10: Configuration Support
The SNC 6101 processes SCSI-3 and SCSI-2 protocols for disk, tape, and tape medium changer devices. It can report the host and devices that are attached to its interfaces. The SNC 6101 has the capability to manage the access security between end points on the FC interface and the SCSI channels. -
Page 11: Access Security Capabilities
• The default settings allow all SAN connections to access all SCSI Channels. The channel zoning capability is always available to users of the SNC 6101. For more information, refer to the ADIC Management Console User’s Guide. Scalar Firewall Manager Scalar Firewall Manager (SFM) technology enables SANs with multiple users to share the same connectivity channels or pipes to access the same or different storage elements or resources. -
Page 12: Data Mover Module
The Data Mover Module is the engine for Server-Free backup and restore and HSM applications that support the Extended Copy Specification (ANSI T10/99-143r1). The Data Mover Module capability is always available to users of the SNC 6101. For more information, refer to the ADIC Management Console User’s Guide. -
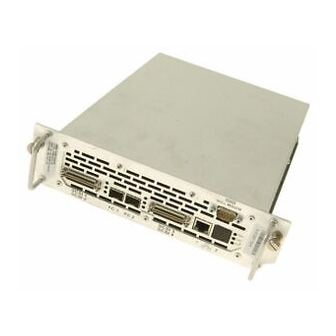
Page 13: Led Indicators
At the time of this printing, Ethernet port #2 is disabled internally. LED Indicators LEDs on the SNC 6101 front panel provide status and activity indicators for the SNC 6101 and its interface devices. Figure 2 below provides the names and locations of these LED indicators. -
Page 14: Specifications
1.64 kg (3.62 lbs) Power Consumption The SNC 6101 receives all its power from the Scalar 100. Maximum power consumption is 30 watts in active mode. SCSI channel termination power is drawn from the Scalar 100 drive sleds, not the SNC 6101. -
Page 15: Operating Environment
Management Console. Supported Platforms The SNC is platform-independent. You can connect a host to the SNC 6101 after you have installed the appropriate host bus adapter and drivers. You can also connect host systems with different operating systems to the SNC 6101 through FC. For a current list of supported platforms, configurations, and host bus adapters, see www.adic.com. - Page 16 Description...
-
Page 17: Installation
This section provides field procedures for installing and configuring the SNC 6101 for operation with the Scalar 100. At the completion of these procedures, your SNC 6101 will be: • mounted in the Scalar 100 Refer to the section To install the SNC 6101 •... -
Page 18: Unpacking And Inspecting
Verify HBA operation with the SNC 6101. Unpacking and Inspecting To unpack and inspect the SNC 6101 following delivery Remove all items from the shipping carton. Save the packing materials in case it is necessary to move or ship the SNC Note 6101 in the future. -
Page 19: Pre-Installation
DB9 serial crossover (null modem) cable • CD with Scalar 100 documentation and a CD with SNC 6101 documentation and software At this time, either fill out and mail the registration card or register the SNC 6101 online at www.adic.com. Pre-Installation... -
Page 20: Installing The Snc 6101 In A Scalar 100
Position the SNC 6101 module as shown in modem ports are positioned at the top. Align the top and bottom rails of the SNC 6101 with those on the Scalar 100 and slide the module into the chassis until it is flush. -
Page 21: Cabling The Snc 6101
Determine your system’s SCSI cable requirements by referring to Table 2 on page 18, and These figures illustrate the SNC 6101 with the maximum number of drives Note installed. If your system configuration contains fewer drives, always install drives in order, beginning at the bottom (drive 1). - Page 22 Route your cables according to the configuration scheme provided in either Figure 7 SCSI Cabling for LTO and SDLT Drives Table 2 Cable Routing for LTO and SDLT Drives SNC 6101 Library/ SCSI 1 terminator Drive 1 SCSI 2 Drive 3...
- Page 23 Table 3 Cable Routing for AIT Drives SNC 6101 Library SCSI 1 Drives 3 & 4/terminator SCSI 2 Drives 5 & 6/terminator SCSI 3 Drives 7 & 8/terminator SCSI 4 SNC 6101 User’s Guide Drives 1 & 2/terminator...
- Page 24 Note updating SNC 6101 firmware. Plug one end of your Ethernet cable into the RJ-45 1 port of the SNC 6101 (RJ-45 2 is disabled). Refer to “Ethernet ports” illustrated in Plug the other end of this cable into your Ethernet LAN. See...
-
Page 25: Configuring The Snc 6101
Configuring the SNC 6101 You can configure the SNC 6101 as soon as you have installed it in the Scalar 100 and all appropriate cables are in place. Configuration defines these values for the SNC 6101: • IP address and subnet mask •... - Page 26 Power up the Scalar 100 and wait until the startup initialization process completes. Within a few minutes, the RDY LED on the SNC 6101 will start flashing once per second and the Done executing startup script message will appear on your service terminal.
- Page 27 0 IBM ULTRIUM-TD2 ======================================== where • SCSI Initiator Channel identifies each of the four SCSI ports on the SNC 6101 (SCSI 1 - SCSI 4) • ID is the SCSI address of the device connected to that port • Product identifies the device located at that address SNC 6101 User’s Guide...
- Page 28 (as needed) are assigned to the tape drives. Drive “1” always begins as the bottom drive. See installation of all your cable connections and terminators. Set the IP address for the SNC 6101 using the following command: ethAddrSet "ip_address","subnet_mask" where “ip_address“ and “subnet_mask“ are replaced with actual values, for example: ethAddrSet "192.168.1.2","225.225.225.0"...
-
Page 29: Updating Snc 6101 Firmware
Updating SNC 6101 Firmware The SNC 6101 should always contain the latest firmware from ADIC. Use the service port to identify the installed firmware version by typing version. Check available. If an upgrade is available, download the newer version (user name and password required) and... -
Page 30: Installing The Host Bus Adapter Card
C. Open the command line window on the host. At the command line prompt, use ping to verify your Ethernet connection to the SNC 6101: ping [SN6101 IP address] where [SN6101 IP address] is the assigned IP address for your SNC 6101, for example: ping 192.168.1.2... - Page 31 When directly attaching the Scalar 100 to a host, plug the opposite end of the FC cable attached to the SNC 6101 into the HBA on the host. For SAN fabric environments, route a FC cable from the host HBA to the desired FC port on the SAN switch.
-
Page 32: Verifying Snc 6101 Operation
Verifying SNC 6101 Operation Use the following procedures to verify SNC 6101 connections and configure the FC port, SNMP traps, and e-mail alerts. Use the ADIC Management Console. For more information, refer to the ADIC Management Console User’s Guide. Using the ADIC Management Console, confirm that all attached devices are displayed under each channel. -
Page 33: Scalar Firewall Manager
SNC 6101. • SFM manages access for hosts connected through FC switches to the SNC 6101. The SNC 6101 supports up to 2048 LUNs across all of its interfaces. It has a virtual limit of how many hosts (HBAs or Initiators) are connected to each port. -
Page 34: Host Registration Service
HRS is also used to monitor the status of hosts connected to the library. When the SNC 6101 receives an HRS pulse from a host, the host is displayed in the AMC as “online.” If the SNC 6101 does not receive two consecutive HRS pulses, the host will be listed as “offline.”... -
Page 35: Adding And Removing Hosts
When you attach a new host to the SAN, SFM automatically detects the host and adds it to the SFM database. When you connect or refresh the SNC 6101 from the ADIC Management Console, you can see the new host in the SFM Access Settings window. If the Host Registration Service is running on the host, SFM automatically obtains the host parameters. -
Page 36: Combining Sfm With Channel Zoning
FC port 1 of the SNC, and SCSI channels 3 and 4 to be accessible through FC port 2. This ensures that data traffic is split across the SNC 6101 SAN interfaces. SFM is configured as usual, but the administrator must be aware that SFM does not override channel zoning. -
Page 37: Maintenance
Note different cable or an adapter may be required. Once the service terminal has been attached to the SNC 6101 service port, a terminal emulation program will be required to access the command line interface. Configuration commands that are available to control, manage, and service the Note SNC 6101 are documented in SNC Firmware 4 User’s Guide. -
Page 38: Verifying The Terminal Connection
Verifying the Terminal Connection When the SNC 6101 is turned on, you can see all characters typed in the terminal. The simplest test is to press Enter. The SNC responds by displaying a command prompt. SNC6101 > For additional commands that are available to control, manage, and service the SNC 6101, refer to the SNC Firmware 4 User’s Guide. -
Page 39: Using Telnet
No other administrator is accessing the SNC 6101 through telnet To open a session to the SNC 6101, start telnet and enter open x.x.x.x where x.x.x.x is the IP address of the SNC 6101. You could also type telnet x.x.x.x. -
Page 40: Removing And Replacing The Sfp
Plug the Fibre Channel cables back in, ensuring the correct polarity. Removing and Replacing the SNC 6101 If a repair action is required for the SNC 6101, you should follow these replacement steps. Shut down the host systems to ensure that all I/O through the SNC CAUTION 6101 has stopped. -
Page 41: Replacing The Snc 6101
Remove the SNC 6101 from its protective bag. Install it in the Scalar 100 according to the steps available in If it is not imperative for the replacement SNC 6101 to have a WWN identical to the replaced SNC 6101, proceed to the... -
Page 42: Changing The Wwn For All Fc Ports
Changing the WWN for all FC Ports Use the following procedure when replacing the SNC 6101 and it is critical that the replacement SNC 6101 uses the same WWN. -
Page 43: Changing A Wwn For One Fc Port
Changing a WWN for one FC port Use the following procedure when you replace another vendor’s appliance with an SNC 6101 and it is critical that one of the replacement SNC FC ports retain the same WWN as the FC port of the replaced appliance. -
Page 44: Clearing Changes To The Wwn For All Fc Ports
Clearing Changes to the WWN for one FC Port Use this procedure when you are removing an SNC 6101 with the WWN on one port changed to match the WWN of a pre-existing unit. -
Page 45: Final Diagnostic Tests
The output in the Node Name column of the of the fcShowNames command should no longer match the output previously saved before using wwnGlobalClear. Final Diagnostic Tests After a SNC 6101 has been replaced, a diagnostic check should be performed to ensure that it now operates properly. Final Test Preparation Connect a service terminal to the SNC 6101. -
Page 46: Ethernet Test
Remove the Ethernet loop back plug. Network Setup for the SNC 6101 The SNC 6101 must be connected to a 10/100-base-T Ethernet network for use with the ADIC Management Console software. For more information, refer to the ADIC Management Console User Guide. -
Page 47: Post-Repair Checklist
Post-Repair Checklist To ensure a successful SNC 6101 installation, it is important that the items in this checklist be verified after you have completed the replacement process. Table 5 Post Replacement Checklist Step Actions Install the replacement SNC 6101 in the Scalar 100. - Page 48 Host systems. Use the fcShowNames command and save the configuration values at a location easily accessed if the SNC 6101 fails. Disconnect the RS-232 cable from the and from the service terminal. End of repair.
- Page 49 HyperTerminal ..... . . 21 SNC 6101 ......21 connector, VHDCI .
- Page 50 ..... . .16 firmware, SNC 6101 ..... .15 firmware, updating .
- Page 51 SFP ....... 36 SNC 6101 ......36 replacement procedures .
- Page 52 Index...
Need help?
Do you have a question about the SNC 6101 and is the answer not in the manual?
Questions and answers