Table of Contents
Advertisement
Quick Links
HC 402 EU/MK • Setup Guide
HC 402 System
The Extron HC 402 EU and HC 402 MK systems are AV presentation solutions that incorporate a built-in control processor for
display control via HDMI Consumer Electronics Control (CEC), RS-232, IR, or Ethernet. Each system also includes digital I/O ports.
Each system is a transmitter-receiver pair that is factory-optimized to work together as if it were a single unit.
Together each transmitter-receiver system extends video, audio, and control signals up to 230 feet (70 m) over a single CAT x cable.
Each system offers two auto-input switching modes, one of which automatically selects sources based on input signals and also
allows manual source selection via buttons. Auto-switching modes can be enabled or disabled via Extron Product Configuration
Software (PCS). The "last connected" auto-switching mode is enabled by default.
The HC 402 EU and HC 402 MK each feature two AV inputs and one output. Each consists of a one-input transmitter (HCT 101 EU
or HCT 101 MK) and a scaling receiver (HCR 102) that has one HDMI input and one connection from the transmitter. The transmitter
can be mounted into a standard EU or MK 1-gang junction box. The receiver is wall, furniture, or rack mountable.
Transmitter
The HCT 101 EU or HCT 101 MK transmitter includes one digital (HDMI) video
input and one analog audio input. The extended HDMI video signal can be
HDCP-compliant.
Receiver
The HCR 102 receiver incorporates a high performance, HDCP compliant scaler
that scales video to provide a consistent output resolution to a display. It accepts
video with resolutions from 480i up to 1920x1200, 1080p, and 2K, and performs
upscaling and downscaling with multiple output rates up to 1920x1200, including
HDTV 1080p/60 and 2K. The receiver includes an on-screen display, test
patterns, and EDID Minder.
This guide provides instructions for an experienced installer to install the HCT 101 EU or HCT 101 MK and the HCR 102. The guide
provides information needed to configure the most essential settings for the system and the receiver. It also describes basic
operations using front panel controls and the on-screen display (OSD) menu system. Full details are available in the HC 400
Series User Guide.
Room
Wireless Access
Point
Ethernet
TCP/IP
Network
Ethernet
POWER
INPUT
OUTPUT
CONTACT / TALLY
OUTPUT
COM
12V
AUDIO
1.7A MAX
1
2
3
4
L
R
RS-232
HDMI
HDMI
C T
C T
C T
C T
G +V
Tx Rx G
Extron
ShareLink Pro 1000
HDMI
Wireless and Wired
Collaboration
Gateway
INPUTS
POWER
12V
1
2.0 A MAX
HCR 102
Scaling Receiver
HCT 101 EU
Transmitter
Side
An HC 402 System Application
Figure 1.
MODEL 80
Tablet
LAN
RESET
A/PoE
B
HDMI,
CEC
SIG
LINK
OUTPUTS
TP
HDMI
IN
HDMI/CEC
Twisted Pair Cable (AV)
230'
e
Front
FLAT PANEL
Display
COM
IR
DIGITAL I/O
AUDIO
L
R
Tx Rx G
S G
1
2
G
3
4
G
HDMI IN
HDMI
HCT 101 EU
HCT 101 MK
HCR 102
PC with
GlobalViewer
Enterprise
TCP/IP
Extron
Network
OCS 100W
Wall Mount
Occupancy
Ethernet
Sensor
HCR 102
LAN
1
Advertisement
Table of Contents

Related Manuals for Extron electronics HC 402 EU


Summary of Contents for Extron electronics HC 402 EU
- Page 1 HC 402 EU/MK • Setup Guide HC 402 System The Extron HC 402 EU and HC 402 MK systems are AV presentation solutions that incorporate a built-in control processor for display control via HDMI Consumer Electronics Control (CEC), RS-232, IR, or Ethernet. Each system also includes digital I/O ports.
-
Page 2: Panels And Features
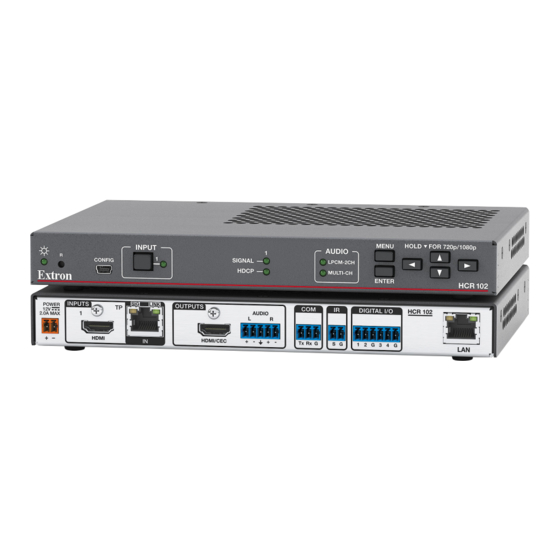
HC 402 EU/MK • Setup Guide (Continued) Panels and Features Front Panel Features HCR 102 MENU HOLD FOR 720p/1080p INPUT AUDIO SIGNAL LPCM-2CH CONFIG HDCP MULTI-CH ENTER HCR 102 HCR 102 Front Panel (Above), Figure 2. HCT 101 EU and HCT 101 MK Front Panels (Right) - Page 3 Rear and Side Panel Features 00-05-A6-XX-XX-XX MAC: 00-05-A6-XX-XX-XX HCR 102 Rear S/N: ####### E###### DIGITAL I/O INPUTS LINK OUTPUTS POWER HCR 102 AUDIO 2.0A MAX HDMI HDMI/CEC Tx Rx G Figure 3. HCR 102 Rear Panel Power input connectors, page 13 HDMI input connectors, page 10 Transmitter output...
-
Page 4: Installation And Configuration
HC 402 EU/MK • Setup Guide (Continued) Installation and Configuration ATTENTION: • Installation and service must be performed by experienced personnel. • L’installation et l’entretien doivent être effectués par du personnel expérimenté. Step 1 — Get Ready Familiarize yourself with the features of the transmitter and receiver (see... -
Page 5: Step 4 - Connect Power
ATTENTION: • If the HCT will be installed into fine furniture, it is best to hire a licenced, bonded craftsperson to cut the access hole and perform the physical installation so the surface will not be damaged. • S’il est prévu d’installer le HCT dans du beau mobilier, il est préférable de faire appel à un artisan autorisé et qualifié pour couper le trou d’accès et réaliser l’installation de telle façon que la surface ne soit pas endommagée. -
Page 6: Step 5 - Configure Network Settings
HC 402 EU/MK • Setup Guide (Continued) Step 5 — Configure Network Settings You can configure the basic network settings in one of the following ways: • Via front panel controls and the OSD menu — a quick method you can use whether or not you need to configure other... - Page 7 To configure network settings using Toolbelt: Connect the PC that you will use for setup and the HCR 102 receiver to the same network, and apply power to all devices. For details on the LAN connection, see on page 12. Start Toolbelt. Start device discovery from within Toolbelt.
-
Page 8: Step 7 - Configure The Control Settings
HC 402 EU/MK • Setup Guide (Continued) Using the OSD menu to configure the AV settings • Use the Quick Setup submenu to set input EDID settings, set output resolution, mute audio, activate video test patterns, enable or disable DHCP, and set the IP address. - Page 9 Step 8 — Test and Troubleshoot the System Test the system. See the HC 400 Series User Guide for an outline of the system testing procedure. Make adjustments to wiring or configuration as needed. Step 9 — Mount the HCT 101 EU or HCT 101 MK NOTE: Extron recommends taking Wall Box...
- Page 10 HC 402 EU/MK • Setup Guide (Continued) Cabling Attach cables using the wiring diagrams on the following pages as a guide. Full details are available in the HC 400 Series User Guide. AV Inputs Digital AV input For HDMI video and for digital audio embedded within HDMI signals:...
- Page 11 AV Outputs Connect a display, projector, or other AV device to the Outputs HDMI/CEC connector (see figure on page 3) on the receiver rear panel for HDMI AV output. Connect the cable and install the LockIt bracket (see step 2 within Digital AV input on the previous page) in the same method as for the HDMI inputs.
- Page 12 HC 402 EU/MK • Setup Guide (Continued) Digital I/O To use digital input or output to control other devices, provide Connect the receiver to a network via the LAN port ( feedback to the receiver, or trigger actions, connect devices to...
- Page 13 Power ATTENTION: • Always use a power supply supplied or specified by Extron. Use of an unauthorized power supply voids all regulatory compliance certification and may cause damage to the supply and the unit. • Utilisez toujours une source d’alimentation fournie par Extron. L’utilisation d’une source d’alimentation non autorisée annule toute conformité...
-
Page 14: Locking The Front Panel (Executive Mode)
HC 402 EU/MK • Setup Guide (Continued) Front Panel Operation and Indications Input Selection and Indication Input selection button and LED figure To select an input from the receiver front panel, push the input 1 button (see , on page 2) to select the input connected to receiver input 1. -
Page 15: Obtaining Control Drivers
Reset Modes: a Brief Summary The HCR 102 receiver offers the following reset modes: Use Factory Firmware: figure • Press and hold the receiver front panel Reset button (see on page 2 for location) while applying power to the unit. Keep holding the button down until the Power LED ( ) blinks twice, or for 6 seconds, then release the button. -
Page 16: Locating Software, Firmware, And Driver Files On The Extron Website
HC 402 EU/MK • Setup Guide (Continued) Locating Software, Firmware, and Driver Files on the Extron Website There are three main ways to find software, firmware, and device drivers within www.extron.com: • Via links from the web page for the specific product •...
Need help?
Do you have a question about the HC 402 EU and is the answer not in the manual?
Questions and answers