Advertisement
Quick Links
Download this manual
See also:
User Manual
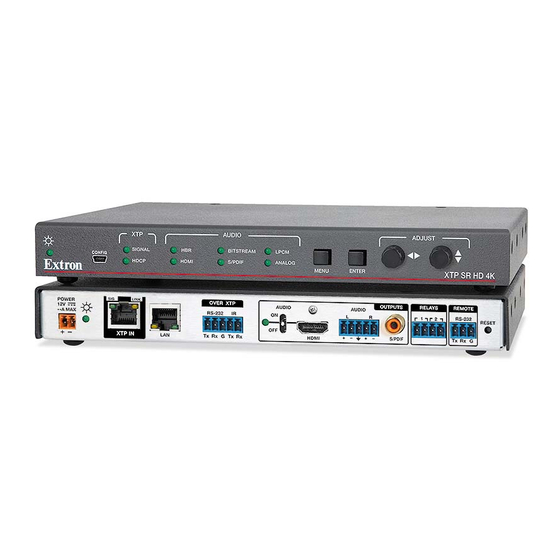
XTP SR HD 4K • Setup Guide
The Extron XTP SR HD 4K is a scaling
receiver for extending video, audio,
bidirectional RS-232 and IR control, and
Ethernet over a shielded twisted pair cable.
This guide provides instructions for an
experienced installer to install and connect
the XTP SR HD 4K scaling receiver.
Power and Throughput Connections
DC power connector and power LED
A
B
XTP input connector and LEDs
LAN connector and LEDs
C
RS-232 and IR Over XTP connector
D
Figure 1.
Rear Panel Features
Installation
Before starting, turn off or disconnect all equipment power sources and mount the XTP SR HD 4K on a table top or in a rack.
Output Connections
Connect a digital video display to the female HDMI connector (
1.
NOTE:
Use an Extron LockIt
Connect a balanced or unbalanced, stereo or mono audio output device to the 3.5 mm, 5-pole captive screw connector (
2.
for 2-channel stereo analog audio (see
Connect an audio device to the female orange RCA connector for digital S/PDIF audio output (
3.
XTP Interconnections
Connect a shielded twisted pair cable between the XTP input connector on the receiver (
1.
an XTP twisted pair transmitter or XTP matrix switcher. For cable recommendations, see
for XTP Communication
ATTENTION:
Do not connect this connector to a computer data or telecommunications network.
Connect a control or controllable device to the LAN RJ-45 connector (
2.
indicate link and activity status.
To pass bidirectional serial or infrared signals to a control or controlled device, connect the device to the RS-232 and IR Over
3.
XTP connector (
). For wiring details, see
D
Control Devices, Relays, and Power Connections
Connect a host device, such as a computer, to the front panel female USB mini-B connector (see
1.
to the right) of the receiver to configure the device or update firmware.
Connect the equipment controlled via momentary or latching contact, like projector screens or lifts,
2.
to these normally open relays (
For serial control of the receiver, connect a host device to the remote RS-232 3.5 mm, 3-pole captive
3.
screw connector (
I
Power the device in one of the following methods:
4.
Connect the provided external power supply to the 2-pole captive screw connector (
•
Connect an XTP power injector to the XTP twisted pair interconnection between the XTP SR HD 4K and a locally
•
powered XTP transmitter or XTP matrix switcher (see the XTP power injector user guide at www.extron.com),
Connect the XTP SR HD 4K to an XTP matrix switcher and enable remote power on the XTP matrix switcher.
•
A
POWER
12V
1.4A MAX
Output Connections
HDMI output connector and HDMI
E
audio switch
Analog audio output connector
F
S/PDIF digital audio output connector
G
Lacing Bracket to secure an HDMI cable to the rear panel connector.
®
Audio Wiring
on the next page.
RS-232 and IR Over XTP Communication
). Do not exceed 24 V at 1 A for each port.
H
).
B
C
D
SIG
LINK
OVER XTP
RS-232
IR
OFF
XTP IN
LAN
Tx
Rx G
Tx
Rx
).
E
on the next page for wiring details).
) to pass 10/100 Ethernet communication. The LEDs
C
E
F
G
H
OUTPUTS
RELAYS
AUDIO
AUDIO
ON
L
R
1
+
−
+
−
S/PDIF
HDMI
Control Connections
Relay connectors
H
I
Remote RS-232 connector
).
G
) and an XTP output connector on
B
Twisted Pair Recommendations
on the next page).
J
) for local power.
A
I
REMOTE
RS-232
2
RESET
Tx Rx G
)
F
SIGNAL
SIGNAL
CONFIG
HDCP
HDCP
J
1
Advertisement

Related Manuals for Extron electronics XTP SR HD 4K


Summary of Contents for Extron electronics XTP SR HD 4K
-
Page 1: Output Connections
Rear Panel Features Installation Before starting, turn off or disconnect all equipment power sources and mount the XTP SR HD 4K on a table top or in a rack. Output Connections Connect a digital video display to the female HDMI connector (... -
Page 2: Front Panel Overview
Pin Wire Color Wire color Wire color White-green White-orange White-orange The XTP SR HD 4K is compatible with shielded twisted pair (F/UTP, SF/UTP, and S/FTP) Green Orange Orange cable. Extron recommends using the following practices to achieve full transmission White-orange White-green distances up to 330 feet (100 meters) and reduce transmission errors. -
Page 3: Hdmi Audio
XTP System Configuration Software The XTP SR HD 4K can be configured by the XTP System Configuration Software when it is installed on a connected host device, such as a PC, through the front panel USB port (see the XTP SR HD 4K User Guide for more details). - Page 4 ZXXX NOTE: = Output rate (see the table below for selected values or the XTP SR HD 4K User Guide for a full list) (37 = default) = Volume (0-64, where 0 = 0% and 64 = 100%, default) = Aspect ratio (1 = fill [default], 2 = follow)
Need help?
Do you have a question about the XTP SR HD 4K and is the answer not in the manual?
Questions and answers