Table of Contents
Advertisement
Quick Links
Advertisement
Table of Contents

Subscribe to Our Youtube Channel
Related Manuals for Insportline Delavan UB


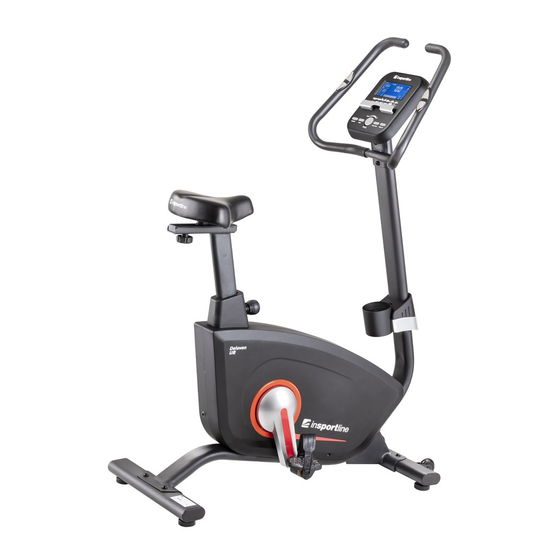
Summary of Contents for Insportline Delavan UB
- Page 1 USER MANUAL – EN IN 20073 Exercise bike inSPORTline Delavan UB...
-
Page 2: Table Of Contents
CONTENTS SAFETY INSTRUCTIONS ........................3 IMPORTANT NOTES ..........................3 PARTS LIST ............................4 DIAGRAM ..............................6 ASSEMBLY ............................. 8 CONSOLE ............................. 12 PROGRAMS ............................13 TROUBLESHOOTING .......................... 15 USE ............................... 15 EXERCISING INSTRUCTIONS ......................16 CORRECT BODY POSTURE ....................... 17 MAINTENANCE ............................ -
Page 3: Safety Instructions
SAFETY INSTRUCTIONS • To ensure the best safety of the exerciser, regularly check it on damages and worn parts. • If you pass on this exerciser to another person or if you allow another person to use it, make sure that that person is familiar with the content and instructions in these instructions. •... -
Page 4: Parts List
• Be sure to set up the exerciser in a dry and even place and always protect it from humidity. If you wish to protect the place particularly against pressure points, contamination, etc., it is recommended to put a suitable, non-slip mat under the exerciser. •... - Page 5 Spring washer Ø6 Left pedal Right pedal Nut M6 Seat post cover Screw ST2.9*12 Knob M16x1.5 Flywheel Knob M10 Screw with eyelet M6*36 Big washer Ø8* Ø20*2.0 U shaped bracket Screw M8*35 Spring washer Nut M6 Nut M10*1.25 Nut M10*1.0*6 Cover Screw with eyelet M8*110 Sensor cable 300 mm...
-
Page 6: Diagram
DIAGRAM... -
Page 8: Assembly
ASSEMBLY STEP 1 Attach the leveling feet (19) to the front and rear stabilizer (2 and 7). Remove the 2 screws (15), 2 washers (16) from the front stabilizer. Attach the front stabilizer (2) to the front of the main frame (1) with 2 screws (15) and 2 washers (16) Remove the 2 screws (15), 2 washers (16) from the rear stabilizer. - Page 9 STEP 3 Remove the 3 nuts (35), 3 washers (34) from the seat (36). Attach the seat (36) to the seat slider (4) with 3 nuts (35) and 3 washers (34). Remove the knob (27) and washer (28) from the seat slider (4). Attach the seat slider (4) to the seat post (3) using the knob (27) and washer (28).
- Page 10 KROK 4 Remove the 4 screws (15), 2 washers (16), 2 washers (33) from the main frame (1). Connect the sensor cable (17) from the main frame (1) to the cable (9) from the handlebar post (5). Attach the bottle holder - A (40) to the Bottle Holder - B (71). Slide the bottle holder A / B (71/40) onto the main frame (1).
- Page 11 STEP 6 Remove the screws (9) from the console (8). Connect the cables (13) and (10) to the console (8). Insert excess cables into the handlebar post. Attach the console (8) to the handlebar post (5) with 4 screws (9). Plug the AC adapter (39) into the power supply (38) on the left.
-
Page 12: Console
CONSOLE BUTTONS START/STOP (ST/SP) Starts / stops the program Starts body fat test DOWN Reduces value or load Increases value or load MODE (ENTER) Confirm the value Change the displayed function TEST (PULSE, RECOVERY) Physical test RESET * Resets the setting, holding down the button for 3 seconds resets all values BODY FAT * Body fat program... -
Page 13: Programs
PROGRAMS MANUAL PROGRAM (P1) Select Manual with the UP and DOWN buttons. Press MODE to confirm. The first parameter TIME starts flashing. Set the value using the UP and DOWN buttons. Confirm with MODE (ENTER). Save and set another value. After setting all values, press START / STOP to start the program. When any parameter set reaches 0, a beep sounds and the program stops. - Page 14 TARGET HEART RATE PROGRAM (P11) Choose TARGET H.R program. The first parameter TIME starts flashing. Set the value using the UP and DOWN buttons. Confirm with MODE (ENTER). Save and set another value. After setting all values, press START / STOP to start the program If the pulse is ±...
-
Page 15: Troubleshooting
POWER CONNECTION Plug the adapter into the device and then into the wall outlet. The console displays all data and a beep sound. CONSOLE ERRORS ERROR 1 – poorly connected cables, poor contact or damaged motor ERROR 2 – no pulse detected through pulse measurement plates during BODY FAT TROUBLESHOOTING Error Solution... -
Page 16: Exercising Instructions
number of burned calories may seem low, but regular and appropriate exercise is the key to achieving the best results. Exercise on the exercise bike also leads to the formation of muscles. It is mainly used to strengthen the thigh and calf muscles. While exercising on a bicycle, you also move your buttocks. If you want to exercise right, you should not forget to breathe properly. -
Page 17: Correct Body Posture
CORRECT BODY POSTURE When training, keep your body upright, or you can learn your hand on your forearms. During pedaling, you should not have your legs fully extended. Your knees should be slightly bent when fully pressing down the pedal. Keep your head straight with your spine to minimize the pain of the cervical muscles and upper back muscles. -
Page 18: Terms And Conditions Of Warranty, Warranty Claims
TERMS AND CONDITIONS OF WARRANTY, WARRANTY CLAIMS General Conditions of Warranty and Definition of Terms All Warranty Conditions stated hereunder determine Warranty Coverage and Warranty Claim Procedure. Conditions of Warranty and Warranty Claims are governed by Act No. 89/2012 Coll. Civil Code, and Act No. - Page 19 is eligible to require a compensation for all the costs arising from the repair. The cost shall be calculated according to the valid price list of services and transport costs. If the Seller finds out (by testing) that the product is not damaged, the Warranty Claim is not accepted. The Seller reserves the right to claim a compensation for costs arising from the false Warranty Claim.
Need help?
Do you have a question about the Delavan UB and is the answer not in the manual?
Questions and answers