Table of Contents
Advertisement
Quick Links
Advertisement
Table of Contents

Subscribe to Our Youtube Channel
Related Manuals for Insportline Delavan RMB


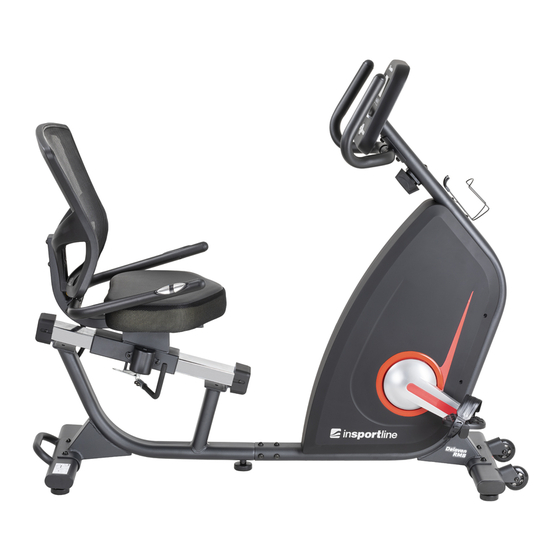
Summary of Contents for Insportline Delavan RMB
- Page 1 USER MANUAL – EN IN 20074 Recumbent inSPORTline Delavan RMB...
-
Page 2: Table Of Contents
CONTENTS SAFETY INSTRUCTIONS ........................3 IMPORTANT NOTES ..........................4 PARTS LIST ............................5 DIAGRAM ..............................7 ASSEMBLY ............................. 9 CONSOLE ............................. 14 EXERCISING INSTRUCTIONS ......................14 TROUBLESHOOTING .......................... 15 ADVANTAGES OF RECUMBTION ....................... 15 MAINTENANCE ............................ 16 STORAGE ............................. 16 IMPORTANT NOTICE ........................... -
Page 3: Safety Instructions
SAFETY INSTRUCTIONS • To ensure the best safety of the exerciser, regularly check it on damages and worn parts. • If you pass on this exerciser to another person or if you allow another person to use it, make sure that that person is familiar with the content and instructions in these instructions. •... -
Page 4: Important Notes
IMPORTANT NOTES • Assemble the exerciser as per assembly instructions and be sure to only use the structural parts provided with the exerciser and designed for it. Prior to the assembly, make sure the contents of the delivery is complete by referring to the parts list of the assembly and operating instructions. -
Page 5: Parts List
PARTS LIST Description Description Handlebar Foam Grip φ24*φ30*450 Main frame - front Main frame - rear Pulse sensor Wire (L=750 mm) Front Handlebar Post Screw ST4.2*20 Plug Ф12.1 Front Stabilizer Rear Stabilizer Handlebar Round End Cap Sliding tube Screw M8*45 Arc washer Ф8xФ20x2.0 Rear Handlebar Washer Ф8xФ16x1.5... - Page 6 Screw M5*35 Belt PJ440 Screw M6*12 Flywheel Bottle holder Nut M10 * 1,0 * 6 Screw ST4.8*15 Screw wit eyelet M6x36 Crank Cover U-Shaped Gasket Nut M10*1.25*9 Screw M8 * 18 Left Crank Idle Wheel Bracket Right Crank Idle Wheel Left Rear Chain Cover Nut M8 Right Rear Chain Cover...
-
Page 7: Diagram
DIAGRAM... -
Page 9: Assembly
ASSEMBLY STEP 1 Attach the leveling feet (46) to the front and rear stabilizer (4 and 5) Remove the 4 screws (49), 4 washers (48) from the front and rear stabilizer (4 and 5) Secure the rear stabilizer (5) to the rear frame (2) with 2 screws (49), 2 washers (48). Tighten with Allen key S6. - Page 10 STEP 2 Remove the 8 screws (44), 4 washers (36), 4 washers (37) from the rear frame. Connect the cables (55) from the front frame (1) to the cable (42) from the rear frame (2). Connect the front frame (1) and rear frame (2) with the 8 screws (44), 4 washers (36), 4 washers (37) that you removed from the rear frame.
- Page 11 STEP 4 Attach the seat (10) to the seat and backrest support (8) with the 4 screws (12) and 4 washers (13) removed from the seat (10). Attach the backrest (11) to the seat and backrest support (8) using the 4 screws (14) and 4 washers (13) that have been removed from the backrest (11).
- Page 12 STEP 5 Attach the rear handlebar (7) to the seat and backrest support (8) using the 2 screws (35), 2 washers (37) and 2 nuts (38). Connect the cable (42) from the rear frame (2) to the pulse sensor cable (31) from the rear handlebar (7).
- Page 13 STEP 7 1. Console attachment Remove the 4 screws from the console (59). Attach the cable from the Tension Control Knob (61) to the load adjustment cable hook. Connect the sensor cables (56) and pulse (55) from the front frame (1) to the cables from the front frame (59). Insert excess cables into the frame (1).
-
Page 14: Console
CONSOLE BUTTONS MODE Press to change the displayed information or confirm RECOVERY Outside the training the button is used to return or exit settings. Increases the value in the setting DOWN The setting will decrease the value RESET In display mode, it resets the values FUNCTION SPEED/BODY FAT RATIO Display current speed 0.0–99.9 km/h or mile/h. -
Page 15: Troubleshooting
Hamstring stretched Sit and outstretch your right leg. Rest the sole of your left foot against the inside of your right tight. Stretch out your right arm along your right leg as far as you can. Hold for 15 seconds and relax. Repeat all with your left leg and left arm. -
Page 16: Maintenance
MAINTENANCE • Clean with a soft cloth and a non-aggressive cleaner. • Do not use aggressive cleaning agents. • Only wipe the electrical parts with a cloth. Avoid contact with water. STORAGE Keep the recumbent in a clean and dry environment. Make sure the power switch is turned off and the exercise bike is not plugged into the power socket. - Page 17 “The Buyer who is the End Customer” or simply the “End Customer” is the legal entity that does not conclude and execute the Contract in order to run or promote his own trade or business activities. “The Buyer who is not the End Customer” is a Businessman that buys Goods or uses services for the purpose of using the Goods or services for his own business activities.
- Page 18 handed over to the Buyer is considered to be the day of the Warranty Claim settlement. When the Seller is not able to settle the Warranty Claim within the agreed period due to the specific nature of the Goods defect, he and the Buyer shall make an agreement about an alternative solution. In case such agreement is not made, the Seller is obliged to provide the Buyer with a financial compensation in the form of a refund.
Need help?
Do you have a question about the Delavan RMB and is the answer not in the manual?
Questions and answers