
Subscribe to Our Youtube Channel
Related Manuals for SWIT BM-U Series


Summary of Contents for SWIT BM-U Series
- Page 1 SWIT ELECTRONICS CO., LTD. BM-U 4K High Definition Monitor Model: BM-U175/245/245HDR/275HDR/315/325/325HDR/316HDR User Manual Please read this user manual throughout before using Ver: A...
- Page 2 All internal technologies of this product are protected, including device, software and trademark. Reproduction in whole or in part without written permission is prohibited. All brands and trademarks of SWIT Electronics Co., Ltd. are protected and other relative trademarks in this user manual are the property of their respective owners.
- Page 3 Maintenance Warning 1. In order to reduce the risk of fire and electrical shock, do not lay this product in rain or damp places. 2. Please keep away from the strong magnetic field; it may cause the noise of the video and audio signals.
-
Page 4: Table Of Contents
Contents Preface. Maintenance Contents Packing List Introduction Operation Introduction Front panel Rear panel Main Menu Size Specification Trouble-Shooting Packing list Standard package Details Monitor User manual Warrantee card Battery plate ( V-mount or Gold-mount) Tabletop stand Power cord ※ Only BM-U175/BM-U245/BM-U245HDR are equipped with battery gusset plate. Introduction This series of monitors adopt TFT-LCD panel, the resolution is up to 3840×2160, H178°... -
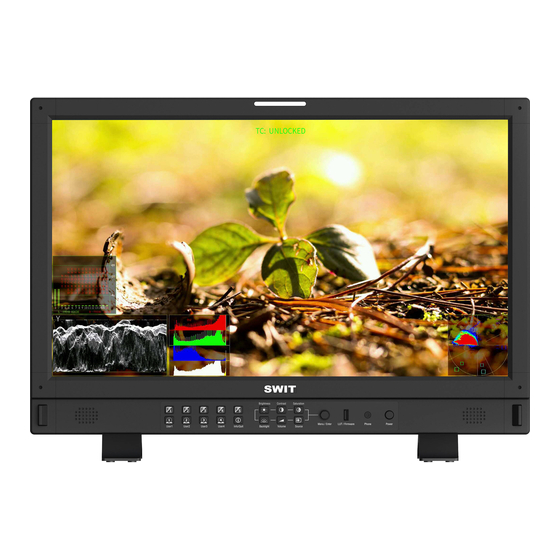
Page 5: Front Panel
Product instructions ·Front panel (11) (1) (2) (4)(5) (7) (8) (9) (10) (1) Speaker: For SDI/HDMI embedded audio. (Will not work if earphone is plugged in) (2) Desktop Stand Feet (3) User1~User4: User shortcut key, which can be used to quickly enter the set user mode. Long press to save user settings. - Page 6 Brightness: Adjust the brightness. -100~100 adjustable, default value is 0. Contrast: Adjust contrast. -100~100 adjustable, default Brightness Contrast Saturation value is 0. Saturation: Adjust saturation. -100~100 adjustable, default value is 0. Backlight: Adjust the backlight. 0~100 adjustable, default Backlight Volume Source value is 16.(The default backlight value of BM-U245 is 35.)
-
Page 7: Rear Panel
·Rear panel (10) (11) (12) (10) (1) SFP IN: Optical fiber interface 12G/6G/3G/HD/SD-SDI video signal fiber input interface Fiber optic module is optional ● (2) SDI OUT1/IN1,SDI OUT2/IN2:12G-SDI (3) SDI OUT3/IN3,SDI OUT4/IN4: 12G-SDI (4) ETHERNET: Network interface 1000M high-speed RJ45 Ethernet port, for web server IP external control. (5)... -
Page 8: Osd
·OSD (1) Time code ( SDI) Under SDI input, the monitor can display Time code information (LTC, VITC1&2). If no Time code info is detected, it will display “TC UNLOCKED” . User can set function keys F1~F5 or GPI pins as “Time Code”... - Page 9 (8) Vector Display vector scope with 100% and 75% markers for SDI and HDMI video. The vector scope pattern display positions, colors, background are adjustable. User can set function keys F1~F5 or GPI pins as “Vector” to turn on or off this function. (9) Waveform The display waveform can be selected from Y/Cb/Cr/R/G/B/RGB types, and single line display mode selectable.
-
Page 10: Main Menu
Key configuration. Steps 1. Press “Menu/ Enter” button, the main menu will pop up from the left top of the screen. The selected main menu highlights in yellow . 2. Revolve “Menu/ Enter” to select submenu, the selected submenu highlights in yellow, press “Menu/ Enter”... - Page 11 Menu Configuration Menu configuration introduces the main menu and each sub-menu. Menu items marked * will give more detailed menu description or operation explanation after the list 1. Input ‒ Set the color of input video Menu Item Menu Description Value Full 0-1023 SDI Full 4-1019 Input Range *1...
- Page 12 OFF,ARRI_LogC_HLG,Canon_CLog2Cin_HLG Canon_CLog3Cin_HLG,Panasonic_VLog_HLG, Camera table when gamut is set to D-Log to HLG RED_L3G10_HLG,Sony_SLog3_Cin_HLG, Rec.2020 and gamma value is HLG1000 Sony_SLog3_SG3_HLG Multi-colour gamut *6 Multi-colour gamut On,Off ON,OFF Set the screen to display the colour Color Temp D55,D65,D75,D93,DCI,USER1,USER2 temperature value Set the user color temperature value User Temp 4000K~9800K when the color temperature mode is...
- Page 13 4. Scanning—Setting for picture scan, zoom, etc. Menu Item Menu Description Value Set up a scanning mode that matches the audio to Pixel To Pixel, Panel Fit, Original scan Scanning Mode *1 the screen Off, Top Left, Top, Top Right, Left, Center, Zoom-in*2 Set a zoom mode Right, Bottom Left, Bottom ,Bottom Right...
- Page 14 5.Control—Setting for TALLY, UMD, IP control to the monitor Value Menu Description Menu Item OFF,ON GPI Control *1 Open or close GPI Control SFP, SDI1, SDI2, SDI3, SDI4, 4×SDI(2-SI)、 GPI 1Pin 4×SDI(SQ), HDMI, Red Tally, Green Tally, GPI 2Pin Yellow Tally ,Time Code, Freeze Frame, WFM GPI 3Pin Set the function of each Type, WFM Single Line, UMD, Marker , Wave-...
- Page 15 *1 GPI control Connect the GPI remote control terminal through the GPI interface on the real panel of the monitor, turn on “GPI control” and set the function of GPI 1-6 buttons. The GPI control allows you to control both the Tally light and the on screen TALLY light on at the same time: *2 UMD Select the display type as “UMD”...
- Page 16 Cascade: 6. Assist— Setting for Vector scope and Histogram patterns. Menu Item Menu Description Value OFF, ON False Color Turn false color display on or off OFF, ON Blue Only Turn blue only on or off Turn on or off focus assist and adjust the OFF, Blue, Red Focus Assist color of the focus assist...
- Page 17 Turn the colour gamut chart on or off On,Off Top left, Top right, Bottom Adjusting the position of the colour gamut map on CIE Position left, Bottom right the screen Set the transparency of the background colour of CIE Blending Off, Low, High the colour gamut map Set the brightness within the colour gamut map...
- Page 18 *2.Horizontal/Vertical When the marker select is set to the user 1/2, the user can adjust the horizontal and vertical value of the mark line according to their own needs. *3. Eye diagram HDMI channel does not display eye diagram. 7. De-embed— Setting for video/audio analysis functions. Menu Item Menu Description Value...
- Page 19 3D LUT cube and calibrate itself automatically. *2.Probe Select This monitor supports the following probes models: BRAND MODE X-rite I1 Pro OEM (SWIT OEM) *3.Start Calibration JETI Specbos 1211 Steps: 1、 Put the monitor into a dark room. Switch on the monitor.
- Page 20 Auto Calibration Please make sure the monitor is in dark room,and the sensor probe is put in the center marker and close Auto Calibration Please make sure the monitor is in to the screen. dark room,and the sensor probe is put in the center marker and close to the screen.
- Page 21 9. System— User profile saving, firmware update. Menu Item Menu Description Value Set lock key OFF, Full Lock Key Lock *1 Select make user mode current Recall Profile*2 Factory,USER1,USER2,USER3,USER4 Save Profile USER1,USER2,USER3,USER4 Save the current state as a user setting When turned on, Payload ID information conforming Payload ID OFF, ON...
- Page 22 *2 Recall Profile/ Save Profile User Settings provide 4 menu Settings, that is, users can save the current monitor menu Settings as one user Settings (USER1~USER4) according to usage habits. Then, when switching menu Settings, just select the corresponding "USER1~USER4" through the “Recall Profile” item to display the corresponding menu Settings.
- Page 23 *4. IP control Connect the monitor to the LAN through an ETHERNET interface, and the Monitor can be con- trolled by web page. Pin No Pin Name Enter Menu- System ‒ IP/Net Mask/Gateway/Port to set the monitor address. Set the computer Ethernet IP addresses at the same LAN environment as the Monitor.
- Page 24 Used crossed wired cable for computer-monitor directly connection. ◎ Use straight-through wired cable for Router connections. ◎ Please seek help from your webmaster for any network connections. ◎ *5.Upgrade System software can update by USB interface, and steps are as follows: 1.Download the latest software package into the U-disk root direction.
- Page 25 Ten、 Multiview Setting*1 Menu Item Menu Description Value Multiview Type Select multiview type Quad View、 PBP、 PIP PIC 1 Select PIC 1 video SDI 1、 SDI 2、 SDI 3、 SDI 4、 HDMI PIC 2 Select PIC 2 video SDI 1、 SDI 2、 SDI 3、 SDI 4、 HDMI Set the display position of the Bottom Left, Bottom Right, Top Left, PIP Window Position...
-
Page 26: Size
Size Monitor (unit: mm) BM-U245HDR... - Page 27 BM-U316HDR BM-U325HDR ※ BM-U175, BM-U245 ,BM-U245HDRhas battery plate in the back, support battery powering. BM-U175, BM-U245 ,BM-U245HDRcan install 100*100 pitch-row VISA bracket. BM-U275HDR, BM-U315, BM-U325,BM-U325HDR,BM-U316HDR can install 100*100 or100*200 pitch-row VISA bracket.
-
Page 28: Specification
Specification LCD Performance Model BM-U175 BM-U245 BM-U245HDR BM-U275HDR Size 17.3 23.8 23.8 Display area 381.88×214.82mm 527.04×296.46mm 527.04×296.46mm 596.74×335.66mm Resolution 3840*2160 3840*2160 3840*2160 3840*2160 Display Color 16.7M 1.07G 16.7M 1.07G Display ratio 16:9 16:9 16:9 16:9 Brightness 1000 cd/m2 1300 cd/m2 Contract 800:1 1500:1... - Page 29 Specification LCD Performance Model BM-U315 BM-U325 BM-U325HDR BM-U316HDR Size 31.1 31.5 31.5 31.4 Display area 697.96×368.06mm 698.40×392.85mm 697.31×392.23mm 697.958 × 368.064 mm Resolution 4096*2160 3840*2160 3840*2160 4096*2160 Display Color 1.07G 1.07G 1.07G 1.07G Display ratio 17:9 16:9 16:9 16:9 Brightness 350 cd/m2 300 cd/m2 850 cd/m2...
- Page 30 Supported Format: Signals below can display on the monitor Input terminal Signal format shown in the Status Display as Format SDI1~4 Multiview HDMI SDI1~4&SFP HDMI &SFP 720*480I60 720×480/60I √ — — 720*480I60 720*480P60 720×480/60P 720*480P60 √ — √ 720*576I50 720×576/50I 720*576I50 √...
- Page 31 Input terminal Signal format shown in the Status Display as Format SDI1~4 Multiview HDMI SDI1~4&SFP HDMI &SFP 2048×1080/59.94P √ √ √ 2048*1080P59.94 2048*1080P60 2048×1080/60P 2048*1080P60 2048*1080P60 √ √ √ 3840×2160/23.98P 3840*2160P23.98 3840*2160P24 √ √ √ 3840×2160/24P 3840*2160P24 3840*2160P24 √ √ √...
-
Page 32: Trouble-Shooting
Trouble-shooting symptom Possible causes Solution Please check if the power is connected, and then The power is not turned on press “POWER” button to turn on the monitor Reconnect to power supply Unstable power voltage BNC or HDMI cable loose contact or not correctly Check and correctly connect the BNC or HDMI cable connected... - Page 33 Technological Development Zone, Nanjing 210038, P.R.China Tel: +86-25-85805753 Email: contact@swit.cc SWIT Electronics Europe GmbH Add: Hochstr. 17, 47228 Duisburg, Germany Tel: +49(0)20659799339 Email: info@swit-europe.com SWIT Electronics America, Inc Add: 3350 Scott Boulevard 61-02, Santa Clara, CA 95054, USA Tel: (408)260-8258, 1-866-986-SWIT(7948) Email: info@swit.us...
Need help?
Do you have a question about the BM-U Series and is the answer not in the manual?
Questions and answers