
Related Manuals for OCULUS Pentacam AXL


Summary of Contents for OCULUS Pentacam AXL
- Page 1 ® OCULUS Pentacam INSTRUCTION MANUAL System for measuring the anterior eye segment and optical biometry...
- Page 2 Our service team will gladly assist. OCULUS Optikgeräte GmbH Revision 04 Release: 05.11.2021 OCULUS is certified according to DIN EN ISO 13485, setting high standards of quality where development, manufacture, quality assurance and service regarding the entire range of products are concerned. i / iii...
-
Page 3: Table Of Contents
Table of Contents Table of Contents 1 Delivery and Deliverables ......................1 2 Symbols ............................3 3 Structure of the Documentation.................... 4 4 Safety Instructions ........................5 About this Manual......................5 4.1.1 Pictogram Used in this Manual..............5 Safety Instructions for Use ..................6 Cybersecurity Instructions..................11 5 Intended Use ..........................14 6 Device Description........................16... - Page 4 Table of Contents 12.4.3 Automatic Backup..................57 13 Test measurement with the Pentacam® AXL..............57 13.1 Test measurement: Tomography (3D scan) ............57 13.2 Test measurement: Axial length................57 13.2.1 Attach the test eye ..................57 13.2.2 Carrying out the test measurement............59 14 Cleaning, Disinfection and Maintenance................62 14.1 Cleaning..........................62 14.2 Disinfection........................64 14.3 Maintenance .........................65...
-
Page 5: Delivery And Deliverables
1 Delivery and Deliverables Delivery and Deliverables Product and accessories Order number Pentacam® AXL 70100 ® Pentacam® AXL accessories 70701 x-y base Power supply 05150150 Dark sheet 027070000006 Washing manual 027070000007 Wire clip 027075000004 Hexagon screwdriver 05520010 ... - Page 6 1 Delivery and Deliverables Software module Order number Standard software package Pentacam® AXL: Floating License Key 77900 with manual SI/77900/.../de Viewing License Pentacam® AXL 70725 Fast Screening Report 70927 IOL Calculator 70110 Belin/Ambrósio Enhanced Ectasia Display 70728 ...
-
Page 7: Symbols
2 Symbols The software version of the patient data management appears in the settings of the patient data management software. The software version of the Pentacam® AXL program appears in the Pentacam® AXL settings. The minimum screen resolution of the Pentacam® displays is ... -
Page 8: Structure Of The Documentation
3 Structure of the Documentation Structure of the Documentation A folder containing documentation is supplied with your Pentacam® AXL: Instruction Manual: The design of the unit is described in detail in this document. The instruction manual also gives you general information about working with the Patient Data Management system and all safety-related instructions for use of the Pentacam®... -
Page 9: Safety Instructions
4 Safety Instructions Safety Instructions About this Manual Carefully read through the Instruction Manual. Keep the Instruction Manual in good condition near the device. Observe the legal regulations with regard to accident prevention. 4.1.1 Pictogram Used in this Manual Attention Identifies a potentially dangerous situation which may cause minor injury or damage to property. -
Page 10: Safety Instructions For Use
16, page Instructions for Setup and Connection Only OCULUS or an authorized dealer is allowed to set up and to connect the Pentacam® AXL. Do not use or store the Pentacam® AXL in rooms that are humid, see sec. - Page 11 4 Safety Instructions Do not operate the devices included in the delivery in areas where explosions may occur, or in proximity to flammable anesthetics or volatile substances such as alcohol, benzine or similar products. Set up the Pentacam® AXL so that the power plug is easy to access. That way, you can easily disconnect it from the power supply for any repairs or maintenance work.
- Page 12 4 Safety Instructions Patient environment information Patient environment is the area where patients can come into contact with any part of a medical electrical equipment (ME equipment) or with another person being in contact with the ME equipment. Attention In the patient environment, use devices that conform to IEC 60601-1. If a multiple power socket is to be used, or if a device is to be used that does not meet the IEC 60601-1 standard, use an isolating transformer.
- Page 13 Make sure that all devices of the ME system meet the requirements of IEC 60601-1 or IEC 60950-1/IEC 62368-1. Instructions for Operation Before first use: Let OCULUS or an authorized dealer train you in the operation of the Pentacam® AXL. Never operate a damaged Pentacam® AXL.
- Page 14 4 Safety Instructions Instructions for Maintenance In order to retain the high measurement accuracy of the Pentacam® AXL OCULUS Optikgeräte GmbH recommends to perform a maintenance service every two years or after 25 000 scans. A corresponding message appears, see sec.
-
Page 15: Cybersecurity Instructions
If you are using a multiple socket extension chord it has to be supplied with a isolation transformer. If you are using a new computer for the Pentacam® AXL, you must have the electrical safety checked. Call OCULUS Service for this purpose. Attention Electromagnetic Compatibility (EMC) / Cables... - Page 16 4 Safety Instructions otherwise unapproved personnel are not exposed to, or gain access to, ePHI. User Responsibility User names or passwords must not be shared with colleagues or others, even if they are permitted by law and provider policy to view the same type of information (e.g.
- Page 17 4 Safety Instructions should consider duration of examination, number of patients, time between examinations, use of other devices in the examination room, several user, etc. Lock the computer if you are leaving the workstation (shortcut: ‘windows logo key’ + ‘L’). Precautions if the computer is connected to a LAN or internet network computer ...
-
Page 18: Intended Use
5 Intended Use Intended Use Attention Federal law restricts this device to sale by or on the order of a physician. The Pentacam® AXL is designed to take photos of the anterior segment of the eye which includes the cornea, pupil, anterior chamber and lens of the eye. - Page 19 and practical experience. who have been instructed by OCULUS staff or an authorized dealer before the initial operation. Patient group Children from 3 years up to not limited. No restrictions on weight,health and condition: Patient is awake and able to understand and to look into a fixation target.
-
Page 20: Device Description
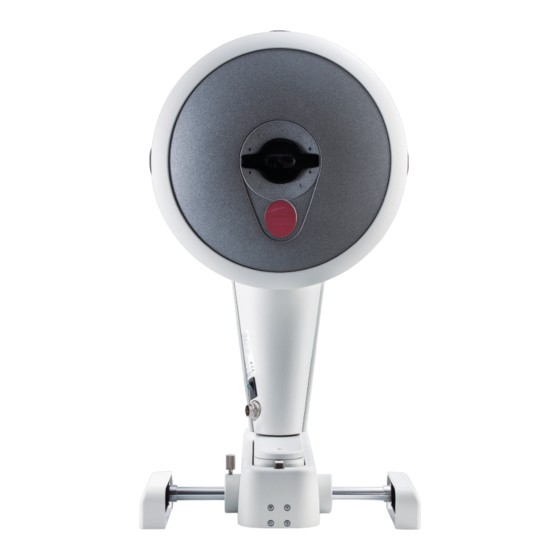
6 Device Description Device Description Overview of the device components 1 Ventilation opening 5 Y-cable connector 2 Measuring window 6 Cross slide 3 Camera opening 7 Sliding plate with circular markings 4 On/off switch with indicator light 8 Joystick Fig. 6-1: Device components 16 / 85 Instruction Manual Pentacam®... -
Page 21: How The Pentacam® Axl Works
A rotatable 3D model displays the front and rear surfaces of the cornea, the iris and the lens. Attention OCULUS Optikgeräte GmbH shall not be liable in any form for further use of the data recorded by a Pentacam® AXL and for the evaluations it has calculated. -
Page 22: Setup And Connection
Before first use, make sure the installation and connection of the Pentacam® AXL are completed by our service or by a professional authorized by OCULUS. Note Do not expose the Pentacam® AXL to any vibrations, shocks, contaminants, moisture, or high temperatures. -
Page 23: Electrical Connection
7 Setup and Connection Electrical Connection Attention Electrical safety hazard Do not use the Pentacam® AXL adjacent to or stacked with other equipment. If you have to use the Pentacam® AXL adjacent to or stacked with other equipment, verify the correct operation of the Pentacam® AXL. ... -
Page 24: Switching On
7 Setup and Connection Note Risk of equipment damage due to incorrect connection If you do not connect the Pentacam® AXL properly, and the connection is live, the unit can be damaged within a short period of time. Do not use excessive force when connecting the electrical plug. ... -
Page 25: Software Installation On Separate Pcs
7 Setup and Connection Software Installation on separate PCs The Pentacam-Software is network compatible. This makes it possible to install the Pentacam® AXL Software on several PCs, connected in a local network. Make sure, that all PC in a network do have the same Pentacam® AXL software version installed. -
Page 26: Patient Data Management
8 Patient Data Management Patient Data Management Starting Patient Data Management You can enter and use the patient data by the patient data management. After you have switched on the PC, it first loads the operating system. Click the Pentacam® AXL icon. The user interface for the Patient Data Management appears. -
Page 27: Selecting An Existing Patient
8 Patient Data Management Enter the patient's last name, first name and date of birth in the patient window. Fig. 8-2: Entering patients Optionally you can enter an ID number for the patient. To save the data you entered, click [Save]. The patient you have just entered now appears in the patient list. -
Page 28: Starting The Pentacam® Axl Software
8 Patient Data Management Extended Patient Search: [Extended] Checkbox Click on the [Extended] checkbox. The screen displays additional search parameters which reference previous examinations. Proceed as for the input of a patient name. Fig. 8-4: Extended search Starting the Pentacam® AXL Software Switching from Patient Data Management to the Pentacam®... -
Page 29: Pentacam® Axl Program
9 Pentacam® AXL Program Pentacam® AXL Program If no error message appears after starting the software with the device connected and switched on (for example component failure, camera not detected, missing references data, etc.), the device is safely ready for operation. - Page 30 9 Pentacam® AXL Program Note As this instruction manual focuses on the Pentacam® AXL operating concept, the description of Pentacam® AXL program functions is limited to starting the measuring process and loading previous examinations. The Reference manual contains detailed information on the functions of the Pentacam®...
-
Page 31: Scan Menu
10 Scan Menu Scan Menu Switching from the Pentacam® AXL program to the Scan menu: In the Pentacam® AXL program (fig. 9-1, page 25) select the menu item [Examination] and click [Scan]. 10.1 Screen layout 1 "Eye" field 7 Adjustment window 2 Overview image with adjusting aid 8 Fixation Target 3 "Image Options"... -
Page 32: Scheimpflug Image Settings
10 Scan Menu measurement of the axial length. Select the eye status in the corresponding dropdown list. Eye Status: Phakic: Default status. Presence of crystalline lens. Aphakic: Absence of the crystalline lens. Pseudophakic (Silicone IOL or similar): IOL of silicone or similar ... - Page 33 10 Scan Menu clicking the white rings in the "Orientation" field (11). This type of image is suitable for a purely densitometric assessment of the lens. "3D Scan" group box Use this option to select how many images you want the camera to ...
-
Page 34: Information For Recording Scheimpflug Images
10 Scan Menu If "Request 6x Alignment" is activated, the axial length measurement starts only if the patient is fixating correctly during the complete scan. After the Pentacam® AXL is aligned properly, the measurement starts automatically. "Request 6x Alignment" deactivated means: The axial length measurements are performed without any interrupt. -
Page 35: Measuring Procedure
Attention Risk of incorrect measurement due to incorrect use Before first use: Let OCULUS or an authorized distributor train you in the operation of the Pentacam® AXL. Risk of incorrect measurements due to improper setup Before taking measurements, the Pentacam® AXL has to be switched on, at least for one hour. - Page 36 11 Measuring Procedure Phakic: Default status. Presence of crystalline lens. Aphakic: Absence of the crystalline lens. Correction of measured axial length by +0.200 mm Pseudophakic (Silicone IOL or similar): IOL of silicone or similar material implanted. Correction of axial length by +0.120 mm. Pseudophakic (Acrylate): Acrylat/Metaacrylate IOL implanted.
- Page 37 11 Measuring Procedure Check that fresh paper has been put onto the chin rest or the chin rest has been cleaned and disinfected, sec. 14, page the forehead rest has been cleaned and disinfected after each examination, sec.
- Page 38 11 Measuring Procedure Example of a rough adjustment for the right eye: Move the cross slide (1) until the marking at the end of the cross slide roughly coincides with the circle R (3) on the sliding plate. 1 Cross slide 4 Marking on the cross slide 2 Left marking 5 Joystick...
- Page 39 11 Measuring Procedure Adjustment Move the image with the cross towards the patient until the four infrared LED are clearly to see. Fig. 11-3: Overview image Focus the pupil image by moving the joystick towards the Pentacam® AXL or away from it. The bars on the right and left of the pupil will support you to find the correct position.
- Page 40 11 Measuring Procedure Fine adjustment Make any fine adjustments required based on the information in the adjustment window. Example (with grey arrows): distance to patient´s eye is not correct. Move the device towards or fromward the patient. Example (with red arrows): Move or rotate the joystick in the specified directions.
- Page 41 11 Measuring Procedure Go to measurement “Adjustment” page 1 Message with instructions Fig. 11-4: Pentacam® AXL: Proceed with 3D-Scan During the measurement of both eyes the following messages may occur. Fig. 11-5: Message: Plausibility check Note The axial length values do not correspond to the values of the normal population.
- Page 42 11 Measuring Procedure If the measured axial length value has a probability of < 1%, the following message may occur. Fig. 11-6: Message: dirty optical window Warning Faulty measurements due to dirty window Clean the optical window. Carry out a test measurement. If you do not carry out the test measurement, then this message will be stored in the Pentacam®...
-
Page 43: Measuring Procedure For The Anterior Segment Of The Eye
11 Measuring Procedure 11.2 Measuring Procedure for the Anterior Segment of the Eye Default settings Start the Scan menu (fig. 10-1, page 27). If necessary make changes to the image options for the particular part of the front of the eye that is to be examined. The default settings in the "3D Scan"... - Page 44 11 Measuring Procedure Adjust the patient’s eye level using the twist grip (fig. 11-7, page 39, item The patient is positioned correctly when chin and forehead touch the rests and the eyes are level with the marking. If you adjust the chinrest for a small head (for example: a child‘s head), the test eye may stop the chinrest.
- Page 45 11 Measuring Procedure Fig. 11-9: Slit light on the cornea Note If the blue slit light is not visible, ensure that you have activated the [Slit Light] checkbox on the "Scan" screen. Darkening the room/dark sheet If the lighting in the examination room has not been turned down or switched off, use the dark sheet supplied to cover the patient and the Pentacam.
- Page 46 11 Measuring Procedure 1 "Eye" field 7 Adjustment window 2 Overview image 8 Fixation Target 3 "Image Options" area 9 Message about device 4 [Slit Light] checkbox 10 [Quit] button 5 [Automatic Release] checkbox 11 "Orientation" field 6 [Start Scan] button Fig.
- Page 47 11 Measuring Procedure Adjustment Move the cross slide towards the patient until the Scheimpflug image shows the cornea of the eye that you are examining. Fig. 11-11: Scheimpflug image (left) and overview image (right) a. This screen is only available with a Pentacam® image without an axial length ment The image is sharpest when the red dot coincides with the red line in the Scheimpflug image (relevant for Pentacam®...
- Page 48 11 Measuring Procedure Fine adjustment Make any fine adjustments required based on the information in the adjustment window. To do so, move the joystick in the specified directions. Example: Move the joystick to the right. Turn the joystick counter clockwise. ...
-
Page 49: Quality Specifications
11 Measuring Procedure 11.3 Quality Specifications 11.3.1 Quality Specifications in the Pentacam® AXL program After you have measured either automatically or manually, the Pentacam® AXL program opens. The "QS" value appears in field (1). 1 "QS" display Fig. 11-12: Pentacam® AXL program with "QS"display Note All examinations are automatically saved, regardless of the quality of the measurement taken. - Page 50 11 Measuring Procedure 1 Single scans with with grey coloured values 2 Signal to noise ratio of the axial length measurement " Fig. 11-13: Display AXL-Scan“ AXL scan data (1) Axial length: The final result of the axial length is calculated just of ...
- Page 51 11 Measuring Procedure reads OK, the measurement is correct and can be reproduced. SNR >=6.3 is yellow, you may want to repeat the measurement. SNR >=5.0 is red, must repeat the measurement. SNR < 5.0 If the "QS" displayis highlighted in yellow, click on the "QS" button. The following dialog box appears: Fig.
- Page 52 11 Measuring Procedure Notes on individual parameters Analysed Area If this value is less than the permissible threshold, the patient must widen his or her eye. Valid Data If this value is less than the permissible threshold, you must darken the room.
-
Page 53: Quality Specifications In The Pentacam® Program
11 Measuring Procedure 11.3.2 Quality Specifications in the Pentacam® program After you have begun measuring either automatically or manually, the Pentacam® program opens. The "QS" value appears in field (1). 1 "QS" display Fig. 11-15: Pentacam® program with "QS"display Note All examinations are automatically saved, regardless of the quality of the measurement taken. - Page 54 11 Measuring Procedure If the "QS" display reads OK, the measurement is correct and can be reproduced. is red, you must repeat the measurement. is highlighted in yellow, click on the "QS" button. The following dialog box appears: Fig.
- Page 55 11 Measuring Procedure Signal to noise ratio Terminating "QS" Click [Cancel] to return to the Pentacam® program. If required, delete the measurement if the image is inadequate. Terminate the current examination which has been saved. If required, make preparations to examine another patient.
-
Page 56: Managing Patient Data
12 Managing Patient Data Managing Patient Data Once you have completed an examination, you can do the following with the patient data: Rename it, sec. 12.1, page 52 Export it, sec. 12.2, page 52 Import it, sec. 12.3, page 54 ... - Page 57 12 Managing Patient Data The default options for import and export of data are configured in the "Settings" field, see also the User Guide. Depending on the settings, you may not have to perform all of the following steps (e.g. selection of the directory). ...
-
Page 58: Importing Patient Data
12 Managing Patient Data 12.3 Importing Patient Data Import received patient and examination data in the Pentacam® AXL software. In case you keep patient data on a USB stick, you can import this data. Note Risk of loss of data due to computer viruses Computer viruses can cause loss of data. -
Page 59: Data Backup
12 Managing Patient Data Recommendation: Import the patient data using the "Single file (U12)" option. Press the [...] button. (2). In the dialog box, select the directory or the file where the patient data are located. Confirm your selection with [OK] or [Open]. The patients and the associated examinations that are found are displayed in the lower part of the dialog. -
Page 60: Backup Data
12 Managing Patient Data 12.4.1 Backup Data Press the [Backup] button at the top right of the Patient Data Management system. The following dialog is displayed: Backup data selection Backup directory and button [...] [Restore] button [Save] button Display free storage space Fig. -
Page 61: Automatic Backup
Test measurement with the Pentacam® AXL 13.1 Test measurement: Tomography (3D scan) The Pentacam® AXL is tested and calibrated at OCULUS. OCULUS Optikgeräte GmbH recommends to carry out additional regular test measurements with the Pentacam® AXL. Start the test with a measurement of a human eye. - Page 62 13 Test measurement with the Pentacam® AXL Use the Allen key to attach the test eye to the chin and head rest, directly underneath the retainer for the head rest. Fig. 13-1: Attach the test eye Make sure that the test eye is in park/home position when it is not being used.
-
Page 63: Carrying Out The Test Measurement
13 Test measurement with the Pentacam® AXL 13.2.2 Carrying out the test measurement The axial length test measurement routine has to be performed daily before the first "Full Sequence Examination". After the Full Sequence Mode is selected the following screen appears: Follow the instructions on the screen, type in the axial length of the test eye and click on "Continue". - Page 64 13 Test measurement with the Pentacam® AXL Align the Pentacam® AXL to the test eye, “Fine adjustment” page Press [Start Scan] or press the return button to start the test measurement manually. In case the test measurement is ok the following message appears: To finish the process click "OK".
- Page 65 13 Test measurement with the Pentacam® AXL Exclude all possible reasons (see screen) for a fail test measurement. Repeat the test measurement again. If also this test measurement is not successfull please call your authorized dealer. To finish this process click "OK". In case you had to replace the test eye because of any reason you have to type in the axial length of the new test eye into the input field before you do a new test measurement.
-
Page 66: Cleaning, Disinfection And Maintenance
14 Cleaning, Disinfection and Maintenance The protective cover closes automatically. You can proceed with the measurements. During an examination: If you adjust the chin rest for a smaller head (the head of a child, for example), the test eye may be in the way. Slide the test eye to the side and then adjust the chin rest. - Page 67 14 Cleaning, Disinfection and Maintenance Cleaning intervalls Clean the components of the Pentacam® AXL once a month or if necessary. Cleaning the Housing It is best to clean the housing surfaces with a soft cloth and an anti-static cleaning agent. ...
-
Page 68: Disinfection
14 Cleaning, Disinfection and Maintenance 14.2 Disinfection Recommendation: Use disinfection wipes suitable for medical devices, for example: Mikrozid sensitive wipes premium; Fa. Schülke & Mayr Softpack 48 Stück / Art. Nr. 165711 Schülke & Mayr GmbH; Tel: +4940521000 / Fax: +494052100318 E-Mail@schuelke.com;... -
Page 69: Maintenance
14.3 Maintenance In order to retain the high measurement accuracy of the Pentacam® AXL OCULUS Optikgeräte GmbH recommends to perform a maintenance service every two years or after 25 000 scans. A corresponding message appears. By daily pop up window: Fig. -
Page 70: Attaching Paper To The Chin Rest
14 Cleaning, Disinfection and Maintenance Attention Risk of personal injury or material damage due to invisible laser radiation The Pentacam® AXL contains a Class 1 laser according to IEC 60825-1: 2014. It is an encapsulated laser system. When the Pentacam® AXL cover is opened, you may be exposed to invisible, Class 3R (5 mW) laser radiation. -
Page 71: Troubleshooting
15 Troubleshooting Troubleshooting Attention If an error occurs which you are unable to correct by following the instructions below, label the device as "out of order" and contact our service department or an authorised distributor. Error Possible cause Remedy After you have started the No power to the power adapter Check whether the indicator light on the power supply is on. -
Page 72: Transport And Storage
16 Transport and Storage Transport and Storage The Pentacam® AXL, must be properly dismantled and packed before being transported or stored. 16.1 Information on Transport and Storage Storage Ambient temperature range -10°C to +55°C Relative humidity, including condensation 10% to 95% Air pressure range 700 hPa to1060 hPa Transport:... -
Page 73: Disassembly
16 Transport and Storage 16.2 Disassembly End the current session. Switch off the device. Disconnect the cable from the computer/laptop and the power adapter. Abb. 16-1: Disassembly Loosen the screw connection of the Y cable and pull it out. When disconnecting electrical connections, pull on the respective plug and not on the cable itself. -
Page 74: Disposal
17 Disposal Disposal In accordance with Directive 2012/19/EC of the European Parliament and the Council of 4th of July 2012, and in accordance with German law governing the marketing, return and environmentally compatible disposal of used electrical and electronic devices, such appliances must be recycled and may not be discarded as household waste. -
Page 75: Assumption Of Liability For Functions And Damage
This certification must contain the date of performance and statement of the performing firm, with signature. If requested, OCULUS will provide the service technician with a list of spare parts and additional descriptive material for this purpose. -
Page 76: Technical Data
19 Technical Data Technical Data Measuring equipment Camera Digital CCD camera Light source Blue LEDs (475 nm, UV-free) Speed 100 images in 2 seconds, 2760 measuring points per recorded image Number of evaluated max. 138,000 measuring points Dimensions W x D x H 275 x 320 to 400 x 500 to 530 mm (measuring head) (10.8 x 12.6 to 15.7 x 19.7 to 20.9 in) - Page 77 19 Technical Data Power supply Pentacam® AXL Output voltage 24 V DC Max. power consumption 42 W Other information Contraindications None noted Lifecycle expectancy Up to 10 years Classification according to IEC 60601 - 1 Type of protection against electrical shock: protection class Level of protection against electrical shock: type Level of protection against damaging water...
- Page 78 19 Technical Data Computer Use a computer which is in conformity with the DIN EN 60950 or IEC 62368 standard. Recommended computer Intel® Core™ i5, 500 GB HDD, 8 GB RAM, specifications Windows® 10, Intel® HD Graphics CE in accordance with Regulation (EU) 2017/745 on Medical Devices (MDR) The unit is a Class IIa product.
-
Page 79: Annex
EMC, and must be installed and operated according to the EMC-Instructions contained in the accompanying paperwork. No special measures need be observed in respect of OCULUS devices and systems. Portable and mobile RF-communications devices can interfere with electrically operated medical devices. -
Page 80: Guidance And Manufacturer's Declaration - Electromagnetic Emisssions For The Pentacam® Axl
Guidance and manufacturer´s declaration electromagentic emissions IEC 60601-1-2, 5.2.2.1, table 1 The OCULUS Pentacam® AXL is intended for operation in the electromagnetic environment specified below. The user of the Pentacam® AXL should ensure that it is being used in such an environment. - Page 81 20 Annex Guidance and manufacturer´s declaration electromagentic immunity, IEC 60601-1-2, 5.2.2.1, table 2 Immunity test IEC 60601 Compliance level Electromagnetic environment - test level guidlines Electrostatic discharge ± 6 kV contact ± 6 kV contact Floors should be made of wood (ESD) ±...
- Page 82 20 Annex Guidance and manufacturer´s declaration electromagentic immunity, IEC 60601-1-2, 5.2.2.2, table 4 Immunity test IEC 60601 Compliance level Electromagnetic environment - Guidelines test level Portable and mobile RF communications equip- ment should be used no closer to any part of Pentacam®...
- Page 83 20 Annex Recommended separation distances between portable and mobile RF communications equipment and the Pentacam® AXL, IEC 60601-1-2, 5.2.2.2, table 6 The Pentacam® AXL in intended for us e in an electromagnetic environment in which radiated RF disturbances are controlled. The customer or the user of the Pentacam® AXL can help prevent electromagnetic interference by maintaining a minimum distance between portable and mobile RF communications equipment (transmitters) and the Pentacam®...
-
Page 84: Description Of The Connection
20 Annex 20.3 Description of the Connection Pentacam® AXL Y cable Power supply adapter (05150150) Computer/PC/laptop Mains connection 80 / 85 Instruction Manual Pentacam® AXL (G/70100/EN 1121 Rev04) -
Page 85: Data Sheet Hemg 49-S240210-7 (05150150)
20 Annex 20.4 Data Sheet HEMG 49-S240210-7 (05150150) H HiTRON UNIVERSAL INPUT AC-DC MEDICAL & ITE APPLICATION EXTERNAL DESKTOP SWITCHING ADAPTER 48-50 WATTS GREEN POWER SINGLE OUTPUT HEMG49 SERIES FEATURES: ACCOMMODATE UNIVERSAL AC INPUT MEET MEDICAL STANDARDS IEC60601-1 & ITE STANDARDS IEC60950-1 EMI MEET EN 55011 &... - Page 86 20 Annex OUTPUT VOLTAGE / CURRENT RATINGS CHART SINGLE OUTPUT MODEL NO. AC INLET O/P VOLTAGE O/P CURRENT IEC320-C14(DT7) 4.0A HEMG49-S120400-7 12.0Vdc IEC320-C8(DT8) 4.0A HEMG49-S120400-8 12.0Vdc IEC320-C14(DT7) 3.3A HEMG49-S150330-7 15.0Vdc IEC320-C8(DT8) 3.3A HEMG49-S150330-8 15.0Vdc HEMG49-S240210-7 IEC320-C14(DT7) 24.0Vdc 2.1A HEMG49-S240210-8 IEC320-C8(DT8) 24.0Vdc 2.1A MECHANICAL DIMENSIONS:...
-
Page 87: Instructions For Integration Into An It-Network
20 Annex 20.5 Instructions for integration into an IT-Network The device, in conjunction with the connected computer and the device software running on it, forms a programmable electrical medical system (PEMS) according to IEC 60601-1. It is essential that you follow the cybersecurity instructions section of “Safety Instructions”... - Page 88 20 Annex List of hazard situations that result from the IT-Network being unable to provide the features that are required to fulfill the purpose of inte- grating the PEMS into to meet the IT-Network: Loss of data unsuitable data exchange ...
- Page 89 20 Annex Instruction Manual Pentacam® AXL (G/70100/EN 1121 Rev04) 85 / 85...
- Page 90 Manufacturer and Service Address Headquarters: OCULUS Optikgeräte GmbH Münchholzhäuser Straße 29 • 35582 Wetzlar • GERMANY Tel. +49 641 2005-0 • Fax +49 641 2005-295 E-Mail: export@oculus.de • www.oculus.de...
Need help?
Do you have a question about the Pentacam AXL and is the answer not in the manual?
Questions and answers