OCULUS Pentacam Instruction Manual
System for measuring and analysing the front part of the eye
Hide thumbs
Also See for Pentacam:
- User manual ,
- Interpretation manual (216 pages) ,
- Instruction manual (72 pages)

Related Manuals for OCULUS Pentacam


Summary of Contents for OCULUS Pentacam
- Page 1 OCULUS | Pentacam Pentacam ® ® INSTRUCTION MANUAL System for measuring and analysing the front part of the eye...
- Page 2 In particular, pay attention to the safety instructions. The operating concept of both the Oculus Pentacam® and Pentacam® HR is basi- cally identical.
-
Page 3: Table Of Contents
Scheimpflug image settings ..............29 10.1.2 Parameters applicable only to the Pentacam® HR......30 10.2 Information for recording Scheimpflug images with a Pentacam® ..... 31 11 Measuring Procedure ......................32 11.1 Performing a Measurement..................32 11.2 Special features of the CSP measurement............36 12 Quality Specifications...................... - Page 4 Immunity for the Pentacam® / Pentacam® HR...........62 21.3 Description of the Connection .................66 21.4 Data sheet HEMG 49-S240210-7 (05150150) ...........67 21.5 Instructions for integration into an IT-Network..........69 iii / iii Instruction Manual Pentacam® / Pentacam® HR (G/70700/EN 0322 Rev02)
-
Page 5: Delivery And Deliverables
Electric cable EU 05200320 Electric cable Switzerland 05200322 Electric cable Argentina 05200323 Electric cable US 05200210 Electric cable GB 05200211 Electric cable Australia 05200212 Instruction Manual Pentacam® / Pentacam® HR (G/70700/EN 0322 Rev02) 1 / 69... - Page 6 Have the damages noted on the bill of lading, so that your claim for damages can be handled properly. For more information regarding shipping and handling, see sec. 17, page 2 / 69 Instruction Manual Pentacam® / Pentacam® HR (G/70700/EN 0322 Rev02)
-
Page 7: Symbols
The software version of the patient data management appears in the settings of the patient data management software. The software version of the Pentacam® / Pentacam® HR program appears in the Pentacam® settings. The minimum screen resolution of the Pentacam® displays is ... -
Page 8: Structure Of The Documentation
this document. The instruction manual also gives you general information about working with the Patient Data Management system and all safety-related instructions for use of the Pentacam® / Pentacam® HR. Attention All safety-related instructions for use of the Pentacam® / Pentacam® HR are given in the Instruction Manual for the unit. -
Page 9: Safety Instructions
Pentacam® / Pentacam® HR > Examination > Scan which means: Select the "Examination" menu from the menu bar. Select the menu item "Scan". Instruction Manual Pentacam® / Pentacam® HR (G/70700/EN 0322 Rev02) 5 / 69... -
Page 10: Safety Instructions For Use
Only OCULUS or an authorized dealer is allowed to set up and to connect the Pentacam® / Pentacam® HR. Do not use or store the Pentacam® / Pentacam® HR in rooms that are humid, see sec. 17, page ... - Page 11 Set up the Pentacam® / Pentacam® HR so that the power plug is easy to access. That way, you can easily disconnect it from the power supply for any repairs or maintenance work.
- Page 12 IEC 60601-1 standard, use an isolating transformer. Fig. 4-1: Patient environment 8 / 69 Instruction Manual Pentacam® / Pentacam® HR (G/70700/EN 0322 Rev02)
- Page 13 IEC 60601-1 or IEC 60950-1/IEC 62368-1. Instructions for Operation Before first use: Let OCULUS or an authorized dealer train you in the operation of the Pentacam® / Pentacam® HR. Never operate a damaged Pentacam® / Pentacam® HR.
- Page 14 If you are using a multiple socket extension chord it has to be supplied with a isolation transformer. If you are using a new computer for the Pentacam® / Pentacam® HR, you must have the electrical safety checked. Call OCULUS Service for this purpose.
-
Page 15: Cybersecurity Instructions
Device Security It is the responsibility of the authorized user to ensure that the Pentacam® / Pentacam® HR device is not left unlocked, or otherwise unsecured when not in use, to ensure that non-authorized medical, professional, or otherwise unapproved personnel are not exposed to, or gain access to, ePHI. - Page 16 Lock the computer if you are leaving the workstation (shortcut: ‘windows logo key’ + ‘L’). 12 / 69 Instruction Manual Pentacam® / Pentacam® HR (G/70700/EN 0322 Rev02)
- Page 17 Heed the instructions for integration into an IT-Network sec. 21.5, page 68 Do not use the Pentacam® / Pentacam® HR with wireless technology, for example with wireless USB (connection between device and computer). Instruction Manual Pentacam® / Pentacam® HR (G/70700/EN 0322 Rev02)
-
Page 18: Intended Use
cornal thickness. Intended medical indication The Pentacam® / Pentacam® HR is indicated as an aid to screen several eye diseases e.g but not limited to: Keratoconus classification and progression Early ectatic diseases Quantification of optical corneal density ... - Page 19 Tearing eyes Intended users Make certain that the Pentacam® / Pentacam® HR is used exclusively in clinics and by eye specialists and opticians (trained staff etc.). Patient group Children from 3 years up to not limited. No restrictions on weight,health and condition: Patient is awake and able to understand and to look into a fixation target.
-
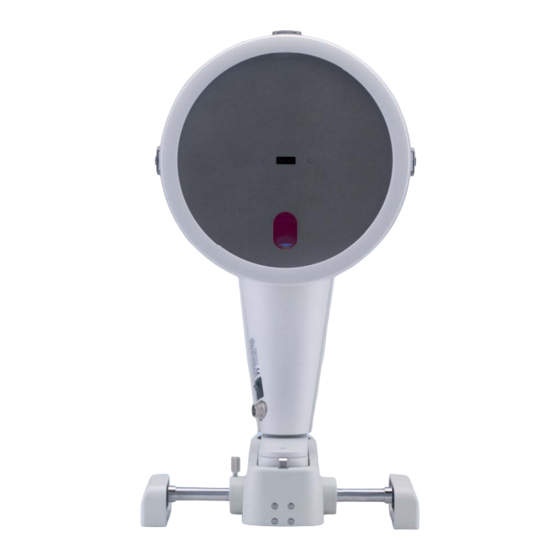
Page 20: Device Description
7 Sliding plate 3 Camera opening 8 Circular markings on sliding plate 4 On/off switch with indicator light 9 Joystick 5 Y-cable connector 10 Nameplate Fig. 6-1: Device components 16 / 69 Instruction Manual Pentacam® / Pentacam® HR (G/70700/EN 0322 Rev02) -
Page 21: How The Pentacam® Works
Attention OCULUS Optikgeräte GmbH shall not be liable in any form for further use of the data recorded by a Pentacam® and for the evaluations it has calculated. Instruction Manual Pentacam® / Pentacam® HR (G/70700/EN 0322 Rev02) -
Page 22: Setup And Connection
Handle the optical device with care. Set up the Pentacam® / Pentacam® HR so that the power plug is easy to access. That way, you can easily disconnect it from the power supply for any repairs or maintenance work. -
Page 23: Electrical Connection
Do not use the Pentacam® / Pentacam® HR adjacent to or stacked with other equipment. If you have to use the Pentacam® / Pentacam® HR adjacent to or stacked with other equipment, verify the correct operation of the Pentacam® / Pentacam® HR. -
Page 24: Switching On
7 Setup and Connection Note Risk of equipment damage due to incorrect connection If you do not connect the Pentacam® / Pentacam® HR properly, and the connection is live, the unit can be damaged within a short period of time. ... -
Page 25: Software Installation On Separate Pcs
Pentacam® Software on several PCs, connected in a local network. Make sure, that all PC in a network do have the same Pentacam® software version installed. A Floating License Key is part of every Pentacam® shipment. Please ensure a proper installation based on the Manual for the Floating License Key. -
Page 26: Patient Data Management
If the Windows desktop appears, you have to start the Patient Data Management program from there. To get to the Pentacam® / Pentacam® HR program, you must first enter a new patient (8) or select an existing patient from the examination list (2). ... -
Page 27: Selecting An Existing Patient
This also brings up a list of any previous examinations for that patient in the examination window (bottom right side). Instruction Manual Pentacam® / Pentacam® HR (G/70700/EN 0322 Rev02) 23 / 69... -
Page 28: Starting The Pentacam® / Pentacam® Hr Software
Fig. 8-4: Advanced search Starting the Pentacam® / Pentacam® HR Software Switching from Patient Data Management to the Pentacam® program: After selecting a patient: Press the [Pentacam] button to start the Pentacam® / Pentacam® HR program (fig. 8-1, page 22) ... -
Page 29: Pentacam® / Pentacam® Hr Program
Note The Pentacam® program is not to be used to dictate therapy without professional correlation with other clinical findings and diagnostic tests. Menu bar Examination and Patient data Fig. - Page 30 9 Pentacam® / Pentacam® HR Program Helpful information The Pentacam® program provides you a direct help. You can recognise that by a yellow mark 26 / 69 Instruction Manual Pentacam® / Pentacam® HR (G/70700/EN 0322 Rev02)
-
Page 31: Scan Menu
"Eye" field (1). The Pupil Image (2) shows the vertical / horizontal positioning of the Pentacam. The object is to position the yellow dot marking the apex Instruction Manual Pentacam® / Pentacam® HR (G/70700/EN 0322 Rev02) 27 / 69... -
Page 32: Scheimpflug Image Settings
You can also use the Return key. Inside the adjustment window (7), there are arrows showing you the direction in which you must move the Pentacam® to activate automatic measurement (Automatic Release). This line (8) shows messages about the device, for example if a ... -
Page 33: Parameters Applicable Only To The Pentacam® Hr
Parameters applicable only to the Pentacam® HR Note The parameters described below apply only to the Pentacam® HR. The Pentacam® HR has additional options for selecting image types. You can find these exclusive parameters in the "Image Options" box (3). "Cornea Fine" group box Select this option for a more detailed image of the cornea. -
Page 34: Information For Recording Scheimpflug Images With A Pentacam
Examination mode Images Automatic meas- Notes examination urement IOLs, ICLs, PIOLs 3D scan for PIOLs, possi- 25-50 If the pupil is insufficiently dilated, apply bly longer exposure mydriatic drops 30 / 69 Instruction Manual Pentacam® / Pentacam® HR (G/70700/EN 0322 Rev02) -
Page 35: Measuring Procedure
Proper patient alignment may be affected by small movements from a rolling stool used during measurement. Perform a Pentacam® / Pentacam® HR scan only if the patient sits in a stationary chair. In cases of wheel chairs lock the brakes. 11.1... - Page 36 Adjust the patient’s eye level using the twist grip (2). The patient is positioned correctly when chin and forehead touch the rests and the eyes are level with the marking. 32 / 69 Instruction Manual Pentacam® / Pentacam® HR (G/70700/EN 0322 Rev02)
- Page 37 If necessary, adjust the position of the cross slide to the left or right. Fig. 11-3: Slit light on the cornea Instruction Manual Pentacam® / Pentacam® HR (G/70700/EN 0322 Rev02) 33 / 69...
- Page 38 Focus the pupil image by moving the joystick towards the Pentacam® or away from it. Adjust the left/right position of the Pentacam® and its height setting. Move the joystick to the left or right and rotate the joystick clockwise or anticlockwise.
-
Page 39: Special Features Of The Csp Measurement
When you have achieved the expected position, a black cross will appear in the centre of the ring, surrounded by four black lines. The Pentacam® will automatically begin measuring, alternately you can start the measuring procedure manually. - Page 40 If necessary, you will be redirected to the peripheral measurements. You can repeat the measurement if you are not satisfied with it. Click on the [Repeat Scan] button (5). 36 / 69 Instruction Manual Pentacam® / Pentacam® HR (G/70700/EN 0322 Rev02)
- Page 41 The measurement process generally remains the same for peripheral measurements. To find out which of the scans is currently being carried out, refer to „CSP Scan Info” (3). Instruction Manual Pentacam® / Pentacam® HR (G/70700/EN 0322 Rev02) 37 / 69...
- Page 42 Nasal scan Temporal scan Superior scan Inferior scan Fig. 11-7: Coverage cards 38 / 69 Instruction Manual Pentacam® / Pentacam® HR (G/70700/EN 0322 Rev02)
-
Page 43: Quality Specifications
12 Quality Specifications Quality Specifications After you have begun measuring either automatically or manually, the Pentacam® program opens. The "QS" button appears in a field below the patient data. 1 "QS" button Fig. 12-1: Pentacam® program with "QS" button Note All examinations are automatically saved, regardless of the quality of the measurement taken. - Page 44 CSP Fixation If this value exceeds the permissible threshold, you must repeat the measurement. If necessary explain to the patient that he has to fix the black ring. 40 / 69 Instruction Manual Pentacam® / Pentacam® HR (G/70700/EN 0322 Rev02)
- Page 45 Terminate the current examination which has been saved. If required, make preparations to examine another patient. In the "Pentacam" overview, select the "Examination" menu and click [New Patient/End]. Instruction Manual Pentacam® / Pentacam® HR (G/70700/EN 0322 Rev02) 41 / 69...
-
Page 46: Managing Patient Data
Click [Export] button below the patient list. The following dialog appears: Saving destination selection 3 [Cancel] and [Export] buttons [...] button 4 Options for data export Fig. 13-1: "Export patient data" dialog 42 / 69 Instruction Manual Pentacam® / Pentacam® HR (G/70700/EN 0322 Rev02) - Page 47 You can send data stored on the hard drive as an e-mail attachment. Note Requirements for transferring data to another PC: The Pentacam® program must be installed on the other PC. If the program is updated on the Pentacam® PC (sender), the program on the other PC (recipient) must also be updated.
-
Page 48: Importing Patient Data
Select the option (1) where the source data are contained ("Folder" or "U12" (single file)). Recommendation: Export the patient data using the "Single file (U12)" option. 44 / 69 Instruction Manual Pentacam® / Pentacam® HR (G/70700/EN 0322 Rev02) -
Page 49: Data Backup
Patient Data Management system. Storage of backup files should always be done on a separate system (for example an external hard drive or a USB flash drive with adequate capacity). Instruction Manual Pentacam® / Pentacam® HR (G/70700/EN 0322 Rev02) 45 / 69... -
Page 50: Backup Data
Confirm your selection with [OK]. To import the data, press the [Restore] button (2). All data in the appropriate directory are copied to the Patient Data Management system. 46 / 69 Instruction Manual Pentacam® / Pentacam® HR (G/70700/EN 0322 Rev02) -
Page 51: Automatic Backup
The settings required for this can be made in the "Settings" area, User Guide. Test measurements with the Pentacam The Pentacam® / Pentacam® HR is tested and calibrated in the Oculus factory. OCULUS Optikgeraete GmbH recommends to perform regular test measurements of the Pentacam® / Pentacam® HR. -
Page 52: Cleaning, Disinfection And Maintenance
15.1 Cleaning Attention Risk of electric shock if the Pentacam® / Pentacam® HR is not completely disconnected from the mains for these jobs. Turn the Pentacam® / Pentacam® HR off, sec. 7.4, page ... -
Page 53: Disinfection
Disinfect the forehead rest after each examination. If you do not use paper for the chinrest, disinfect the chinrest after each examination. Instruction Manual Pentacam® / Pentacam® HR (G/70700/EN 0322 Rev02) 49 / 69... -
Page 54: Maintenance
15 Cleaning, Disinfection and Maintenance 15.3 Maintenance In order to retain the high measurement accuracy of the Pentacam® / Pentacam® HR OCULUS Optikgeräte GmbH recommends to perform a maintenance service every two years or after 25 000 scans. A corresponding message appears. -
Page 55: Attaching Paper To The Chin Rest
Place the chin rest paper (2) in such a way that the holes of the paper and those in the chin rest (3) are aligned. Insert the two pins (1) in the chin rest. Instruction Manual Pentacam® / Pentacam® HR (G/70700/EN 0322 Rev02) 51 / 69... -
Page 56: Troubleshooting
Patient Data Management be- comes active. When you start the Pent- acam® program, the message, "Load Bootloader" must appear. Contact the service department or your authorised dealer 52 / 69 Instruction Manual Pentacam® / Pentacam® HR (G/70700/EN 0322 Rev02) -
Page 57: Transport And Storage
17 Transport and Storage Transport and Storage The Pentacam® / Pentacam® HR, must be properly dismantled and packed before being transported or stored. 17.1 Information on Transport and Storage Storage Ambient temperature range -10°C to +55°C Relative humidity, including condensation... -
Page 58: Disassembly
Transport the Pentacam® / Pentacam® HR carefully. Do not hold the device by the joystick to carry it. Store the Pentacam® / Pentacam® HR in compliance with the storage conditions. Avoid placing near heaters and moisture. 54 / 69... -
Page 59: Disposal
In accordance with legal regulations, you are entitled to a warranty for the Pentacam® / Pentacam® HR. If modifications are made to the Pentacam® / Pentacam® HR by unauthorized persons, all warranty claims shall be voided. Improper modifications and repairs may result in considerable hazards to users and patients. -
Page 60: Assumption Of Liability For Functions And Damage
19.2 Assumption of Liability for Functions and Damage OCULUS will only accept responsibility for the safety, reliability and serviceability of the Pentacam® / Pentacam® HR if the unit is used in compliance with the following terms: Only use the equipment in conformance with this instruction manual. -
Page 61: Technical Data
9 to 99 D Accuracy ± 0.2 D ± 0.1 D Reproducibility ± 0.2 D ± 0.1 D Working distance 80 mm (3.1 in) 80 mm (3.1. in) Instruction Manual Pentacam® / Pentacam® HR (G/70700/EN 0322 Rev02) 57 / 69... - Page 62 800hPa to 1060hPa Storage conditions Ambient temperature range -10°C to +55°C Relative humidity, including condensation 10 % to 95 % Air pressure range 700 hPa bis 1060 hPa 58 / 69 Instruction Manual Pentacam® / Pentacam® HR (G/70700/EN 0322 Rev02)
- Page 63 CE in accordance with Regulation (EU) 2017/745 on Medical Devices (MDR) The unit is a Class IIa product. Conformity assessment procedure : (EU) 2017/745 MDR, Annex IX, chapter I and III Instruction Manual Pentacam® / Pentacam® HR (G/70700/EN 0322 Rev02) 59 / 69...
-
Page 64: Annex
A short flicker of the illumination of the Pentacam® / Pentacam® HR during the examination is permissible because it will not affect the diagnosis, treatment and observation. -
Page 65: Guidance And Manufacturer's Declaration - Electromagnetic Emissions And Immunity For The Pentacam® / Pentacam® Hr
IEC 60601-1-2: 2015, based to table 1 The OCULUS Pentacam® / Pentacam® HR is intended for operation in the electromagnetic environment speci- fied below. The user of the Pentacam® / Pentacam® HR should ensure that it is being used in such an environ- ment. - Page 66 0% U ; 250/300 0% U ; 250/300 τ τ periods periods Note: U is the a.c. mains voltage prior to application of the test level τ 62 / 69 Instruction Manual Pentacam® / Pentacam® HR (G/70700/EN 0322 Rev02)
- Page 67 RF transmitters, and electromagnetic site survey should be considered. If the measured field strength in the location in which the Pentacam® / Pentacam® HR is used exceeds the applicable RF compliance level above, the Pentacam® / Pentacam®...
- Page 68 The Pentacam® / Pentacam® HR in intended for use in an electromagnetic environment in which radiated RF disturbances are controlled. The customer or the user of the Pentacam® / Pentacam® HR can help prevent elec- tromagnetic interference by maintaining a minimum distance between portable and mobile RF communications equipment (transmitters) and the Pentacam®...
-
Page 69: Description Of The Connection
21 Annex 21.3 Description of the Connection Pentacam®/Pentacam® HR Y cable Power supply adapter (05150150) Computer/PC/laptop Mains connection Instruction Manual Pentacam® / Pentacam® HR (G/70700/EN 0322 Rev02) 65 / 69... -
Page 70: Data Sheet Hemg 49-S240210-7 (05150150)
(3) The exact obtainable load regulation depends upon the output cord selected and load current. (4) Due to requests in market and advances in technology, specifications subject to change without notice. For the details of safety approval, please consult the factory. 66 / 69 Instruction Manual Pentacam® / Pentacam® HR (G/70700/EN 0322 Rev02) - Page 71 HEMG49-S120400-8 IEC320-C8(DT8) 12.0Vdc 4.0A HEMG49-S150330-7 IEC320-C14(DT7) 15.0Vdc 3.3A IEC320-C8(DT8) 3.3A HEMG49-S150330-8 15.0Vdc IEC320-C14(DT7) 2.1A HEMG49-S240210-7 24.0Vdc IEC320-C8(DT8) 2.1A HEMG49-S240210-8 24.0Vdc WEIGHT: 373.0g (13.2 Oz.) MECHANICAL DIMENSIONS: MM [INCHES] Instruction Manual Pentacam® / Pentacam® HR (G/70700/EN 0322 Rev02) 67 / 69...
-
Page 72: Instructions For Integration Into An It-Network
License handling from local license server to PEMS and vice versa Storage and data export to local network storage and loading from local network storage Printout to local printer 68 / 69 Instruction Manual Pentacam® / Pentacam® HR (G/70700/EN 0322 Rev02) - Page 73 Changes to the IT-Network include: changes in IT-Network configuration connection of additional items to the IT-Network disconnecting items from the IT-Network update of equipment connected to the IT-Network Instruction Manual Pentacam® / Pentacam® HR (G/70700/EN 0322 Rev02) 69 / 69...
- Page 74 Manufacturer and Service Address Headquarters: OCULUS Optikgeräte GmbH Münchholzhäuser Straße 29 • 35582 Wetzlar • GERMANY Tel. +49 641 2005-0 • Fax +49 641 2005-295 E-Mail: export@oculus.de • www.oculus.de USA: OCULUS, Inc. 17721 59th Avenue NE • Arlington •...
Need help?
Do you have a question about the Pentacam and is the answer not in the manual?
Questions and answers