Table of Contents
Advertisement
Quick Links
Advertisement
Table of Contents

Related Manuals for TigerStop TigerRack


Summary of Contents for TigerStop TigerRack
- Page 1 TigerRack User Manual Rev. 0.01...
-
Page 3: Table Of Contents
Table of Contents Contact Us 35 Appendix A: Default Parameter Values Parts Inventory 37 Appendix B: Accessories & TigerRack Installation Software lEctrical EquirEmEnts igEr natomy ounting rackEt nstallation ifting igEr tandard ushEr nstallation & a hEck djust thE inion tandard... - Page 4 GENERAL WARNINGS WARNING: Installation of your TigerStop® Product must be done by a person trained in the safe design and installation of automation products, and in the safe operation of power equipment. Ensure that such installation meets all legally required safety requirements and guidelines, and that proper guarding and safety devices are provided on all sides of the equipment to preclude unintended access during operation.
- Page 5 Don’t get pinched by the push feeder. Keep your hands away when in motion! Keep the work area clean and well lighted to avoid accidental injury. Do not use TigerStop® machines in a dangerous environment. Using power tools in damp or wet locations or in rain can cause shock or electrocution.
- Page 6 Customer Service will email you the enable code during ® business hours, Monday-Friday 6am-4pm PST. You can also request the code by phone. 3. After installing TigerRack, power it on and the screen displays: “Enter Enable Code…Call TigerStop …ph# 360-254-0661” and the machine ®...
-
Page 7: Contact Us
+1 (360) 260 0755 TigerStop Europe TigerStop Europe Email: info@tigerstop.nl Phone: +31 546 575 171 TigerStop Europe | Sales TigerStop Europe | Sales Email: info@tigerstop.nl Phone: +31 546 575 171 (option 2) TigerStop Europe | Service TigerStop Europe | Service Email: sos@tigerstop.nl... - Page 8 Parts Inventory ssembly DESCRIPTION PART QUANTITY (NUMBER) TigerRack Beam & Carriage (TR-##) Amplifier (AMP6) TigerStop Standard ® Controller (CON5) Standard Interconnect (SIK) Power Cable (PC-220V) Data Cable (CC5-XX)
- Page 9 Parts Inventory onTroller Tand ssembly DESCRIPTION PART QUANTITY (NUMBER) Controller Stand Top (M1803) Square Tube (M1808) Round Tube (M1807) Controller Stand Base Half-Bracket (M10070) M6x14mm Socket-Head Screw (F7216) M6x10mm Socket-Head Screw (F7208) M8x50mm Hex-Head Screw (F9827) M8x45mm Hex-Head Screw (F9826)
- Page 10 Parts Inventory DESCRIPTION PART QUANTITY (NUMBER) Spacer (F6702) M8x35mm T-Bolt (F0184) Flange Nut (F0419) ounTing ardware DESCRIPTION PART QUANTITY (NUMBER) Mounting Bracket Varies (BR-TSR) Mounting Bracket 1 per Mounting Hardware Pack Bracket (F0032) TigerRack Mounting Hardware Pack Varies (F0031)
- Page 11 Parts Inventory usher ssembly DESCRIPTION PART QUANTITY (NUMBER) TigerRack Standard Pusher Foot (GSX-TR) M8x20mm Hex Head Screw (F1943) M8 Washer (F3025) M8 T-Nut (F0406)
-
Page 12: Tigerrack Installation
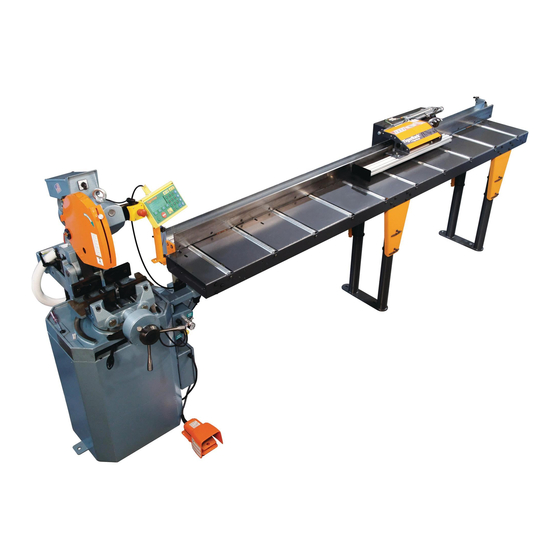
TigerRack Installation lecTrical equiremenTs owe r VOLTS CIRCUIT BREAKER 220/240V 20A (USA)/16A (EU) TigerRack requires a dedicated circuit. iger naTomy Controller Flipaway Stop Pusher Mounting Slots Attachment (Underside) Brakes (Optional) Controller Stand Amplifier Box TigerRack Serial Number Rack Motor Box... -
Page 13: L Ifting T Iger R Ack
TigerRack ships with lifting hardware installed on the top of the beam. ALWAYS use these lifting points when moving TigerRack. Failure to use the pre-determined lifting points risks damage to TigerRack. Lifting requires a forklift equipped with a lifting beam. -
Page 14: S Tandard P Usher F Oot I Nstallation
TigerRack Installation 3. Lower TigerRack into position over the Mounting Brackets. 4. Attach TigerRack using the TigerRack Mounting Hardware Pack. The factory pre-inserts T-Nuts into the mounting slots on the bottom of TigerRack. 5. Remove the eye bolts when attachment is complete. Leave the lifting plates in place. -
Page 15: C Heck & A Djust The P Inion
TigerRack into service. h ec k Th e pi n i o n Te n s i o n Power-off TigerRack before checking the pinion tension. Place a ~1” (25mm) strip of paper on the rack teeth near the carriage. - Page 16 TigerRack Installation Tandard nTerconnecT nsTallaTion Integrate the tool and TigerRack with the Limit Switch and Air Solenoid to enable safer semi-automatic operation when running Part Lists. i m iT wiTc h u n cTi o n The limit switch tells the TigerRack the tool’s current status.
- Page 17 TigerRack Installation o le n o i d n sTall aTi o n Lockout/Tagout the tool, TigerRack, and air supply before installation. Determine which of the tool’s air lines is the “IN” line. “OUT” Air 2. Disconnect the “IN” line, and measure it’s outside diameter. If the diameter is neither 6mm nor 4mm, supply the appropriate sized M5 fittings for the air line.
- Page 18 5. Place the Spacer between the Square Tube’s holes. 6. Connect the Spacer, Top, and Tube with an M8x50mm Hex-Head Screw. 7. Fasten with an M8 Flange Nut. 8. Attach the TigerStop Standard Controller to the Controller Stand Top using an M6x10mm Socket-Head ®...
-
Page 19: 13 M Ount The A Mplifier
Standard Controller and to the Amplifier. ® The Data Cable is proprietary. DO NOT use an “off the shelf” cable. Doing so risks damage to TigerRack. 2. Connect the Standard Interconnect Kit cable to the Amplifier. 3. Connect the Power Cable to the Amplifier and to incoming power. -
Page 20: Neumatic C Onnections (O Ptional )
To use the pneumatic flip-away stop or the tube and pipe gripper options, connect the air prep unit that comes with TigerRack to the main air supply. Twist the top cap of the air prep unit to adjust the air... -
Page 21: Setup
Setup ouTine Every time TigerRack powers-on, it requires the ‘Home Routine’. The Home Routine is a three-step process in which TigerRack moves to its farthest possible position. Ensure the area is clear. TigerRack moves automatically during this routine. Press to run the Home Routine. -
Page 22: 16 R Un The D Rive T Est
The Drive Test measures difficulty of movement. From the Ready Screen, press the [Show] soft key. 2. Press the [Menu] soft key. 3. TigerRack requires a password to access all menu options. Enter the password and press By default, the TigerRack password is the serial number. -
Page 23: 17 F Ind The E Nd L Imits
From the Ready Screen, press the [Show] soft key. 2. Press the [Menu] soft key. 3. TigerRack requires a password to access all menu options. Enter the password and press 4. At the Menu Select screen, press the [Setup] soft key. - Page 24 Setup 3. TigerRack requires a password to access all menu options. Enter the password and press 4. At the Menu Select screen, press the [Options] soft key. 5. Press until reaching the Units screen. 6. Press to toggle between inches and metric.
- Page 25 From the Ready Screen, press the [Show] soft key. 2. Press the [Menu] soft key. 3. TigerRack requires a password to access all menu options. Enter the password and press 4. At the Menu Select screen, press the [Setup] soft key.
-
Page 26: 20 S Et I Nterconnect T Ype
From the Ready Screen, press the [Show] soft key. 2. Press the [Menu] soft key. 3. TigerRack requires a password to access all menu options. Enter the password and press 4. At the Menu Select screen, press 5. Press the [SysInfo] soft key. - Page 27 Setup rake If TigerRack is equipped with brakes, set the Brake Type setting to tell TigerRack when to engage them. From the Ready Screen, press the [Show] soft key. 2. Press the [Menu] soft key. 3. TigerRack requires a password to access all menu options. Enter the password and press 4.
-
Page 28: 22 O Ptimizer S Ettings
From the Ready Screen, press the [Show] soft key. 2. Press the [Menu] soft key. 3. TigerRack requires a password to access all menu options. Enter the password and press 4. At the Menu Select screen, press the [PartList] soft key. - Page 29 8. Press until reaching the OptTime screen. The Optimizer Time sets the time threshold for TigerRack accepting an optimization solution. After the set time, TigerRack picks the best available option. A lower Opt Time setting will work faster with lower yield.
-
Page 30: Tigerstop Standard Controller Basic Functions
® anual ovemenT To manually move TigerRack to a stop position, enter a distance from the saw blade. Enter this distance as a whole number, a decimal, or a fractional value. nTe r i n g ec i mal s Start at the Ready Screen. - Page 31 ‘Next’ field. 5. Press and TigerRack moves to the calculated position. ncremenT The increment function is a push feed mode that steps TigerRack through a series of movements. Increment: • Can be a positive length that moves TigerRack towards the tool.
-
Page 32: 26 Q Uick C Alibration
Manually jog TigerRack towards or away from the tool. Start at the Ready Screen. 2. Press and hold If the jog buttons move TigerRack in the wrong direction, use the ‘ J og Reverse’ setting in the ‘Setup’ menu to reverse the movement. uick alibraTion A short-cut to the calibration setting. - Page 33 Start at the Ready Screen. 2. Press the [Show] soft key. 3. Press the [PrSet] soft key to access the preset feature. 4. Enter the desired preset number and press 5. TigerRack moves to the preset position.
-
Page 34: Ntering P Art L Ists
Enter as many parts as desired into a pusher list and TigerRack says when it needs another stock material piece. Set Point A set point list tells TigerRack to act as a stop. It treats each length you enter as an absolute value from your zero point. Pattern A pattern list tells TigerRack to process one stock-length’s worth of parts in a push-feed fashion. - Page 35 TigerStop Standard Controller Basic Functions ® rog r am m i n g a i sT Start at the Ready Screen. 2. Press the [Show] soft key. 3. Press the [List] soft key. 4. Enter the list number to program and press the [Edit] soft key.
-
Page 36: Ackboard D Efecting & O Ptimizing
TigerStop Standard Controller Basic Functions ® 10. Repeat steps 8 & 9 to enter additional part lengths and quantities. 11. Press the [Done] soft key. 12. Press to run the list or to exit. & o ackboard efecTing pTimizing Backboard Defecting & Optimizing is a process that allows quick and easy cutting around material defects while optimizing the clear stock for better material yield. - Page 37 26.5in START 10. Enter the measurement from step 9 and press 11. TigerRack optimizes the material up to the defect and uses as much of the material as possible. 12. Repeat steps 8-11 while processing the material.
-
Page 38: 32 D Isable Q Uick C Alibration
From the Ready Screen, press the [Show] soft key. 2. Press the [Menu] soft key. 3. TigerRack requires a password to access all menu options. Enter the password and press 4. At the Menu Select screen, press the [Options] soft key. -
Page 39: Maintenance Schedule
• Check the pinion gear to ensure that it is properly tensioned. • Run a motor drive test and record the data in the maintenance log. If drive numbers are above 12000, contact TigerStop Customer Service. ® e ar ly •... -
Page 40: Maintenance Log
Maintenance Log Date Setting Value Drive Test Results MxP= MxN= MxP= MxN= MxP= MxN= MxP= MxN= MxP= MxN= MxP= MxN= MxP= MxN= MxP= MxN= MxP= MxN= MxP= MxN= MxP= MxN= MxP= MxN= MxP= MxN= MxP= MxN= MxP= MxN= MxP= MxN= MxP= MxN= MxP=... - Page 41 Appendix A: Default Parameter Values Menu Parameter Default Value Menu Parameter Default Value Kerf .125 Opt Pen 1.000 Setup Scale 2.55000 Clamp 1 5.000 in Lash .050 Clamp 2 -5.000 in Swing Clamp 0.000 in Language English Download Style Pri-Global Password Serial number Infinite...
- Page 42 32.000 Laser Location Motor End Brake Gain 30.000 Set to maximum Find Vel 0.000 Laser Laser Limit limit of TigerStop Find Trig 300.000 at factory. Laser Reference 5.000 in Clamp On Delay 100 ms Crayon Saw On Delay 100 ms PF Offset 29.250 in...
-
Page 43: Appendix B: Accessories & Software
Back Fence • TigerTouch Tablet Package • Back Fence Ruler • Cascading Cut Lists • Chop Saw Support Visit our website to learn more about TigerRack software & accessories, including manuals and brochures: tigerstop.com Visit our online store at: shop.tigerstop.com... - Page 44 TigerStop Product COMPARISON CHART Power Working Max Load Product Drive Type Accuracy Requirement Length Push 2 AA +/- .008” 0’ - 20’ Caliper TigerSPC +/- 0.2mm 0m - 6m Battery 32mm Belt +/- .008” 8’ - 20’ SawGear Stop Only 110 Vac +/- 0.2mm...
Need help?
Do you have a question about the TigerRack and is the answer not in the manual?
Questions and answers