Table of Contents
Advertisement
Advertisement
Table of Contents

Subscribe to Our Youtube Channel
Related Manuals for TigerStop TigerFence


Summary of Contents for TigerStop TigerFence
- Page 1 TigerFence User Manual Rev. 0.01...
-
Page 2: Table Of Contents
® iger tAndArd ontroller ssemBly ontroller tAnd ssemBly TigerFence Installation leCtriCAl equirements ounting iger enCe ontroller tAnd inAl onneCtions 13 Setup ower eAdy Creen rive ind the imits AliBrAte nits... - Page 3 GENERAL WARNINGS WARNING: Installation of your TigerStop® Product must be done by a person trained in the safe design and installation of automation products, and in the safe operation of power equipment. Ensure that such installation meets all legally required Keep the work area clean and well lighted to avoid accidental injury.
- Page 4 Phone: +31 546 575 171 TigerStop Europe | Sales TigerStop Europe | Sales The TigerFence password is set to the serial number. It is stamped on the main beam’s motor end. Email: info@tigerstop.nl Phone: +31 546 575 171 (option 2)
-
Page 5: Parts Inventory
Parts Inventory Parts Inventory Body Assembly Mounting Template Assembly DESCRIPTION DESCRIPTION PART QUANTITY PART QUANTITY (NUMBER) (NUMBER) Mounting Template (SA8083) TigerFence Body (SA8024) 5/16”-18 T-Bolt (F0177) 5/16” Body Handle Washer (F1670) (F2232) 5/16” Locking Washer (F1675) Ripping Fence 5/16”-18 (XA0912-X) -
Page 6: M Otor C Over A Ssembly
Controller Stand Top (M1803) Motor Cover (S0601-1) Square Tube (M1808) M4x8mm Round Tube Button-Head Cap Screw (M1807) (F9859) Controller Stand Base Bracket (M10070) TigerStop Standard Controller Assembly ® M6x14mm Socket-Head Screw (F7216) DESCRIPTION PART QUANTITY (NUMBER) M6x10mm Socket-Head Screw (F7208) TigerStop Standard ®... -
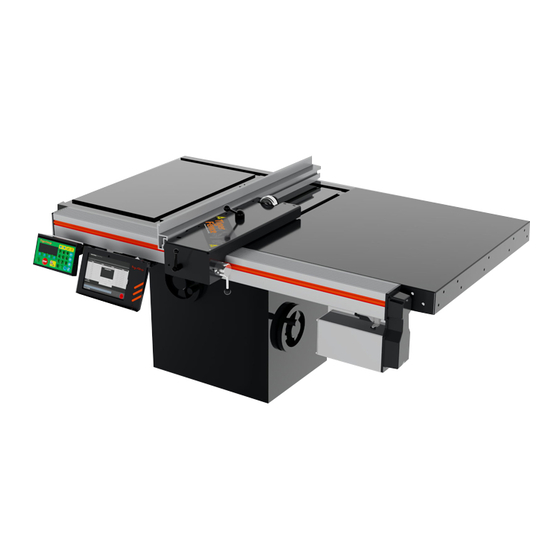
Page 7: Tigerfence Installation
Remove Existing Fence Remove the existing fence. Inspect the mounting surface carefully. File down any bumps and fill any valleys. If this is not possible, you may need to shim TigerFence to make it perfectly parallel with the saw blade. Mounting Options There are two ways to mount a TigerFence. - Page 8 Tighten 1/4 turn past finger tight, only. Mounting Surface: TigerFence mounts to the side of the tabletop. It requires a flat, smooth mounting surface at least 3” (75mm) Final Checks: high. Mounting surface deviations cause inaccuracies and excessive wear on TigerFence.
-
Page 9: Ontroller S Tand
6. Connect the Spacer, Top, and Tube with an M8x50mm Hex-Head Screw. Fasten the Motor Cover using 3 7. Fasten with an M8 Flange Nut. M4x8mm (or 12mm) screws. 8. Attach the TigerStop ® Standard Controller to the Controller Stand Top using an M6x10mm Socket-Head Screw. -
Page 10: Inal C Onnections
Lash Waiting for Text Entry Line 2 shows the current position of TigerFence. The position ends with either ‘in’ or ‘mm’ depending on measurement system. Line 3 shows the next position of TigerFence. This is also where user input appears. -
Page 11: Ind The E Nd L Imits
TigerFence is improperly installed. Do NOT put TigerFence into service. Remove TigerFence from the table and ensure the mounting surface is flat. Then remount TigerFence and ensure that the mounting hardware is not over- tightened. Run the drive test again to ensure that it is below 15,000. - Page 12 6. Enter the password and then press Enter a distance and then press Set Units TigerFence can display its position in inches or in metric. To switch between inches and metric: From the Ready Screen, press the [Show] soft key. 2. Press the [Menu] soft key.
-
Page 13: Tigerstop Standard Controller Basic Functions
Standard Controller Basic Functions Manual Movement Calculator To manually move TigerFence to a stop position, enter a distance from the saw blade. This distance can be entered as a decimal or a fractional value. TigerFence has a calculator function for simple math problems. - Page 14 ® Increment The increment function is a push feed mode that steps TigerFence through a series of movements. TigerFence can be manually jogged in or out. When activated, TigerFence will move until you let go of the jog Increment: button.
- Page 15 3. Enter the preset number and press 2. Press the [PrSet] soft key to access the preset feature. 4. TigerFence moves to the preset position. 3. Enter the preset number you want to program and then press the [Edit] soft key.
-
Page 16: 24 E Ntering P Art L Ists
Set Point • A set point list tells TigerFence to act as a stop. It treats each length you enter as an absolute value from your zero point. 8. Enter how many parts to process at that length, followed by Pattern •... - Page 17 TigerStop ® Standard Controller Basic Functions TigerStop ® Standard Controller Basic Functions Running a Pusher List 4. Select the [Pattern] soft key. From the Ready Screen, press the [Show] soft key. 5. Enter the head cut value and press 2. Press the [List] soft key.
- Page 18 TigerStop ® Standard Controller Basic Functions TigerStop ® Standard Controller Basic Functions Editing a List 4. Dynamic Optimization upgrade, only: Enter the stock length and then press From the Ready Screen, press the [Show] soft key. 5. Load the material, cycle the tool, and then press to move to the next length.
-
Page 19: Maintenance Schedule
Tighten The Belt: Remove belt cover. 2. Loosen the 4 motor mount bolts. 3. Pull down on the motor assembly until belt is tight. 4. Tighten the motor mount bolts. To download the complete TigerStop ® Standard Controller manual, visit: https://www.tigerstop.com/download/tigerstop-users-guide... -
Page 20: Maintenance Log
Maintenance Log Appendix A: Default Parameter Values Setting Value Setting Menu Parameter Default Value Menu Parameter Default Value MxP= MxN= MxP= MxN= Kerf .125 Opt Pen 1.000 MxP= MxN= Setup Scale 8.00000 Clamp 1 5.000 in MxP= MxN= Lash .100 Clamp 2 -5.000 in MxP=... - Page 21 Appendix A: Default Parameter Values Menu Parameter Default Value Menu Parameter Default Value Stall MEP 2.000 Zero End Motor End Stall MES 2.000 Set TIK None Run MEP 2.000 System Baud Rate 9600 Info Run MES .200 I/O Panel Baud 9600 Motion Rate...
- Page 22 TigerStop Product COMPARISON CHART Power Working Max Load Product Drive Type Accuracy Requirement Length Push 2 AA +/- .008” 0’ - 20’ Caliper TigerSPC +/- 0.2mm 0m - 6m Battery 32mm Belt +/- .008” 8’ - 20’ SawGear Stop Only 110 Vac +/- 0.2mm...
Need help?
Do you have a question about the TigerFence and is the answer not in the manual?
Questions and answers