Advertisement
Quick Links
Advertisement

Related Manuals for TigerStop TigerScan


Summary of Contents for TigerStop TigerScan
- Page 1 Made In America 2015 TigerStop, LLC ® TigerScan March 2015 Mk2...
-
Page 3: Safety First
FOUR IMPORTANT CAUTIONS: 1. Do not randomly drill and tap holes in the TigerStop fence beam for mounting or for any other purpose. This might damage the drive system. All fastening or attachment to the fence beam MUST be made by inserting T-bolts or T-nuts WITH washers! 2. - Page 4 Do not operate with guards removed. Keep the work area clean and well-lit to avoid accidental injury. Do not use TigerStop in a dangerous environment. Using power tools in wet locations or in rain can cause shock or electrocution! Do not operate near flammable liquids or in gaseous or explosive atmospheres! Wear proper apparel, no loose clothes or jewelry which could get pulled into moving machinery or materials.
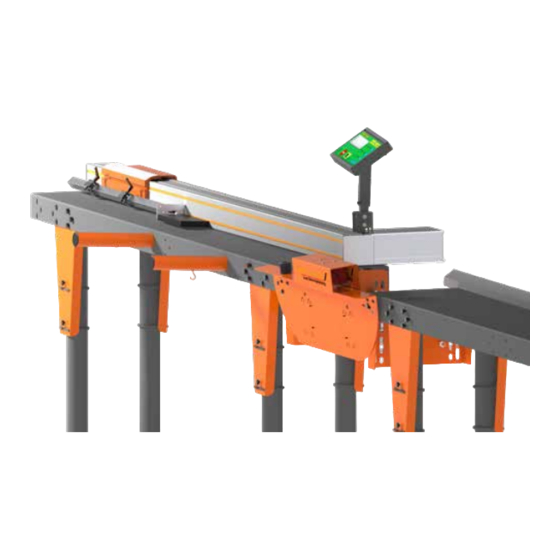
- Page 6 Attach the TigerScan base to two TigerStop tables. Ensure the laser is pointing towards the TigerStop. Attach Light Tower The TigerScan light tower can be installed in any location where the operator can easily see it. Use the supplied hardware to install.
- Page 7 Attach Material Staging Tubes...
-
Page 8: Power Supply
Connections Connections Connect TigerStop to I/O Panel From White End (Amplifier) Black End (I/O Panel) 15 Pin (I/O Panel) (TigerStop Amplifier) White End (I/O Panel) Black End (Controller) 15 Pin (I/O Panel) (TigerStop Controller) CONTROLLER Connect Laser to I/O Panel... - Page 9 Setup Enter Enable Code If you purchased TigerScan as an add on to an existing TigerStop, you must enter a new enable code (provided by TigerStop at time of purchase) that will unlock the TigerScan upgrade. If you purchased the complete TigerScan system, the complete funcionality will be unlocked during the warranty registration process.
- Page 10 Enter your code and press [=]. TigerStop is now properly enabled. Set TigerScan Settings Once TigerScan is installed, there are few settings to configure. These settings are inside the Laser menu. To access the Laser menu... 1. Start at the Ready Screen. Press the [Show] soft key to display more options.
-
Page 11: Laser Marking
Laser Error Laser Error is the amount that you have to move away from the last defect scan to count as another defect scan when using the TigerScan laser defecting system. The default setting of 0.200 works well for most applications. - Page 12 Laser Location Laser location tells TigerStop where the laser is physically mounted in relation to the TigerStop. For TigerScan, this setting must be set to ‘Motor End’. To change Laser Location... 1. Press [B] or [C] to toggle the setting.
- Page 13 Using the TigerScan System Using the TigerScan System The TigerScan laser defecting system changes the way you cut lists with your TigerStop. Once installed, using the system is a 3 step process; 1. Enter and Run a Pusher List. 2. Scan your stock material.
- Page 14 To scan length data, you will use the TigerScan paddle to break the laser beam in certain locaitons. Place the stock material on the material staging tubes. Butt the material against the bumper. The TigerScan system uses a series of light tower flashes and beeps to tell the user what the system is doing.
- Page 15 7. Load the material and press [Start] to begin processing. Using the Material Queue TigerScan has a material queue that can queue up to 6 stock lengths worth of data. The queue can be filled before processing or can be filled as the TigerStop is processing another stock length.
Need help?
Do you have a question about the TigerScan and is the answer not in the manual?
Questions and answers