Advertisement
Available languages
Available languages
Quick Links
International Assembly Instructions for model VMTV
Sanus Systems 2221 Hwy 36 West, Saint Paul, MN 55113 7.05.05
Customer Service: (800) 359-5520 • (651) 484-7988 • fax (651) 636-0367
Customer Service Europe: 31 (0)20 5708938 • fax 31 (0)20 5708989
See complementary Sanus products at www.sanus.com
Advertisement

Related Manuals for Sanus Systems VMTV


Summary of Contents for Sanus Systems VMTV
- Page 1 International Assembly Instructions for model VMTV Sanus Systems 2221 Hwy 36 West, Saint Paul, MN 55113 7.05.05 Customer Service: (800) 359-5520 • (651) 484-7988 • fax (651) 636-0367 Customer Service Europe: 31 (0)20 5708938 • fax 31 (0)20 5708989 See complementary Sanus products at www.sanus.com...
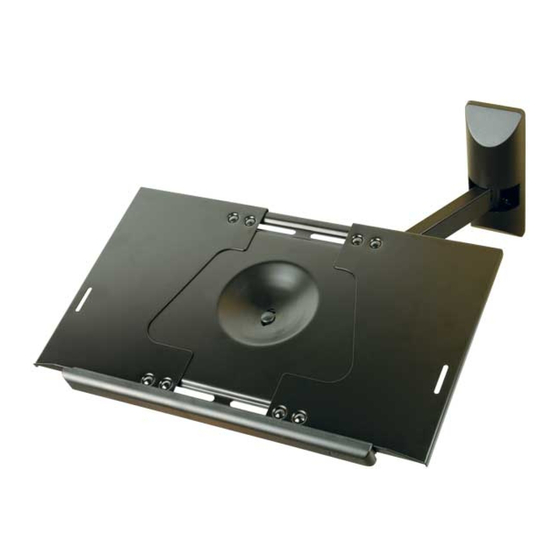
- Page 3 Assembly Instructions for Sanus Systems VMTV Thank you for choosing a Sanus Systems television wall mount. The VMTV is designed to mount 13” to 27” televisions weighing up to 100 lbs to a wood stud wall. It has three tilt settings: 0°, -5°, and -10°. It will also Pan up to 110°, and swivel up to 180°.
- Page 4 Required Tools: Drill with 7/32” drill bit, wrench or socket set, and a Phillips screw driver Supplied Parts: Hardware shown actual size. Other parts are scaled. (1) Wall Plate - a (4) Lag Bolt - b (1) Arm - c (1) Arm Pivot Bolt - d (1) Arm Pivot Nut - e (1) Wall Plate Cover - f...
- Page 5 Diagram 1 Diagram 2 1] Find a stud: The Wall Plate (a) must be mounted to a wood stud. Use a high quality stud sensor to locate the stud. It is a good idea to verify where the stud is located with an awl or thin nail as shown in Diagram 1. Make sure the Wall Plate is oriented so that the two tabs are close to the bottom as seen in Diagram 2.
- Page 6 Diagram 5 Diagram 6 Off center hole 5] Attach the Plastic Connector Top: Slide the Plastic Connector Top (g) onto the end of the Arm (c). Place the Set Screw (h) through the off center hole in the Plastic Connector Top. Thread it into the mating hole in the Arm with a Phillips screw driver as shown in diagram 5. 6] Add the TV Platter: Make sure the TV Platter (i) is oriented so that the tallest bent side points up and faces the front.
- Page 7 Instrucciones de armado del modelo VMTV de Sanus Systems Gracias por elegir el soporte de pared para televisor de Sanus Systems. El modelo VMTV ha sido diseñado para montar televisores de 33 cm a 68,6 cm (13 a 27 pulg.) con un peso de hasta 45,3 kg (100 lb) en una pared con pies derechos de madera. Tiene tres ajustes de inclinación: 0°, -5°...
- Page 8 Herramientas necesarias: Taladro con broca de 5,6 mm (7/32 pulg.), juego de llaves mecánicas o casquillos y destornillador Phillips Piezas suministradas: La tornillería se muestra del tamaño real. Otras piezas se muestran a escala. (1) Placa adaptadora - a (4) Tirafondo - b (1) Brazo - c (1) Perno de pivote de brazo - d (1) Tuerca de pivote de brazo - e...
- Page 9 Diagrama 1 Diagrama 2 1] Hallar un pie derecho: La placa de pared (a) se debe montar a un pie derecho de madera. Utilizar un detector de vigas de alta calidad para localizar el pie derecho. Es una buena idea verificar la ubicación del pie derecho con un punzón o clavo delgado, como se ilustra en el diagrama 1a. Asegurarse de que la placa de pared quede orientada de manera que las dos lengüetas queden cerca de la parte inferior, como se ilustra en el diagrama 2.
- Page 10 Diagrama 5 Diagrama 6 Agujero descentrado 5] Conectar la parte superior del conector de plástico: Deslizar la parte superior del conector de plástico (g) en el extremo del brazo (c). Pasar el tornillo prisionero (h) por el agujero descentrado en la parte superior del conector de plástico. Enroscarlo en el agujero correspondiente del brazo con un destornillador Phillips, como se ilustra en el diagrama 5.
- Page 11 Montageanweisungen für das Modell VMTV von Sanus Systems Wir freuen uns, dass Sie sich für eine Fernseherwandhalterung von Sanus Systems entschieden haben. Das Modell VMTV ist für Fernseher mit Bildschirmdiagonalen zwischen 33 cm (13”) und 68,6 cm (27”) sowie einem Gewicht bis 45,4 kg (100 lb) und die Montage an einer Holzbalkenträgerwand ausgelegt.
- Page 12 Erforderliche Werkzeuge: Bohrmaschine mit Bohrer 5,6 mm (7/32”), Maulschlüssel- oder Steckschlüsselsatz und Kreuzschlitzschraubendreher Mitgelieferte Teile: Zubehör in Originalgröße dargestellt. Die anderen Teile sind maßstäblich dargestellt. (1) Wandplatte – a (4) Holzschraube – b (1) Arm – c (1) Armgelenkschraube – d (1) Armgelenkmutter –...
- Page 13 Abbildung 1 Abbildung 2 1] Holzbalkenträger suchen: Die Wandplatte (a) MUSS an einem Holzbalkenträger montiert werden. Mit einem hochwertigen Sensor einen Balkenträger suchen. Die Lage des Trägers kann am besten mit einer Ahle oder einem dünnen Nagel wie in Abbildung 1 überprüft werden. Die Wandplatte muss so ausgerichtet sein, dass die beiden Nasen wie in Abbildung 2 unten liegen.
- Page 14 Abbildung 5 Abbildung 6 Exzentrische Bohrung 5] Kunststoffverbindungsoberteil anbauen: Das Kunststoffverbindungsoberteil (g) auf das Ende von Arm (c) schieben. Die Einstellschraube (h) durch die exzentrische Bohrung in dem Kunststoffverbindungsoberteil stecken. Die Einstellschraube mit einem Kreuzschlitzschraubendreher wie in Abbildung 5 in die passende Bohrung im Arm eindrehen.
- Page 15 Instructions d’assemblage du VMTV de Sanus Systems Nous vous remercions d’avoir choisi un montant mural pour téléviseur de Sanus Systems. Le VMTV est conçu pour soutenir au mur des téléviseurs entre 33 et 68,6 cm (13 et 27 po) et d’un poids maximal de 45,4 kg (100 lb), sur une ossature en bois.
- Page 16 Outils nécessaires : Perceuse avec mèche de 5,6 mm (7/32 po), jeu de clés ou de douilles et un tournevis cruciforme Pièces fournies : Le matériel illustré est grandeur réelle. D’autres pièces ne sont pas grandeur réelle. (1) Plaque murale - a (4) Tire-fond - b (1) Bras - c (1) Boulon d’articulation du bras - d...
- Page 17 Schéma 1 Schéma 2 1] Repérage d’un montant : La plaque murale (a) doit être montée sur une ossature en bois. Servez-vous d’un détecteur de montants de haute qualité pour repérer le montant. Il est préférable de vérifier l’emplacement du montant à l’aide d’un poinçon ou d’un clou mince tel qu’indiqué sur le schéma 1.
- Page 18 Schéma 5 Schéma 6 Trou central décalé 5] Fixation du dessus du connecteur en plastique : Faites glisser le dessus du connecteur en plastique (g) sur l’extrémité du bras (c). Placez la vis de pression (h) dans le trou central décalé dans le dessus du connecteur en plastique.
- Page 19 L’installazione errata può causare danni o lesioni gravi. Non utilizzare questo prodotto per scopi diversi da quelli specificamente indicati dalla Sanus Systems. La Sanus Systems non è responsabile di danni o lesioni causati da montaggio, o utilizzo non corretti. Chiamare la Sanus Systems prima di riportare i prodotti al punto vendita.
- Page 20 Strumenti necessari: trapano con punta da 5,6 mm (7/32”), un set di chiavi esagonali e un cacciavite Philips Parti fornite: la minuteria metallica è mostrata nelle dimensioni reali Altre parti sono in scala. (1) piastra per parete - a (4) tirafondo - b (1) Braccio - c (1) bullone pivottante per braccio - d (1) dado pivottante per braccio - e (1) copertura per piastra per parete - f...
- Page 21 Figura 1 Figura 2 1] Ricercare una trave: La piastra a parete (a) deve essere montata su una trave di legno. Usare un rilevatore di travi di legno di alta qualità per individuare le travi di legno nella parete. È una buona idea verificare la posizione delle travi di legno con un punteruolo o con un chiodo sottile come nella Figura 1.
- Page 22 Figura 5 Figura 6 Foro fuori centro 5] Montare la parte superiore del connettore di plastica: Fare scorrere la parte superiore del connettore di plastica (g) sull’estremità del braccio (c). Posizionare la serie di viti (h) attraverso il foro fuori centro nella parte superiore del connettore di plastica. Avvitare nel foro corrispondente del braccio con un cacciavite Phillips come mostrato nella figura 5.
- Page 23 Инструкция по сборке настенного крепления Sanus Systems VMTV Благодарим Вас за приобретение настенного крепления для телевизора Sanus Systems. Крепление VMTV предназначено для установки телевизоров с диагональю от 33 см до 68,6 см (от 13 дюймов до 27 дюймов), весом до 45,4 кг (100 фунтов) на деревянные...
- Page 24 Необходимые инструменты: Дрель со сверлом 5,6мм (7/32”), набор ключей или набор торцовых насадок, крестообразная отвертка. Комплект поставки: Детали изображены в реальном размере. Другие части изображены в масштабе. Настенная крепежная пластина (a) – 1 шт. Шуруп под ключ (b) – 4 шт. Кронштейн...
- Page 25 Рисунок 1 Рисунок 2 1] Найдите деревянную стойку: Крепежная пластина (a) должна быть установлена на деревянной стойке каркасной стены. Для определения местонахождения деревянной стойки следует использовать высокочувствительный датчик. Целесообразно проверить, правильно ли определено местонахождение стойки, с помощью шила или тонкого гвоздя, как показано на рисунке 1. Убедитесь, что выступы на настенной крепежной...
- Page 26 Рисунок 5 Рисунок 6 смещенное от центра отверстие 5] Прикрепите верхнюю часть пластмассовой насадки: Наденьте верхнюю часть пластмассовой насадки (g) на край кронштейна (c). Вставьте установочный винт (h) в смещенное от центра отверстие в пластмассовой насадке. С помощью крестообразной отвертки ввинтите его в соединительное отверстие в кронштейне, как...
- Page 27 Sanus Systems VMTV の組み立て説明書 Sanus Systems テレビ壁掛け製品をお買い上げいただきありがとうございます。 VMTV は、 33 cm (13 インチ)か ら68.6 cm (27 インチ)、 45.4 kg (100 lb) までのテレビを木製の間柱のある壁面に取り付けるよう設計されていま す。 0°、 -5°、 -10° の 3 段階の角度に傾けることができます。 さらに、 最大 110°まで回転させたり、 最大 180°まで旋回さ せることができます。 設置するテレビのサイズおよび重量により、 この仕様は異なります。 安全性に関する警告 : こ こに記載されている説明ではよ く わからない場合、 も し く は設置上の安全性について疑問がある場合は、...
- Page 28 必要な工具 : 5.6 mm (7/32 インチ)のドリルビットのついたドリル、 レンチまたはソケットの セット、 プラスドライバー 梱包部品 : 金具は実サイズで表示されています。 その他の部品は実サイズではありません。 (1) 壁面プレート - a (4) ラグボルト - b (1) アーム - c (1) アーム用ピボッ トボルト - d (1) アーム用ピボットナット - e (1) 壁面プレートカバー - f (1) プラスチック製 コネクタの上部...
- Page 29 図 1 図 2 1] 間柱の位置を確認する : 壁面プレート (a) は、 必ず木製の間柱に取り付けてください。 高性能の間柱探知機を使って、 間柱の位置を調べます。 図 1のように、 千枚通しか細い釘で間柱の位置を確認しておく とよいでしょう。 図 2 のように、 2 つのタブが下方にく るように壁面プレートの向きを確認します。 壁面プレートをテンプレートにして、 取り付ける間柱の幅内に、 ラグボルト (f) の 4 つの穴の位置の印を付けます。 5.6 mm(7/32 インチ)のドリルビッ トを使って、 印を付けた位置に予め奥行き 6.4 cm (2.5 in) の穴を 4 つ開けておきます。 2] 壁面プレートを取り付ける : 図...
- Page 30 図 5 図 6 中心から外れたところにある穴 5] プラスチック製コネクタの上部を取り付ける : プラスチック製コネクタの上部 (g) をアーム (c) の先端に差し込みます。 プラスチック製コネクタの上部の中心から外れたとこ ろにある穴に、 止めネジ (h) を差し込みます。 図 5 のように、 プラスドライバーでネジをアームの適合する穴にねじ込みます。 6] テレビ設置台を取り付ける : 折れ曲がっている面が上向きかつ正面になるようテレビ設置台 (i) の向きを確認します。 プラスチック製コネクタの上部 (g) にテレビ設置台を載せます。 設置台用ボルト (j) のヘッ ドの下には、 角のある首があります。 この角が、 テレビ設置台の中央に ある 3 つの角穴の 1 つに適合します。 後方の穴が 0°、 中央の穴が -5°、 前方の穴が -10°の傾斜角度になります。 設置す るテレビのサイズおよび重量により、...
- Page 31 Sanus Systems VMTV 装配说明 感谢您选用 Sanus Systems 电视机墙架。VMTV 设计用于将 33 厘米到 68,6 厘米(13 到 27 英寸)的电视机安装到 木立筋墙面,承重可达 45 公斤 (100 磅) 。它有三种倾斜设置:0°、-5° 和 -10°。它还可以左右转动 110°,旋转 180°。电视机的尺寸和重量会影响这些规格。 安全警告:如果您不理解这些说明或对安装的安全性有任何疑问,请致电有资格的承包商或与 Sanus 联系,联系电 话:800.359.5520(美国)或 31 (0) 20 5708938(欧洲)。您也可以访问我们的网站 www.sanus.com。我们的客户服务代 表将迅速协助您解决安装问题及零件缺少或损坏的问题。通过授权经销商所购产品的替换零件将直接送货上门。 请仔细检查以确保零件无缺少或缺陷。切勿使用有缺陷的零件。安装不正确可能会导致损坏或严重受伤。切勿将 本品用于 Sanus Systems 未明示的任何其它目的。Sanus Systems 对由于安装不正确、装配不正确或使用不当引...
- Page 32 必需的工具:带 5.6 毫米(7/32 英寸) 钻头的钻孔机、扳手或套筒组、飞利浦 螺丝刀 提供的零件:五金件按实际尺寸显示。其它零件按比例显示。 (1) 墙板 - a (4) 方头螺栓 - b (1) 臂 - c (1) 臂枢轴螺栓 - d (1) 臂枢轴螺母 - e (1) 墙板盖 - f (1) 塑料 连接器顶部 - g (1) 定位螺丝 - h (1) 电视机转盘...
- Page 33 图 1 图 2 1] 找墙筋: 墙板 (a) 必须安装到木立筋上。使用高质量的墙筋传感器找到墙筋。建议用锥子或细钉确定墙筋的位置,如图 1 所示。确保墙板方向正确,以使两个突起靠近底部,如图 2 所示。使用墙板作为样板在选定墙筋的两侧之间标记 方头螺栓 (b) 的 4 个孔的位置。预先用 5.6 毫米(7/32 英寸) 钻头在标记位置钻出 6.4 厘米(2.5 英寸) 深的孔。 2] 安装墙板: 用四个方头螺栓将墙板安装到墙上,如图 2 所示。 警告:旋紧方头螺栓 (b) 直至墙板 (a) 紧贴墙面。切勿将方头螺栓旋得过紧! 图 3 图 4 两个孔...
- Page 34 图 5 图 6 偏距孔 5] 安装塑料连接器顶部: 将塑料连接器顶部 (g) 滑动到臂 (c) 的末端。将定位螺丝 (h) 穿入并通过塑料连接器顶部的偏距孔。用飞利浦螺丝 刀将该螺丝旋入臂的配合孔中如图 5 所示。 6] 安装电视机转盘: 确保电视机转盘 (i) 方向正确,以使最高的弯曲侧向上且朝向正面。将电视机转盘向下插入塑料连接器顶部 (g) 的 顶端。在底盘螺钉 (j) 的头部之下是方颈。此正方形刚好与切入电视机转盘中央的 3 个方孔中的一个相吻合。后 面的孔为 0°倾斜,中央的孔为 -5°倾斜,前面的孔为 -10°倾斜。电视机的尺寸和重量会影响倾斜角度。大 图 7 于 23 英寸或重量大于 27公斤(60 磅)的电视机不要 插槽...
Need help?
Do you have a question about the VMTV and is the answer not in the manual?
Questions and answers