
Related Manuals for Sony RM -NX7000


Summary of Contents for Sony RM -NX7000
- Page 1 3-254-727-11(1) Int egrat ed Remot e Commander Operat ing Inst ruct ions RM -NX7000 ©2004 Sony Corporation Downloaded from: https://www.usersmanualguide.com/...
- Page 2 Downloaded from: https://www.usersmanualguide.com/...
- Page 3 Commander or the manual accompanying it in whole or in part, or renting the software without the permission of the copyright holder. • In no event will SONY be liable for any financial damages, or loss of profits, including claims made by third parties, arising out of the use of the software supplied with this Remote Commander.
- Page 4 Refer to them whenever you call upon your Sony dealer regarding this product. – Reorient or relocate the receiving antenna. Model No. RM-NX7000 – Increase the separation between the Serial No.
-
Page 5: Table Of Contents
Table of Cont ent s Features ........................... 8 Getting Started Unpacking ........................11 Preparing RM-NX7000 ....................12 Charging ........................14 Using the touch panel display ................... 16 Calibrating the touch panel display (ALIGNMENT) ..........16 Location and Function of Controls ................17 Screen layout and elements ................... - Page 6 Continued Table of Cont ent s Customizing the Component display (COMPONENT EDIT) ......88 Changing the assignment of a function key (MOVE) ..........89 Deleting a function key (DELETE) ................92 Setting the skin (key appearance and color) and the label (name) of a function key (SKIN/LABEL) ......................
- Page 7 Easy selection of a series of actions (macro) programmed for Zapping (ZAPPING) Outline of Zapping ....................172 What is Zapping? ......................172 Editing the Zapping function .................. 174 About the edit display for Zapping ................174 Step 1: Creating a Zapping group ................176 Step 2: Creating a Zapping element ................
-
Page 8: Features
Feat ures The multi functional remote control, RM-NX7000, allows you to control multiple AV components, lighting equipment, and air-conditioners with one remote control. The following features are provided. Easy t o use int erf ace Ext ended f unct ions of t he Rem ot e Com m ander 65,536 color operation display The Remote Commander is equipped... - Page 9 You can assign function keys of or Sony Remote Support Line multiple components to a single 1-(866)-922-7669 component display. For example, when you watch a DVD with a home theater system, if you...
-
Page 10: Getting Started
Get t ing St art ed Downloaded from: https://www.usersmanualguide.com/... -
Page 11: Unpacking
Unpacking Check the accessories in the package before using the Remote Commander. • Remote Commander RM-NX7000 (1) • Battery charging stand (1) • AC power adaptor (1) • USB cable (1) • Stylus (1) • Installation CD-ROM (1) • Operating Instructions (1, this manual) •... -
Page 12: Preparing Rm-Nx7000
Preparing RM -NX7000 After checking the contents of the package, start up the Remote Commander. The procedure to start up the Remote Commander is explained here. Charge the Remote Commander, connecting the supplied AC power adaptor. For details, see page 14. - Page 13 When the display for the alignment appears, calibrate the touch key display. For details, see page 16. The Home display appears, and the Remote Commander is ready to operate. Then, let’s start up the Remote Commander! Then, let’s start up the Remote Commander! Downloaded from: https://www.usersmanualguide.com/...
-
Page 14: Charging
Charging Charge the Remote Commander using the supplied Battery charging stand. The Remote Commander can also be charged by connecting the supplied AC power adaptor directly without using the Battery charging stand. Notes • Be sure to charge the Remote Commander when you use it for the first time. •... - Page 15 Charging w it hout using t he Bat t ery charging st and Connect the AC power adaptor directly to the DC IN jack of the Remote Commander. You can operate the Remote Commander while charging it. Notes • After starting up, charging continues. Do not disconnect the AC power adaptor until charging is complete and be disappears.
-
Page 16: Using The Touch Panel Display
Using t he t ouch panel display Calibrat ing t he t ouch panel display (ALIGNM ENT) Tap t he cent er of t he m arks sequent ially w it h t he supplied St ylus. We say “tap” about pressing lightly on the display with the Stylus. -
Page 17: Location And Function Of Controls
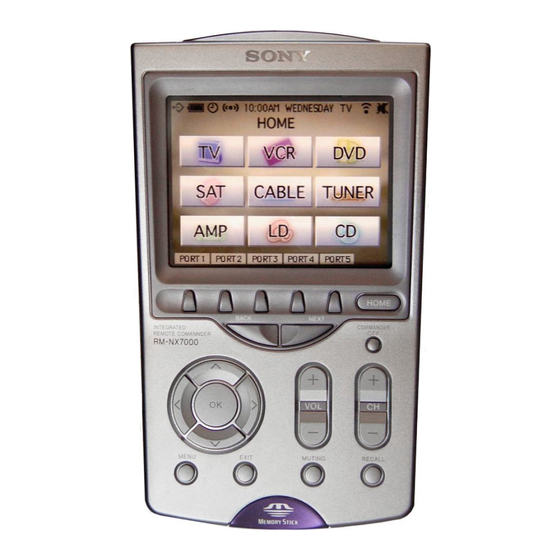
In this section, names and functions of parts and controls on RM-NX7000 are explained. Software keys on the touch panel screen are called function keys, and hardware buttons on the Remote Commander are called function buttons. Rem ot e Com m ander RM -NX7000 (f ront panel) HOME BACK NEXT... - Page 18 Continued Locat ion and Funct ion of Cont rols 4 OK button and Cursor Control buttons Used to operate the menu display of a component being controlled by the Remote Commander. 5 M ENU button Shows the menu display of a component being controlled by the Remote Commander.
- Page 19 To turn on the display again, press any button except the COMMANDER OFF, or the touch panel display. To change the length of time before the Automatic-Off function works, see page 216. Rem ot e Com m ander RM -NX7000 (upper and rear panel) Rear qf DC IN jack Used to connect the supplied AC power adaptor.
- Page 20 Continued Locat ion and Funct ion of Cont rols qk Infrared emitter ql RESET button Used to restart the Remote Commander. Press this button with the supplied Stylus when the Remote Commander does not work at all even if you press the touch panel display.
-
Page 21: Screen Layout And Elements
Screen layout and elem ent s Operat ion m ode display This is the display used for operating your component. If you press a respective Component key shown in the Home display, function keys for the selected component appear. Hom e Display The Home display appears when the HOME button is pressed. - Page 22 Continued Locat ion and Funct ion of Cont rols Com ponent display A Component display appears when a Component key in the Home display is pressed. Function keys to control the component are assigned to the Component display. Component display of TV Set t ing m ode display This is the display used for setting the Remote Commander.
- Page 23 2 [EXIT] key Press to return to the previous mode display. 3 Setting keys Press to set up each setting. [PRESET] key Press to change a component preset code (page 43). Setting items: [SOLUTION] (page 45) [BRAND] (page 48) [SEARCH] (page 50) [HOM E EDIT] key Press to customize the Home display (page 67).
- Page 24 Continued Locat ion and Funct ion of Cont rols [SYSTEM ] key Press to set the function of the Remote Commander (“Memory Stick”, display indication, etc.) (pages 206, 212). Setting items: [MEMORY STICK] (page 206) [DISPLAY] (page 212) [CLOCK] (page 220) [BEEP] (page 222) [LOCK] (page 223) [ABOUT] (page 224)
-
Page 25: Setting Up The Remote Commander Using "Navitus Design
Set t ing up t he Rem ot e Com m ander using “ NAVITUS Design” Installing “NAVITUS Design” software contained in the supplied CD- ROM on your computer, you can set up the Remote Commander with your computer. “NAVITUS Design” makes complex settings such as “Macro”... - Page 26 Continued Set t ing up t he Rem ot e Com m ander using “ NAVITUS Design” Inst alling “ NAVITUS Design” Follow the instructions below to install. Notes • Do not copy the “NAVITUS Design” folder in the supplied CD-ROM to a computer. •...
- Page 27 Inst alling t he USB driver To connect a computer and the Remote Commander using the supplied USB cable, installing the USB driver to the computer is necessary. Follow the instructions below to install. Notes • If the AC power adaptor is not connected to the Remote Commander, USB cannot be detected by the computer even if the USB cable is connected.
- Page 28 Continued Set t ing up t he Rem ot e Com m ander using “ NAVITUS Design” Select “ Inst all t he sof t w are aut om at ically [Recom m ended]” , t hen click [Next ]. Installing of the USB driver starts.
- Page 29 Click [Finish]. Installing of the USB driver finishes. For Window s M illennium Edition users Close all sof t w are running on Window s. Insert t he supplied CD-ROM in t he CD-ROM drive of t he com put er. After a moment, “InstallShield Wizard”...
- Page 30 Continued Set t ing up t he Rem ot e Com m ander using “ NAVITUS Design” For Window s 98 Second Edition users Close all sof t w are running on Window s. Insert t he supplied CD-ROM in t he CD-ROM drive of t he com put er. After a moment, “InstallShield Wizard”...
- Page 31 M ark only t he check box of “ Specif y a locat ion” , t hen click [Brow se]. The “browse for Folder” dialog box appears. Select t he “ Driver” f older in “ CD- ROM drive (NAVITUS)” , t hen click [OK].
- Page 32 Set t ing up t he Rem ot e Com m ander using “ NAVITUS Design” St art ing up “ NAVITUS Design 1.0” On Window s XP Click the [Start] button on Windows, and point to [All Programs]. Click [Sony NAVITUS] then [NAVITUS Design 1.0]. “NAVITUS Design 1.0” display On Window s other than XP Click the [Start] button on Windows, and point to [Programs].
- Page 33 Using “ NAVITUS Design” – Help You can set up the Remote Commander by operating “NAVITUS Design”, referring to the detailed instructions provided in Help. Starting Help Start up “NAVITUS Design”, then click [Help] on the menu bar and select [NAVITUS Design help].
- Page 34 Continued Set t ing up t he Rem ot e Com m ander using “ NAVITUS Design” Click [NAVITUS Design 1.0] in t he “ Current ly Inst alled Program s” list , t hen click [Change/Rem ove]. “InstallShield Wizard” of “NAVITUS Design” appears. Select “...
- Page 35 Click [Finish]. Uninstalling of “NAVITUS Design” finishes. For Window s M illennium Edition/ Window s 98 Second Edition users Click [St art ], [Set t ings] t hen [Cont rol Panel]. The “Control Panel” window appears. Double-click [Add/Rem ove Program s]. The “Add/Remove Programs Properties”...
-
Page 36: Basic Operations
Basic Operat ions Downloaded from: https://www.usersmanualguide.com/... -
Page 37: Basic Operations Of The Remote Commander
Tip The Remote Commander is preset at the factory to control most Sony components. To use certain Sony components or components other than Sony’s, see “Programming the preset codes of components (PRESET)” (page 42) and program the component preset codes for the Remote Commander. - Page 38 Continued Basic Operat ions of t he Rem ot e Com m ander Press a f unct ion key on t he Com ponent display or a but t on on t he Rem ot e Com m ander. For example, press the [TV POWER] key. The remote control signal is sent to the component you want to operate (in this case, a TV), and the component functions.
-
Page 39: Entering The Set Display (Setting Mode)
Ent ering t he Set display (Set t ing m ode) You can customize the Remote Commander’s display to your preference by changing key design or programming complex operations for a single key. Each setting can be performed in the corresponding setting mode. As it is necessary to use the Set display for setting, how to enter the Set display and how certain keys function in each setting display are explained here. -
Page 40: Inputting Letters (Label Setting)
Continued Basic Operat ions of t he Rem ot e Com m ander Input t ing let t ers (label set t ing) The basic operations to input letters is explained here. Letters can be input in the label (name) setting display by pressing the keyboard using the supplied Stylus. The label setting display appears when creating a new key or changing a key label already set. - Page 41 Notes • You cannot use certain keys depending on the genre of label. Keys that cannot be used appear pressed. If you press one of these keys, a beep sounds twice. • You cannot set a label having no letters. •...
-
Page 42: Programming The Preset Codes Of Components (Preset)
Programming of the preset code is required in the following cases: – To use a Sony component that is not registered to the Remote Commander by the default setting – To use a component other than Sony’s New components can be registered to the Remote Commander by downloading their preset codes from the web site and programming for the Remote Commander. -
Page 43: Programming A Preset Code
Program m ing a preset code Press t he [SET] key f or 2 seconds or longer in t he Hom e display. The Set display appears. Press t he [PRESET] key. Press a Com ponent key you w ant t o program a preset code f or. - Page 44 Remote control signals of the component to be registered is received by the Remote Commander, then registering can be simply performed by searching automatically a preset code. RM -NX7000 Remote control of the component to be registered About 5 - 10 cm...
- Page 45 When program m ing of a preset code is com plet e The display returns to the Component key selection display (step 3, page 43). To program anot her com ponent successively Repeat the procedure from step 3 on page 43. To perf orm ot her set t ings af t er f inishing t he set t ing of program m ing a preset code Press the [EXIT] key.
- Page 46 Continued Program m ing t he preset codes of com ponent s (PRESET) Follow ing t he on-screen inst ruct ions, press and hold dow n t he but t on of t he rem ot e cont rol of t he AV com ponent t o be regist ered unt il a beep sounds.
- Page 47 When t w o or m ore preset codes are det ect ed The display on the right appears. Program a preset code by performing one of the following ways. z Tip If you press the [CANCEL] key, the preset code will not be programmed and the display will return to the programming method selection display (step 1 on page 45).
- Page 48 Continued Program m ing t he preset codes of com ponent s (PRESET) Program m ing a preset code using t he list of brand preset codes (BRAND) The following steps are continued from step 4 on page 44. Programming a preset code of a TV component is explained here. Press t he [BRAND] key in t he program m ing m et hod select ion display.
- Page 49 When the component to be registered does not function properly The selected preset code may be incorrect. Select again the preset code by pressing the [v] or [V] key, aim the Remote Commander at the component to be registered, and then press the [TEST] key again. z Tips •...
- Page 50 Continued Program m ing t he preset codes of com ponent s (PRESET) Program m ing a preset code using t he list of com ponent preset codes (SEARCH) The following steps are continued from step 4 on page 44. Programming a preset code of a TV component is explained here.
- Page 51 When the component to be registered does not function properly The selected preset code may be incorrect. Select again the preset code by pressing the [v] or [V] key, aim the Remote Commander at the component to be registered, and then press the [TEST] key again. Repeat this operation until the component to be registered functions properly.
-
Page 52: Using The Direct Access Buttons (Direct Access)
Using t he Direct Access but t ons (DIRECT ACCESS) The Direct Access buttons are shortcuts to skip to given displays from the home display. If you program a Direct Access button to jump to the desired page, the page will appear by just pressing the Direct Access button. You can also change the labels (names) of the Direct Access buttons. - Page 53 Press t he t ag of a Direct Access but t on you w ant t o set t he label t o. For example, set the label by pressing the [Button1] tag. Note You cannot select a tag, even if you press a Direct Access button on the Remote Tags of the Direct Access buttons Commander.
- Page 54 Continued Using t he Direct Access but t on (DIRECT ACCESS) When t he label set t ing is com plet e, press t he [OK] key. The label setting of the Direct Access button is confirmed and the display returns to step 3.
-
Page 55: Programming An Action To Skip To The Desired Page For A Direct Access Button
Program m ing an act ion t o skip t o t he desired page for a Direct Access but t on You can program a series of actions (macro) for the Direct Access buttons. If you program an action to skip to the desired page for a Direct Access button, you can jump to your favorite page just by pressing the button. - Page 56 Continued Using t he Direct Access but t on (DIRECT ACCESS) Press t he [DIRECT ACCESS M ACRO] key. A message for confirming of deleting a macro appears. If you press [YES] key, a macro that has already been programmed will be deleted, and a new macro will be programmed.
- Page 57 Press t he [OK] key. The display returns to step 3. The setting for jumping to the first page of the TV/DVD component by pressing the MOTHER button is programmed. z Tips • If you press the [CANCEL] key, the macro will not be set and the display will return to step 3.
-
Page 58: Programming Remote Control Signals For A Key Or Button - Learning Function (Learn)
Program m ing rem ot e cont rol signals for a key or but t on – Learning funct ion (LEARN) You can teach remote control signals for an component to any of the programmable function keys on the Component display, and buttons on the Remote Commander. - Page 59 Place t he Rem ot e Com m ander head t o head w it h t he rem ot e cont rol of t he com ponent w hose signal is t o be learned. RM -NX7000 Remote control of the AV component...
- Page 60 Continued Program m ing rem ot e cont rol signals for a key or but t on – Learning funct ion (LEARN) Notes • Function keys that are not learnable appear pressed. If you press one of these keys, a beep sounds twice. Or if you select a function key which has already learned a remote control signal, a function key for which a macro has been programmed or a function key which has been set as the reference key for Alias, a message appears according to the respective setting contents.
- Page 61 Note on w hen teaching a signal to an Alias key/ button An Alias key/button is set to refer to the setting contents of another key/button and work the same as the reference key/button. When you teach an Alias button, a message appears and prompts you to select either the button you pressed or the reference key/button of the pressed button to teach a signal to.
- Page 62 • When you teach signals of an interactive signal exchange system remote control unit (supplied with some Sony tuners, amplifiers and receivers) to the Remote Commander, the response signal of the main unit may interfere with learning of the Remote Commander.
- Page 63 Not es on learning t he signals of an air-condit ioner About seasonal adjustments If you change the seasonal settings of your air-conditioner, you have to teach the remote control signals of the new settings to the Remote Commander. If the pow er-on/ off operation does not w ork correctly If the Remote Commander operates only “ON”...
-
Page 64: Deleting The Learned Remote Control Signal
Continued Program m ing rem ot e cont rol signals for a key or but t on – Learning funct ion (LEARN) Delet ing t he learned rem ot e cont rol signal You can delete the remote control signal that a key or button has learned. When the learned signal is deleted, the key or button returns to the status before learning. - Page 65 If you w ant t o delet e all learned dat a Press the [YES] key. The data deleting message appears. When deletion is complete, the display returns to step 4. If you do not w ant t o delet e all learned dat a Press the [NO] key.
-
Page 66: Customizing The Display
Cust omizing t he Display Downloaded from: https://www.usersmanualguide.com/... -
Page 67: Customizing The Home Display (Home Edit)
Cust om izing t he Hom e display (HOM E EDIT) You can change the assignment of the Component keys in the Home display, and the labels of the Component keys. Also, you can add a new page to the Home display if necessary. - Page 68 Continued Cust om izing t he Hom e display (HOM E EDIT) The Home display can also be customized easily with a computer by using the supplied application “NAVITUS Design.” You can enjoy customizing the Home display screen by importing pictures from the computer and set them to the keys, for example. “NAVITUS Design”...
-
Page 69: Changing The Assignment Of A Component Key (Move)
Changing t he assignm ent of a Com ponent key (M OVE) The assignment of the Component keys can be changed. You can assign a component you often use to the first page, or assign AV components used together to nearby keys. z Tip It is recommended to add a new page using the [PAGE] function (page 85) before moving a Component key, so that you can change the assignment of Component keys after empty... - Page 70 Continued Cust om izing t he Hom e display (HOM E EDIT) Press t he posit ion t o w hich t he Com ponent key is t o be m oved. To move the Component key to another page of the Home display Press the NEXT/BACK button to change the page, then press the position the Component key is to be moved to.
- Page 71 z Tip If you press the [CANCEL] key without pressing the position the Component key is to be moved to, the display returns to step 4. Note If you press a position that cannot be specified as the position the Component key is to be moved to (the Component key selected to be moved that appears pressed, or positions except Component keys and empty space), a beep sounds twice.
-
Page 72: Deleting A Component Key (Delete)
Continued Cust om izing t he Hom e display (HOM E EDIT) Delet ing a Com ponent key (DELETE) Unnecessary Component keys can be deleted from the Home display. Once a Component key is deleted, all the programmed data and settings for the component (the Component display, function keys, data on function buttons) are deleted. - Page 73 Press t he [YES] key. The selected Component key is deleted, the display returns to step 4. If you do not want to delete the Component key, press the [NO] key. The Component key will not be deleted, and the display returns to step 4. To f inish all set t ings, press t he COM M ANDER OFF but t on f or 2 seconds or longer.
-
Page 74: Setting The Skin (Key Appearance And Color) And The Label (Name) Of The Component Key (Skin/Label)
Continued Cust om izing t he Hom e display (HOM E EDIT) Set t ing t he skin (key appearance and color) and t he label (nam e) of t he Com ponent key (SKIN/LABEL) You can set the skin (key appearance and color) and the label shown on the Component key. - Page 75 Press a Com ponent key w hose skin (key appearance and color) and label you w ant t o set . The display for the skin setting appears. Component keys Labels for the Direct Access buttons Press t he Direct Access but t on t o select it . z Tip If you press the Direct Access button, you cannot set the skin.
- Page 76 Continued Cust om izing t he Hom e display (HOM E EDIT) Set t he label of t he Com ponent key. Input letters to the label in the label setting display by pressing the keyboard using the supplied Stylus. For inputting letters to the label, see “Inputting letters (label setting)”...
-
Page 77: Copying A Component Key (Duplicate)
Copying a Com ponent key (DUPLICATE) You can create a new Component key by copying an existing Component key. If you duplicate a Component key, a new Component key with the same preset code and function buttons as an existing Component key is created. It is convenient to create a new Component key by changing partially the setting contents of an existing Component key. - Page 78 Continued Cust om izing t he Hom e display (HOM E EDIT) If you w ant t o change a com ponent preset code Press the [YES] key. For details on programming of a preset code, see “Programming the preset codes of components (PRESET)”...
- Page 79 z Tips • A new Component key created by copying has the same skin as the copied Component key. If you want to change the skin of a new Component key created by copying, set the skin again. For details, see “Setting the skin (key appearance and color) and the label (name) of the Component key (SKIN/LABEL)”...
-
Page 80: Creating A New Component Key (New)
Continued Cust om izing t he Hom e display (HOM E EDIT) Creat ing a new Com ponent key (NEW) You can create a new Component key in the Home display. There are two methods to create a new Component key. •... - Page 81 To creat e a Com ponent key w it hout program m ing a preset code of a com ponent Select “NONE” from the AV component list in the display and then go to step 6. Select a m et hod t o program a preset code (PRESET) f or t he Com ponent key, and t hen program a preset code.
- Page 82 Continued Cust om izing t he Hom e display (HOM E EDIT) To f inish all set t ings, press t he COM M ANDER OFF but t on f or 2 seconds or longer. The display returns to the Home display. Or press the [EXIT] key repeatedly until the Home display is shown.
-
Page 83: Creating An Alias Component Key (Alias)
Creat ing an Alias Com ponent key (ALIAS) An Alias Component key is a Component key that operates by referring to the setting contents of another component. For example, if you create an Alias key that refers to the TV Component key, you can create a Component key having the same setting contents as the existing TV Component key. - Page 84 Continued Cust om izing t he Hom e display (HOM E EDIT) Set t he label of t he Alias Com ponent key t o be creat ed. For details on setting the label, see “Inputting letters (label setting)” (pages 40 - 41).
-
Page 85: Adding/Deleting A Page Of The Home Display (Page)
Adding/delet ing a page of t he Hom e display (PAGE) You can add or delete a page of the Home display. You can add a page of the Home display, if there is no space to assign a key when you want to create a Component key, or if you want to group Component keys by page as you prefer. - Page 86 Continued Cust om izing t he Hom e display (HOM E EDIT) Conf irm t hat a page w ill be added, and press t he [OK] key. A new page is not added yet here, and the display returns to step 4. Press t he [OK] key.
- Page 87 Press t he NEXT but t on t o select t he page you w ant t o delet e, and t hen press t he [OK] key. Press the NEXT button to display the next page, or press the BACK button to display the previous one.
-
Page 88: Customizing The Component Display (Component Edit)
Cust om izing t he Com ponent display (COM PONENT EDIT) You can change the assignment of function keys in a Component display, and the labels of function keys. Also, you can add a new page to the Component display if necessary. Customize the Component display as you prefer. Start editing of function keys or the Component display screen from the Component Edit display. -
Page 89: Changing The Assignment Of A Function Key (Move)
The Component display can also be customized easily with a computer by using the supplied application “NAVITUS Design.” You can enjoy customizing the Component display screen by importing pictures from the computer and set them to the keys or wallpaper, for example. Changing t he assignm ent of a funct ion key (M OVE) The assignment of function keys can be changed. - Page 90 Continued Cust om izing t he Com ponent display (COM PONENT EDIT) Press t he key you w ant t o m ove. For example, press the [DISPLAY] key. The selected key appears pressed. To m ove t he key in t he Trash can page Press the NEXT/BACK button on the Remote Commander to display the Trash...
- Page 91 Press t he posit ion you w ant t o m ove t he f unct ion key t o. If the position you pressed has enough empty space to assign the function key you want to move, the key moves there. To move other function keys successively, repeat steps 5 and 6.
-
Page 92: Deleting A Function Key (Delete)
Continued Cust om izing t he Com ponent display (COM PONENT EDIT) Delet ing a funct ion key (DELETE) You can delete a function key shown in the Component display. If there are any unnecessary function keys after setting or customizing, you can delete them. The deleted key is once stored in the Trash can page. - Page 93 Press t he [DELETE] key. Press t he Com ponent key t hat includes t he f unct ion key you w ant t o delet e. Keys that can be deleted appear released (normal appearance). Keys having learned data blink indicating that the learning signal can be deleted.
- Page 94 Continued Cust om izing t he Com ponent display (COM PONENT EDIT) To f inish all set t ings, press t he COM M ANDER OFF but t on f or 2 seconds or longer. The display returns to the Home display. Or press the [EXIT] key repeatedly until the Home display is shown.
- Page 95 To f inish all set t ings, press t he COM M ANDER OFF but t on f or 2 seconds or longer. The display returns to the Home display. Or press the [EXIT] key repeatedly until the Home display is shown. Downloaded from: https://www.usersmanualguide.com/...
- Page 96 Continued Cust om izing t he Com ponent display (COM PONENT EDIT) To erase all learned dat a set t o t he keys/but t ons in a com ponent You can erase all learned data by specifying the component on the Remote Commander.
-
Page 97: Setting The Skin (Key Appearance And Color) And The Label (Name) Of A Function Key (Skin/Label)
Set t ing t he skin (key appearance and color) and t he label (nam e) of a funct ion key (SKIN/LABEL) You can set the skin (key appearance and color) and the label displayed on a function key. For the skin setting, select from the provided skins for a function key. For the label setting, you can set the letter size and color in addition to the label name shown on a function key. - Page 98 Continued Cust om izing t he Com ponent display (COM PONENT EDIT) Press a f unct ion key w hose skin and label you w ant t o set . The display for the skin setting appears. z Tips • You can change a page of the display with the NEXT/BACK button on the Remote Commander.
- Page 99 Set t he label t o be displayed on t he f unct ion key. Input letters to the label in the label setting display by pressing the keyboard using the supplied Stylus. For inputting letters to the label, see “Inputting letters (label setting)”...
-
Page 100: Setting A Function Key Of Another Component To A Component Display (Alias)
Continued Cust om izing t he Com ponent display (COM PONENT EDIT) Set t ing a funct ion key of anot her com ponent t o a Com ponent display (ALIAS) You can create an Alias key in the Component display. The Alias key in created so that it refers to the setting contents of another function key and works in the same way as the reference key. - Page 101 Press t he [NEW] key. To set Alias t o an exist ing key Select a function key or a function button on the Remote Commander you want to set Alias to, and then go to step 7. Notes • Function keys to which you cannot set Alias appear pressed and cannot be selected.
- Page 102 Continued Cust om izing t he Com ponent display (COM PONENT EDIT) 2 Press the function key you w ant to refer to. For example, press the [TV POWER] key. 3 The function key for reference is set to the Alias key, and the display returns to step 5 for other Alias key settings.
-
Page 103: Setting A Wallpaper (Wallpaper)
Set t ing a w allpaper (WALLPAPER) The wallpaper (background) for the Component display screen can be set by selecting from the provided Wallpapers. With the supplied application “NAVITUS Design”, you can import your original wallpaper and set it on “NAVITUS Design.” If you set the wallpaper imported on the computer to the Component display of “NAVITUS Design”... - Page 104 Continued Cust om izing t he Com ponent display (COM PONENT EDIT) Press t he NEXT/BACK but t on on t he Rem ot e Com m ander t o select a w allpaper. Press t he [OK] key. The preview of the Component display with the selected wallpaper appears.
-
Page 105: Adding/Deleting A Page Of The Component Display (Page)
Adding/delet ing a page of t he Com ponent display (PAGE) You can add or delete a page of the Component display. If you want to group keys that are usually used together, create a page, then assign those keys on the new page for easy use. You can delete an unnecessary page created by deletion of function keys. - Page 106 Continued Cust om izing t he Com ponent display (COM PONENT EDIT) Conf irm t hat a page w ill be added, and press t he [OK] key. A new page is not added here yet. Press t he [OK] key. A new page is added to the end of the Component display, and the display returns to step 3.
- Page 107 Delet ing a page of t he Com ponent display (DELETE) Perf orm st eps 1 t o 3 in “ Adding a page t o t he Com ponent display (ADD)” (page 105). Press t he [DELETE] key. Press t he Com ponent key t hat includes t he page you w ant t o delet e.
- Page 108 Continued Cust om izing t he Com ponent display (COM PONENT EDIT) Conf irm t hat a page w ill be delet ed, and press t he [OK] key. A page is not deleted here yet. Press t he [OK] key. Deletion of the page is complete and the display returns to the Component Edit display (step 3 on page 105).
-
Page 109: Assigning Function Keys Of Multiple Av Components To A Component Display
Assigning funct ion keys of m ult iple AV com ponent s t o a Com ponent display The Multi component key is a Component key with which you can remotely control multiple AV components with function keys of multiple AV components assigned to one Component display. - Page 110 Continued Assigning funct ion keys of m ult iple AV com ponent s t o a Com ponent display Delet e or m ove f unct ion keys in t he Com ponent display assigned t o t he creat ed Alias com ponent . Assign the function keys according to the frame space of the wallpaper changed in step 2.
- Page 111 Cust om izing f unct ions Customizing functions to create your favorite Multi Component key and reference pages are as follows. [ALIAS] : To create Alias function keys and assign them to a Component display (page 100) [SKIN/ LABEL] : To set the skin and the label of a function key (page 97) [WALLPAPER] : To set a wallpaper to the Component display (page 103)
-
Page 112: Convenient Operations By Programming A Series Of Actions
Convenient operations by programming a series of actions (macro) for a key/button Downloaded from: https://www.usersmanualguide.com/... -
Page 113: Outline Of A Series Of Actions (Macro)
Out line of a series of act ions (m acro) In this section, the concept of a macro, types of macros and the setting up procedure of a macro are explained. What is a m acro ? If you program a series of actions as one operation, you can transmit several remote control signals in proper order by simply pressing a key/button. - Page 114 Continued Out line of a series of act ions (m acro) Types of m acros and set t ing f low There are the three follow ing types of macros. A macro programmed for a function key/button. A SYSTEM M ACRO: series of actions you programmed works when the programmed key/button is pressed.
-
Page 115: Programming A Series Of Actions (Macro) For A Key/Button
Program m ing a series of act ions (m acro) for a key/but t on St ep 1: Select ing a key/but t on you w ant t o program a m acro for In “Step 1”, before programming a macro procedure, how to select a key/button you want to program a macro procedure for is explained. - Page 116 Continued Program m ing a series of act ions (m acro) for a key/but t on Press t he [SYSTEM M ACRO] key. Press a Com ponent key t hat w ill include t he f unct ion key t o be creat ed. For example, press the [DVD] key.
- Page 117 Note Make sure to set the label to a new key. The label will not be set when no letters are input even if you press the [OK] key. Go on t o “ St ep 2: Set t ing a m acro” (page 120). 2 When program m ing a m acro f or an exist ing f unct ion key/but t on Select a function key/button you want to program a macro for.
- Page 118 Continued Program m ing a series of act ions (m acro) for a key/but t on Press a f unct ion key/but t on a m acro is t o be program m ed f or. Notes • Function keys you cannot program a macro for appear pressed, and cannot be selected. If you press one of these keys, a beep sounds twice.
- Page 119 3 When program m ing a m acro f or a Com ponent key or a Direct Access but t on Select a Component key or a Direct Access button a macro is to be programmed for. Press t he [SET] key f or 2 seconds or longer in t he Hom e display.
-
Page 120: Step 2: Setting A Macro
Continued Program m ing a series of act ions (m acro) for a key/but t on St ep 2: Set t ing a m acro The procedure to set a macro to a key/button selected in “Step 1” is explained here. - Page 121 Press t he [OK] key t o program t he key/but t on of t he select ed com ponent . Operation for turning on the amplifier is temporarily stored. Repeat steps 1 - 3 until you finish programming the macro procedure. For example, press the following keys to set remote control operations to watch a DVD.
- Page 122 Continued Program m ing a series of act ions (m acro) for a key/but t on Notes • You can program up to 128* operation steps for a macro. After programming 128 steps, the programmable macro procedure setting finishes automatically and the 128 steps you have programmed are registered as a macro.
- Page 123 Confirm the setting contents when you program a macro. z Tip If you are using a Sony AV component, the power-on and power-off keys are assigned on the second page of the Component display. These keys are programmed with the functions to power on and power off respectively.
- Page 124 Continued Program m ing a series of act ions (m acro) for a key/but t on To check the settings of the system macro (function key/ button) Press t he [SET] key f or 2 seconds or longer in t he Hom e display. The Set display appears.
- Page 125 Press t he key/but t on w hose m acro you w ant t o check. The macro procedure programmed in “Step 2” is shown in the display in order. When a function key is programmed as a step, the key appears where the key is assigned in the display.
- Page 126 Continued Program m ing a series of act ions (m acro) for a key/but t on Press t he [M ACRO VIEWER] key. Press t he Com ponent key or a Direct Access but t on w hose m acro you w ant t o check.
-
Page 127: Macro Operation Using The Timer Function
M acro operat ion using t he Tim er funct ion You can set the Remote Commander to perform a series of actions at a desired time. This is called a Timer macro. Create a Timer program key and program a Timer macro for the key. - Page 128 Continued M acro operat ion using t he Tim er funct ion The Program Edit display is the basic setting display to set the Timer Program key. To program the setting, return to the Program Edit display and press the [OK] key shown in the upper right of the display after setting with each setting item tag.
-
Page 129: Step 1: Creating A Timer Program Key
St ep 1: Creat ing a Tim er program key In “Step 1”, creating a Timer program key to be programmed with a Timer macro is explained. Press t he [SET] key f or 2 seconds or longer in t he Hom e display. - Page 130 Continued M acro operat ion using t he Tim er funct ion Set t he label, and t hen press t he [OK] key. The newly created Timer program key is displayed. Input letters to the label in the label setting display by pressing the keyboard using the supplied Stylus.
- Page 131 To set the label again To set the label of the Timer program key again, press the [LABEL] tag in step 4, press the Timer program key you want to set the label to, and set letters in the label setting display. Then press the [OK] key. Downloaded from: https://www.usersmanualguide.com/...
-
Page 132: Step 2: Setting The Time
Continued M acro operat ion using t he Tim er funct ion St ep 2: Set t ing t he t im e In this Step, setting the day of the week and the time for starting a timer macro is explained. - Page 133 Set t he t im er execut ion t im e. “–” “+” SUN – SAT SUN: Sunday MON: Monday MON – SAT TUE: Tuesday WED: Wednesday MON – FRI THU: Thursday FRI: Friday SUN, SAT SAT: Saturday Set the [HOUR], [MINUTES] and [DAY] by pressing the [+]/[–] key. z Tip Each time you press the [+]/[–] key, the [HOUR], [MINUTES] or [DAY] is advanced/reversed by one.
- Page 134 Continued M acro operat ion using t he Tim er funct ion Press t he [OK] key. The setting of the time for timer operation is complete. Press t he [OK] key. The timer execution time is decided, and the display returns to the Timer display (step 3 on page 129).
-
Page 135: Step 3: Programming A Macro
St ep 3: Program m ing a m acro In this Step, how to set a macro is explained. Press t he [M ACRO] t ag. Press a Tim er program key you w ant t o program a m acro f or. If you select a Timer program key already programmed w ith a macro The message for confirmation of deleting... - Page 136 Continued M acro operat ion using t he Tim er funct ion Press t he [OK] key. The setting of the macro procedure is complete and the display returns to the Timer display (step 3 on page 129). To finish the setting Press the COMMANDER OFF button for 2 seconds or longer.
- Page 137 z Tip Progressive m et hod f or set t ing t he Tim er program You programmed the setting with the respective tag, such as [TIME], [MACRO], etc., in the method for setting explained from page 129. You can also program the settings totally after setting with all tags. In the Program Edit display, create a new key by pressing the [NEW] key.
- Page 138 Continued M acro operat ion using t he Tim er funct ion To copy a m acro program m ed f or anot her Tim er program You can copy the time set with the [TIME] tag and the macro contents set with the [MACRO] tag that have already been programmed for a Timer program key to another Timer program key.
- Page 139 Press a Tim er program key you w ant t o set t he copied m acro. For example, press the [Wake up by TV] key. The display to confirm execution of copying appears in the display. Note You cannot select the tag other than [COPY] in this step. Press t he [OK] key.
- Page 140 Continued M acro operat ion using t he Tim er funct ion To delet e a Tim er program key You can delete a Timer program key created accidentally, or a Timer program key that is no longer in use. Press t he [SET] key f or 2 seconds or longer in t he Hom e display.
- Page 141 Press t he [OK] key. The deletion setting is programmed, and the display returns to the Timer display (step 3 on page 129). To finish the setting Press the COMMANDER OFF button for 2 seconds or longer. The display returns to the Home display.
- Page 142 Continued M acro operat ion using t he Tim er funct ion Press a Tim er program key w hose m acro execut ion you w ant t o check. The label for the Timer program key and the timer operation time are displayed, and the remote control signals of the macro programmed for the Timer program key are transmitted.
- Page 143 Press t he [ON/OFF] t ag. Press a Tim er program key w hose execut ion set t ing you w ant t o set t o ON/OFF. If you press a Timer program key that appears normal (released), the key will appear pressed and the execution setting will be set to ON.
- Page 144 Continued M acro operat ion using t he Tim er funct ion To check t he set t ing of a Tim er m acro procedure You can check the contents of a Timer macro procedure in the display. Press t he [SET] key f or 2 seconds or longer in t he Hom e display. The Set display appears.
- Page 145 Press t he [OK] key. The display returns to step 3. To finish the setting Press the COMMANDER OFF button for 2 seconds or longer. The display returns to the Home display. The setting finishes. To manually check the programmed macro procedure in order in step 5 Press the [PAUSE] key to suspend consecutive showing.
-
Page 146: Programming A Series Of Actions (Macro) For A Component List
Programming a series of act ions (macro) for a Component List Downloaded from: https://www.usersmanualguide.com/... -
Page 147: Outline Of A Component List
Out line of a Com ponent List In this section, the concept of a Component list is explained. What is a Com ponent List ? The Component List that is provided for each component shows what items (list elements) a component handles. You can play the contents or change channels just by selecting an item from the list. -
Page 148: Programming A List Element
Program m ing a List elem ent About t he edit display for a List elem ent Before setting a List element, we will explain about the edit display for a List element. The following items can be set to a List element. The setting can be performed by selecting a setting item tag in the edit display for a List element. - Page 149 Example: To create a new List Example: To program the macro element procedure for a List element Press the [NEW] key. Press the [MACRO] tag. Program the macro procedure. Set a label in the display for the label setting, and press the [OK] key. Press the [OK] key.
-
Page 150: Step 1: Creating A List Element
Continued Program m ing a List elem ent St ep 1: Creat ing a List elem ent In “Step 1”, creating an element for a Component List is explained. You can set a title, etc., to an element for a Component List. Press t he [SET] key f or 2 seconds or longer in t he Hom e display. - Page 151 Press t he [NEW] key. z Tip Whatever tag is selected, you can set the label if you press the [NEW] key. Set t he label. About t he label t o be set f or t he List elem ent For element labels, input all relevant information needed for searching or sorting.* Input the search information for each item.
- Page 152 Continued Program m ing a List elem ent Example: Label items for CD changer Input letters for [ALBUM], [DISC No], [ARTIST] and [GENRE] in the order. 1 Input “Blah Bla Bla” for [ALBUM ]. 2 Input “05” for [DISC No]. 3 Input “Slob”...
- Page 153 To set the label again To set the label of a List element again, press the [LABEL] tag in step 5, press the [v]/[V] key to select a List element whose label you want to change, and press the [ENTER] key. Then set the letters again in the display for the label setting, and press the [OK] key.
-
Page 154: Step 2: Programming A Macro
Continued Program m ing a List elem ent St ep 2: Program m ing a m acro In this step, programming a macro for a List element created in “Step 1” is explained. Press t he [M ACRO] t ag. Press t he [v] or [V] key t o select an elem ent you w ant t o program a m acro f or, and... - Page 155 z Tips • For programming a macro for a List element, press in sequence function keys and buttons you want to program as the macro procedure. Confirm the program by pressing the [OK] key for the same component. It is not necessary to press the [OK] key each time you press the individual function keys or buttons.
- Page 156 Continued Program m ing a List elem ent Press t he Com ponent key t hat includes t he List elem ent you w ant t o delet e. Press t he [DELETE] t ag. Press t he [v] or [V] key t o select a List elem ent you w ant t o delet e, and t hen press t he [ENTER] key.
-
Page 157: Creating A User List (User List)
Creat ing a User List (USER LIST) About t he edit display for a User List Collecting only your favorite List elements, you can set them to a User List key. You can create up to nine User List keys. For example, you can create a category named “MY MUSIC”... - Page 158 Continued Creat ing a User List (USER LIST) Example: To create a new User Example: To add a List element List key to the User List key Press the [NEW] key, and set a label for Select a User List key you want to add the User List key.
-
Page 159: Creating A User List Key
Creat ing a User List key Press t he [SET] key f or 2 seconds or longer in t he Hom e display. The Set display appears. Press t he [COM PONENT LIST] key. Press t he [USER] key. Press t he Com ponent key you w ant t o creat e a User List f or. - Page 160 Continued Creat ing a User List (USER LIST) Press t he [NEW] key. z Tips • Whatever tag is selected, you can set the label if you press the [NEW] key. • For a User List key, you cannot select or change a skin.
- Page 161 Press t he [v] or [V] key t o select a List elem ent t o be added, and t hen press t he [ENTER] key. In this step, when you press the [ENTER] key, the color of the selected List element changes to red.
- Page 162 Continued Creat ing a User List (USER LIST) To delet e a User List You can delete a User List key created by mistake, or a User List key that is no longer in use. Press t he [SET] key f or 2 seconds or longer in t he Hom e display. The Set display appears.
- Page 163 Press t he [OK] key. The selected User List key is deleted. The display returns to step 4. To finish the setting Press the COMMANDER OFF button for 2 seconds or longer. The display returns to the Home display. The setting finishes. Downloaded from: https://www.usersmanualguide.com/...
-
Page 164: Adding An Element To A User List
Continued Creat ing a User List (USER LIST) Adding an elem ent t o a User List Press t he [SET] key f or 2 seconds or longer in t he Hom e display. The Set display appears. Press t he [COM PONENT LIST] key. Press t he [USER] key. - Page 165 Press t he User List key you w ant t o add a User elem ent t o. The table of the list elements programmed for the selected User List key is shown. Press t he [ADD] t ag. Press t he [v] or [V] key t o select a User elem ent t o be added t o t he User List , and t hen press t he [ENTER] key.
- Page 166 Continued Creat ing a User List (USER LIST) Press t he [OK] key. Press t he [OK] key. Adding a List element is programmed, and the display returns to step 4. To finish the setting Press the COMMANDER OFF button for 2 seconds or longer.
- Page 167 Press t he [EDIT] t ag. Press t he User List key of t he User elem ent you w ant t o delet e. The table of the list elements programmed for the selected User List key is shown. Press t he [DELETE] t ag.
- Page 168 Continued Creat ing a User List (USER LIST) Press t he [OK] key. The deletion of the List element is stored in memory. Press t he [OK] key. The List element is deleted, and the display returns to step 4. To finish the setting Press the COMMANDER OFF button for 2 seconds or longer.
-
Page 169: Using The Component List
Using t he Com ponent List Press t he List key of a com ponent key in t he Com ponent display. For example, press the [CD LIST] key. The sort item display appears. [CD LIST] key The sort item display for the CD component appears. - Page 170 Continued Using t he Com ponent List Select an album and press t he key. [ENTER] key Arrow Keys Alias keys Move the cursor up/down. Arrow keys: [ENTER] key: Confirms the element selected by the cursor and executes the macro programmed for the element. Alias keys: Refer to the [.], [N], [x] and [>] keys of the operation display of the component.
- Page 171 Easy selection of a series of actions (macro) programmed for Zapping (ZAPPING) Downloaded from: https://www.usersmanualguide.com/...
-
Page 172: Outline Of Zapping
Out line of Zapping What is Zapping? Zapping is the function to call up easily and sequentially only desired channels, enabling channel selection from multiple channels grouped by genre. For example, if you create a “NEWS” group by gathering your favorite news channels together, you can select any one channel set to this group. - Page 173 Using Zapping Right after the Component display appears, the label of the Zapping group “News” is shown on the Zapping viewer. Each time you press the key of the Zapping viewer on the touch panel display, the labels of the Zapping elements appear sequentially on the Zapping viewer as follows, and you can switch among news channels only.
-
Page 174: Editing The Zapping Function
Edit ing t he Zapping funct ion About t he edit display for Zapping Before setting the Zapping function, we explain about the edit display for Zapping. Editing the Zapping group where channels are collected is performed in the Zapping display. Editing each Zapping element that is contained in the Zapping group is performed in the Zapping Edit display. - Page 175 Each time the setting for a respective setting item tag shown in the edit display for a Zapping group or a Zapping element is complete, the display returns to this edit display for a Zapping group or a Zapping element. When the display returns to the edit display for a Zapping group or a Zapping element, press the [OK] key shown on the upper right of the display to decide the contents set by a respective setting item tag.
-
Page 176: Step 1: Creating A Zapping Group
Continued Edit ing t he Zapping funct ion St ep 1: Creat ing a Zapping group In this step, creating a Zapping group to which Zapping elements are to be set is explained. For example, create a Zapping group named “NEWS.” Press t he [SET] key f or 2 seconds or longer in t he Hom e display. - Page 177 Note You cannot set the same label name as another Zapping group, regardless of whether characters are upper or lowercase. If you try to set the same label name, a beep sounds twice. Press t he [OK] key. Creation of the label of the Zapping group is set.
-
Page 178: Step 2: Creating A Zapping Element
Continued Edit ing t he Zapping funct ion St ep 2: Creat ing a Zapping elem ent Create a Zapping element for the Zapping group ([NEWS] key) created in “Step 1.” z Tip If no Zapping element is set to the Zapping group, only the [end of zapping] key appears in the display. - Page 179 Set t he label of t he Zapping elem ent . When the label setting is complete, press the [OK] key. For inputting letters to the label, see “Inputting letters (label setting)” (pages 40 - 41). Specified settings to the label of the Zapping element besides the information described on pages 40 - 41 are as follows.
-
Page 180: Step 3: Programming A Macro
Continued Edit ing t he Zapping funct ion St ep 3: Program m ing a m acro Program a macro for the Zapping element ([CBS] key) created in “Step 2.” Press t he [EDIT] t ag in t he Zapping display. Press a Zapping group key t hat includes t he Zapping elem ent you w ant t o... - Page 181 Program a m acro procedure f or t he Zapping elem ent . For details on programming a macro procedure, see steps 1 - 4 in “Step 2: Setting a macro” (pages 120 - 121). z Tip Up to 128 steps (actions) can be programmed for one Zapping element.
-
Page 182: Step 4: Creating A Zapping Viewer
Continued Edit ing t he Zapping funct ion St ep 4: Creat ing a Zapping view er After creating a Zapping viewer key, you can assign a Zapping group to it. You can create up to 5 Zapping viewer keys for a component. Press t he [SET] key f or 2 seconds or longer in t he Hom e display. - Page 183 Set t he skin of t he Zapping view er. The skin for the Zapping viewer can be selected from four skins shown below. Press the NEXT button to show the next skin, and press the BACK button to show the previous skin.
- Page 184 Continued Edit ing t he Zapping funct ion Press t he [OK] key. The Zapping viewer key is assigned on the last page of the Component display and the display returns to step 4. z Tips • If there is no space to assign a Zapping viewer key in the last page, a new page will be added and the key will be created there.
- Page 185 Press t he Zapping group you w ant t o delet e. The indiction of the Zapping group disappears. If the selected Zapping group is assigned to a Zapping view er key or an Assign button, the message for confirmation of deleting Zapping group appears.
- Page 186 Continued Edit ing t he Zapping funct ion To change t he order of t he Zapping elem ent s You can change the order of the Zapping elements after you have created them. Press t he [SET] key f or 2 seconds or longer in t he Hom e display. The Set display appears.
- Page 187 Press t he Zapping elem ent key you w ant t o m ove. The selected key appears pressed. For example, press the [CBS] key. Press t he Zapping elem ent key t hat is assigned af t er t he place w here you w ant t o assign t he Zapping elem ent key select ed in st ep 6.
- Page 188 Continued Edit ing t he Zapping funct ion To check t he m acro procedure of a Zapping elem ent You can check, on the display, the contents of the macro procedure set to a Zapping element. Press t he [SET] key f or 2 seconds or longer in t he Hom e display. The Set display appears.
- Page 189 Press t he Zapping elem ent w hose m acro you w ant t o check. The macro procedure is shown. About checking the macro procedure When a function key is programmed as a step, the key appears where the key is assigned in the display.
- Page 190 Continued Edit ing t he Zapping funct ion To delet e a Zapping elem ent You can delete a Zapping element created by mistake or a Zapping element that is no longer in use. Press t he [SET] key f or 2 seconds or longer in t he Hom e display. The Set display appears.
- Page 191 Press t he Zapping elem ent key you w ant t o delet e. The indication of the Zapping element disappears. Press t he [OK] key. Press t he [OK] key. The Zapping element key is deleted, and the display returns to the Set display (step 2 on page 182).
- Page 192 Continued Edit ing t he Zapping funct ion To delet e a Zapping view er You can delete a Zapping viewer created by mistake or a Zapping viewer that is no longer in use. Press t he [SET] key f or 2 seconds or longer in t he Hom e display. The Set display appears.
- Page 193 Press t he [OK] key. The Zapping viewer is deleted and the display returns to step 4. To f inish all set t ings, press t he COM M ANDER OFF but t on f or 2 seconds or longer. The display returns to the Home display.
- Page 194 Continued Edit ing t he Zapping funct ion To assign a Zapping view er t o a f unct ion but t on If you assign a Zapping group to a function button, you can perform the Zapping function with one function button. The button a Zapping group is assigned to is called an Assign button.
- Page 195 Press a f unct ion but t on you w ant t o assign a Zapping group t o. If you press a function button to w hich the Zapping view er cannot be assigned A message appears. A button for which learned data or a macro, etc., has been programmed cannot become an Assign button and you cannot assign the Zapping...
- Page 196 Continued Edit ing t he Zapping funct ion Press t he [OK] key. Setting of the Assign button is complete and the display returns to step 4. To f inish all set t ings, press t he COM M ANDER OFF but t on f or 2 seconds or longer.
-
Page 197: Using A "M Emory Stick
Using a “M emory St ick” Downloaded from: https://www.usersmanualguide.com/... -
Page 198: About A "Memory Stick
About a “ M em ory St ick” What is a “ M em ory St ick” ? A “Memory stick” is a small and light IC recording media with a storage capacity larger than a floppy disk. It can be used in specified external connected devices or as a removable recording media for saving data, as well as a data- exchangeable media between various “Memory Stick”-compatible devices. - Page 199 “Memory Stick” may be damaged. Not es on use • We recommend backing up data frequently to avoid data loss. Sony is not liable for data that is lost or damaged. • You cannot use copyrighted recorded materials without permission except for personal use.
-
Page 200: Inserting A "Memory Stick
Continued About a “ M em ory St ick” Insert ing a “ M em ory St ick” Open t he “ M em ory St ick” Rear slot cover. Insert a “ M em ory St ick” w it h t he label side up unt il a click is heard. -
Page 201: Removing A "Memory Stick
Rem oving a “ M em ory St ick” Note If you remove a “Memory Stick” while the indication of writing or reading is shown, recorded data may be deleted or damaged. Make sure that the Remote Commander is not reading from or writing to the “Memory Stick”... -
Page 202: Reading Data Saved In A "Memory Stick" (Read)
Reading dat a saved in a “ M em ory St ick” (READ) You can import data set up with the supplied application or the latest remote control codes downloaded from a web site to the Remote Commander from “NAVITUS Design” using a “Memory Stick.” The following data can be saved to a “Memory Stick”... - Page 203 After the “Memory Stick” confirmation display, the following displays appear according to the contents in the “Memory Stick.” In case of all environm ent dat a: The confirmation display for updating all environmental data appears. In case of preset dat a and it s im age dat a: The confirmation display for updating preset data appears.
- Page 204 Continued Reading dat a saved in a “ M em ory St ick” (READ) Press t he [YES] key. The Remote Commander starts reading the file. When reading of the file is correctly complete, the confirmation display appears. If you fail to read the file, an error message appears.
- Page 205 Data contents in the M essage Symptom and corrective action “M emory Stick” A “Memory Stick” is not Insert a “Memory Stick.” Preset inserted. Operate after Component inserting a “Memory Stick.” Loading from the “Memory If you press the [YES] key, you can Preset Stick”...
- Page 206 Continued Reading dat a saved in a “ M em ory St ick” (READ) Reading a “ M em ory St ick” f rom t he set t ing m ode When a “Memory Stick” is already inserted in the Remote Commander, you can start the reading procedure from the Set display.
-
Page 207: Saving Remote Commander Data To A "Memory Stick" (Save)
Saving Rem ot e Com m ander dat a t o a “ M em ory St ick” (SAVE) You can save all data set up with the Remote Commander to a “Memory Stick.” This function is useful when backing up the data or transferring all data set up with the Remote Commander to a computer via a “Memory Stick.”... - Page 208 Continued Saving Rem ot e Com m ander dat a t o a “ M em ory St ick” (SAVE) If an error m essage appears If an abnormal status of the “Memory Stick” or the Remote Commander is detected while reading the “Memory Stick”, an error message appears. M essage Symptom and corrective action The “Memory Stick”...
- Page 209 Press t he [SYSTEM ] key. Press t he [M EM ORY STICK] key. Press t he [SAVE] key. For further operations, see steps 2 and 3 in “Saving Remote Commander data to a “Memory Stick” (SAVE)” (page 207). Press t he [OK] key in t he conf irm at ion display. The display returns to step 4.
- Page 210 Continued Saving Rem ot e Com m ander dat a t o a “ M em ory St ick” (SAVE) Press t he [YES] key. The Remote Commander starts formatting. When formatting a “Memory Stick” is correctly complete, the confirmation display appears. z Tip If you press the [NO] key, the procedure finishes without formatting.
-
Page 211: Remote Commander's Other Functions
Remot e Commander’s Ot her Funct ions Downloaded from: https://www.usersmanualguide.com/... -
Page 212: Setting The Display Window
Set t ing t he Display Window You can make various settings to the touch panel display. In addition to calibrating the touch panel display, you can set the automatic off time of the display window, or the automatic off time and brightness of the backlight that illuminates the LCD screen. - Page 213 Tap t he cent er of t he m ark t hree t im es in order w it h t he supplied St ylus. When calibration is complete, the display returns to step 4. Note When calibrating, tap correctly the center of mark.
-
Page 214: Setting The Backlight Automatic-Off Time (Back Light)
Continued Set t ing t he Display Window Set t ing t he Backlight Aut om at ic-Off t im e (BACK LIGHT) The backlight that illuminates the LCD screen turns on automatically when an indication appears in the LCD screen and turns off after a certain period of time (Backlight Automatic-Off function). - Page 215 1 Set Automatic-Off time. Each time you press the [+] / [–] key, the time is advanced/reversed by 1 second. If you hold the [+]/[–] key pressed, the time is advanced/ reversed by 2 seconds. You can adjust the time between 3 and 60 seconds. The default setting is 10 seconds.
-
Page 216: Setting The Automatic-Off Time Of The Display Window (Off Time)
Continued Set t ing t he Display Window Set t ing t he Aut om at ic-Off t im e of t he display w indow (OFF TIM E) The LCD screen turns off automatically after a certain period of time (Display Automatic-Off function). - Page 217 1 Set Automatic-Off time. Each time you press the [+] or [–] key, the time is advanced/reversed by 1 minute. If you hold the [+]/[–] key pressed, the time is advanced/ reversed by 2 minutes. You can adjust the time between 1 and 30 minutes. The default setting is 10 minutes.
-
Page 218: Adjusting The Brightness Of The Display Window's Backlight (Brightness)
Continued Set t ing t he Display Window Adjust ing t he bright ness of t he display w indow ’s backlight (BRIGHTNESS) Adjust the brightness of the backlight. Press t he [SET] key f or 2 seconds or longer in t he Hom e display. - Page 219 To f inish all set t ings, press t he COM M ANDER OFF but t on f or 2 seconds or longer. The display returns to the Home display. Or press the [EXIT] key repeatedly until the Home display is shown. Downloaded from: https://www.usersmanualguide.com/...
-
Page 220: Setting The System Clock (Clock)
Set t ing t he syst em clock (CLOCK) You can set the system clock that appears in the Home and Component display. Press t he [SET] key f or 2 seconds or longer in t he Hom e display. The Set display appears. - Page 221 Set t he year, m ont h, day, hour, and m inut es by pressing t he [+]/[–] keys t o adjust t he Syst em clock. z Tips • Each time you press the [+]/[–] key, the digit is advanced/reversed by one. If you hold the [+]/[–] key pressed the digit is advanced/reversed by two.
-
Page 222: Setting The Beep Sound (Beep)
Set t ing t he beep sound (BEEP) The Remote Commander is set at the factory for the key-touch confirmation beep to sound when you press a display key or a button on the Remote Commander. You can set the key-touch confirmation beep not to sound. Press t he [SET] key f or 2 seconds or longer in t he Hom e display. -
Page 223: Locking The Settings (Lock)
Locking t he set t ings (LOCK) To prevent accidental changing, adding or erasing of settings, lock the settings so that you can edit only the System settings. All settings are not locked by default. Press t he [SET] key f or 2 seconds or longer in t he Hom e display. -
Page 224: Remote Commander Information (About)
Rem ot e Com m ander inform at ion (ABOUT) You can check the system information (used memory capacity, version, etc.) of the Remote Commander in the display. Press t he [SET] key f or 2 seconds or longer in t he Hom e display. -
Page 225: Setting To The Recovery Mode (Recovery)
Set t ing t o t he recovery m ode (RECOVERY) The latest kernel (basic program of the Remote Commander) is updated as necessary in the NAVITUS web site. After downloading the latest kernel to “NAVITUS Design”, you can transfer it to the Remote Commander by connecting the Remote Commander to the computer with the USB cable. -
Page 226: Using The Application Mode
Using t he applicat ion m ode Use the application mode when you clean the LCD screen of the Remote Commander or when you want to browse imported image files for the wallpaper using “NAVITUS Design.” Notes The Remote Commander consumes considerable battery power in the application mode compared with other modes. -
Page 227: Displaying Image Files Set As Wallpapers
When cleaning is com plet e, press t he COM M ANDER OFF but t on f or 2 seconds or longer. The display returns to the Home display. Or you can also return to the Home display by pressing the [EXIT] key. Displaying im age files set as w allpapers Using the Wall Album function, you can browse image files set as wallpapers for the Remote Commander with “NAVITUS Design.”... -
Page 228: Additional Information
Addit ional Informat ion Downloaded from: https://www.usersmanualguide.com/... -
Page 229: Precautions
Precaut ions • Do not expose the remote control detectors of your components to direct sunlight or other strong illumination. Strong light can interfere with remote control operations. • Be sure to place the Remote Commander out of reach of small children or pets. Household products such as air conditioners, heaters, electric appliances, and electric shutters or curtains could accidentally be operated by the infrared signals of the Remote Commander, creating risk of fire or serious injury. - Page 230 Continued Precaut ions Not es on charging About the charging time • It takes about eight hours to fully charge the discharged batteries. • While charging, you can still use the Remote Commander to control AV components and make settings. About the battery life w hen the Remote Commander is fully charged The battery life span varies depending on the environment and conditions of use.
-
Page 231: Troubleshooting
If you have problems setting up or using the Remote Commander, first check that the batteries are charged (page 14), then check the items below. If the problem persists, consult your nearest Sony dealer. Trouble w it h t he Rem ot e Com m ander’s basic set t ings... - Page 232 Continued Troubleshoot ing Symptom Remedy The clock does not appear in the • The system clock indication may be set to OFF. Component display. Set the system clock indication to ON (page 220). • The letters are hidden partially because the area The label letters shown on the upper side of the Component where the component label and the page...
- Page 233 • When you teach signals of an interactive signal exchange system remote control unit (supplied learn the remote control signals. with some Sony receivers and amplifiers) to the Remote Commander, the response signal of the main unit, such as an amplifier, may interfere with the learning of the Remote Commander.
- Page 234 Continued Troubleshoot ing Trouble w it h t he operat ion m ode Symptom Remedy A beep sounds twice, and the • The settings are locked and cannot be edited. display does not change even if you Release the lock (page 223). press a key.
- Page 235 Symptom Remedy You cannot control the volume. • The Remote Commander is Alias-set at the factory to adjust the volume of a visual component on a TV and the volume of an audio component on an amplifier, assuming that you hear the sound of a visual component from the TV speakers and the sound of an audio component from the speakers connected to an AV amplifier.
- Page 236 Continued Troubleshoot ing Symptom Remedy The display does not change to the • The [SET] key should be pressed for 2 seconds setting display even when you press or longer. If you press the [SET] key for 2 the [SET] key. seconds or longer, you can enter the setting display.
- Page 237 Symptom Remedy Although you have programmed a • The Component key should be pressed for 2 macro for a Component key, the seconds or longer in this case. When a macro is programmed for a Component key, the macro Component key will not operate, even if you press it.
- Page 238 Continued Troubleshoot ing Trouble w it h t he set t ing m ode Com m on problem s Symptom Remedy The setting cannot be edited. • The settings are locked so that they cannot be edited. Release the lock. For details, see “Locking the settings (LOCK)”...
- Page 239 Symptom Remedy A button or key assigned to the • You may have edited or deleted the setting Alias component does not operate contents of the button or key. For the Alias components already created at the factory as even if you press it. the Multi Components, all assigned buttons and keys are created so that they refer to other keys by the Alias setting.
- Page 240 Continued Troubleshoot ing Symptom Remedy A skin image read from “NAVITUS • For the skins imported from “NAVITUS Design” does not appear. Design”, only skins imported for a project can be read to the Remote Commander and selected. You cannot read a skin imported as the common skin for all projects.
- Page 241 Trouble w it h t he t im er program and t he t im er m acro set t ing Symptom Remedy • The macro programmed for the Timer program The timer you have set cannot be correctly executed. key may be incorrectly set.
- Page 242 Continued Troubleshoot ing Trouble w it h t he m ove set t ing Symptom Remedy A beep sounds twice when you tap • There is no space for locating a key on the place the point where you want to move where you want to move the function key to, or the key to.
- Page 243 Trouble w it h t he m acro set t ing Symptom Remedy The macro function does not • Make sure to program a series of actions in the correct order (page 123). operate correctly. • Try changing the orientation of the Remote Commander.
- Page 244 Continued Troubleshoot ing Trouble w it h a “ M em ory St ick” Symptom Remedy A “Memory Stick” cannot be • The inserting direction is incorrect. Insert the inserted. “Memory Stick” in the correct direction. • You may have locked the operation mode. Even if you insert a “Memory Stick”, a beep sounds twice and the While pressing the [EXIT] button, press and...
- Page 245 Symptom Remedy Data of the “Memory Stick” cannot • The size of the data saved on the “Memory be read by the Remote Commander Stick” is larger than the free memory space of the Remote Commander. Delete unnecessary or data of the Remote Commander cannot be written to the “Memory pages, etc., using “NAVITUS Design”, and save Stick.”...
- Page 246 Continued Troubleshoot ing Trouble w it h t he USB connect ion Symptom Remedy A beep sounds twice and data • You may have locked the operation mode. cannot be transferred even if the While pressing the [EXIT] button, press and USB cable is connected.
- Page 247 Ot hers Symptom Remedy A beep sounds, and the error • A problem with the project file may have occured. message “Import full data from NAVITUS Design using the Transfer full data to the Remote Commander “Memory Stick” or USB.” appears. with USB by connecting the USB cable and the AC power adaptor, or read full data from a “Memory Stick.”...
-
Page 248: Specifications
Specificat ions Supplied accessories LINUX Battery charging stand (1) AC power adaptor (1) USB cable (1) i.MX1 Application Processor 200 MHz Stylus (1) Installation CD-ROM (1) M emory Operating Instructions (1, this manual) 32 MB (RAM) Brochure (1) User memory range: approx. 15 MB Warranty Card (1) Other printed materials (1 set) Interface... - Page 249 Downloaded from: https://www.usersmanualguide.com/...
- Page 250 Downloaded from: https://www.usersmanualguide.com/...
- Page 251 Downloaded from: https://www.usersmanualguide.com/...
- Page 252 Cover printed on 100% recycled paper. All other content printed on chlorine-free paper using VOC (Volatile Organic Compound)-free vegetable oil based ink. Printed in Japan Downloaded from: https://www.usersmanualguide.com/...
- Page 253 This file has been downloaded from: www.UsersManualGuide.com User Manual and User Guide for many equipments like mobile phones, photo cameras, monther board, monitors, software, tv, dvd, and othes.. Manual users, user manuals, user guide manual, owners manual, instruction manual, manual owner, manual owner's, manual guide, manual operation, operating manual, user's manual, operating instructions, manual operators, manual operator, manual product, documentation manual, user maintenance, brochure, user reference, pdf manual Downloaded from:...
Need help?
Do you have a question about the RM -NX7000 and is the answer not in the manual?
Questions and answers