Table of Contents
Advertisement
Quick Links
Offline Array Recovery Procedures
SuperTrak SX6000 and UltraTrak
This document describes the procedures for protecting data and restoring array status to
arrays that have gone
operation. O
is the most serious. However, many
FFLINE
corrected and the data on the disk drives may be preserved.
Below is a chart of the various array conditions and their meanings.
Array Condition
Functional
Synchronizing
Rebuilding
Critical
Offline
Disk Drive Condition
Functional
Needs Rebuilding
Rebuilding
Arrays are composed of disk drives. A disk drive failure causes an array failure. The
Promise RAID controller automatically initiates Rebuilding as corrective action. When a
hot spare drive is available, the hot spare will replace the failed drive. If a hot spare drive
is not available, the RAID controller will attempt to rebuild the array by rebuilding the
failed disk drive.
If the RAID controller successfully rebuilds the failed disk drive, the array will be
restored to
FUNCTIONAL
same disk drive, user intervention is required to remove that drive for testing and possible
replacement. The first section of this document, Notification and Diagnosis, deals with
this issue.
. Promise Array products report several conditions during
OFFLINE
Meaning
Online and ready for use.
The process of verifying data integrity by recalculating
redundant data and matching the data on the disk drives.
The process of reconstructing an array in critical mode by
placing redundant data on a replacement disk drive.
Degraded array condition due to a failed or removed disk
drive. Fault tolerance is lost but the data is still accessible.
Triggers Rebuilding.
Degraded array condition due to two failed or removed disk
drives. Fault tolerance is lost. The data is not accessible.
User intervention is required.
Meaning
Online and ready for use.
Disk drive failed. Causes Critical array condition and will
trigger Rebuilding. If this condition repeats, remove and test
the disk drive.
Disk drive removed. Causes Critical array condition. Will
trigger Rebuilding when installed.
The process of reconstructing data on a disk drive.
status. If the RAID controller repeatedly attempts to rebuild the
©2002 Promise Technology, Inc. All Rights Reserved.
conditions can be
OFFLINE
Version 5a
Advertisement
Table of Contents

Related Manuals for Promise Technology SuperTrak SX6000


Summary of Contents for Promise Technology SuperTrak SX6000
- Page 1 If the RAID controller repeatedly attempts to rebuild the FUNCTIONAL same disk drive, user intervention is required to remove that drive for testing and possible replacement. The first section of this document, Notification and Diagnosis, deals with this issue. ©2002 Promise Technology, Inc. All Rights Reserved.
-
Page 2: Table Of Contents
Offline Array Recovery Procedures—SuperTrak SX6000 and UltraTrak, Version 5a User intervention is always required when multiple drives have failed or a failure takes place because a drive has been removed from the array. The procedures for protecting data and restoring array status differ depending on when and how the array goes offline. -
Page 3: Warnings
Offline Array Recovery Procedures—SuperTrak SX6000 and UltraTrak, Version 5a Warnings • Many of the procedures in this document involve data-deletion operations. Follow the instructions carefully to avoid or minimize permanent loss of your data. • Begin with Notification and Diagnosis to identify the problem with your system. -
Page 4: Notification And Diagnosis
When a disk drive encounters a problem serious enough to make it fail, your Promise RAID product will notify you of the condition. The method of notification depends on which Promise product you have. Three methods are listed here: SuperTrak SX6000, UltraTrak and Promise Array Management (PAM). -
Page 5: Automatic Rebuild
Offline Array Recovery Procedures—SuperTrak SX6000 and UltraTrak, Version 5a Automatic Rebuild SuperBuild Array Utility 1.10 (c) 2001 Promise Technology, Inc. [ Define Array Menu ] Array No RAID Level Total Drv Capacity (MB) Status Array 1 RAID5 61234 Rebuilding CH3 52%... -
Page 6: Remove A Disk Drive For Testing
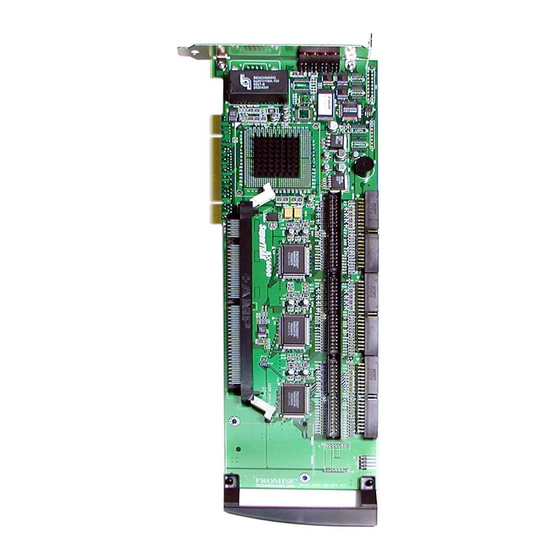
The most important part of testing a suspect disk drive is to identify the right one. The photo above shows a SuperTrak SX6000 card in a typical installation, with the channel numbers indicated. Identify the channel with the failed drive then follow the drive cable to that drive. -
Page 7: Testing A Disk Drive
Offline Array Recovery Procedures—SuperTrak SX6000 and UltraTrak, Version 5a Testing a Disk Drive The diagnostic programs from the disk drive manufacturers are designed for testing individual disk drives in personal computers. For this reason, the suspect drive must be connected to a computer as if it were a single, non-array drive. -
Page 8: Ultratrak
Offline Array Recovery Procedures—SuperTrak SX6000 and UltraTrak, Version 5a UltraTrak If an array problem arises during routine computer operation, the UltraTrak controller beeps every three seconds to alert you to the existence of a problem. Check the LCD display on the front of the cabinet for information. -
Page 9: Remove A Disk Drive For Testing
Offline Array Recovery Procedures—SuperTrak SX6000 and UltraTrak, Version 5a Remove a Disk Drive for Testing The most important part of testing a suspect disk drive is to identify the right one. UltraTrak channel numbers are identified on each removable disk drive carrier, as shown below. -
Page 10: Testing A Disk Drive
Offline Array Recovery Procedures—SuperTrak SX6000 and UltraTrak, Version 5a UltraTrak RM15000 (above). Channels are numbered left to right. Shut down the UltraTrak and your computer. Remove the carrier corresponding to the channel with the failed drive. Remove the failed drive from the carrier. -
Page 11: Results And Action
Offline Array Recovery Procedures—SuperTrak SX6000 and UltraTrak, Version 5a Warnings • Do not substitute third-party disk utilities, because they lack the proprietary functions of the drive manufacturer’s program. • If you remove a disk drive, reconnect it to its original Channel. -
Page 12: Promise Array Management
If you are running Promise Array Management (PAM) software on your system, the monitoring utility will send on-screen alerts and messages to call your attention to an array in trouble. PAM works the same whether you have a SuperTrak SX6000 or an UltraTrak system. -
Page 13: Automatic Rebuild
Offline Array Recovery Procedures—SuperTrak SX6000 and UltraTrak, Version 5a Automatic Rebuild When automatic rebuilding begins, the disk drive in Channel 4 reappears, confirming that it is the target of the rebuild. The UltraTrak controller will attempt to rebuild the data on the failed drive. -
Page 14: Other Components
Removing a disk drive for testing gives you an opportunity to check its connections. • If you have a SuperTrak SX6000, opening your computer gives you a chance to check all of the disk drive data and power cable connections. -
Page 15: Case 1: Array Goes Offline During Rebuilding
Offline Array Recovery Procedures—SuperTrak SX6000 and UltraTrak, Version 5a Case 1: Array goes during rebuilding. OFFLINE This procedure is both a basic recovery action and a diagnostic action. In Promise Array Management (PAM), look at the Tree View and click on the first drive under Disk View. -
Page 16: Case 2: After Reboot, The Array Again Goes Offline During Rebuilding
Offline Array Recovery Procedures—SuperTrak SX6000 and UltraTrak, Version 5a Case 2: After reboot, the array again goes OFFLINE during rebuilding. In order to follow this procedure, you must know which disk is the target disk. You should have determined this information from the instructions for Case 1, above. -
Page 17: Recovery Procedure For Case 2
Offline Array Recovery Procedures—SuperTrak SX6000 and UltraTrak, Version 5a Recovery Procedure for Case 2 Warning This procedure may result in data loss. Follow instructions carefully. Be sure you have a backup copy of all your data from the array before beginning the procedure. -
Page 18: Alternative Recovery Procedure For Case 2
Offline Array Recovery Procedures—SuperTrak SX6000 and UltraTrak, Version 5a Alternative Recovery Procedure for Case 2 This procedure applies to UltraTrak units with firmware version 1.1.0.05. UltraTraks with this and later firmware versions have the capability of skipping over bad sectors during rebuilding. -
Page 19: Case 3: Array Goes Offline Due To A General Power Problem
Offline Array Recovery Procedures—SuperTrak SX6000 and UltraTrak, Version 5a Case 3: Array goes offline due to a general power problem. Turn off the power. Determine the cause of the power problem and correct it. Reboot the system. Array status should be... -
Page 20: Offline Offline
Offline Array Recovery Procedures—SuperTrak SX6000 and UltraTrak, Version 5a Case 4: Array goes due to a disk power OFFLINE problem. Warning Do NOT reconnect power to this disk while the system is running. Turn off the SuperTrak PC or the UltraTrak. -
Page 21: Case 5: Array Goes Offline Because The Wrong Disk Was
Offline Array Recovery Procedures—SuperTrak SX6000 and UltraTrak, Version 5a Case 5: Array goes because the wrong disk was OFFLINE removed from a array. CRITICAL Warning Do NOT replace the removed disk while the system is running. Turn off the UltraTrak or SuperTrak PC. -
Page 22: Case 6: Array Goes Offline For An Unknown Reason
Offline Array Recovery Procedures—SuperTrak SX6000 and UltraTrak, Version 5a Case 6: Array goes for an unknown reason. OFFLINE Reboot the UltraTrak or SuperTrak PC. Array status should be FUNCTIONAL If the array status is still , make sure all the disks are in the cabinet OFFLINE (UltraTrak) or connected (SuperTrak) in their original order. -
Page 23: Supertrak Bios Recovery Procedure
Offline Array Recovery Procedures—SuperTrak SX6000 and UltraTrak, Version 5a SuperTrak BIOS Recovery Procedure Recovery Requirements This procedure replaces the current array with a new one without disturbing the data. Use it only when an array has gone offline for an unknown reason. Be careful to follow these steps exactly in order to prevent data loss. -
Page 24: Obtain Information On The Current Array
Offline Array Recovery Procedures—SuperTrak SX6000 and UltraTrak, Version 5a Obtain information on the current array To access the Promise BIOS, reboot your SuperTrak PC. SuperTrak SX6000 (tm) BIOS Version 1.10.0 (Build 7) (c) 2001 Promise Technology, Inc. All rights reserved. - Page 25 Offline Array Recovery Procedures—SuperTrak SX6000 and UltraTrak, Version 5a SuperBuild Array Utility 1.10 (c) 2001 Promise Technology, Inc. [ Define Array Definition Menu ] Array No RAID Level Total Drv Status Array 1 RAID 5 Offline Stripe Block: 64 KB...
-
Page 26: Delete The Current Array
Offline Array Recovery Procedures—SuperTrak SX6000 and UltraTrak, Version 5a Delete the current array From the Main menu, press 4 to see the Delete Array Menu. The Delete Array Menu screen appears. SuperBuild Array Utility 1.10 (c) 2001 Promise Technology, Inc. -
Page 27: Create A New Array
Offline Array Recovery Procedures—SuperTrak SX6000 and UltraTrak, Version 5a Create a new array With the Main Menu on your screen, press 4 to to see View/Define Array. The Define Array Definition Menu screen appears. Press 3 to see View/Define Array. The Define Array Menu screen appears. - Page 28 Offline Array Recovery Procedures—SuperTrak SX6000 and UltraTrak, Version 5a Warning If you leave Initialize Array ON, all of your data will be lost when the new array is created. Press the arrow keys to move to the Drive Assignments section. Drives are identified by their Channel ID number.
-
Page 29: Ultratrak Recovery Procedure
Offline Array Recovery Procedures—SuperTrak SX6000 and UltraTrak, Version 5a UltraTrak Recovery Procedure Recovery Requirements This procedure replaces the current array with a new one without disturbing the data. Use it only when an array has gone offline for an unknown reason. Be careful to follow these steps exactly in order to prevent data loss. -
Page 30: Obtain Information On The Current Array
Offline Array Recovery Procedures—SuperTrak SX6000 and UltraTrak, Version 5a Obtain information on the current array RAID Level On the UltraTrak front control panel, press SEL to mark View Status. Press SEL again. Press twice to mark View Array Information, then press SEL. - Page 31 Offline Array Recovery Procedures—SuperTrak SX6000 and UltraTrak, Version 5a Note You cannot obtain Stripe Block Size or Gigabyte Boundary of an existing array from the UltraTrak LCD display. However, the following facts may be helpful in estimating the missing values: •...
-
Page 32: Delete The Current Array
Offline Array Recovery Procedures—SuperTrak SX6000 and UltraTrak, Version 5a Delete the current array On the UltraTrak front control panel, press SEL to mark View Status. Press to mark Configuration, then press SEL. Type in your password and press SEL. Press SEL again to select Configure Array. -
Page 33: Create A New Array
Offline Array Recovery Procedures—SuperTrak SX6000 and UltraTrak, Version 5a Create a new array After deleting the array, the interface leaves you at Delete Array. Press once to mark Define Array, then press SEL. The RAID definition list appears with RAID Level marked. - Page 34 Offline Array Recovery Procedures—SuperTrak SX6000 and UltraTrak, Version 5a At Add/Remove Drives, press SEL. Press to mark a free drive. Press SEL to assign the drive to the array. When you are done, press EXIT. The Initialization default is ON. Press SEL to turn it OFF.
Need help?
Do you have a question about the SuperTrak SX6000 and is the answer not in the manual?
Questions and answers