Table of Contents
Advertisement
Quick Links
Advertisement
Table of Contents

Related Manuals for Promise Technology SuperTrak SX6000


Summary of Contents for Promise Technology SuperTrak SX6000
- Page 1 SuperTrak SX6000 User Manual...
- Page 2 All trademarks are the property of their respective holders. IMPORTANT DATA PROTECTION INFORMATION You should back up all data before installing SuperTrak SX6000. Promise is not responsible for any loss of data resulting from the use, disuse or misuse of this or any other Promise product.
-
Page 3: Table Of Contents
SuperTrak SX6000™ User Manual Table of Contents 1 Introduction Promise Technology, Inc................1 What is SuperTrak SX6000? ..............1 Key Features....................2 System Requirements ................2 Operating System Support............... 3 2 Getting Started Unpacking SuperTrak SX6000 ..............5 SuperTrak SX6000 Controller Card Cables Quick Installation Checklist .............. - Page 4 Rebuilding/Synchronizing Fault Tolerant Arrays Partitioning & Formatting Arrays Configuration Ideas ................34 Fault Tolerance Hot Spare Drive(s) 6 Troubleshooting Buzzer Alarms ..................37 LED Display Codes ................. 38 SuperTrak SX6000 BIOS Error Messages..........39 Installation & Runtime Problems............39 SuperTrak SX6000 Technical Specifications...
- Page 5 SuperTrak SX6000™ User Manual Frequently Asked Questions Pre-Installation Drive Issues B2 Installation Issues Post-Installation Technology Background Introduction to RAID RAID 0 – Striping RAID 1 – Mirroring RAID 0+1 – Striping/Mirror RAID 3 – Block Striping with Parity Drive RAID 5 – Block and Parity Striping C4...
-
Page 6: Manual Conventions
SuperTrak SX6000™ User Manual Manual Conventions Common identifiers: ↵ Press the Enter key [Key] Press the key(s) shown within the brackets Note: Supplementary note containing important information Common expressions: Left-click Move the mouse cursor over the specified target then click once with the left mouse button. - Page 7 SuperTrak SX6000™ User Manual Notes...
-
Page 8: Introduction
Create arrays at various RAID levels (0, 1, 0+1, 3, 5), depending on the application being used • Set up a network of SuperTrak SX6000 RAID servers (all running under different RAID levels) and monitor those servers from any workstation on the network •... -
Page 9: Key Features
SuperTrak SX6000’s PAM software package is an all-in-one modular solution. Key Features The following are key features of the Promise SuperTrak SX6000 RAID system: Drive Types • Supports standard IDE drives (Ultra ATA, Ultra DMA) •... -
Page 10: Operating System Support
What follows is a brief description of the different support levels available for each operating system: Windows NT/Windows 2000 The SuperTrak SX6000 is fully functional in a Windows NT 4.0 or Windows 2000 operating system. Promise Technology supplies and supports the necessary SuperTrak SX6000 drivers for this environment. The SuperTrak SX6000 Message Server and Message Agent are Windows NT/Windows 2000 Services, and will only function on a Windows NT/2000 system. - Page 11 SuperTrak SX6000™ User Manual Chapter 1 Notes - 4 -...
-
Page 12: Getting Started
PC, is sensitive to static electricity. Be sure that you are properly grounded (Promise recommends that you wear an anti-static strap, or place a free hand on a grounded object), and that your PC is unplugged before installing any of the SuperTrak SX6000 components. -
Page 13: Cables
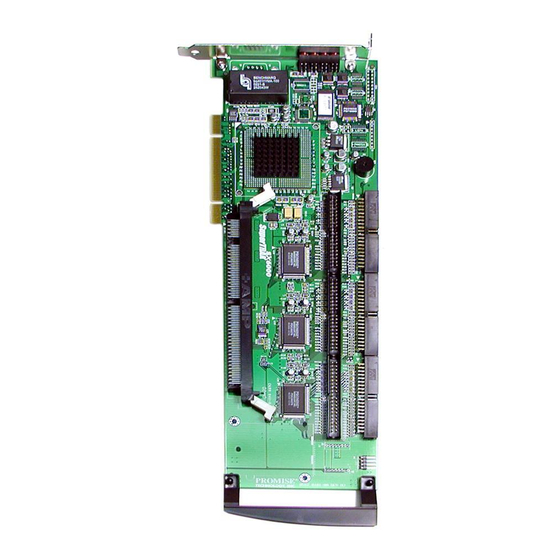
Figure 1 SuperTrak SX6000 controller card Cables Ultra ATA/100 drive cables are provided with the SuperTrak SX6000 controller card. These cables must be used with Ultra ATA/100 and Ultra ATA/66 drives in order to realize full Ultra ATA/100 and/or Ultra ATA/66 specs. They differ from older 40-wire/40- pin IDE cables by adding an extra ground wire between each data wire, resulting in an 80-wire/40-pin cable. -
Page 14: Software Installation
These include: BIOS Utility, Network Connection, Driver Installation, and Application Installation. BIOS Utility The SuperTrak SX6000 BIOS utility called SuperBuild must be used to create the first array(s) on the SuperTrak SX6000. Arrays may subsequently be created through the - 7 -... -
Page 15: Network Connections
SuperTrak SX6000™ User Manual Chapter 2 PAM utility. You must have an array on SuperTrak SX6000 in order to use the drives for data storage. See Chapter 0, for more information about using the SuperBuild BIOS utility to create an array. - Page 16 SuperTrak SX6000™ User Manual Chapter 2 Notes - 9 -...
-
Page 17: Superbuild
The following portion of the “Quick reference setup” is a listing of steps necessary to complete each type of task required for setting up the SuperTrak SX6000 system through the SuperBuild BIOS utility. The tasks are not intended to be a complete, step- by-step guide to setting up the SuperTrak SX6000 system successfully. -
Page 18: Entering The Bios Superbuild Utility
Chapter 3 Entering the BIOS SuperBuild utility When the system boots, you will see the “Promise SuperTrak SX6000 BIOS” sign-on banner appear on the screen. Once the BIOS identifies the arrays attached to the SuperTrak SX6000 controller, it will offer an option to enter the SuperBuild utility. -
Page 19: Setting The Halt On Error Option
Press the [Ctrl-Y] keys to save the changes. SuperTrak BIOS Reference When the SuperTrak SX6000 BIOS loads during system boot time, it displays pertinent information about the RAID arrays that it finds, then displays “Press <Ctrl-F> to enter Array BIOS Configuration Utility” (see below). - Page 20 This is the MB (Megabyte) data size of the indicated array. Track-Mapping This is the CHS (Cylinder/Head/Sector) equivalent of the array geometry as hosted by the SuperTrak SX6000 BIOS int 13h disk services. Status Shows one of three possible array status conditions: Functional The array is fully operational, and no problems are present.
-
Page 21: Main Menu
SuperTrak SX6000™ User Manual Chapter 3 Main Menu SuperBuild Array Utility 1.10 (c) 2001 Promise Technology, Inc. [ Main Menu ] Auto Setup....[ 1 ] View Drive Assigments..[ 2 ] View/Define Array.....[ 3 ] Delete Array....[ 4 ] Controller Configuration..[ 5 ]... -
Page 22: Auto Setup Options Menu
This section of the screen is the only selectable portion. Depending on the number of drives recognized by SuperTrak SX6000, the “Auto Setup Options Menu” may limit the number of array types available. You choose a RAID level in the “Optimize array for”... - Page 23 (megabytes), not counting spare drives. When you have completed your selections, press the [Ctrl-Y] keys. SuperBuild will create an array automatically from the hard drives connected to the SuperTrak SX6000 controller. SuperBuild will then ask to reboot the system. - 16 -...
-
Page 24: View Drive Assignments
[ESC] Exit fields. Figure 6 View Drive Assignments screen Channel: ID This field shows the SuperTrak SX6000 controller channel ID (1-6) to which a particular drive is attached. Drive Model This field identifies the manufacturer, model, and model number (if applicable) of each drive installed on the SuperTrak SX6000 card. -
Page 25: View/Define Array
NOTE: Promise recommends that if you are creating a single array using SuperTrak without a "hot" spare drive, do so through the “Auto Setup” screen under selection [1] of the “Main Menu”. SuperBuild Array Utility 1.10 (c) 2001 Promise Technology, Inc. [ Define Array Menu ] Array No... -
Page 26: Define Array Definition Menu
(Spanning). See Chapter 5 about RAID levels. NOTE: Promise recommends the use of identical drives when creating a new array for best results. SuperBuild Array Utility 1.10 (c) 2001 Promise Technology, Inc. [ Define Array Definition Menu ] Array No... -
Page 27: Gigabyte Boundary
Without this feature enabled, SuperTrak SX6000 will NOT permit the use of a replacement drive that is slightly smaller than the remaining working drive. -
Page 28: Creating A Raid 1 Array
SuperTrak SX6000™ User Manual Chapter 3 Setting the Gigabyte Boundary For RAID 0 arrays, SuperTrak SX6000 sets the “Gigabyte Boundary” to “OFF”. Creating a RAID 1 Array In the “Define Array Definition Menu” section, use the [Spacebar] to cycle through array types and select “RAID 1”... -
Page 29: Creating A Raid 0+1 Array
"hot spare” replacement (see page 25). Changing the Stripe Block Size For RAID 1 arrays, SuperTrak SX6000 does permit the user to change the Stripe Block size. This feature is not available for RAID 1 arrays. Setting the Initialize Function For RAID 1 arrays, SuperTrak SX6000 will allow you to toggle the “Initialize”... -
Page 30: Creating A Raid 3 Array
"hot" spare drive in case of drive failure (see Page 25). Changing the Stripe Block Size For RAID 0+1 arrays, SuperTrak SX6000 will allow you to change the stripe block size. The default is 64K. However, certain application environments may perform optimally with different. -
Page 31: Creating A Raid 5 Array
SuperBuild. Setting the Initialize Function For RAID 3 arrays, SuperTrak SX6000 will allow you to toggle the “Initialize” “ON” or “OFF”. The default is “ON”. To toggle “Initialize”, use the [Arrow] keys to highlight the field and the [Spacebar] to toggle between “ON” and “OFF”. -
Page 32: Creating A Spanning Array
Data will be stored to the first drive until it is physically full. SuperTrak SX6000 then will save data on to the next drive in sequence. Each member of an array will no longer be readable as an independent drive if removed from the array. -
Page 33: Setting A Disk Array As Bootable
(see below). NOTE: Your PC or server must be configured to use SuperTrak SX6000 as the bootable controller. The system will then use the bootable array as the (fixed) boot C: drive. -
Page 34: Delete Array
SuperTrak SX6000™ User Manual Chapter 3 Delete Array By pressing [4] from the “Main Menu” screen displays the “Delete Array Menu” (see below). SuperBuild Array Utility 1.10 (c) 2001 Promise Technology, Inc. [ Delete Array Menu ] Array No RAID Level Total Drv... -
Page 35: Controller Configuration
[Spacebar]. “Halt On Error” is enabled if you want the system to halt processing during bootup if the SuperTrak SX6000 BIOS determines that there is an array error. The OS Selection option should be selected based on the operating system you will be using. -
Page 36: Installing Drivers
Windows NT 4.0 Installing Driver in Existing Windows NT 4.0 System The following procedure details the installation of the SuperTrak SX6000 drivers on a Windows NT version 4.0 or later system. Under Windows NT 4.0, insert the included “SuperTrak SX6000 Driver” diskette in drive A: when prompted for the drivers. - Page 37 Select “Other” (requires disk provided by hardware manufacturer). Specify “a:\”, insert the Promise driver diskette into drive A: and press [Enter]. Select the “WinNT Promise SuperTrak SX6000 (tm) Controller” and click “OK”. NOTE: for CD installations, you must also specify the driver for your CD-ROM adapter (i.e.
-
Page 38: Installing Driver In Existing Windows 2000 System
Windows 2000 Installing Driver in Existing Windows 2000 System After installing the SuperTrak SX6000 card and rebooting your system, Windows 2000 setup will show a “New Hardware Found” dialog box. In the “New Hardware Found” dialog box, click “Driver from disk provided by hardware manufacturer”... -
Page 39: Promise Array Management Installation
There are several layers of the Promise Array Management (PAM) software installation that must be installed on the appropriate network servers/workstations. Make sure the SuperTrak SX6000 device driver is installed before moving on to install the PAM utility software. See the Promise Array Management User Manual for complete installation procedures. -
Page 40: Raid Setup
Removing any other drive may cause the array to become unavailable. When notified either by the SuperTrak SX6000 BIOS or the PAM utility that a drive has failed, note the channel number of the failed drive to determine the physical location of the failed drive. -
Page 41: Rebuilding/Synchronizing Fault Tolerant Arrays
RAID storage downtime and perhaps extend one's livelihood. Since SuperTrak SX6000 maintains six independent data channels and assigns just one drive per channel, users are protected in case a single drive or an entire data channel fails. - Page 42 SuperTrak SX6000™ User Manual Chapter 4 Some possibilities for making use of hot spares can include: • A 2-drive mirrored array with 2 hot spare drives. This allows for triple drive fault tolerance before the array would be set offline.
- Page 43 SuperTrak SX6000™ User Manual Chapter 4 Notes - 36 -...
-
Page 44: Troubleshooting
Troubleshooting This chapter provides information on how to interpret error conditions as reported by the SuperTrak SX6000. This includes buzzer alarms, LED display codes, SuperTrak BIOS Error Messages, and Installation & Runtime Problems. The information contained here covers the most common error conditions that occur with SuperTrak SX6000 installations. -
Page 45: Led Display Codes
LED Display Codes LED displays appear on the backplane of the SuperTrak SX6000 controller. NOTE: The LEDs on the backplane of the SuperTrak SX6000 controller go through various patterns throughout the power-on and initialization process. However, only three different conditions remain constant. -
Page 46: Supertrak Sx6000 Bios Error Messages
SuperTrak SX6000™ User Manual Chapter 5 SuperTrak SX6000 BIOS Error Messages On boot-up, the SuperTrak SX6000 BIOS will initialize. Should an error be detected, the following messages will appear on screen and the boot-up process halted. Message: No Array is defined…... - Page 47 SuperTrak SX6000™ User Manual Chapter 5 Notes - 40 -...
-
Page 48: Supertrak Sx6000 Technical Specifications
SuperTrak SX6000™ User Manual Appendix A SuperTrak SX6000 Technical Specifications Performance-Related Features • True hardware-based RAID • Single IRQ per RAID I/O • Intelligent cache dynamically configures itself • Support for up to 128MB (minimum of 16MB required) of RAM in one 168-pin DIMM socket •... - Page 49 , as well as status of drives and array Physical & environmental • SuperTrak SX6000 card size: Size: 13.5” x 4.2” (34.3cm x 10.7cm) • Operating temperature: 32 - 122°F (0 - 50°C) • Relative humidity: 5 - 95% non-condensing •...
-
Page 50: Frequently Asked Questions
Pre-Installation (Speed, Device Types, Capacity, Cabling) What kind of hard drives can I use with a SuperTrak SX6000 array? You can use any Ultra ATA/100, or Ultra ATA/33/66 hard drive(s) to create arrays on the SuperTrak SX6000. However, you should use matching drives for multiple-drive arrays to maximize capacity usage as well as performance. -
Page 51: Drive Issues B2
Multiple drives striped or spanned will not work. Also, the other controller must address the drives as LBA, not CHS. If I have a problem with one of the drives on the SuperTrak SX6000, how can I low level format it to correct the problem? Do not do this! Low-level formatting IDE drives is unnecessary and generally does not correct problems that might be experienced during use. -
Page 52: Installation Issues
(NT, Drive Capacity, Booting, IRQ Settings) Why doesn’t Windows NT/2000 see my SuperTrak SX6000 controller? You need to install the SuperTrak SX6000 drivers to be able to see the card and the attached drives (arrays). Why are some drives recognized by the SuperTrak SX6000 Array Setup... -
Page 53: Post-Installation
Post-Installation (Power Up, BIOS Initialization, Memory Managers, Caching, Booting) Why does my SuperTrak SX6000 take so long to power up and get a signal to the VGA monitor now that the SuperTrak SX6000 card is installed? The process should only take a few seconds at most. The SuperTrak SX6000 controller performs an intensive memory check each time at power-up. - Page 54 13h interface used by FDISK. In order to access drives on the SuperTrak SX6000 from MSDOS at all, you must first create a RAID array. Why can’t I see the array I just created with PAM under the Windows NT Disk...
- Page 55 SuperTrak SX6000™ User Manual Appendix B Notes - B6 -...
-
Page 56: Technology Background
SuperTrak SX6000™ User Manual Appendix C Technology Background Introduction to RAID RAID (Redundant Array of Independent Disks) allows multiple hard drives to be combined together to form one large logical drive or “array.” As far as the operating system is concerned, the array represents a single storage device, and treats it as such. -
Page 57: Raid 1 - Mirroring
SuperTrak SX6000™ User Manual Appendix C RAID 1 – Mirroring When a disk array is mirrored, identical data is written to a pair of drives, while reads are performed in parallel. The reads are performed using elevator seek and load balancing techniques where the workload is distributed in the most efficient manner. -
Page 58: Raid 3 - Block Striping With Parity Drive
SuperTrak SX6000™ User Manual Appendix C Figure 17 Raid 0+1 Striping and Mirroring of Two Drive Pairs RAID 3 – Block Striping with Parity Drive RAID level 3 organizes data across the physical drives of the array, and stores parity information onto a drive dedicated to this purpose. -
Page 59: Raid 5 - Block And Parity Striping C4
SuperTrak SX6000™ User Manual Appendix C Figure 18 Raid 3 Multiple Drives Stripe Data with One Parity Drive RAID 5 – Block and Parity Striping RAID 5 is similar to RAID 3 as described above except that the parity data is rotated across the physical drives along with the block data. -
Page 60: Spanning C5
SuperTrak SX6000™ User Manual Appendix C Spanning In a Spanning array, the disk array capacity is equal to the sum of all drives, even if the drives are of different capacities. Spanning stores data onto a drive until it is completely filled then proceeds to store data onto the next drive in the array. -
Page 61: Contacting Technical Support
Fax Technical Support (408) 228-6401 Attention: Technical Support Phone Technical Support (408) 228-6402 7:30-5:00pm M-F Pacific Standard Time If you wish to write us for support: Promise Technology, Inc. Attn: Technical Support 1745 McCandless Drive Milpitas, CA 95035, USA - D1 -... - Page 62 Attention: Technical Support Phone Technical Support +31 (0)40 256 94 61 8:30-5:00pm The Netherlands Time If you wish to write us for support: Promise Technology Europe B.V. Attn: Technical Support 1European Business Centre, Unit 1.25 Luchthavenweg 81 5657 EA Eindhoven, The Netherlands...
-
Page 63: Limited Warranty
SuperTrak100 SX6™ User Manual Appendix E Limited Warranty Promise Technology, Inc. (“Promise”) warrants that for two (2) years from the time of the delivery of the product to the original end user: the product will conform to Promise’s specifications; the product will be free from defects in material and workmanship under normal use and service. - Page 64 SuperTrak100 SX6™ User Manual Appendix E Promise’s sole responsibility with respect to any product is to do one of the following: replace the product with a conforming unit of the same or superior product; repair the product; recover the product and refund the purchase price for the product. Promise shall not be liable for the cost of procuring substitute goods, services, lost profits, unrealized savings, equipment damage, costs of recovering, reprogramming, or reproducing of programs or data stored in or used with the products, or for any other...
-
Page 65: Returning Product For Repair (Usa And Canada Only)
SuperTrak SX6000™ User Manual Appendix F Returning Product For Repair (USA and Canada Only) If you suspect a product is not working properly, or if you have any questions about your product, contact our Technical Support Staff through one of our Technical Services, making sure to provide the following information: •... -
Page 66: Your Responsibilities F2
SuperTrak SX6000™ User Manual Appendix F Your Responsibilities You are responsible for determining whether the product is appropriate for your use and will interface with your equipment without malfunction or damage. You are also responsible for backing up your data before installing any product and for regularly backing up your data after installing the product. - Page 67 SuperTrak SX6000™ User Manual Index INDEX Arrays Errors Bootable ......10, 26 Halt On ........12 Creating .11, 18, 21, 22, 23, 24, 25 Critical & Offline......33 Deleting .......11, 27 Hot Spare Drives .......25 Gigabyte Boundary ......20 Partitioning/Formatting ..3, 34 RAID 0 ........20 RAID 0+1........22...
- Page 68 SuperTrak SX6000™ User Manual Index SuperBuild ......See BIOS Synchronization ......34 Software Installation......7 Quick install .........7 TCP/IP .........8 Spanning........25 TCP/IP ..........8 Assigning drives to, ....25 Troubleshooting ......37 NOTES...
Need help?
Do you have a question about the SuperTrak SX6000 and is the answer not in the manual?
Questions and answers