
Related Manuals for Wexiodisk WD-18CW


Summary of Contents for Wexiodisk WD-18CW
- Page 1 TROLLEY DISHWASHER WD-18CW (translation of the original documentation) Read the manual before using the machine! Installation and user manual S/N: (En) Valid from: 202211 Rev.:...
-
Page 3: Table Of Contents
WD-18CW Rev. (202211) 1. General instructions ................ 1 1.1 Symbols used ....................2 1.2 Machine rating ....................3 1.3 Checking that the machine and manual correspond ........3 1.4 EU Declaration of Conformity ................4 2. Safety instructions ................5 2.1 General information .................. - Page 4 WD-18CW Rev. (202211) 3.7 Adjustment of rotating table ................18 3.8 Adjusting the locking arms ................19 3.9 Trial operation ....................20 3.9.1 Commissioning protocol ................. 20 3.10 Documentation ..................... 21 4. Operating instructions ..............22 4.1 Before washing ....................23 4.1.1 Machine design ..................
-
Page 5: General Instructions
WD-18CW Rev. (202211) General instructions 1. General instructions Read the instructions in this manual carefully as they contain important information regarding the correct, effective and safe installation, use and servicing of the machine. Service personnel should have access to all documentation for the machine. -
Page 6: Symbols Used
WD-18CW Rev. (202211) General instructions 1.1 Symbols used This symbol warns of situations where a safety risk may arise. The instructions given should be followed in order to prevent injury and dangerous situations. This symbol on a machine part warns of electrical equipment. The machine must... -
Page 7: Machine Rating
WD-18CW Rev. (202211) General instructions 1.2 Machine rating The machine has two rating plates, one of which is placed at the bottom of one side of the machine and the other in the electrical cabinet. The technical information on the plates is also included on the machine’s wiring diagram. The... -
Page 8: Eu Declaration Of Conformity
WD-18CW Rev. (202211) General instructions 1.4 EU Declaration of Conformity A so-called EU Declaration of Conformity is provided on delivery of the machine. CE_16_2 Contact details of the manufacturer (Wexiödisk AB, Mårdvägen 4, SE- 35245 Växjö, SWEDEN, Tel.: +46 470 771200, Fax: +46 470 23752, E- mail: wexiodisk@wexiodisk.com). -
Page 9: Safety Instructions
WD-18CW Rev. (202211) Safety instructions 2. Safety instructions Read the chapter GENERAL INSTRUCTIONS carefully before starting work. 2.1 General information The machine is CE marked, which means that it complies with the requirements of the EU Machinery Directive with regard to product safety. Product safety means that the design of the machine will prevent personal injury or damage to property. -
Page 10: Transport
Warranty repairs must be performed by an authorised company. Contact an authorised service company to draw up a programme of preventive care and maintenance. For authorised service companies, please see www.wexiodisk.com or contact Wexiödisk AB. • The regular checks described in the manual must be carried out in accordance with the instructions. -
Page 11: Operation
WD-18CW Rev. (202211) Safety instructions 2.5 Operation Be very careful around the machine when it is in operation. 2.5.1 High temperatures • The temperature of the washing and rinsing water is 60° C and 85°C. Do not open the machine until the washing and rinsing phases have finished. -
Page 12: Installation Instructions
WD-18CW Rev. (202211) Installation instructions 3. Installation instructions Read the chapters GENERAL INSTRUCTIONS and SAFETY INSTRUCTIONS carefully before starting work. 3.1 General information Read these instructions carefully, as they contain important information regarding the correct installation method. • The instructions should be used together with the machine's wiring diagram and flow diagram for water and any steam. -
Page 13: Power Supply
WD-18CW Rev. (202211) Installation instructions 3.2.3 Power supply Electrical connections are made by qualified personnel in a way that complies with local and national regulations. The machine’s capacity requirements are stipulated in TECHNICAL SPECIFICATIONS. 3.2.4 Water Water connections are made by qualified personnel in a way that complies with local and national regulations. -
Page 14: Transport And Storage
WD-18CW Rev. (202211) Installation instructions 3.3 Transport and storage Always transport the machine in an upright position. Take care during transport, as there is a risk of tipping. N.B.! The machine must not be transported without a pallet or other support. Some form of support beam must always be used along the sides of the machine during transport. -
Page 15: Installation
WD-18CW Rev. (202211) Installation instructions 3.5 Installation Parts which must be assembled are prepacked inside each machine section together with the necessary bolts, nuts, etc. There are two installation options for the machine: free-standing in the room (1 shutter door) or with a clean and dirty side (2 shutter doors). -
Page 16: Positioning The Machine
WD-18CW Rev. (202211) Installation instructions 3.5.2 Positioning the machine Check the following points before the machine is placed in position: • Check that the fuse for the machine at the site is off, blocked and that outgoing electrical circuits from the machine are non-live. -
Page 17: Connections
WD-18CW Rev. (202211) Installation instructions 3.6 Connections 27841_R3 The machine installed "on the floor" Hot water connection Cold water connection Compressed air connection Condensation connection (option) Steam connection (option) Electrical connection Ventilation connection Floor drain... - Page 18 WD-18CW Rev. (202211) Installation instructions 27840_R3 The machine is installed "recessed into the floor" Hot water connection Cold water connection Compressed air connection Condensation connection (option) Steam connection (option) Electrical connection Ventilation connection Floor drain In the following chapter, figures are given in brackets to clarify what needs to be...
-
Page 19: Electrical Connection
WD-18CW Rev. (202211) Installation instructions 3.6.1 Electrical connection Information about electrical connections is available on the machine’s wiring diagram which is provided on delivery. Store the diagrams in the plastic pocket, located in the electrical cabinet, even after installation. •... -
Page 20: Ventilation
WD-18CW Rev. (202211) Installation instructions 3.6.3 Ventilation The machine’s heat load for the room is stipulated in TECHNICAL SPECIFICATIONS. The machine has a heat recovery unit connected to an exhaust fan to reduce the amount of steam released. Extractor fans for extracting steam can be installed above the infeed and outfeed openings, as well as above the area of the machine where steam is emitted from the condensing fan. -
Page 21: Detergent And Drying Agent
WD-18CW Rev. (202211) Installation instructions 3.6.7 Detergent and drying agent • The machine comes ready for fitting detergent and drying agent equipment, but this is not included with the machine. • To avoid making unnecessary holes in the machine, the equipment should be placed on the wall behind the machine on the outfeed side. -
Page 22: Adjustment Of Rotating Table
WD-18CW Rev. (202211) Installation instructions 3.7 Adjustment of rotating table D335_1 Floor of the machine showing rotating table and floor plates Rotating table Support rollers Sill plate Location of support legs Rotating table start position markers • After installing the machine, the rotating table (1) needs to be adjusted to the correct level. -
Page 23: Adjusting The Locking Arms
WD-18CW Rev. (202211) Installation instructions (3). In this position, the rotating table should not be resting on the four support rollers (2). 3.8 Adjusting the locking arms Locking arm Upper gate bar Circular rod, Ø 6 mm Sensor plate Screw... -
Page 24: Trial Operation
WD-18CW Rev. (202211) Installation instructions 3.9 Trial operation Prepare the machine for trial operation with the help of OPERATING INSTRUCTIONS. The instructions describe the measures that must be taken to prepare the machine for operation. 3.9.1 Commissioning protocol This should be completed when the machine is started up and used. -
Page 25: Documentation
WD-18CW Rev. (202211) Installation instructions 3. Check the setting of the reference values: All the reference values have been set to the recommended values on delivery. • Check that all reference values are correctly adjusted • Check that the water temperatures (tank, booster heater, etc.) have been reached in accordance with the reference values 4. -
Page 26: Operating Instructions
WD-18CW Rev. (202211) Operating instructions 4. Operating instructions Read the chapters GENERAL INSTRUCTIONS and SAFETY INSTRUCTIONS carefully before starting work. The machine's touch panel contains built-in guides on what and how things must be done. The use of the machine is dependent on how the machine is equipped. -
Page 27: Before Washing
WD-18CW Rev. (202211) Operating instructions 4.1 Before washing 4.1.1 Machine design 18_02_R2 Booster pump Heat recovery unit Shaft-mounted gear motor Booster heater Worm gear motor Main switch Pressure switch Tank Washing pump Return pump Drain tap Electrical cabinets Emergency stop... -
Page 28: On/Off Button
WD-18CW Rev. (202211) Operating instructions Nozzle Level pipe Rinse pipe ON/OFF button In the following chapter, figures are given in brackets to clarify what needs to be done. These numbers refer to image and list above. 4.1.2 ON/OFF button The light on the ON/OFF button indicates the following: •... - Page 29 WD-18CW Rev. (202211) Operating instructions The various fields are divided into the following parts: Date and time Machine status Temperature of tanks Temperature of final rinse Login symbol Text describing what happens in the activity field Symbol for function displayed...
- Page 30 WD-18CW Rev. (202211) Operating instructions Top bar (A) This indicates the machine status using text and symbols (2, 3, 4) and the date and time (1). Alarm and information messages are displayed here. More information about these is shown in the activity field (C).
- Page 31 WD-18CW Rev. (202211) Operating instructions Symbols The following symbols and a brief description may be displayed in the various fields of the panel (some depending on machine type). Symbol Explanation Symbol Explanation Black: Information Change the water Blue: About the machine...
- Page 32 WD-18CW Rev. (202211) Operating instructions Symbol Explanation Symbol Explanation Logged in Logged out Low flow Machine status No / Cancel No flow Other Relay test START Protocol Repeat / Machine is in Reset operation Save to PC Save to USB...
-
Page 33: Preparations Before Filling
WD-18CW Rev. (202211) Operating instructions Symbol Explanation Symbol Explanation Medium wash program Medium wash program without spin dry with spin dry Spin dry Menu Return / Back 4.1.4 Preparations before filling In this chapter, figures are given in brackets from the figure beneath chapter 4.1.1 Machine design. -
Page 34: Filling And Heating The Machine
WD-18CW Rev. (202211) Operating instructions 4.1.5 Filling and heating the machine Start button Activity text • Check that the ON/OFF button is illuminated blue and the machine is in standby mode. • Press the ON/OFF button beneath the touch panel to start the machine. It may take up to 10 seconds before the screen on the touch panel illuminates and the ON/OFF button illuminates green. - Page 35 WD-18CW Rev. (202211) Operating instructions The figure above will be displayed when the machine is ready for washing.
-
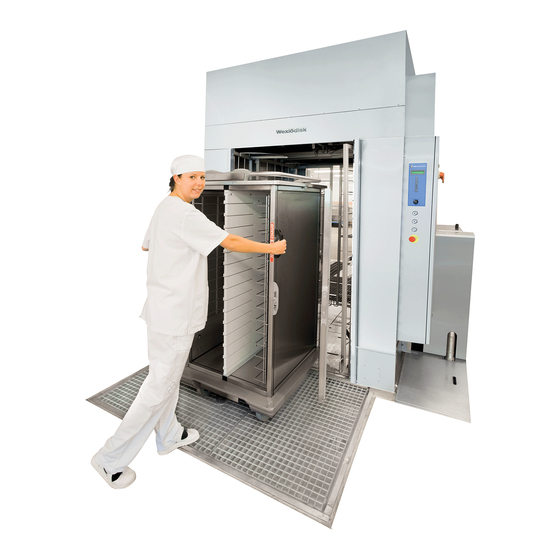
Page 36: Washing
WD-18CW Rev. (202211) Operating instructions 4.2 Washing 4.2.1 Positioning dishware Examples of the different types of trolleys and other items that can be washed. Note that trolleys and other wheeled items do not need to be secured. All you need to do is wheel the items in and close the gates, locking arms and shutter doors to start the wash. - Page 37 WD-18CW Rev. (202211) Operating instructions 1 = Table trolley 2 = Transport trolley 3 = Other items...
-
Page 38: Selecting A Programme
WD-18CW Rev. (202211) Operating instructions 4.2.2 Selecting a programme The programmes can be run with or without a spin cycle. The program time can vary somewhat depending on the pressure and flow of incoming water. Wash programs with spin dry Program time approx. - Page 39 WD-18CW Rev. (202211) Operating instructions Wash programs without spin dry A program without spin dry should be used if the items being washed are for some reason not suitable for spinning, for example if the items cannot be fixed firmly in place.
-
Page 40: Starting Washing
WD-18CW Rev. (202211) Operating instructions 4.2.3 Starting washing Check that the arrows on the rotating table and sill plate are exactly aligned (home position). Place the trolley with the dishware in the cage and lock the trolley's wheels. Select a suitable program and follow the instructions on the touch panel. -
Page 41: Emergency Stop
WD-18CW Rev. (202211) Operating instructions 4.2.5 Emergency stop If the machine needs to be stopped during operation for some reason, press button (13) for an emergency stop. Before the machine can be restarted, the emergency stop button (13) must be reset by turning it in the direction of the arrows. -
Page 42: Checking The Wash Result
WD-18CW Rev. (202211) Operating instructions 4.2.8 Checking the wash result The dishware should be checked after each wash for: PROBLEM CAUSES & MEASURES Starch spots • Scraping: Important to remove as much food particles as possible before washing. This also means that the water in the machine Misting does not need to be changed as often. -
Page 43: After Use - Cleaning
WD-18CW Rev. (202211) Operating instructions 4.3 After use – Cleaning HACCP is a preventive inspection system to ensure hygiene requirements are met during the washing process and cleaning of the machine. As a result of its design, the machine meets strict hygiene requirements. Regular, thorough cleaning is also important from a hygiene perspective. -
Page 44: Daily Cleaning
WD-18CW Rev. (202211) Operating instructions 4.3.3 Daily cleaning Internally The machine should be cleaned at least once a day when in normal operation. Go to the menu icon and select "Cleaning". Follow the instructions displayed on the machine's touch panel. -
Page 45: Cleaning The Heat Recovery Unit In The Event Of An Alarm Or Once / Year
WD-18CW Rev. (202211) Operating instructions 4.3.6 Cleaning the heat recovery unit in the event of an alarm or once / year N.B.! When rinse cleaning the heat recovery unit and the base of the battery box, do not use more water than the drain under the battery can remove from the machine. -
Page 46: Operating Problems
WD-18CW Rev. (202211) Operating instructions 4.3.8 Operating problems Troubleshooting If the touch panel screen gives no indication of whether the ON/OFF button has been pressed, check the main switch to see whether it is turned on. If the problem persists, contact authorised service personnel. - Page 47 WD-18CW Rev. (202211) Operating instructions All errors displayed on the touch panel have an error code, which is displayed in the alarm. This error code must be specified when contacting service personnel. When you contact service personnel, you will need to provide the following information: •...
- Page 48 WD-18CW Rev. (202211) Operating instructions Information alarms (blue) An information alarm is generated, e.g. because a predetermined number of wash cycles has been reached. Type of alarm and minimise / maximise Symbol for type of alarm (maintenance) Descriptive text Error code...
- Page 49 WD-18CW Rev. (202211) Operating instructions Error alarms (yellow) Error alarm is generated e.g. for low water flow in the machine. Type of alarm and minimise / maximise Error code Symbol for type of alarm Descriptive text Continue to next screen...
- Page 50 WD-18CW Rev. (202211) Operating instructions Critical error alarms (red) A critical error alarm is generated because a serious error has occurred. The majority of these alarms cannot be reset by the operator, and service personnel must be contacted. Type of alarm and minimise / maximise...
-
Page 51: Technical Specifications
WD-18CW Rev. (202211) Technical specifications 5. Technical specifications The manufacturer reserves the right to make changes to the technical data. TECHNICAL DATA Washing pump (kW) Return pump (kW) Booster pump (kW) 0.58 Rotating table motor (kW) 0.55 Condenser fan (kW) Drive motor for shutter door (kW) (Single door) 0.18... - Page 52 WD-18CW Rev. (202211) Technical specifications CAPACITY AND OPERATING DATA Total wash cycle, program ECO (min) * P1 / P4 1.2 ** / 1.0 *** Total wash cycle, program Medium (min) * P2 / P5 1.6 ** / 1.4 *** Total wash cycle, program Heavy (min) * P3 / P6 2.0 ** / 1.8 ***...
- Page 53 WD-18CW Rev. (202211) Technical specifications CONNECTION, STEAM-HEATED MACHINE 150–250 kPa * Total connected load (kW) Main fuse 400-415 V 3N~(A) ** Max. connection area 400-415V 3N~ (L1-L3, N, PE) (TN-S) Cu (mm²) Maximum short-circuit current Icu (kA) Steam connection (internal thread) R1¼"...
Need help?
Do you have a question about the WD-18CW and is the answer not in the manual?
Questions and answers