Table of Contents
Advertisement
Available languages
Available languages
Quick Links
Operating Instructions | Betriebsanleitung | Mode d'emploi |
Instrucciones de manejo | Manuale d'uso | Handleiding
Original Operating Instructions | Original-Betriebsanleitung | Mode d'emploi original |
Instrucciones de manejo originales | Manuale d'uso originale | Originele handleiding
Flexsafe
Pro Mixer Drive Unit
®
Drive Unit for Use with Flexsafe
Mixing Bags and Palletanks for Mixing
®
Antriebseinheit zur Verwendung mit Flexsafe
Misch-Bags und Palletanks für Mischen
®
Moteur d'agitation à utiliser avec les poches de mélange Flexsafe
et les Palletank de mélange
®
Unidad de accionamiento para el uso con bolsas de mezcla Flexsafe
y Palletanks para mezclas
®
Unità motrice da utilizzare con sacche di miscelazione Flexsafe
e Palletank per miscelazione
®
Aandrijfeenheid voor gebruik met Flexsafe
mengbags en Palletanks voor Mengen
®
1000062670
Advertisement
Chapters
Table of Contents

Related Manuals for Sartorius Flexsafe Pro


Summary of Contents for Sartorius Flexsafe Pro
- Page 1 Operating Instructions | Betriebsanleitung | Mode d’emploi | Instrucciones de manejo | Manuale d’uso | Handleiding Original Operating Instructions | Original-Betriebsanleitung | Mode d’emploi original | Instrucciones de manejo originales | Manuale d’uso originale | Originele handleiding Flexsafe Pro Mixer Drive Unit ®...
- Page 2 English page Deutsch Seite Français page Español página Italiano pagina Nederlands pagina...
-
Page 3: Table Of Contents
Contents Contents 1 About these Instructions . . . . . . . . . . . . . . . . . . . . . . . . . . . . . . . . . . . . . . . . . . . . . . . . . . . . . . . . . . . . . .7 Scope . - Page 4 Contents 4 Operating Concept . . . . . . . . . . . . . . . . . . . . . . . . . . . . . . . . . . . . . . . . . . . . . . . . . . . . . . . . . . . . . . . . . .21 4.1 Display in the Main Menu .
- Page 5 Contents 8 Operation . . . . . . . . . . . . . . . . . . . . . . . . . . . . . . . . . . . . . . . . . . . . . . . . . . . . . . . . . . . . . . . . . . . . . . . . . . . 39 8.1 Setting Up Process Data Acquisition for USB Mass Storage .
- Page 6 17 Sartorius Service . . . . . . . . . . . . . . . . . . .
-
Page 7: About These Instructions
About these Instructions About these Instructions Scope These instructions are part of the device. These instructions apply to the device in the following versions: Device Type Flexsafe Pro Mixer Drive Unit FMD300001 ® Other Applicable Documents In addition to these instructions, observe the following documentation: −... -
Page 8: Symbols Used
Safety Precautions Symbols Used 1.4.1 Warnings in Operating Instructions WARNING Denotes a danger with the risk that death or severe injury may result if it is not avoided. CAUTION Denotes a hazard that may result in moderate or minor injury if it is not avoided. -
Page 9: Modifications To The Device
Do not open the device yourself. We recommend that any repair work, even that not covered by the warranty, is carried out by Sartorius Service or after consulting with Sartorius Service. Only carry out the maintenance work described in these instructions. For maintenance work that has to be carried out by Sartorius Service, please contact Sartorius Service. -
Page 10: Personnel Qualification
Before working with the device: Read the instructions carefully and completely. If these instructions are lost: Request a replacement or download the latest version from the Sartorius website (www.sartorius.com). Retain the instructions. The information contained in these instructions must be available to all individuals working with the device. -
Page 11: Safety Information On The Device
Only use the original power supply cable. If the power supply cable must be replaced: Contact Sartorius Service. Do not repair or modify the power supply cable. 2.7.3... -
Page 12: Conduct In An Emergency
Leave the emergency switch-off switch in the engaged position until the faults or malfunctions have been resolved. Malfunctions should be resolved by Sartorius Service. When the fault or malfunction is repaired: Disengage the emergency shut-off switch. To do so, pull out the emergency shut-off switch until the green ring on the emergency shut-off switch is visible. -
Page 13: Working On The Device
Safety Precautions 2.11 Working on the Device Not all areas of the device or Palletank for Mixing can always be surveyed ® in full, the visibility of certain areas may be restricted, i.e. if the device is inserted or removed at the Palletank for Mixing. -
Page 14: Moving Parts
Safety Precautions 2.15 Moving Parts 2.15.1 Motor If the user of the device or other people nearby come into contact with the motor during this process: There is a risk of fingers becoming trapped and crushed between the motor and the Palletank for Mixing. -
Page 15: Magnetic Forces
Safety Precautions 2.16 Magnetic Forces 2.16.1 Effects on Implants From Magnetic Forces The device’s motor emits strong magnetic forces during operation. Magnetic forces can affect implants and other magnetic devices. People with implants can be lethally or seriously injured by these forces; magnetic or magnetized devices can also be damaged by these forces. -
Page 16: Device Description
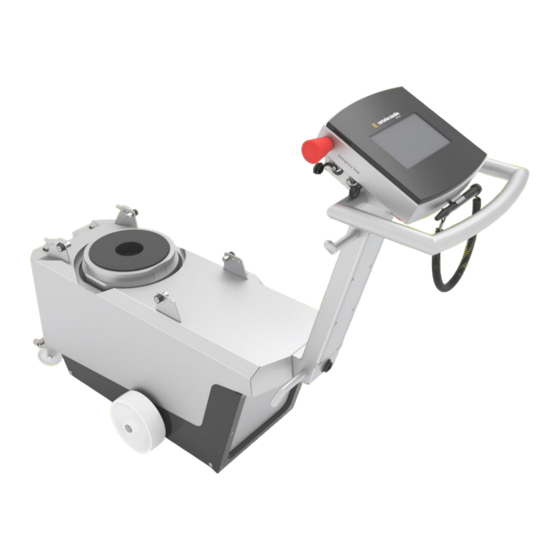
Device Description Device Description Device Overview Fig. 1: Flexsafe Pro Mixer Drive unit (viewed from above) ® Pos . Designation Description Guide roller Used to insert and remove the device underneath the Palletank ® Mixing. Glides across the Palletank for mixing guide rails. ®... -
Page 17: Components For Coupling With The Palletank
Device Description Components for Coupling with the Palletank for Mixing and Mixing Bag ® Fig. 2: Components for Coupling with the Palletank for Mixing and mixing bag (moving parts lowered) ® Pos . Designation Description Palletank recognition sensor Determines if the device is positioned under a Palletank for Mixing. -
Page 18: Connections, Cable Reel And On-Off Switch
Fig. 3: Connections, cable reel and on-off switch Pos . Designation Description ETHERNET Connection for Sartorius Service personnel only. Is sealed with a cover cap. REMOTE Connection for remote control. Is sealed with a cover cap. Connection for USB mass storage. Is sealed with a cover cap. -
Page 19: Coupling And Decoupling The Device On The Palletank
Device Description Coupling and Decoupling the Device on the Palletank for Mixing ® Fig. 4: Device coupled with Palletank for Mixing and decoupled from Palletank for Mixing ® ® (example) Pos . Designation Description Alignment pins coupled The alignment pins have risen and are connected to the alignment plate of the Palletank for Mixing. -
Page 20: Emergency Shut-Off Switch
Symbol Meaning During operation, parts in the device may be live. The device may only be opened by Sartorius Service. In case the electrical equipment malfunctions, the device must be immediately disconnected from the power supply. There is a risk of crushing when coupling the device to the Palletank for Mixing. -
Page 21: Operating Concept
Operating Concept Operating Concept Display in the Main Menu Access level: Admin DD.MM.YYYY HH:MM:SS Mixing with recipe Manual mixing Remote mixing Fig. 5: “Main menu” display (example) Pos . Designation Description Status bar Shows the logged-in user as well as the date and time. -
Page 22: Display In The Mixing Process
Operating Concept Display in the Mixing Process Access level: Admin Manual mixing DD.MM.YYYY HH:MM:SS Set parameters Actual speed [rpm] Speed Duration Time [hh:mm:ss] Fig. 6: Mixing process display in the “Manual mixing” operating mode (example) Pos . Designation Description Status bar Displays the logged-in user, date and time, and the selected operating mode. -
Page 23: User Guide
Operating Concept User Guide The user guide guides the user through the process step routine and provides support with entering values in entry fields. Access level: :Admin Access level: Admin Manual mixing Manual mixing DD.MM.YYYY HH:MM:SS DD.MM.YYYY HH:MM:SS Couple motor Lift up the motor by pressing the arrow up Install Palletank button. -
Page 24: Message
Operating Concept Message Alarm Access level: Admin DD.MM.YYYY HH:MM:SS Time Date State Text Mixing Motor Error: Speed lost Mixing with recipe Manual mixing Remote mixing Fig. 9: Message (error message, example) Pos . Designation Description Error list Displays the saved error messages and warning messages. Available functions Shows the available functions. - Page 25 Operating Concept Pos . Symbol Designation Description [Start] button Starts a mixing process. [Pause] button Interrupts a mixing process. [Stop] button Stops a mixing process or the remote operation of the device. [Previous display] button | Switches to the previous or next display in a process step rou- [Next display] button tine or in a menu.
-
Page 26: Menu Structure
Set the date and time. Language Set the language. User User login Define an access restriction for the program menu. administration User View and manage saved users. administration Maintenance Access only for Sartorius Service Operating Instructions Flexsafe Pro Mixer Drive Unit ®... -
Page 27: Navigating The Menus
Operating Concept 4.10 Navigating the Menus To access a menu: Press the button for the menu, e.g. the [Manual Access level: Admin DD.MM.YYYY HH:MM:SS mixing] button (1). The first display in the process step routine or the submenu is shown. Mixing with recipe Manual mixing Remote mixing... -
Page 28: Installation
Installation Installation Scope of Delivery Item Quantity Flexsafe Pro Mixer Drive Unit ® Screw to replace the transport lock screw Country-specific power supply cable (EU) Country-specific power supply cable (USA) Potential equalization cable, combined with power supply cable and additional power supply plug Operating instructions Technical documentation Unpacking the Device... -
Page 29: Removing The Transport Lock
Installation Removing the Transport Lock The device is protected with a transport lock on delivery. The transport lock consists of 2 transport lock screws. The transport lock screws must be removed in order to operate the device. Personnel: 2 persons, user Procedure Hold the device firmly by the handle and push it down in a controlled manner. -
Page 30: Getting Started
Check whether the country-specific power plug matches the power con- nections at the installation site. If required: Contact Sartorius Service (for available power supply cables, see Chapter “16 Accessories”, page 60). Unscrew the nut for the strain relief (2) and remove. -
Page 31: Acclimatizing The Device
Getting Started Acclimatizing the Device If the device is moved from one location to another location and the tempe- rature at the current location is lower than the temprature at the next loca- tion: The temperature difference can lead to condensation from humidity in the device (moisture formation). -
Page 32: Moving The Device To The Installation Site
Getting Started Moving the Device to the Installation Site Procedure Release the 2 locking brakes on the castors. WARNING Risk of injury while moving the device! When moving the device ensure that no personnel or objects are in the way. Wear personal protective equipment. -
Page 33: System Settings
System Settings System Settings Logging Into the Device The device comes with preinstalled users. The user classed as “supervisor” must initially log into the device. The user classed as “supervisor” is automatically selected upon delivery. The standard password for this user is “1111”. -
Page 34: Creating, Changing, Or Deleting Users
0 or 1 Administrator group 0 or 1 0 or 1 Only Sartorius Service 0 = no access restriction 1 = can be access restricted; if access restricted: Only accessible by user group “Users”, “Group” or “Administrator group” 2 = is access restricted, accessible only by user group “Group” or “Administrator group”... -
Page 35: Creating Users
System Settings 7.3.3 Creating Users Procedure In the list of saved users, hold down the [List down] button until the end Settings Access level: Admin DD.MM.YYYY HH:MM:SS of the list is reached. User administration Double click in the empty row. User Password Group... -
Page 36: Deleting Users
System Settings 7.3.5 Deleting Users Procedure Go to the desired entry in list of saved users. To do so, press the [List up] or [List down] buttons. Double-click on the desired entry in the [User] table cell. The table cell is selected. Press the entry again. -
Page 37: Modifying Recipe Entries
System Settings Pos . Designation Recipe name Last change (time stamp) Available functions List of recipes Saved phase Requirements If the operating modes are access restricted for the mixing process: The personal user profile has the user group “Users” user group, the personal password is known. -
Page 38: Parameter List
System Settings Parameter List 7.6.1 Parameters in the Program Menu Parameters Setting values Explanation Speed [rpm] 20 – 750 Define the mixing speed. Duration [00 h / 00 min / 00 s] 00:00:01 – − Define the duration for a mixing process or for a 99:59:59 phase in a recipe. -
Page 39: Operation
Operation Operation Setting Up Process Data Acquisition for USB Mass Storage The process data from the mixing process can be saved on a USB mass storage device (USB stick). The process data are saved in a text file. The text file can be exported and statistically evaluated, e.g. -
Page 40: Installing The Mixing Bag In The Palletank For Mixing
Operation Installing the Mixing Bag in the Palletank ® for Mixing Requirements The [Install Palletank] display is shown in the operating display. WARNING Danger of crushing due to magnetic forces! High magnetic forces exist between the motor of the device and the impeller in the mixing bag. - Page 41 Operation Procedure Release the 2 locking brakes on the castors. WARNING Risk of injury while moving the device! When moving the device, ensure that no personnel or objects are in the way. Wear personal protective equipment. Align the device in front of the Palletank for Mixing.
-
Page 42: Coupling The Device To The Palletank
Operation Coupling the Device to the Palletank ® Mixing and Impeller To couple the device to the Palletank for mixing and the impeller: The ® motor, the alignment pins and the distance sensor must be raised. Manual mixing Manual mixing Access level: Admin Access level: Admin DD.MM.YYYY HH:MM:SS... -
Page 43: Filling The Mixing Bag
Operation Procedure Check the position of the motor in the “Couple motor” display. The positioning bars must be in the lowest position. If the positioning bars are not in the lowest position: Click on the [Lower] button and hold it down. This causes the motor and the associated components to be lowered to the starting position. -
Page 44: Carrying Out The Mixing Process
Operation Carrying Out the Mixing Process 8.9.1 Starting the Mixing Process Procedure If the “Mixing with recipe” or “Manual mixing” operating mode is selected: Press the [Start] button. If the “Remote mixing” operating mode is selected: Start the mixing process on the remote control unit (see the remote control unit instructions). -
Page 45: Viewing Recorded Messages
Operation Procedure Press the [Error] or [Warning] button. The error list appears. To switch between the entries in the error list: Press the [List up] or [List down] button. Check the entries in the error list: To call up the information for a message: Press the [Info] button. To call up the details for a message: Press the [Details] button. -
Page 46: Emptying And Removing The Mixing Bag
Operation Procedure Check the position of the motor in the “Separate motor” display. Access level: Admin Manual mixing DD.MM.YYYY HH:MM:SS The positioning bars must be in the top position (1). Click on the [Lower] button and hold it down. Separate motor The device is disconnected from the Palletank for Mixing and the Lift down the motor by pressing the... -
Page 47: Ending The Process Data Acquisition
Operation Procedure Slowly pull the device away from the Palletank for mixing until the rear ® guide rollers are at the end of the guide rails of the Palletank for mixing. ® The device must roll away over the 2 rolling elements on the guide rails of the Palletank for Mixing. -
Page 48: Cleaning And Maintenance
Maintenance Schedule Interval Component Action 12 months Device Have the function of the device checked by Sartorius Service. 12 months Sensors Have the device sensors cali- brated by Sartorius Service. Restarting the System Procedure Commission the device (see Chapter “6 Getting Started”, page 30). -
Page 49: Malfunctions
Error Message Malfunction (Info) Cause Solution Chapter, Page [Lifting system error: [Lifting motor does The motor cannot Please contact Sartorius Motor timeout] not reach position. be correctly Service. (Sensor or motor are started-up, because damaged)] the motor and other components are damaged. - Page 50 Malfunctions Error Message Malfunction (Info) Cause Solution Chapter, Page [Lifting system error: [Position sensors are The motor cannot Please contact Sartorius Sensor] damaged or wrongly be correctly started Service. calibrated] up, because the sensors are damaged or incorrectly calibrated. [Mixing motor error:...
- Page 51 Malfunctions Error Message Malfunction (Info) Cause Solution Chapter, Page [Mixing motor error: [Power consumption The storage current Check the position of the 10.5, Bearing current] too high] is too high, causing mixing bag and impeller. the mixing process to be interrupted or locked.
-
Page 52: Faults When Operating The Device
Mixing and couple with the mixing bag’s impeller (see Chapter “8.5”, ® Page 40 and Chapter “8.6”, Page 42). If the warning message reoccurs: Contact Sartorius Service. 10.6 Checking the Coupling with the Mixing Bag and Impeller Procedure Stop the mixing process. -
Page 53: Decommissioning
Decommissioning Decommissioning 11.1 Decommissioning the Device Requirements The device is removed from the Palletank (see Chapter “8.12 Ending the ® Mixing Process”, page 45). Procedure Turn the device off. Disconnect the power supply cable from the power supply at the instal- lation site. -
Page 54: Transport
Transport 12 Transport 12.1 Installing the Transport Lock If the device needs to be transported, e.g. if it needs to be shipped: The transport lock must be installed. The transport lock consists of 2 transport lock screws that were fitted on the device on delivery. -
Page 55: Storage And Shipping
Defective devices or parts can be returned to Sartorius Stedim Biotech. Returned devices must be clean, decontaminated, and properly packed. Transport damage as well as measures for subsequent cleaning and disinfection of the device or parts by Sartorius Stedim Biotech shall be charged to sender. WARNING... -
Page 56: Disposal
14.2.2 Disposal Requirements The device has been decontaminated. Procedure Dispose of the device. Follow the disposal instructions on our website (www.sartorius.com). Dispose of the packaging in accordance with local government regulations. Operating Instructions Flexsafe Pro Mixer Drive Unit ®... -
Page 57: Technical Data
Technical Data 15 Technical Data 15.1 Dimensions and Weight Unit Value Dimensions (width x length x height) 439 x 1242 x 1006 Weight 15.2 Ambient Conditions Unit Value Installation Site Indoor use only Away from direct sunlight Not in close proximity to heating and air conditioning systems Away from radiation exposure from microwaves, UV lasers or X-radiation. -
Page 58: Electromagnetic Compatibility
(also) supplies residential buildings. 15.4 Suitability of Palletank for Mixing and Mixing Bags ® Only Sartorius Flexsafe Pro Mixer Bag ® Filling volume of 50L to 1000L and a maximum of two connections on the front and underside... -
Page 59: Remote Operation
Technical Data 15.6 Remote Operation Unit Value Approved external control system Sartorius FlexAct ® Communication connection Using a connection cable for remote operation Type of connection cable for remote operation: Shielded 8-pin plug, M12, A coded, screw assembly with M16 thread, 8 x 0.25 mm Input signals from remote control Target value for mixing speed at 0 –... -
Page 60: Acoustic Emission
(www.sartorius.com) for information about the service addresses, services provided, or to contact a local representative. When contacting Sartorius Service with questions about a system or in the event of malfunctions, be sure to have the device information close at hand e.g., serial number, hardware, firmware, and configuration. Consult the information on the manufacturer’s ID label and in the “System Information | Software”... - Page 61 Inhalt Inhalt 1 Über diese Anleitung . . . . . . . . . . . . . . . . . . . . . . . . . . . . . . . . . . . . . . . . . . . . . . . . . . . . . . . . . . . . . . . . 65 Gültigkeit .
- Page 62 Inhalt 4 Bedienkonzept . . . . . . . . . . . . . . . . . . . . . . . . . . . . . . . . . . . . . . . . . . . . . . . . . . . . . . . . . . . . . . . . . . . . . . 79 4.1 Anzeige im Hauptmenü.
- Page 63 Inhalt 8 Bedienung . . . . . . . . . . . . . . . . . . . . . . . . . . . . . . . . . . . . . . . . . . . . . . . . . . . . . . . . . . . . . . . . . . . . . . . . . . 97 8.1 Prozessdatenerfassung durch USB-Massenspeicher einrichten .
- Page 64 17 Sartorius Service . . . . . . . . . . . . . . . . . . .
-
Page 65: Über Diese Anleitung
Über diese Anleitung Über diese Anleitung Gültigkeit Diese Anleitung ist Teil des Geräts. Die Anleitung gilt für das Gerät in den folgenden Ausführungen: Gerät Flexsafe Pro Mixer Drive unit FMD300001 ® Mitgeltende Dokumente Ergänzend zu dieser Anleitung folgende Dokumentationen beachten: −... -
Page 66: Darstellungsmittel
Sicherheitshinweise Darstellungsmittel 1.4.1 Warnhinweise in Handlungsbeschreibungen WARNUNG Kennzeichnet eine Gefährdung, die Tod oder schwere Körperverletzung zur Folge haben kann, wenn sie nicht vermieden wird. VORSICHT Kennzeichnet eine Gefährdung, die eine mittelschwere oder leichte Kör- perverletzung zur Folge haben kann, wenn sie nicht vermieden wird. ACHTUNG Kennzeichnet eine Gefährdung, die Sachschäden zur Folge haben kann, wenn sie nicht vermieden wird. -
Page 67: Modifikationen Am Gerät
Geräts kann beeinträchtigt werden oder Prüfzeichen können ihre Gültigkeit verlieren. Das Gerät nicht eigenmächtig öffnen. Wir empfehlen Reparaturarbeiten auch außerhalb der Gewährleistung durch den Sartorius Service oder nach Rücksprache mit dem Sartorius Ser- vice durchführen zu lassen. Nur Wartungsarbeiten durchführen, die in dieser Anleitung beschrieben sind. -
Page 68: Personalqualifikation
Gefährdungen hervorrufen. Das Gerät nur in sicherheitstechnisch einwandfreiem Zustand betreiben. Die Wartungsintervalle einhalten (Intervalle und Wartungstätigkeiten siehe Kapitel „9.2 Wartungsplan“, Seite 106). Beschädigungen umgehend durch den Sartorius Service beheben las- sen. Die aufgeklebten Symbole am Gerät im lesbaren Zustand halten. Sicherheitseinrichtungen Die Sicherheitseinrichtungen des Geräts schützen Personen, die am Gerät... -
Page 69: Sicherheitsinformationen Am Gerät
Die Verwendung eines ungeeigneten oder unzulänglich bemessenen Net- zanschlusskabels kann zu unvorhersehbaren Gefahren führen und Perso- nen lebensbedrohlich verletzen, z. B. durch Stromschläge. Nur das Original-Netzanschlusskabel verwenden. Wenn das Netzanschlusskabel ersetzt werden muss: Den Sartorius Ser- vice kontaktieren. Das Netzanschlusskabel nicht reparieren oder modifi- zieren. 2.7.3... -
Page 70: Verhalten Im Notfall
Den Not-Aus-Schalter im verriegeltem Zustand belassen, bis die Störun- gen oder Fehlfunktionen beseitigt sind. Fehlfunktionen durch den Sartorius Service beseitigen lassen. Wenn die Störungen oder Fehlfunktionen behoben sind: Den Not-Aus- Schalter entriegeln. Dazu den Not-Aus-Schalter herausziehen, bis der grüne Ring am Not-Aus-Schalter sichtbar wird. -
Page 71: Arbeiten Am Gerät
Sicherheitshinweise 2.11 Arbeiten am Gerät Nicht alle Bereiche am Gerät oder Palletank für Mischen können immer ® vollständig überblickt werden, einzelne Bereiche können nur beschränkt einsehbar sein, z. B. beim Einfahren oder Ausfahren des Geräts am Palletank für Mischen. ® Wenn das Gerät betrieben wird, während sich Personen im Aktionsbereich des Geräts befinden: Die Personen können in den Gefahrenbereich zwi- schen Gerät und Palletank... -
Page 72: Bewegliche Teile
Sicherheitshinweise 2.15 Bewegliche Teile 2.15.1 Motor Beim Koppeln des Geräts mit dem Rührer des Misch-Bags fährt der Motor hoch. Wenn währenddessen Bediener des Geräts oder umstehende Perso- nen mit dem Motor in Berührung kommen: Finger können zwischen dem Motor und dem Palletank für Mischen eingeklemmt und gequetscht ®... -
Page 73: Magnetische Kräfte
Sicherheitshinweise 2.16 Magnetische Kräfte 2.16.1 Beeinflussung von Implantaten durch magnetische Kräfte Am Motor des Geräts treten im Betrieb hohe magnetische Kräfte auf. Mag- netische Kräfte wirken auf Implantate und magnetische Gegenstände. Menschen mit Implantaten können dadurch tödlich oder schwer verletzt werden;... -
Page 74: Gerätebeschreibung
Gerätebeschreibung Gerätebeschreibung Geräteübersicht Abb. 1: Flexsafe Pro Mixer Drive Unit (Ansicht von oben) ® Pos . Bezeichnung Beschreibung Führungsrolle Dient zum Einfahren und Ausfahren des Geräts unter den Palletank für Mischen. Gleitet auf den Führungsschienen des ® Palletank für Mischen. ®... -
Page 75: Komponenten Für Kopplung Mit Palletank
Gerätebeschreibung Komponenten für Kopplung mit Palletank für Mischen und Misch-Bag ® Abb. 2: Komponenten für Kopplung mit Palletank für Mischen und Misch-Bag (bewegliche Teile eingefahren) ® Pos . Bezeichnung Beschreibung Palletank -Erkennungssensor Ermittelt, ob das Gerät unter einen Palletank für Mischen einge- ®... -
Page 76: Anschlüsse, Kabeltrommel Und Ein-Aus-Schalter
Anschlüsse, Kabeltrommel und Ein-Aus-Schalter Abb. 3: Anschlüsse, Kabeltrommel und Ein-Aus-Schalter Pos . Bezeichnung Beschreibung ETHERNET Anschluss nur für Sartorius Service. Ist mit einer Schutzkappe verschlossen. REMOTE Anschluss für externe Steuerung. Ist mit einer Schutzkappe ver- schlossen. Anschluss für USB-Massenspeicher. Ist mit einer Schutzkappe verschlossen. -
Page 77: Kopplung Und Entkopplung Des Geräts Am Palletank ® Für Mischen
Gerätebeschreibung Kopplung und Entkopplung des Geräts am Palletank für Mischen ® Abb. 4: Gerät mit Palletank für Mischen gekoppelt und von Palletank für Mischen entkoppelt ® ® (Beispiel) Pos . Bezeichnung Beschreibung Ausrichtbolzen gekoppelt Die Ausrichtbolzen sind hochge- fahren und sind mit der Ausricht- platte des Palletank für Mischen ®... -
Page 78: Not-Aus-Schalter
Symbole am Gerät Symbol Bedeutung Während des Betriebs können Teile im Gerät unter Span- nung stehen. Das Gerät darf nur durch den Sartorius Ser- vice geöffnet werden. Bei Fehlfunktionen an der elektri- schen Ausrüstung muss das sofort spannungslos geschaltet werden. -
Page 79: Bedienkonzept
Bedienkonzept Bedienkonzept Anzeige im Hauptmenü Berechtigung: Admin DD.MM.YYYY HH:MM:SS Mixing mit Rezept Manuelles Mixing Remote Mixing Abb. 5: Anzeige „Hauptmenü“ (Beispiel) Pos . Bezeichnung Beschreibung Statusleiste Zeigt den angemeldeten Benutzer sowie Datum und Uhrzeit. Programmmenü Dient zur Auswahl des Mischvorgangs, z. B. Betriebsmodus „Manuelles Mixing“. -
Page 80: Anzeige Im Mischvorgang
Bedienkonzept Anzeige im Mischvorgang Berechtigung: Admin Manuelles Mixing DD.MM.YYYY HH:MM:SS Set parameters Akt. Drehzahl [rpm] Drehzahl Dauer Zeit [hh:mm:ss] Abb. 6: Anzeige Mischvorgang im Betriebsmodus „Manuelles Mixing“ (Beispiel) Pos . Bezeichnung Beschreibung Statusleiste Zeigt den angemeldeten Benutzer, Datum und Uhrzeit und den ausgewählten Betriebsmodus. -
Page 81: Benutzerführung
Bedienkonzept Benutzerführung Die Benutzerführung leitet den Benutzer durch die Prozessschritteroutine und unterstützt bei der Eingabe von Wer- ten in Eingabefelder. Berechtigung: Admin Berechtigung: Admin Manuelles Mixing Manuelles Mixing DD.MM.YYYY HH:MM:SS DD.MM.YYYY HH:MM:SS Motor kuppeln Pfeil nach oben-Taste drücken um Motor Palletank istallieren hochzufahren. -
Page 82: Meldung
Bedienkonzept Meldung Alarm Berechtigung: Admin DD.MM.YYYY HH:MM:SS Zeit Datum Status Text Mixing Motor Error: Speed lost Mixing mit Rezept Manuelles Mixing Remote Mixing Abb. 9: Meldung (Fehlermeldung, Beispiel) Pos . Bezeichnung Beschreibung Fehlerliste Zeigt die gespeicherten Fehlermeldungen und Warnmeldungen. Verfügbare Funktionen Zeigt die verfügbaren Funktionen. - Page 83 Bedienkonzept Pos . Symbol Bezeichnung Beschreibung Schaltfläche [Starten] Startet einen Mischvorgang. Schaltfläche [Pausieren] Unterbricht einen Mischvorgang. Schaltfläche [Stoppen] Stoppt einen Mischvorgang oder den Remote-Betrieb des Geräts. Schaltfläche [Anzeige Wechselt zur vorherigen oder zur nachfolgenden Anzeige in zurück] | einer Prozessschritteroutine oder in einem Menü. Schaltfläche [Anzeige wei- ter] Schaltfläche [Rezept...
-
Page 84: Menüstruktur
Einstellungen Datum & Uhrzeit Datum und Zeit einstellen. Sprache Die Sprache einstellen. Benutzerverwal- Benutzerlogin Eine Zugangsbeschränkung für Programmmenü tung festlegen. Benutzerver- Gespeicherte Benutzer einsehen und verwalten. waltung Wartung Zugang nur für Sartorius Service Betriebsanleitung Flexsafe Pro Mixer Drive Unit ®... -
Page 85: In Menüs Navigieren
Bedienkonzept 4.10 In Menüs navigieren Um ein Menü aufzurufen: Auf die Schaltfläche des Menüs tippen, z. B. Berechtigung: Admin DD.MM.YYYY HH:MM:SS auf die Schaltfläche [Manuelles Mixing] (1). Die erste Anzeige in der Prozessschritteroutine oder das Untermenü Mixing mit Rezept Manuelles Mixing wird eingeblendet. -
Page 86: Installation
Installation Installation Lieferumfang Artikel Menge Flexsafe Pro Mixer Drive Unit ® Schraube, zum Ersatz der Transportsicherungsschraube Länderspezifisches Netzanschlusskabel (EU) Länderspezifisches Netzanschlusskabel (USA) Potentialausgleichskabel, mit Netzanschlusskabel kombi- niert und mit zusätzlichem Netzanschlussstecker versehen Betriebsanleitung Technische Unterlagen Auspacken Vorgehen Das Gerät auspacken. Wenn das Gerät zwischengelagert wird: Die Hinweise zur Lagerung beachten (siehe Kapitel „15.2 Umgebungsbedingungen“, Seite 115). -
Page 87: Transportsicherung Entfernen
Installation Transportsicherung entfernen Bei Lieferung ist das Gerät durch eine Transportsicherung geschützt. Die Transportsicherung besteht aus 2 Transportsicherungsschrauben. Die Transportsicherungsschrauben müssen für den Betrieb des Geräts abge- nommen werden. Personal: 2 Personen, Bediener Vorgehen Das Gerät am Griff festhalten und kontrolliert nach unten drücken. Das Gerät soweit nach unten drücken, dass der Griff auf dem Boden auf- liegt. -
Page 88: Inbetriebnahme
Prüfen, ob der länderspezifische Netzstecker mit den Netzanschlüssen am Aufstellort übereinstimmt. Bei Bedarf: Den Sartorius Service kontaktieren (verfügbare Netzan- schlusskabel siehe Kapitel „16 Zubehör“, Seite 118). Die Mutter der Zugentlastung (2) lösen und abnehmen. Das Netzanschlusskabel in die Kabelhalterung einlegen. -
Page 89: Gerät Akklimatisieren Lassen
Inbetriebnahme Gerät akklimatisieren lassen Wenn das Gerät von einem Standort an einen anderen Standort verscho- ben wird und die Temperatur am aktuellen Standort niedriger ist als die Temperatur am nächsten Standort: Der Temperaturunterschied kann zu Kondensation von Luftfeuchtigkeit im Gerät führen (Betauung). Feuchtig- keit im Gerät kann zu Fehlfunktionen führen. -
Page 90: Gerät Zum Aufstellort Verschieben
Inbetriebnahme Gerät zum Aufstellort verschieben Vorgehen Die 2 Feststellbremsen an den Transportrollen lösen. WARNUNG Verletzungsgefahr beim Verschieben des Geräts! Beim Verschieben darauf achten, dass sich keine Personen oder Gegenstände im Weg befinden. Die persönliche Schutzausrüstung tragen. VORSICHT Stolpergefahr durch Anschlusskabel! Beim Verschieben des Geräts auf die Position der Anschlusskabel achten. -
Page 91: Systemeinstellungen
Systemeinstellungen Systemeinstellungen Am Gerät anmelden Bei Lieferung sind Benutzer voreingestellt. Die Erstanmeldung am Gerät muss durch den Benutzer „supervisor“ erfolgen. Der Benutzer „supervisor“ ist bei Lieferung automatisch ausgewählt. Das Standard-Kennwort für die- sen Benutzer ist „1111“. Vorgehen In der Statusleiste auf die Schaltfläche [Anmelden] tippen. Der Anmeldedialog wird eingeblendet. -
Page 92: Benutzer Anlegen, Ändern Oder Löschen
0 oder 1 Administratorengruppe 0 oder 1 0 oder 1 Nur Sartorius Service 0 = Keine Zugriffsbeschränkung 1 = Kann zugangsbeschränkt werden; Wenn zugangsbeschränkt: Zugriff durch Benutzergruppe „Benutzer“, „Gruppe“ oder „Administratorengruppe“ 2 = Ist zugangsbeschränkt, Zugriff nur durch Benutzergruppe „Gruppe“ oder „Administratorengruppe“... -
Page 93: Benutzer Anlegen
Systemeinstellungen 7.3.3 Benutzer anlegen Vorgehen In der Liste gespeicherter Benutzer lange auf die Schaltfläche [Liste run- Einstellungen Berechtigung: Admin DD.MM.YYYY HH:MM:SS ter] tippen, bis das Ende der Liste erreicht ist. Benutzerverwaltung In die Leerzeile doppeltippen. Benutzer Kennwort Gruppe Abmeldezeit Es wird ein neuer Eintrag angelegt. Admin Administratorengruppe Operator... -
Page 94: Benutzer Löschen
Systemeinstellungen 7.3.5 Benutzer löschen Vorgehen In der Liste der gespeicherten Benutzer zum gewünschten Eintrag gehen. Dazu auf die Schaltflächen [Liste hoch] oder [Liste runter] tippen. In die Tabellenzelle [Benutzer] des gewünschten Eintrags doppeltippen. Die Tabellenzelle wird markiert. Erneut auf den Eintrag tippen. Die Tastatur wird eingeblendet. -
Page 95: Einträge Im Rezept Ändern
Systemeinstellungen Pos . Bezeichnung Rezeptname Letzte Änderung (Zeitstempel) Verfügbare Funktionen Liste der Rezepte Gespeicherte Phase Voraussetzungen Wenn die Betriebsmodi für den Mischvorgang zugangsbeschränkt sind: Das persönliche Benutzerprofil hat die Benutzergruppe „Benutzer“, das persönliche Kennwort ist bekannt. Vorgehen Im Programmmenü auf die Schaltfläche [Mixing mit Rezept] tippen. Die Anzeige [Rezept] wird geöffnet. -
Page 96: Parameterliste
Systemeinstellungen Parameterliste 7.6.1 Parameter im Programmmenü Parameter Einstellwerte Erläuterung Drehzahl [rpm] 20 – 750 Rührgeschwindigkeit festlegen. Dauer [00 h / 00 min / 00 s] 00:00:01 – − Laufzeit für einen Mischvorgang oder für eine Phase 99:59:59 in einem Rezept festlegen. −... -
Page 97: Bedienung
Bedienung Bedienung Prozessdatenerfassung durch USB-Massen- speicher einrichten Die Prozessdaten aus dem Mischvorgang können auf einem USB-Massen- speicher (USB-Stick) erfasst werden. Die Prozessdaten werden in eine Text- datei geschrieben. Die Textdatei kann z. B. in Excel exportiert und statistisch ausgewertet werden. Es werden folgende Prozessdaten in der Textdatei erfasst: −... -
Page 98: Misch-Bag Im Palletank
Bedienung Misch-Bag im Palletank für Mischen ® installieren Voraussetzungen In der Bedienanzeige ist die Anzeige [Palletank installieren] eingeblendet. WARNUNG Quetschgefahr durch magnetische Kräfte! Zwischen dem Motor des Geräts und dem Rührer im Misch-Bag treten hohe magenische Kräfte auf. Die Informationen in der Bedienanzeige des Geräts beachten. Die Benutzerführung des Geräts zeigt die erforderlichen Arbeitsschritte für die Installation des Misch-Bags und des Rührers nacheinander an. - Page 99 Bedienung Vorgehen Die 2 Feststellbremsen an den Transportrollen lösen. WARNUNG Verletzungsgefahr beim Verschieben des Geräts! Beim Verschieben darauf achten, dass sich keine Personen oder Gegenstände im Weg befinden. Die persönliche Schutzausrüstung tragen. Das Gerät vor dem Palletank für Mischen ausrichten. Die Führungsrol- ®...
-
Page 100: Gerät Mit Palletank
Bedienung Gerät mit Palletank für Mischen und mit ® Rührer koppeln Um das Gerät mit dem Palletank für Mischen und dem Rührer zu koppeln: ® Der Motor, die Ausrichtbolzen und der Distanzsensor müssen hochgefahren werden. Manuelles Mixing Manuelles Mixing Berechtigung: Admin Berechtigung: Admin DD.MM.YYYY HH:MM:SS DD.MM.YYYY HH:MM:SS... -
Page 101: Misch-Bag Füllen
Bedienung Vorgehen Die Position des Motors in der Anzeige „Motor kuppeln“ prüfen. Der Positionsbalken muss in der untersten Position liegen. Wenn der Positionsbalken nicht in der untersten Position liegt: Auf die Schaltfläche [Runterfahren] tippen und die Schaltfläche gedrückt hal- ten. Dadurch werden der Motor und die zugehörigen Komponenten in die Ausgangsposition heruntergefahren. -
Page 102: Mischvorgang Durchführen
Bedienung Mischvorgang durchführen 8.9.1 Mischvorgang starten Vorgehen Wenn der Betriebsmodus „Mixing mit Rezept“ oder „Manuelles Mixing“ gewählt ist: Auf die Schaltfläche [Starten] tippen. Wenn der Betriebsmodus „Remote Mixing“ gewählt ist: Den Mischvor- gang an der externen Steuerung starten (siehe Anleitung der externen Steuerung). -
Page 103: Erfasste Meldungen Einsehen
Bedienung Vorgehen Auf die Schaltfläche [Fehler] oder [Warnung] tippen. Die Fehlerliste wird eingeblendet. Um zwischen den Einträgen der Fehlerliste zu springen: Auf die Schalt- fläche [Liste hoch] oder [Liste runter] tippen. Die Einträge in der Fehlerliste prüfen: Um die Information zu einer Meldung aufzurufen: Auf die Schaltflä- che [Info] tippen. -
Page 104: Entleeren Und Entnehmen Des Misch-Bags
Bedienung Vorgehen Die Position des Motors in der Anzeige „Motor abtrennen“ prüfen. Der Berechtigung: Admin Manuelles Mixing DD.MM.YYYY HH:MM:SS Positionsbalken muss in der obersten Position (1) liegen Auf die Schaltfläche [Runterfahren] tippen und die Schaltfläche Motor abtrennen gedrückt halten. Pfeil nach unten-Taste drücken um Motor runterzufahren. -
Page 105: Prozessdatenerfassung Abschließen
Bedienung Vorgehen Das Gerät langsam vom Palletank für Mischen wegziehen, bis die hinte- ® ren Führungsrollen am Ende der Führungsschienen des Palletank für ® Mischen liegen. Das Gerät muss über die 2 Roll-Elemente auf den Füh- rungsschienen des Palletank für Mischen hinwegrollen. ®... -
Page 106: Reinigung Und Wartung
Wartungsplan Intervall Bauteil Tätigkeit 12 Monate Gerät Die Funktion des Geräts durch den Sartorius Service prüfen lassen. 12 Monate Sensoren Die Sensoren des Geräts durch den Sartorius Service kalibrieren lassen. Wiederinbetriebnahme Vorgehen Das Gerät in Betrieb nehmen (siehe Kapitel „6 Inbetriebnahme“, Seite 88). -
Page 107: Störungen
10.2 Fehlermeldungen Fehlermeldung Störung (Info) Ursache Behebung Kapitel, Seite [Fehler Hubsystem: [Motor wird nicht Der Motor kann Den Sartorius Service kontak- Motor Time-out] hochgefahren. (Sen- nicht korrekt hoch- tieren. sor oder Motor gefahren werden, beschädigt)] weil der Motor oder andere Komponen- ten beschädigt sind. - Page 108 Störungen Fehlermeldung Störung (Info) Ursache Behebung Kapitel, Seite [Fehler Hubsystem: [Positionssensoren Der Motor kann Den Sartorius Service kontak- Sensor] beschädigt oder nicht korrekt hoch- tieren. falsch kalibriert] gefahren werden, weil Sensoren beschädigt oder fehlerhaft kalibriert sind. [Fehler Rührermo- [Motor Temperatur...
-
Page 109: Störungen Im Gerätebetrieb
Störungen Fehlermeldung Störung (Info) Ursache Behebung Kapitel, Seite [Fehler Rührermo- [Rührer instabil] Der Rührer im Die Position von Misch-Bag 10.5, tor: Rührer instabil] Misch-Bag ist insta- und Rührer prüfen. bil, dadurch ist der Mischvorgang unterbrochen und gesperrt. [Fehler Rührermo- [Offene Antriebss- Der Motor hat eine Das Gerät ausschalten. -
Page 110: Ausgetretene Flüssigkeiten
Mischen einfahren und mit dem Rührer des Misch-Bags koppeln (siehe Kapi- ® tel 8.5, Seite 98 und Kapitel 8.6, Seite 100). Wenn die Warnmeldung erneut auftritt: Den Sartorius Service kontaktieren. 10.6 Kopplung mit Misch-Bag und Rührer prüfen Vorgehen Den Mischvorgang stoppen. -
Page 111: Außerbetriebnahme
Außerbetriebnahme Außerbetriebnahme 11.1 Gerät außer Betrieb nehmen Voraussetzungen Das Gerät ist vom Palletank für Mischen ausgefahren (siehe Kapitel „8.12 ® Mischvorgang abschließen“, Seite 103). Vorgehen Das Gerät ausschalten. Den Netzstecker des Netzanschlusskabels von der Spannungsversor- gung am Aufstellort abziehen. Den Netzstecker des Potentialausgleichskabels von die Spannungsver- sorgung am Aufstellort abziehen. -
Page 112: Transport
Transport 12 Transport 12.1 Transportsicherung montieren Wenn das Gerät transportiert werden muss, z. B. für einen Versand des Geräts: Die Transportsicherung muss montiert werden. Die Transportsicherung besteht aus 2 Transportsicherungsschrauben, die bei Lieferung im Gerät montiert waren. Personal: 2 Personen, Bediener Vorgehen Das Gerät am Griff festhalten und kontrolliert nach unten drücken. -
Page 113: Lagerung Und Versand
Geräts! Das auf einer ebenen Fläche abstellen und die Feststellbremsen sichern. Die persönliche Schutzausrüstung tragen. 13.2 Gerät und Teile zurücksenden Defekte Geräte oder Teile können an Sartorius Stedim Biotech zurückge- sendet werden. Zurückgesandte Geräte müssen sauber, dekontaminiert und sachgerecht verpackt sein. -
Page 114: Entsorgung
Die Verpackung besteht aus umweltfreundlichen Materialien, die als Sekun- därrohstoffe dienen können. 14.2.2 Entsorgen Voraussetzungen Das Gerät ist dekontaminiert. Vorgehen Das Gerät entsorgen. Dazu die Entsorgungshinweise auf unserer Inter- netseite (www.sartorius.com) beachten. Die Verpackung gemäß den landesrechtlichen Bestimmungen entsor- gen. Betriebsanleitung Flexsafe Pro Mixer Drive Unit ®... -
Page 115: Technische Daten
Technische Daten 15 Technische Daten 15.1 Maße und Gewicht Einheit Wert Maße (Breite x Länge x Höhe) 439 x 1242 x 1006 Gewicht 15.2 Umgebungsbedingungen Einheit Wert Aufstellort Innenräume Keine direkte Sonneneinstrahlung Nicht in unmittelbarer Nähe von Heizungs- oder Klimaanlagen Keine Strahlungsbelastung durch Mikrowellen, UV-Laser oder Röntgenstrah- lung Vibrationsfrei... -
Page 116: Elektromagnetische Verträglichkeit
Niederspannungs-Versorgungsnetz angeschlossen sind, das (auch) Wohnge- bäude versorgt. 15.4 Eignung von Palletank für Mischen und Misch-Bags ® Nur Sartorius Flexsafe Pro Mixer Bag ® Füllvolumen von 50L bis 1000L und maximal 2 Anschlüssen an der Vorder- und Unterseite Füllvolumen von 50L bis 1000L und 3 oder mehr Anschlüssen an der Vorder- und Unterseite Füllvolumen von 1500L bis 3000L... -
Page 117: Remote-Betrieb
Technische Daten 15.6 Remote-Betrieb Einheit Wert Zugelassenes externes Steuersystem Sartorius FlexAct ® Kommunikationsanschluss Durch ein Anschlusskabel für Remote-Betrieb Typ des Anschlusskabels für Remote-Betrieb: Einbaustecker, geschirmt, 8-polig, M12, A-kodiert, Schraubmontage mit M16-Gewinde, 8 x 0,25 mm Eingangssignale von externer Steuerung Sollwert für Rührgeschwindigkeit bei 0 – 750 rpm 0 –... -
Page 118: Schallemission
1000061414 17 Sartorius Service Der Sartorius Service steht bei Rückfragen zum Gerät gern zur Verfügung. Für Informationen zu den Service-Adres- sen, Service-Leistungen und zum Kontakt vor Ort siehe die Sartorius-Internetseite (www.sartorius.com). Bei Anfragen zum System und für den Kontakt bei Fehlfunktionen die Geräteinformationen bereithalten und dem Sartorius Service mitteilen, z. - Page 119 Table des matières Table des matières 1 À propos de ce mode d’emploi . . . . . . . . . . . . . . . . . . . . . . . . . . . . . . . . . . . . . . . . . . . . . . . . . . . . . 123 Validité...
- Page 120 Table des matières 4 Principes d’utilisation . . . . . . . . . . . . . . . . . . . . . . . . . . . . . . . . . . . . . . . . . . . . . . . . . . . . . . . . . . . . . . 137 4.1 Écran dans le menu principal .
- Page 121 Table des matières 8 Fonctionnement . . . . . . . . . . . . . . . . . . . . . . . . . . . . . . . . . . . . . . . . . . . . . . . . . . . . . . . . . . . . . . . . . . . 155 8.1 Configurer l’enregistrement des données de processus par un périphérique de stockage de masse USB .
- Page 122 17 Sartorius Service . . . . . . . . . . . . . . . . . . .
-
Page 123: À Propos De Ce Mode D'emploi
À propos de ce mode d’emploi À propos de ce mode d’emploi Validité Ce mode d’emploi fait partie intégrante de l’appareil. Ce mode d’emploi est valable pour la version suivante de l’appareil : Appareil Type Flexsafe Pro Mixer Drive unit FMD300001 ®... -
Page 124: Typographie
Consignes de sécurité Typographie 1.4.1 Avertissements dans la description des opérations AVERTISSEMENT Signale un danger qui est susceptible d’entraîner la mort ou des blessures graves s’il n’est pas évité. ATTENTION Signale un danger qui est susceptible d’entraîner des blessures moyennes ou légères s’il n’est pas évité. -
Page 125: Modifications Sur L'appareil
N’ouvrez pas l’appareil de votre propre chef. Nous vous recommandons de faire effectuer les réparations par le Sartorius Service ou après avoir consulté le Sartorius Service, même si l’appareil n’est plus sous garantie. N’effectuez que les travaux de maintenance décrits dans ce manuel Pour les travaux de maintenance qui doivent être effectués par le Sartorius Ser-... -
Page 126: Qualification Du Personnel
Conservez le mode d’emploi. Si vous perdez le mode d’emploi, demandez-en un autre exemplaire ou téléchargez la version la plus récente sur le site Internet de Sartorius (www.sartorius.com). Bon fonctionnement de l’appareil Un appareil endommagé... -
Page 127: Informations De Sécurité Sur L'appareil
à une électrocution. Utilisez uniquement le câble secteur d’origine. S’il faut remplacer le câble secteur : contactez le Sartorius Service. Ne réparez pas et ne modifiez pas le câble secteur. 2.7.3 Câble d’équipotentialité... -
Page 128: Comportement En Cas D'urgence
Laissez l’interrupteur d’urgence en position verrouillée tant que les erreurs ou les dysfonctionnements n’ont pas été éliminés. Demandez au Sartorius Service de remédier aux dysfonctionnements. Une fois que vous avez remédié aux erreurs ou aux dysfonctionnements : déverrouillez l’interrupteur d’urgence. À cet effet, tirez l’interrupteur d’urgence jusqu’à... -
Page 129: Opérations Sur L'appareil
Consignes de sécurité 2.11 Opérations sur l’appareil Toutes les parties de l’appareil ou du Palletank de mélange ne sont pas ® toujours entièrement visibles, certaines parties ne le sont que partiellement, par ex. quand on insère l’appareil sous le Palletank de mélange ou quand ®... -
Page 130: Éléments Mobiles
Consignes de sécurité 2.15 Éléments mobiles 2.15.1 Moteur Le moteur monte lors du couplage de l’appareil avec l’agitateur de la poche de mélange. Si pendant ce temps, l’opérateur de l’appareil ou des personnes se trouvant à proximité entrent en contact avec le moteur : leurs doigts peuvent être coincés et écrasés entre le moteur et le Palletank ®... -
Page 131: Forces Magnétiques
Consignes de sécurité 2.16 Forces magnétiques 2.16.1 Effets des forces magnétiques sur les implants Pendant le fonctionnement, des forces magnétiques importantes sont générées au niveau du moteur de l’appareil. Les forces magnétiques ont un effet négatif sur les implants et les objets magnétiques. Par conséquent, les personnes portant des implants peuvent être mortellement ou grièvement blessées, et les objets magnétiques ou magnétisés peuvent être endommagés. -
Page 132: Description De L'appareil
Description de l’appareil Description de l’appareil Vue d’ensemble de l’appareil Ill. 1 : Flexsafe Pro Mixer Drive Unit (vue de dessus) ® Pos . Désignation Description Rouleau de guidage Permet d’insérer l’appareil sous le Palletank de mélange et de l’en ®... -
Page 133: Composants De Couplage Avec Le Palletank ® De Mélange Et La Poche
Description de l’appareil Composants de couplage avec le Palletank de mélange et la poche ® de mélange Ill. 2 : Composants de couplage avec le Palletank de mélange et la poche de mélange (pièces mobiles rentrées) ® Pos . Désignation Description Capteur de détection du Détecte si l’appareil est inséré... -
Page 134: Connecteurs, Enrouleur De Câble Et Interrupteur Marche | Arrêt
Ill. 3 : Connecteurs, enrouleur de câble et interrupteur marche | arrêt Pos . Désignation Description ETHERNET Port uniquement pour le Sartorius Service. Fermé par un capuchon de protection. REMOTE Connexion pour unité de commande externe. Fermé par un capuchon de protection. -
Page 135: Couplage De L'appareil Au Palletank ® De Mélange Et Découplage
Description de l’appareil Couplage de l’appareil au Palletank ® mélange et découplage Ill. 4 : Appareil couplé au Palletank de mélange et découplé du Palletank de mélange ® ® (exemple) Pos . Désignation Description Goujons d’alignement Les goujons d’alignement sont en couplés position haute et sont raccordés à... -
Page 136: Interrupteur D'urgence
Signification Des éléments de l’appareil peuvent être sous tension pendant le fonctionnement. Seuls les membres du Sartorius Service sont autorisés à ouvrir l’appareil. En cas de dysfonctionnements de l’équipement électrique, mettez immédiatement l’appareil hors tension. Risque d’écrasement lors du couplage de l’appareil avec le Palletank de mélange. -
Page 137: Principes D'utilisation
Principes d’utilisation Principes d’utilisation Écran dans le menu principal Niveau d’accès: Admin DD.MM.YYYY HH:MM:SS Mélange avec recette Mélange manuel Mélange à distance Ill. 5 : Écran « Menu principal » (exemple) Pos . Désignation Description Barre d’état Indique l’utilisateur connecté ainsi que la date et l’heure. -
Page 138: Écran En Mode De Mélange
Principes d’utilisation Écran en mode de mélange Niveau d’accès: Admin. Mélange manuel DD.MM.YYYY HH:MM:SS Set parameters Vitesse réelle [rpm] Vitesse Durée Temps [hh:mm:ss] Ill. 6 : Écran de la procédure de mélange dans le mode de fonctionnement « Mélange manuel » (exemple) Pos . -
Page 139: Guide Utilisateur
Principes d’utilisation Guide utilisateur Le guide utilisateur guide l’utilisateur à travers la routine des étapes de processus et l’aide lors de la saisie de valeurs dans les champs de saisie. Niveau d’accès: Admin Niveau d’accès: Admin Mélange manuel Mélange manuel DD.MM.YYYY DD.MM.YYYY HH:MM:SS... -
Page 140: Message
Principes d’utilisation Message Alarme Niveau d’accès: Admin DD.MM.YYYY HH:MM:SS Heure Date Etat Texte Erreur moteur de mélange: perte de vitesse Mélange avec recette Mélange manuel Mélange à distance Ill. 9 : Message (message d’erreur, exemple) Pos . Désignation Description Liste des erreurs Indique les messages d’erreur et les messages d’avertissement enregistrés. - Page 141 Principes d’utilisation Pos . Symbole Désignation Description Bouton [Démarrer] Démarre une procédure de mélange. Bouton [Pause] Interrompt une procédure de mélange. Bouton [Arrêter] Arrête une procédure de mélange ou le fonctionnement à distance de l’appareil. Bouton [Écran précédent] | Passe à l’écran précédent ou suivant dans une routine Bouton [Écran suivant] d’étapes de processus ou dans un menu.
-
Page 142: Structure Du Menu
Régler la langue. Niveau d’accès Connexion de Définir une restriction d’accès au menu des l’utilisateur programmes. Gestion des Afficher et gérer les utilisateurs enregistrés. utilisateurs Maintenance Accès uniquement pour le Sartorius Service Mode d’emploi Flexsafe Pro Mixer Drive Unit ®... -
Page 143: Naviguer Dans Les Menus
Principes d’utilisation 4.10 Naviguer dans les menus Pour ouvrir un menu : appuyez sur le bouton du menu, par ex. sur le Niveau d’accès: Admin. DD.MM.YYYY HH:MM:SS bouton [Mélange manuel] (1). Le premier écran dans la routine des étapes de processus ou le sous- Mélange avec recette Mélange manuel menu s’affiche. -
Page 144: Installation
Installation Installation Contenu de la livraison Article Quantité Flexsafe Pro Mixer Drive Unit ® Vis, pour remplacer la vis du dispositif de sécurité pour le transport Câble secteur spécifique au pays (EU) Câble secteur spécifique au pays (USA) Câble d’équipotentialité, combiné à un câble secteur et doté d’une fiche secteur supplémentaire Mode d’emploi Documents techniques... -
Page 145: Retirer Le Dispositif De Sécurité Pour Le Transport
Installation Retirer le dispositif de sécurité pour le transport À la livraison, l’appareil est protégé par un dispositif de sécurité pour le transport. Le dispositif de sécurité pour le transport est composé de 2 vis de sécurité pour le transport. Ces vis doivent être retirées pour permettre à l’appareil de fonctionner. -
Page 146: Mise En Service
Vérifiez si la fiche secteur spécifique au pays correspond aux prises sec- teur sur le lieu d’installation. Si nécessaire : contactez le Sartorius Service (câbles secteur dispo- nibles, voir chapitre « 16 Accessoires », page 177). Dévissez l’écrou de la bride de décharge de traction (2) et retirez-le. -
Page 147: Adapter L'appareil À L'environnement
Mise en service Adapter l’appareil à l’environnement Si l’appareil est déplacé d’un endroit à un autre et si la température à l’emplacement actuel est inférieure à celle de l’emplacement suivant : la différence de température peut provoquer de la condensation dans l’appareil. -
Page 148: Déplacer L'appareil Vers Le Lieu D'installation
Mise en service Déplacer l’appareil vers le lieu d’installation Procédure Débloquez les 2 freins d’arrêt des roues de transport. AVERTISSEMENT Risque de blessures lors du déplacement de l’appareil ! Quand vous déplacez l’appareil, veillez à ce qu’il n’y ait pas de personnes ou d’objets sur le chemin. -
Page 149: Réglages Du Système
Réglages du système Réglages du système Se connecter à l’appareil Des utilisateurs sont déjà préréglés à la livraison. La première connexion à l’appareil doit être effectuée par l’utilisateur « supervisor ». L’utilisateur « supervisor » est automatiquement sélectionné à la livraison. Le mot de passe par défaut pour cet utilisateur est «... -
Page 150: Créer, Modifier Ou Supprimer Des Utilisateurs
0 ou 1 0 ou 1 Uniquement le Sartorius Service 0 = Pas de restrictions d’accès 1 = Peut avoir un accès restreint ; si c’est le cas : accès par le groupe d’utilisateurs « Utilisateur », « Groupe » ou «... -
Page 151: Créer Un Utilisateur
Réglages du système 7.3.3 Créer un utilisateur Procédure Dans la liste des utilisateurs enregistrés, appuyez longuement sur le Niveau d’accès: Admin. Réglages DD.MM.YYYY HH:MM:SS bouton [Liste bas] jusqu’à ce que vous atteigniez la fin de la liste. Gestion des utilisateurs Appuyez deux fois sur la ligne vide. -
Page 152: Supprimer Un Utilisateur
Réglages du système 7.3.5 Supprimer un utilisateur Procédure Allez à l’entrée souhaitée dans la liste des utilisateurs enregistrés. À cet effet, appuyez sur les boutons [Liste haut] ou [Liste bas]. Appuyez deux fois sur l’entrée souhaitée dans la cellule [Utilisateur] du tableau. -
Page 153: Modifier Des Entrées Dans La Recette
Réglages du système Pos . Désignation Nom de la recette Dernière modification (horodatage) Fonctions disponibles Liste des recettes Phase enregistrée Conditions requises Si l’accès aux modes de fonctionnement pour la procédure de mélange est restreint : le profil utilisateur personnel a le groupe d’utilisateurs «... -
Page 154: Liste Des Paramètres
Réglages du système Liste des paramètres 7.6.1 Paramètres dans le menu des programmes Paramètre Valeurs de réglage Explication Vitesse [rpm] 20 – 750 Régler la vitesse d’agitation. Durée 00:00:01 – − Régler la durée d’une procédure de mélange ou d’une [00 h / 00 min / 00 s] 99:59:59 phase dans une recette. -
Page 155: Fonctionnement
Fonctionnement Fonctionnement Configurer l’enregistrement des données de processus par un périphérique de stockage de masse USB Les données de la procédure de mélange peuvent être enregistrées sur un périphérique de stockage de masse USB (clé USB). Les données de processus sont écrites dans un fichier texte. Le fichier texte peut être exporté... -
Page 156: Sélectionner Une Recette
Fonctionnement Sélectionner une recette (uniquement pour le mode de fonctionnement « Mélange avec recette ») Procédure Dans la liste des recettes (1), appuyez sur le bouton [Recette précédente] Phase 3 ou [Recette suivante] jusqu’à ce que la recette souhaitée s’affiche. Phase 4 Vérifiez les réglages de la recette. -
Page 157: Insérer L'appareil Sous Le Palletank
Fonctionnement Insérer l’appareil sous le Palletank ® de mélange Conditions requises − Le Palletank de mélange est prêt à fonctionner. ® − Le message [Connecter Palletank] est affiché sur l’écran de commande. ATTENTION Risque d’écrasement par des éléments mobiles ! Lors de l’insertion de l’appareil sous le Palletank de mélange, les rouleaux ®... - Page 158 Fonctionnement Soulevez la poignée de manière à ce que les rouleaux de guidage arrière glissent sur les rails de guidage du Palletank de mélange. ® Poussez l’appareil entièrement sous le Palletank de mélange. L’appareil ® doit rouler sur les rails de guidage du Palletank de mélange à...
-
Page 159: Coupler L'appareil Au Palletank
Fonctionnement Coupler l’appareil au Palletank de mélange ® et à l’agitateur Pour coupler l’appareil au Palletank de mélange et à l’agitateur : le moteur, ® les goujons d’alignement et le capteur de distance doivent être en position haute. Mélange manuel Mélange manuel Niveau d’accès: Admin. -
Page 160: Remplir La Poche De Mélange
Fonctionnement Procédure Vérifiez la position du moteur sur l’écran « Coupler moteur ». La barre de position doit être en position basse. Si la barre de position n’est pas en position basse : appuyez sur le bouton [Descendre] et maintenez-le enfoncé. Ainsi, le moteur et les composants associés descendront dans la position initiale. -
Page 161: Effectuer La Procédure De Mélange
Fonctionnement Effectuer la procédure de mélange 8.9.1 Démarrer la procédure de mélange Procédure Si vous avez sélectionné le mode de fonctionnement « Mélange avec recette » ou « Mélange manuel » : appuyez sur le bouton [Démarrer]. Si vous avez sélectionné le mode de fonctionnement « Mélange à distance »... -
Page 162: Afficher Les Messages Enregistrés
Fonctionnement Procédure Appuyez sur le bouton [Erreur] ou [Avertissement]. La liste des erreurs apparaît. Pour passer d’une entrée à l’autre dans la liste des erreurs : appuyez sur le bouton [Liste haut] ou [Liste bas]. Contrôlez les entrées dans la liste des erreurs : Pour afficher le texte d’info d’un message : appuyez sur le bouton [Info]. -
Page 163: Vider Et Retirer La Poche De Mélange
Fonctionnement Procédure Vérifiez la position du moteur sur l’écran « Séparer le moteur ». La barre Niveau d’accès: Admin. Mélange manuel DD.MM.YYYY HH:MM:SS de position doit être en position haute (1). Appuyez sur le bouton [Descendre] et maintenez-le enfoncé. Séparer le moteur L’appareil est découplé... -
Page 164: Terminer L'enregistrement Des Données De Processus
Fonctionnement Procédure Tirez lentement l’appareil hors du Palletank de mélange jusqu’à ce que ® les rouleaux de guidage arrière se trouvent au bord des rails de guidage du Palletank de mélange. L’appareil doit rouler sur les rails de guidage ® du Palletank de mélange à... -
Page 165: Nettoyage Et Maintenance
Plan de maintenance Intervalle Composant Opération 12 mois Appareil Faites vérifier le fonctionnement de l'appareil par le Sartorius Service. 12 mois Capteurs Faites vérifier le fonctionnement des capteurs par le Sartorius Service. Remise en service Procédure Mettez l’appareil en service (voir chapitre « 6 Mise en service », page 146). -
Page 166: Erreurs
Erreurs 10 Erreurs 10.1 Messages d’avertissement Message Erreur (Info) Cause Remède Chapitre, d’avertissement page [Avertissement [La position Pendant la procé- Vérifier si l’agitateur tourne mélange: position mesurée a changé dure de mélange, le correctement et librement moteur de mélange] de plus de 2mm par capteur de distance (contrôle visuel dans le rapport à... -
Page 167: Messages D'erreur
Erreur (Info) Cause Remède Chapitre, page [Erreur du système [Le moteur de Le moteur ne peut Contacter le Sartorius Service. de déplacement : déplacement pas monter correc- timeout du moteur] n’atteint pas sa tement parce que le position. (le capteur moteur ou d’autres... - Page 168 Erreurs Message d’erreur Erreur (Info) Cause Remède Chapitre, page [Erreur moteur de [Courant moteur Le courant moteur Vérifier la position de la poche 10.5, mélange : courant supérieur à la limite est trop élevé si bien de mélange et de l’agitateur. moteur] (au moins une phase que la procédure de...
-
Page 169: Erreurs Pendant Le Fonctionnement De L'appareil
à l’agitateur de la poche de mélange (voir ® chapitre 8.5, page 157 et chapitre 8.6, page 159). Si le message d’avertissement apparaît à nouveau : contactez le Sartorius Service. 10.6 Vérifier le couplage de la poche de mélange et de l’agitateur Procédure Arrêtez la procédure de mélange. -
Page 170: Mise Hors Service
Mise hors service Mise hors service 11.1 Mettre l’appareil hors service Conditions requises L’appareil a été extrait du Palletank de mélange (voir chapitre « 8.12 ® Terminer la procédure de mélange », page 162). Procédure Éteignez l’appareil. Débranchez la fiche du câble secteur de l’alimentation électrique sur le lieu d’installation. -
Page 171: Transport
Transport 12 Transport 12.1 Installer le dispositif de sécurité pour le transport Si vous devez transporter l’appareil, par ex. pour l’expédier : le dispositif de sécurité pour le transport doit être installé. Le dispositif de sécurité pour le transport comprend 2 vis de sécurité pour le transport qui étaient montées sur l’appareil lors de la livraison. -
Page 172: Stockage Et Expédition
Procédure Mettez l’appareil hors service. Montez le dispositif de sécurité pour le transport. Contactez le Sartorius Service pour obtenir des informations sur le renvoi d’appareils ou de pièces (informations sur le renvoi, voir notre site Internet www.sartorius.com). Emballez correctement l’appareil et les éléments avant de les expédier. -
Page 173: Recyclage
Élimination Conditions requises L’appareil a été décontaminé. Procédure Éliminez l’appareil. Consultez à cet effet les consignes d’élimination disponibles sur notre site Internet (www.sartorius.com). Recyclez l’emballage conformément aux réglementations en vigueur dans votre pays. Mode d’emploi Flexsafe Pro Mixer Drive Unit... -
Page 174: Caractéristiques Techniques
Caractéristiques techniques 15 Caractéristiques techniques 15.1 Dimensions et poids Unité Valeur Dimensions (largeur x longueur x hauteur) 439 x 1242 x 1006 Poids 15.2 Conditions ambiantes Unité Valeur Lieu d’installation En intérieur Pas de rayons directs du soleil Pas à proximité immédiate de systèmes de chauffage ou de climatisation Pas d'exposition aux micro-ondes, aux lasers UV ou aux rayons X Sans vibrations Altitude maximale au-dessus du niveau de la mer... -
Page 175: Compatibilité Électromagnétique
(également) des immeubles d’habitation. 15.4 Compatibilité des Palletank de mélange et des poches de mélange ® Uniquement poche Sartorius Flexsafe Pro Mixer ® Volume de remplissage de 50 L à 1000 L et au maximum 2 raccords à l’avant et en dessous Volume de remplissage de 50 L à... -
Page 176: Mode De Fonctionnement À Distance
15.6 Mode de fonctionnement à distance Unité Valeur Système de commande externe autorisé Sartorius FlexAct ® Connexion de communication Par un câble de raccordement pour fonctionnement à distance Type de câble de raccordement pour fonctionnement à distance : Connecteur incor- poré, blindé, 8 broches, M12, codé... -
Page 177: Émission Acoustique
Internet de Sartorius (www.sartorius.com). Si vous avez des questions sur le système et si vous contactez le Sartorius Service en cas de dysfonctionnement, veuillez indiquer les informations sur l’appareil, par ex. numéro de série, hardware, firmware, configuration. Consultez à... - Page 178 Contenido Contenido 1 Acerca de estas instrucciones . . . . . . . . . . . . . . . . . . . . . . . . . . . . . . . . . . . . . . . . . . . . . . . . . . . . . . 182 Validez .
- Page 179 Contenido 4 Concepto de manejo . . . . . . . . . . . . . . . . . . . . . . . . . . . . . . . . . . . . . . . . . . . . . . . . . . . . . . . . . . . . . . . 196 4.1 Pantalla en el menú...
- Page 180 Contenido 8 Manejo . . . . . . . . . . . . . . . . . . . . . . . . . . . . . . . . . . . . . . . . . . . . . . . . . . . . . . . . . . . . . . . . . . . . . . . . . . . . . 214 8.1 Configurar la adquisición de datos de proceso a través de un dispositivo de almacenamiento masivo USB.
- Page 181 17 Sartorius Service . . . . . . . . . . . . . . . . . . .
-
Page 182: Acerca De Estas Instrucciones
Acerca de estas instrucciones Acerca de estas instrucciones Validez Estas instrucciones son parte del aparato. Las instrucciones se aplican al aparato en las siguientes versiones: Aparato Tipo Flexsafe Pro Mixer Drive unit FMD300001 ® Documentos pertinentes Además de estas instrucciones, consulte la siguiente documentación: −... -
Page 183: Símbolos
Instrucciones de seguridad Símbolos 1.4.1 Indicaciones de advertencia en las descripciones de uso ADVERTENCIA Indica un peligro que, si no se evita, puede provocar lesiones graves o incluso la muerte. ATENCIÓN Indica un peligro que, si no se evita, puede provocar lesiones moderadas o leves. -
Page 184: Modificaciones En El Aparato
Le recomendamos realizar los trabajos de reparación fuera de garantía tam- bién a través de Sartorius Service o después de la consulta con el Sartorius Service. Solo realice el mantenimiento como se describe en este manual. Para traba- jos de mantenimiento que deben realizarse a través de Sartorius Service,... -
Page 185: Cualificación Del Personal
Respetar los intervalos de mantenimiento (para los intervalos y las tareas de mantenimiento, ver capítulo “9.2 Plan de mantenimiento”, página 224). Encargue la reparación de daños a Sartorius Service de inmediato. Mantener los símbolos adjuntos en el aparato en un estado legible. Dispositivos de seguridad... -
Page 186: Información De Seguridad En El Aparato
Utilizar únicamente el cable de alimentación original. Si es necesario sustituir el cable de alimentación: Contactar con Sartorius Service. No reparar ni modificar el cable de alimentación. 2.7.3 Cable de conexión equipotencial... -
Page 187: Comportamiento En Caso De Emergencia
Dejar el interruptor de parada de emergencia en la posición de bloqueo hasta que se hayan subsanado los fallos o averías. Reparar las averías a través de Sartorius Service. Cuando las averías o los fallos hayan sido corregidos: Desbloquear el interruptor de parada de emergencia. -
Page 188: Trabajar Con El Aparato
Instrucciones de seguridad 2.11 Trabajar con el aparato No todas las áreas del aparato o del Palletank para mezclas siempre se ® pueden examinar completamente, las áreas individuales solo pueden ser parcialmente visibles, p. ej. al introducir o retirar el aparato del Palletank ®... -
Page 189: Piezas Móviles
Instrucciones de seguridad 2.15 Piezas móviles 2.15.1 Motor Al acoplar el aparato con el agitador de la bolsa de mezcla, el motor sube. Si durante este tiempo, el operador del aparato o las personas cercanas entran en contacto con el motor: Los dedos se pueden atascar o aplastar entre el motor y el Palletank para mezclas. -
Page 190: Campos Magnéticos
Instrucciones de seguridad 2.16 Campos magnéticos 2.16.1 Influencia de los campos magnéticos sobre los implantes Durante el funcionamiento se producen altos campos magnéticos en el motor del aparato. Los campos magnéticos actúan sobre los implantes y los objetos magnéticos. Por lo que personas con implantes pueden sufrir lesiones graves o morir;... -
Page 191: Descripción Del Aparato
Descripción del aparato Descripción del aparato Descripción general del aparato Fig. 1: Flexsafe Pro Mixer Drive Unit (vista desde arriba) ® Pos . Nombre Descripción Ruedas de guía Se utilizan para introducir o retirar el aparato de debajo del Palletank para mezclas. -
Page 192: Componentes Para Acoplamiento Con Palletank
Descripción del aparato Componentes para acoplamiento con Palletank para mezclas ® y bolsa de mezcla Fig. 2: Componentes para acoplamiento con Palletank para mezclas y bolsa de mezcla (partes móviles retraídas) ® Pos . Nombre Descripción Sensor de reconocimiento Determina si la unidad se ha introducido bajo un Palletank para ®... -
Page 193: Conectores, Carrete De Cable E Interruptor De Encendido Y Apagado
Fig. 3: Conectores, carrete de cable e interruptor de encendido y apagado Pos . Nombre Descripción ETHERNET Conexión solo para Sartorius Service. Se cierra con una tapa protectora. REMOTE Conexión para controlador externo. Se cierra con una tapa protectora. Conexión para almacenamiento masivo USB. Se cierra con una tapa protectora. -
Page 194: Acoplamiento Y Desacoplamiento Del Aparato En El Palletank ® Para Mezclas
Descripción del aparato Acoplamiento y desacoplamiento del aparato en el Palletank para mezclas ® Fig. 4: Aparato acoplado con Palletank para mezclas y desacoplado del Palletank para ® ® mezclas (ejemplo) Pos . Nombre Descripción Pernos de alineación Los pernos de alineación están acoplados elevados y conectados a la placa de alineación del Palletank... -
Page 195: Interruptor De Parada De Emergencia
Durante el funcionamiento, partes del aparato pueden estar bajo tensión. El aparato solo puede abrirse por Sartorius Service. En caso de mal funcionamiento del equipo eléctrico, este debe ser apagado inmediatamente. Existe riesgo de aplastamiento al acoplar el aparato con el Palletank para mezclas. -
Page 196: Concepto De Manejo
Concepto de manejo Concepto de manejo Pantalla en el menú principal Nivel acceso: Admin. DD.MM.YYYY HH:MM:SS Mezc. con receta Mez. manual Mezc. remota Fig. 5: Pantalla “Menú principal” (ejemplo) Pos . Nombre Descripción Barra de estado Muestra el usuario registrado así como la fecha y la hora. -
Page 197: Pantalla En El Proceso De Mezcla
Concepto de manejo Pantalla en el proceso de mezcla Nivel acceso: Admin. Mez. manual DD.MM.YYYY HH:MM:SS Set parameters Veloc. real [rpm] Velocidad Duración Tiempo [hh:mm:ss] Fig. 6: Pantalla en el proceso de mezcla en el modo de funcionamiento “Mez. manual” (ejemplo) Pos . -
Page 198: Guía De Usuario
Concepto de manejo Guía de usuario La guía de usuario guía al usuario a través de la rutina de los pasos del proceso y ayuda a introducir valores en los campos de introducción. Nivel acceso: Admin Nivel acceso: Admin Manuelles Mixing Mez. -
Page 199: Mensaje
Concepto de manejo Mensaje Alarma Nivel acceso: Admin. DD.MM.YYYY HH:MM:SS N.º. Hora Fecha Estado Texto Error mezc. motor: Se ha perd. veloc. Mezc. con receta Mez. manual Mezc. remota Fig. 9: Mensaje (mensaje de error, ejemplo) Pos . Nombre Descripción Lista de errores Muestra los mensajes de error o de advertencia guardados. - Page 200 Concepto de manejo Pos . Símbolo Nombre Descripción Botón [Iniciar] Comienza un proceso de mezcla. Botón [Pausar] Interrumpe un proceso de mezcla. Botón [Parar] Para un proceso de mezcla o el funcionamiento remoto del aparato. Botón [Pantalla anterior] | Cambia a la pantalla anterior o siguiente en una rutina de Botón [Pantalla siguiente] pasos de proceso o en un menú.
-
Page 201: Estructura Del Menú
Configuración del idioma. Nivel acceso Ini. sesión usuario Establecer restricción de acceso para el menú del programa. Administración Ver y administrar usuarios guardados. de usuarios Mantenimiento Acceso solo para Sartorius Service Instrucciones de manejo para Flexsafe Pro Mixer Drive unit ®... -
Page 202: Navegar Por Los Menús
Concepto de manejo 4.10 Navegar por los menús Abrir un menú: Pulsar el botón del menú, p. ej. el botón [Mez. manual] (1). Nivel acceso: Admin. DD.MM.YYYY HH:MM:SS Se muestra la primera pantalla en la rutina de pasos de proceso o el submenú. -
Page 203: Instalación
Instalación Instalación Contenido del suministro Artículo Cantidad Flexsafe Pro Mixer Drive Unit ® Tornillo para sustituir el tornillo de seguridad para el transporte Cable de alimentación específico del país (EU) Cable de alimentación específico del país (EE. UU.) Cable de conexión equipotencial, combinado con un cable de alimentación y provisto de un conector de red adicional Instrucciones de manejo Documentación técnica... -
Page 204: Retirar El Dispositivo De Seguridad Para El Transporte
Instalación Retirar el dispositivo de seguridad para el transporte En el momento de la entrega, el aparato está protegido con un dispositivo de seguridad para el transporte. El dispositivo de seguridad para el transporte consta de 2 tornillos de seguridad para el transporte. Los tornillos de seguridad para el transporte deben retirarse para operar la unidad. -
Page 205: Puesta En Marcha
Compruebe que el enchufe de alimentación específico del país coincide con las conexiones de alimentación en el lugar de instalación. Si es necesario: Contacte con Sartorius Service (cable de alimenta- ción disponible ver capítulo “16 Accesorios”, página 236). Aflojar y retirar la tuerca de alivio de tensión (2). -
Page 206: Permitir Que El Aparato Se Aclimate
Puesta en marcha Permitir que el aparato se aclimate Si se mueve el aparato de una ubicación a otra y la temperatura del lugar actual es menor que la de la siguiente ubicación: La diferencia de temperatura podría provocar condensación debido a la humedad del aire en el aparato (empañamiento). -
Page 207: Mover El Aparato Al Lugar De Instalación
Puesta en marcha Mover el aparato al lugar de instalación Procedimiento Soltar los 2 frenos de las ruedas de transporte. ADVERTENCIA ¡Peligro de lesiones al mover el aparato! Cuando se mueva, verificar que no haya personas o objetos en el camino. Utilizar el equipo de protección personal. -
Page 208: Ajustes Del Sistema
Ajustes del sistema Ajustes del sistema Iniciar sesión en el aparato En el momento de la entrega, los usuarios están preestablecidos. El primer inicio de sesión en el aparato debe ser utilizando el usuario “supervisor”. El usuario “supervisor” está seleccionado automáticamente en la entrega. La contraseña estándar para ese usuario es “1111”. -
Page 209: Crear, Cambiar O Borrar Un Usuario
0 o 1 Grupo de administradores 0 o 1 0 o 1 Solo Sartorius Service 0 = Sin acceso restringido 1 = Puede restringirse el acceso; Si el acceso está restringido: Acceso para el grupo de usuarios “Usuario”, “Grupo” o “Grupo de administradores”... -
Page 210: Crear Usuario
Ajustes del sistema 7.3.3 Crear usuario Procedimiento En la lista de usuarios guardados, pulsar el botón [Lista abajo] hasta Ajustes Nivel acceso: Admin. DD.MM.YYYY HH:MM:SS llegar al final de la lista. Administración de usuarios Pulsar dos veces en la línea en blanco. Usuario Contraseña Grupo... -
Page 211: Eliminar Usuario
Ajustes del sistema 7.3.5 Eliminar usuario Procedimiento Ir a la entrada deseada en la lista de usuarios guardados. Para ello, pulsar los botones [Lista arriba] o [Lista abajo]. Pulsar dos veces en la celda de la tabla [Usuario] de la entrada deseada. Se marca la celda de la tabla. -
Page 212: Cambiar Entrada En La Fórmula
Ajustes del sistema Pos . Nombre Nombre de la fórmula Último cambio (marca de tiempo) Funciones disponibles Lista de fórmulas Fase guardada Requisitos Si los modos de funcionamiento para el proceso de mezcla son de acceso restringido: El perfil de usuario personal tiene el grupo de usuarios “Usuario” y se conoce la contraseña. -
Page 213: Lista De Parámetros
Ajustes del sistema Lista de parámetros 7.6.1 Parámetros en el menú de programa Parámetro Valores de ajuste Explicación Velocidad [rpm] 20 – 750 Ajuste de la velocidad de agitación. Duración 00:00:01 – − Especificar el tiempo de ejecución para un proceso de mezcla [00 h / 00 min / 00 s] 99:59:59 o para una fase en una fórmula. -
Page 214: Manejo
Manejo Manejo Configurar la adquisición de datos de proceso a través de un dispositivo de almacenamiento masivo USB Los datos de proceso del proceso de mezcla se pueden grabar en un dispositivo de almacenamiento masivo USB (memoria USB). Los datos de proceso se graban en un archivo de texto. -
Page 215: Seleccionar Fórmula (Solo Modo De Funcionamiento "Mezc. Con Receta")
Manejo Seleccionar fórmula (solo modo de funcio- namiento “Mezc. con receta”) Procedimiento En la lista de fórmulas (1), pulsar el botón [Fórmula anterior] o [Fórmula Fase 3 siguiente] hasta que se muestre la fórmula deseada. Fase 4 Comprobar la configuración en la fórmula. Cuando sea necesario: Ajustar la fórmula (ver capítulo “8.9 Realizar mezcla”, página 220). -
Page 216: Introducir El Aparato Bajo El Palletank
Manejo Introducir el aparato bajo el Palletank ® para mezclas Requisitos − El Palletank para mezclas está listo para usar. ® − La pantalla de mando muestra la pantalla [Acoplar Palletank]. ATENCIÓN ¡Peligro de aplastamiento por piezas móviles! Al introducir el aparato bajo el Palletank para mezclas, las ruedas de guía ®... - Page 217 Manejo Tirar del asa hacia arriba de forma que las ruedas de guía traseras deslicen sobre los rieles del Palletank para mezclas. ® Deslizar completamente el aparato bajo el Palletank para mezclas. El ® aparato debe rodar sobre los 2 elementos rodantes en los rieles del Palletank para mezclas.
-
Page 218: Acoplar El Aparato Con El Palletank
Manejo Acoplar el aparato con el Palletank para ® mezclas y el agitador Para acoplar el aparato con el Palletank para mezclas y el agitador: Deben ® estar levantados el motor, los pernos de alineación y el sensor de distancia. Mez. -
Page 219: Llenar La Bolsa De Mezcla
Manejo Procedimiento Comprobar la posición del motor en la pantalla “Acoplar motor”. La barra de posición debe estar en la posición más baja. Si la barra de posición no está en la posición más baja: Pulsar el botón [Bajar] y mantenerlo presionado. Esto hará que el motor y sus componentes asociados se retraigan a la posición inicial. -
Page 220: Realizar Mezcla
Manejo Realizar mezcla 8.9.1 Iniciar proceso de mezcla Procedimiento Si se selecciona el modo de funcionamiento “Mezc. con receta” o “Mez. manual”: Pulsar el botón [Iniciar]. Si se selecciona el modo de funcionamiento “Mezc. remota”: Iniciar el proceso de mezcla en el controlador externo (consultar instrucciones del controlador externo). -
Page 221: Ver Mensajes Registrados
Manejo Procedimiento Pulsar el botón [Error] o [Advertencia]. Se muestra la lista de errores. Para moverse entre las entradas de la lista de errores: Pulsar el botón [Lista arriba] o [Lista abajo]. Comprobar la entrada en la lista de errores: Para ver el texto de información de un mensaje: Pulsar el botón [Info]. -
Page 222: Vaciado Y Extracción De La Bolsa De Mezcla
Manejo Procedimiento Verificar la posición del motor en la pantalla “Separar motor”. La barra de Nivel acceso: Admin. Mélange manuel DD.MM.YYYY HH:MM:SS posición debe estar en la posición más alta (1) Pulsar el botón [Bajar] y mantenerlo presionado. Separar motor El aparato se desacopla del Palletank para mezclas y del agitador en la Baje el motor pulsando el botón... -
Page 223: Finalizar Adquisición De Datos De Proceso
Manejo Procedimiento Retirar lentamente el aparato del Palletank para mezclas hasta que las ® ruedas de guía traseras se encuentren al final de los rieles del Palletank ® para mezclas. El aparato debe rodar sobre los 2 elementos rodantes en los rieles del Palletank para mezclas. -
Page 224: Limpieza Y Mantenimiento
Plan de mantenimiento Intervalo Componente Tarea 12 meses Aparato Verificar el funcionamiento del aparato a través de Sartorius Service. 12 meses Sensores Calibrar los sensores del aparato a través de Sartorius Service. Nueva puesta en marcha Procedimiento Poner el aparato en funcionamiento (ver capítulo “6 Puesta en marcha”,... -
Page 225: Averías
Averías 10 Averías 10.1 Mensajes de advertencia Mensaje de Avería (información) Causa Solución Capítulo, advertencia página [Advert. mezc.: Pos. [La pos. medida se Durante el proceso Comprobar si el agitador se motor mezcla] ha modif. en más de de mezcla, el sensor mueve correcta y libremente 2 mm desde la pos. -
Page 226: Mensajes De Error
Avería (Información) Causa Solución Capítulo, página [Error del sistema [Subir el motor no El motor no se Contactar con Sartorius elevador: Tie. agot. alcanza la posición. puede elevar correc- Service. motor] (El sensor o el motor tamente, debido a están dañados)] que el motor u otros componentes están... - Page 227 Averías Mensaje de error Avería (Información) Causa Solución Capítulo, página [Error mezc. motor: [La corr. uni. motriz La corriente de con- Comprobar la posición de la 10.5, Corr. uni. motriz] supera lím. (mín. una trol es demasiado bolsa de mezcla y del impulsor. fase >11 A rms)] alta, por lo que el proceso de mezcla...
-
Page 228: Averías En El Funcionamiento Del Aparato
(ver ® capítulo 8.5, página 216 y capítulo 8.6, página 218). Si el mensaje de advertencia vuelve a aparecer: Contactar con Sartorius Service. 10.6 Comprobar el acoplamiento con la bolsa de mezcla y el agitador Procedimiento Detener el proceso de mezcla. -
Page 229: Puesta Fuera De Servicio
Puesta fuera de servicio Puesta fuera de servicio 11.1 Poner el aparato fuera de servicio Requisitos El aparato está extraído del Palletank para mezclas (ver capítulo “8.12 ® Finalizar el proceso de mezcla”, página 221). Procedimiento Apagar el aparato. Desconecte el enchufe del cable de alimentación de la fuente de alimentación en el lugar de instalación. -
Page 230: Transporte
Transporte 12 Transporte 12.1 Montar el dispositivo de seguridad para el transporte Si se necesita transportar el aparato, p. ej. para un envío del aparato: El dispositivo de seguridad para el transporte debe estar montado. El dispositivo de seguridad para el transporte consta de 2 tornillos de seguridad para el transporte que se montaron en el aparato cuando se entregó. -
Page 231: Almacenamiento Y Envío
Tanto los daños que puedan producirse durante el transporte como cualquier limpieza o desinfección adicional del aparato o las piezas que Sartorius Stedim Biotech tenga que realizar a posteriori correrán a cargo del remitente. ADVERTENCIA ¡Peligro de lesiones por aparatos contaminados! -
Page 232: Eliminación
Requisitos El aparato está descontaminado. Procedimiento Desechar el aparato. Seguir para ello las indicaciones de eliminación de nuestra página web (www.sartorius.com). Desechar el embalaje de conformidad con las normas locales. Instrucciones de manejo para Flexsafe Pro Mixer Drive unit ®... -
Page 233: Datos Técnicos
Datos técnicos 15 Datos técnicos 15.1 Dimensiones y peso Unidad Valor Medidas (ancho x largo x alto) 439 x 1242 x 1006 Peso 15.2 Condiciones del entorno Unidad Valor Lugar de instalación Interior Sin luz solar directa No en las inmediaciones de calefacción o aire acondicionado No exponer a la radiación de microondas, rayos láser o rayos x Sin vibraciones Altura máxima sobre el nivel del mar... -
Page 234: Compatibilidad Electromagnética
15.4 Idoneidad de Palletank para mezclas y bolsas de mezcla ® Solo bolsa de mezcla Flexsafe Pro de Sartorius ® Volumen de llenado de 50L a 1000L y un máximo de 2 conexiones en la parte frontal e inferior Volumen de llenado de 50L a 1000L y 3 o más conexiones en la parte frontal e... -
Page 235: Funcionamiento Remoto
Datos técnicos 15.6 Funcionamiento remoto Unidad Valor Sistema de control externo aprobado Sartorius FlexAct ® Toma de comunicación A través de un cable de conexión para el funcionamiento remoto Tipo de cable de conexión para el funcionamiento remoto: Enchufe incorpo-... -
Page 236: Emisión Acústica
1000061414 17 Sartorius Service Sartorius Service está a su disposición para cualquier consulta sobre el aparato. Consulte las direcciones, los servicios ofrecidos y la forma de contacto del servicio técnico en la página web de Sartorius (www.sartorius.com). En caso de consultas relativas al sistema y a un funcionamiento incorrecto, tenga siempre a mano la información del aparato, p. - Page 237 Indice Indice 1 Riguardo questo manuale . . . . . . . . . . . . . . . . . . . . . . . . . . . . . . . . . . . . . . . . . . . . . . . . . . . . . . . . . . 241 Validità...
- Page 238 Indice 4 Sistema di comando . . . . . . . . . . . . . . . . . . . . . . . . . . . . . . . . . . . . . . . . . . . . . . . . . . . . . . . . . . . . . . . . 255 4.1 Schermata nel menu principale .
- Page 239 Indice 8 Funzionamento . . . . . . . . . . . . . . . . . . . . . . . . . . . . . . . . . . . . . . . . . . . . . . . . . . . . . . . . . . . . . . . . . . . . 273 8.1 Configurare l’acquisizione dei dati di processo tramite il dispositivo di memoria di massa USB .
- Page 240 17 Sartorius Service . . . . . . . . . . . . . . . . . . .
-
Page 241: Riguardo Questo Manuale
Riguardo questo manuale Riguardo questo manuale Validità Il presente manuale fa parte dell’apparecchio. Il manuale vale per l’apparecchio nelle seguenti versioni: Apparecchio Tipo Flexsafe Pro Mixer Drive unit FMD300001 ® Documenti di riferimento Oltre al presente manuale tenere in considerazione anche i seguenti documenti: −... -
Page 242: Spiegazione Dei Simboli
Istruzioni di sicurezza Spiegazione dei simboli 1.4.1 Avvertenze nelle descrizioni delle azioni AVVERTENZA Questo simbolo segnala un pericolo che potrebbe causare lesioni gravi o mortali se non fosse evitato. ATTENZIONE Questo simbolo segnala un pericolo che potrebbe causare lesioni di media o lieve entità... -
Page 243: Modifiche All'apparecchio
Si consiglia di far eseguire le riparazioni anche fuori garanzia da parte del Sartorius Service o dopo aver consultato il Sartorius Service. Svolgere esclusivamente gli interventi di manutenzione descritti in questo manuale. Contattare il Sartorius Service per gli interventi di manutenzione che devono essere eseguiti dal Sartorius Service. 2.1.3 Usi scorretti prevedibili L’impiego dell’apparecchio è... -
Page 244: Qualificazione Del Personale
Conservare il manuale. In caso di perdita del manuale, richiederne una copia oppure scaricare il manuale aggiornato dal nostro sito web (www.sartorius.com). Operatività dell’apparecchio Un apparecchio danneggiato o delle parti usurate possono provocare malfunzionamenti o causare dei pericoli difficilmente riconoscibili. -
Page 245: Informazioni Di Sicurezza Sull'apparecchio
Utilizzare esclusivamente il cavo di alimentazione originale. Se è necessario sostituire il cavo di alimentazione: contattare il Sartorius Service. Non riparare o modificare il cavo di alimentazione. 2.7.3 Cavo di collegamento equipotenziale La mancanza di un cavo di collegamento equipotenziale o l’utilizzo di un... -
Page 246: Comportamento In Caso D'emergenza
Lasciare l’interruttore di arresto di emergenza in posizione di blocco fino all’eliminazione dei guasti o malfunzionamenti. Per risolvere i malfunzionamenti rivolgersi al Sartorius Service. Una volta che i guasti o malfunzionamenti sono stati eliminati: sbloccare l’interruttore di arresto d’emergenza estraendolo fino a quando l’anello verde sull’interruttore di arresto di emergenza diventa visibile. -
Page 247: Lavorare Con L'apparecchio
Istruzioni di sicurezza 2.11 Lavorare con l’apparecchio Non tutte le aree dell’apparecchio o del Palletank per miscelazione ® possono essere sempre completamente visibili, delle singole aree possono essere visibili solo in misura limitata, per es. durante l’inserimento o l’estrazione dell’apparecchio sul | dal Palletank per miscelazione. -
Page 248: Parti In Movimento
Istruzioni di sicurezza 2.15 Parti in movimento 2.15.1 Motore Quando si accoppia l’apparecchio all’agitatore della sacca di miscelazione, il motore sale. Se nel frattempo gli operatori dell’apparecchio o gli astanti vengono a contatto con il motore: le dita possono venire intrappolate e schiacciate tra il motore e il Palletank per miscelazione. -
Page 249: Forze Magnetiche
Istruzioni di sicurezza 2.16 Forze magnetiche 2.16.1 Influenza delle forze magnetiche sugli impianti medici Durante il funzionamento si verificano sul motore dell’apparecchio forze magnetiche elevate. Le forze magnetiche agiscono sugli impianti medici e sugli oggetti magnetici. Le persone con impianti medici possono essere ferite in modo letale o grave;... -
Page 250: Descrizione Dell'apparecchio
Descrizione dell’apparecchio Descrizione dell’apparecchio Visione d’insieme dell’apparecchio Fig. 1: Flexsafe Pro Mixer Drive Unit (vista dall’alto) ® Pos . Denominazione Descrizione Rullo di guida Serve a inserire ed estrarre l’apparecchio sotto il Pallentank per miscelazione. Scivola sulle rotaie di guida del Palletank per miscelazione. -
Page 251: Componenti Per L'accoppiamento Al Palletank
Descrizione dell’apparecchio Componenti per l’accoppiamento al Palletank per miscelazione e alla ® sacca di miscelazione Fig. 2: Componenti per l’accoppiamento al Palletank per miscelazione e alla sacca di miscelazione (parti mobili rientrate) ® Pos . Denominazione Descrizione Sensore di rilevamento del Rileva se l’apparecchio è... -
Page 252: Attacchi, Tamburo Per Cavo E Interruttore On | Off
Fig. 3: Attacchi, tamburo per cavo e interruttore On | Off Pos . Denominazione Descrizione ETHERNET Attacco solo per il Sartorius Service. È chiuso con un tappo di protezione. REMOTE Attacco per unità di controllo esterna. È chiuso con un tappo di protezione. -
Page 253: Accoppiamento E Disaccoppiamento Dell'apparecchio Sul Palletank
Descrizione dell’apparecchio Accoppiamento e disaccoppiamento dell’apparecchio sul Palletank per miscela- ® zione Fig. 4: Apparecchio accoppiato al Palletank per miscelazione e disaccoppiato dal Palletank ® ® stesso (esempio) Pos . Denominazione Descrizione Perni di allineamento I perni di allineamento sono accoppiati fuoriusciti e sono connessi alla piastra di allineamento del Palletank... -
Page 254: Interruttore Di Arresto D'emergenza
Significato Durante il funzionamento è possibile che delle parti dell’apparecchio siano sotto tensione. L’apparecchio può essere aperto solo da parte del Sartorius Service. In caso di malfunzionamento della dotazione elettrica, deve essere immediatamente scollegato dall’alimentazione elettrica. Rischio di schiacciamento quando si accoppia l’apparecchio al Palletank... -
Page 255: Sistema Di Comando
Sistema di comando Sistema di comando Schermata nel menu principale Livello di accesso: Ammin. DD.MM.YYYY HH:MM:SS Miscelazione con ricetta Miscelazione manuale Miscelazione in remoto Fig. 5: Schermata “Menu principale”(esempio) Pos . Denominazione Descrizione Barra dello stato Mostra l’utente collegato nonché la data e l’ora. -
Page 256: Schermata Nell'operazione Di Miscelazione
Sistema di comando Schermata nell’operazione di miscelazione Livello di accesso: Ammin. Miscelazione manuale DD.MM.YYYY HH:MM:SS Set parameters Velocità reale [rpm] Velocità Durata Tempo [hh:mm:ss] Fig. 6: Schermata dell’operazione di miscelazione nel menu operativo “Manual mixing” (esempio) Pos . Denominazione Descrizione Barra dello stato Mostra l’utente collegato, la data e l’ora nonché... -
Page 257: Interfaccia Utente
Sistema di comando Interfaccia utente L’interfaccia utente guida l’utente attraverso la routine di passi di processo e lo assiste durante l’inserimento di valori nei campi d’inserimento. Livello di accesso: Ammin. Livello di accesso: Ammin. Miscelazione manuale Miscelazione manuale DD.MM.YYYY DD.MM.YYYY HH:MM:SS HH:MM:SS Accoppiare motore... -
Page 258: Messaggio
Sistema di comando Messaggio Allarme Livello di accesso: Ammin. DD.MM.YYYY HH:MM:SS N°. Tempo Data Stato Testo Errore motore di miscelaz.: perdita di velocità Miscelazione con ricetta Miscelazione manuale Miscelazione in remoto Fig. 9: Messaggio (messaggio di errore,esempio) Pos . Denominazione Descrizione Elenco degli errori Mostra i messaggi di errore e i messaggi di avviso salvati. - Page 259 Sistema di comando Pos . Simbolo Denominazione Descrizione Pulsante [Avvia] Avvia un’operazione di miscelazione. Pulsante [Sospendi] Sospende un’operazione di miscelazione. Pulsante [Arresta] Arresta un’operazione di miscelazione o il funzionamento in remoto dell’apparecchio. Pulsante [Schermata Passa alla schermata precedente o a quella successiva in precedente] | una routine di passi di processo o in un menu.
-
Page 260: Struttura Dei Menu
Impostare la lingua. Livello di accesso Login utente Definire una limitazione di accesso per il menu del programma. Gestione utenti Visualizzare e gestire gli utenti salvati. Manutenzione Accesso solo per il Sartorius Service Manuale d’uso Flexsafe Pro Mixer Drive Unit ®... -
Page 261: Navigare Nei Menu
Sistema di comando 4.10 Navigare nei menu Per richiamare un menu: toccare il pulsante del menu, per es. il pulsante Livello di accesso: Ammin. DD.MM.YYYY HH:MM:SS [Miscelazione manuale] (1). Compare la prima schermata nella routine di passi di processo o il Miscelazione con ricetta Miscelazione manuale sottomenu. -
Page 262: Installazione
Installazione Installazione Equipaggiamento fornito Articolo Quantità Flexsafe Pro Mixer Drive Unit ® Vite per sostituire la vite di sicurezza per il trasporto Cavo di alimentazione specifico del paese (UE) Cavo di alimentazione specifico del paese (USA) Cavo di collegamento equipotenziale, combinato con cavo di alimentazione e dotato di una spina di rete aggiuntiva Manuale d’uso Documentazione tecnica... -
Page 263: Rimozione Del Dispositivo Di Sicurezza Per Il Trasporto
Installazione Rimozione del dispositivo di sicurezza per il trasporto Alla consegna, l’apparecchio è protetto con un dispositivo di sicurezza per il trasporto. Il dispositivo di sicurezza per il trasporto è costituito da 2 viti apposite. Le viti di sicurezza per il trasporto devono essere tolte per il funzionamento dell’apparecchio. -
Page 264: Messa In Funzione
Controllare che la spina specifica del paese sia conforme alle prese elet- triche del luogo di installazione. Se necessario: contattare il Sartorius Service (cavi di alimentazione disponibili vedi capitolo “16 Accessori”, pagina 295). Allentare e togliere il dado del fermacavo (2). -
Page 265: Acclimatare L'apparecchio
Messa in funzione Acclimatare l’apparecchio Se l’apparecchio viene spostato da un luogo in un altro e la temperatura nel luogo attuale è inferiore a quella del luogo in cui viene portato: a causa della differenza di temperatura l’umidità dell’aria può condensarsi nell’apparecchio (formazione di condensa). -
Page 266: Spostare L'apparecchio Sul Luogo Di Installazione
Messa in funzione Spostare l’apparecchio sul luogo di installa- zione Procedura Allentare i 2 freni di stazionamento delle rotelle di trasporto. AVVERTENZA Rischio di lesioni durante lo spostamento dell’apparecchio! Accertarsi che durante lo spostamento non vi siano persone od oggetti sul tratto da percorrere. Indossare le attrezzature di protezione individuale. -
Page 267: Impostazioni Di Sistema
Impostazioni di sistema Impostazioni di sistema Login all’apparecchio Alla consegna vi sono degli utenti preimpostati. Il login iniziale all’apparecchio deve essere effettuato dall’utente “supervisor”. Alla consegna l’utente “supervisor” viene selezionato automaticamente. La password standard per questo utente è “1111”. Procedura Toccare il pulsante [Login] nella barra dello stato. -
Page 268: Creare, Modificare O Cancellare Gli Utenti
0 o 1 Gruppo amministratori 0 o 1 0 o 1 Solo il Sartorius Service 0 = Nessun accesso limitato 1 = Può essere con accesso limitato; se è con accesso limitato: accesso da parte del gruppo utenti “Utente”, “Gruppo “ o “Gruppo amministratori “... -
Page 269: Creare Degli Utenti
Impostazioni di sistema 7.3.3 Creare degli utenti Procedura Nell’elenco degli utenti salvati toccare a lungo il pulsante [Elenco giù] Impostazioni Livello di accesso: Ammin. DD.MM.YYYY HH:MM:SS fino a raggiungere la fine dell’elenco. Gestione utenti Toccare due volte nella riga vuota. Utente Password Gruppo... -
Page 270: Modificare La Limitazione Di Accesso Per L'operazione Di Miscelazione
Impostazioni di sistema 7.3.5 Cancellare gli utenti Procedura Scorrere nell’elenco degli utenti salvati fino alla voce desiderata. A tale scopo toccare il pulsanti [Elenco su] o [Elenco giù]. Toccare due volte nella cella della tabella [user] della voce desiderata. La cella della tabella viene evidenziata. Toccare di nuovo la voce. -
Page 271: Modificare Le Voci Nella Ricetta
Impostazioni di sistema Pos . Denominazione Nome della ricetta Ultima modifica (indicatore orario) Funzioni disponibili Elenco delle ricette Fase salvata Presupposti Se i modi operativi per l’operazione di miscelazione sono con accesso limitato: il profilo utente personale ha il gruppo utenti “Utente” e la password personale è... -
Page 272: Elenco Dei Parametri
Impostazioni di sistema Elenco dei parametri 7.6.1 Parametri nel menu del programma Parametro Valori di impostazione Spiegazione Velocità [rpm] 20 – 750 Definire la velocità di agitazione. Durata 00:00:01 – 99:59:59 − Definire il tempo di esecuzione per un’operazione di [00 h / 00 min / 00 s] miscelazione o per una fase in una ricetta. -
Page 273: Funzionamento
Funzionamento Funzionamento Configurare l’acquisizione dei dati di processo tramite il dispositivo di memoria di massa USB I dati di processo dell’operazione di miscelazione possono essere acquisiti su un dispositivo di memoria di massa USB (chiavetta USB). I dati di processo vengono scritti in un file di testo. Il file di testo può essere per es. esportato e valutato statisticamente in Excel. -
Page 274: Selezionare La Ricetta (Solo Il Modo Operativo "Miscelazione Con Ricetta")
Funzionamento Selezionare la ricetta (solo il modo operativo “Miscelazione con ricetta”) Procedura Nell’elenco delle ricette (1) toccare a lungo il pulsante [Ricetta Fase 3 precedente] o [Ricetta successiva] fino a quando viene visualizzata la Fase 4 ricetta desiderata. Controllare le impostazioni nella ricetta. Se necessario: adattare la ricetta (vedi capitolo “8.9 Eseguire l’operazione di miscelazione”, pagina 279). -
Page 275: Inserire L'apparecchio Sotto Il Palletank Per Miscelazione
Funzionamento Inserire l’apparecchio sotto il Palletank ® per miscelazione Presupposti − Il Palletank per miscelazione è pronto per l’uso. ® − Nel display di comando appare la schermata [Agganciare Palletank]. ATTENZIONE Rischio di schiacciamento dovuto a parti in movimento! Durante l’inserimento dell’apparecchio sotto il Palletank per miscelazione i ®... - Page 276 Funzionamento Alzare la maniglia in modo che i rulli di guida posteriori scorrano sulle rotaie di guida del Palletank per miscelazione. ® Spingere completamente l’apparecchio sotto il Palletank ® miscelazione. L’apparecchio deve scorrere via per mezzo dei 2 elementi a rulli sulle rotaie di guida del Palletank per miscelazione.
-
Page 277: Accoppiare L'apparecchio Con Il Palletank Per Miscelazione E Con L'agitatore
Funzionamento Accoppiare l’apparecchio con il Palletank ® per miscelazione e con l’agitatore Per accoppiare l’apparecchio con il Palletank per miscelazione e con ® l’agitatore: il motore, i perni di allineamento e il sensore di distanza devono essere fuoriusciti. Miscelazione manuale Miscelazione manuale Livello di accesso: Ammin. -
Page 278: Riempire La Sacca Di Miscelazione
Funzionamento Procedura Controllare la posizione del motore nella schermata “Accoppiare motore”. La barra di posizione deve trovarsi nella posizione più in basso. Se la barra di posizione non si trova nella posizione più in basso: toccare il pulsante [Scendere] e tenerlo premuto. In questo modo il motore e i componenti annessi ritornano nella posizione di partenza. -
Page 279: Eseguire L'operazione Di Miscelazione
Funzionamento Eseguire l’operazione di miscelazione 8.9.1 Avviare l’operazione di miscelazione Procedura Se è selezionato il modo operativo “Miscelazione con ricetta” o “Miscelazione manuale”: toccare il pulsante [Avvia]. Se è selezionato il modo operativo “Miscelazione in remoto”: avviare l’operazione di miscelazione sull’unità di controllo esterna (vedi il manuale dell’unità... -
Page 280: Visualizzare I Messaggi Rilevati
Funzionamento Procedura Toccare il pulsante [Errore] o [Avviso]. Compare l’elenco degli errori. Per passare da una voce all’altra nell’elenco degli errori: toccare il pulsante [Elenco su] o [Elenco giù]. Controllare le voci nell’elenco degli errori: Per richiamare un testo informativo di un messaggio: toccare il pulsante [Info]. -
Page 281: Svuotare E Rimuovere La Sacca Di Miscelazione
Funzionamento Procedura Controllare la posizione del motore nella schermata “Separare motore”. Livello di accesso: Ammin. Miscelazione manuale DD.MM.YYYY HH:MM:SS La barra di posizione deve trovarsi nella posizione più in alto (1). Toccare il pulsante [Scendere] e tenerlo premuto. Separare motore L’apparecchio viene disaccoppiato dal Palletank per miscelazione e Abbassare il motore premendo il pul-... -
Page 282: Concludere L'acquisizione Dei Dati Di Processo
Funzionamento Procedura Allontanare lentamente l’apparecchio dal Palletank per miscelazione ® fino a quando i rulli di guida posteriori si trovano alla fine delle rotaie di guida del Palletank per miscelazione. L’apparecchio deve scorrere via ® per mezzo dei 2 elementi a rulli sulle rotaie di guida del Palletank ®... -
Page 283: Pulizia E Manutenzione
Piano di manutenzione Intervallo Componente Intervento 12 mesi Apparecchio Far controllare il funzionamento dell'ap- parecchio da parte del Sartorius Service. 12 mesi Sensori Far calibrare i sensori da parte del Sartorius Service. Rimessa in funzione Procedura Mettere in funzione l’apparecchio (vedi capitolo “6 Messa in funzione”, pagina 264). -
Page 284: Guasti
Guasti 10 Guasti 10.1 Messaggi di avviso Messaggio di Guasto (info) Causa Soluzione Capitolo, avviso pagina [Avviso miscela- [La posizione misu- Durante l’operazione Controllare se l’agitatore si zione: posizione rata è cambiata di di miscelazione il sen- muove correttamente e libera- motore di miscel.] oltre 2 mm rispetto sore di distanza... -
Page 285: Messaggi Di Errore
Causa Soluzione Capitolo, errore pagina [Errore del sistema [Il motore di sposta- Il motore non può Contattare il Sartorius Service. di spostamento: mento non rag- salire correttamente timeout motore] giunge la posizione perché il motore (il sensore o il stesso o altri compo-... - Page 286 Guasti Messaggio di Guasto (info) Causa Soluzione Capitolo, errore pagina [Errore motore di [Corrente motore La corrente di aziona- Controllare la posizione della 10.5, miscelaz.: corrente superiore al limite mento è troppo alta, sacca di miscelazione e motore] (almeno una fase quindi l’operazione di dell’agitatore.
-
Page 287: Guasti Durante Il Funzionamento Dell'apparecchio
® (vedi capitolo 8.5, pagina 275 e capitolo 8.6, pagina 277). Se il messaggio di avviso si verifica di nuovo: contattare il Sartorius Service. 10.6 Controllare l’accoppiamento con la sacca di miscelazione e con l’agitatore Procedura Arrestare l’operazione di miscelazione. -
Page 288: Messa Fuori Servizio
Messa fuori servizio Messa fuori servizio 11.1 Mettere l’apparecchio fuori servizio Presupposti L’apparecchio è estratto dal Palletank per miscelazione (vedi capitolo “6.1.1 ® Collegare il cavo di collegamento equipotenziale”, pagina 264). Procedura Spegnere l’apparecchio. Estrarre la spina del cavo di alimentazione dall’alimentazione del luogo di installazione. -
Page 289: Trasporto
Trasporto 12 Trasporto 12.1 Montare il dispositivo di sicurezza per il trasporto Se l’apparecchio deve essere trasportato, per es. in caso di spedizione: il dispositivo di sicurezza per il trasporto deve essere montato. Il dispositivo di sicurezza per il trasporto è costituito da 2 viti apposite che sono state montate sull’apparecchio per la fornitura. -
Page 290: Stoccaggio E Spedizione
Indossare le attrezzature di protezione individuale. 13.2 Rispedire l’apparecchio e i componenti Gli apparecchi o i componenti difettosi possono essere restituiti a Sartorius Stedim Biotech. Gli apparecchi restituiti devono essere puliti, decontaminati e imballati in modo adeguato. -
Page 291: Smaltimento
14.2.2 Smaltimento Presupposti L’apparecchio è decontaminato. Procedura Smaltire l’apparecchio. Consultare a riguardo le indicazioni per lo smaltimento disponibili nel nostro sito Internet (www.sartorius.com). Smaltire l’imballaggio secondo le normative nazionali vigenti. Manuale d’uso Flexsafe Pro Mixer Drive Unit ®... -
Page 292: Dati Tecnici
Dati tecnici 15 Dati tecnici 15.1 Dimensioni e peso Unità Valore Dimensioni (larghezza x lunghezza x altezza) 439 x 1242 x 1006 Peso 15.2 Condizioni ambientali Unità Valore Luogo di installazione Ambienti interni Nessuna esposizione a irraggiamento solare diretto Non nelle immediate vicinanze di impianti di riscaldamento e di climatizzazione Nessuna esposizione a microonde, laser UV o raggi X Assenza di vibrazioni Altitudine massima sul livello del mare... -
Page 293: Compatibilità Elettromagnetica
15.4 Idoneità di Palletank per miscelazione e sacche di miscelazione ® Solo sacca Sartorius Flexsafe Pro Mixer ® Volume di riempimento da 50 L fino a 1000 L e con massimo 2 raccordi sul lato frontale e inferiore Volume di riempimento da 50 L fino a 1000 L e con 3 o più... -
Page 294: Funzionamento In Remoto
Dati tecnici 15.6 Funzionamento in remoto Unità Valore Sistema di controllo esterno approvato Sartorius FlexAct ® Attacco di comunicazione Mediante un cavo di collegamento per il funzionamento in remoto Tipo del cavo di collegamento per il funzionamento in remoto: connettore... -
Page 295: Materiali
Unità Valore Livello di pressione acustica, massimo dB (A) 16 Accessori Questa tabella contiene un estratto degli accessori ordinabili. Per informazioni su ulteriori articoli rivolgersi a Sartorius Stedim Biotech. Articolo Quantità Codice d’ordine Cavo di alimentazione specifico del paese per... -
Page 296: Sartorius Service
Service, alle prestazioni di Service e al contatto in loco si prega di visitare il nostro sito Internet (www.sartorius.com). Per qualsiasi domanda sul sistema e se si contatta il Sartorius Service in caso di malfunzionamenti, tenere pronte le informazioni specifiche dell’apparecchio, per es. numero di serie, hardware, firmware e configurazione, e indicarle al Sartorius Service. - Page 297 Inhoud Inhoud 1 Over deze handleiding . . . . . . . . . . . . . . . . . . . . . . . . . . . . . . . . . . . . . . . . . . . . . . . . . . . . . . . . . . . . . 301 Geldigheid .
- Page 298 Inhoud 4 Bedieningsconcept . . . . . . . . . . . . . . . . . . . . . . . . . . . . . . . . . . . . . . . . . . . . . . . . . . . . . . . . . . . . . . . . 315 4.1 Scherm van het hoofdmenu .
- Page 299 Inhoud 8 Bediening . . . . . . . . . . . . . . . . . . . . . . . . . . . . . . . . . . . . . . . . . . . . . . . . . . . . . . . . . . . . . . . . . . . . . . . . . . 333 8.1 Verzamelen van procesgegevens door USB-geheugen instellen .
- Page 300 17 Sartorius Service . . . . . . . . . . . . . . . . . . .
-
Page 301: Over Deze Handleiding
Over deze handleiding Over deze handleiding Geldigheid Deze handleiding maakt deel uit van het apparaat. De handleiding geldt voor het apparaat in de volgende uitvoeringen: Apparaat Type Flexsafe Pro Mixer Drive Unit FMD300001 ® Relevante documenten In aanvulling op deze handleiding de volgende documentatie raadplegen: −... -
Page 302: Weergavemiddelen
Veiligheidsinstructies Weergavemiddelen 1.4.1 Waarschuwingen in beschrijvingen van handelingen WAARSCHUWING Duidt een gevaar aan dat de dood of ernstig lichamelijk letsel tot gevolg kan hebben als het niet wordt vermeden. VOORZICHTIG Duidt een gevaar aan dat middelzwaar of gering lichamelijk letsel tot gevolg kan hebben als het niet wordt vermeden. -
Page 303: Modificaties Aan Het Apparaat
Het apparaat niet eigenmachtig openen. Wij adviseren om reparatiewerkzaamheden ook buiten de garantie door Sartorius Service of na overleg met Sartorius Service te laten uitvoeren. Alleen onderhoudswerkzaamheden uitvoeren die in deze handleiding zijn beschreven. Contact opnemen met Sartorius Service voor onderhouds- werkzaamheden die door Sartorius Service moeten worden uitgevoerd. -
Page 304: Kwalificatie Van Het Personeel
De handleiding bewaren. Bij verlies van de handleiding een nieuw exemplaar aanvragen of de actuele handleiding op de website van Sartorius downloaden (www. sartorius.com). Goede werking van het apparaat Een beschadigd apparaat of versleten onderdelen kunnen tot storingen leiden of moeilijk herkenbare gevaren veroorzaken. -
Page 305: Veiligheidsinformatie Op Het Apparaat
Alleen de originele netaansluitkabel gebruiken. Wanneer de netaansluitkabel moet worden vervangen: contact opnemen met Sartorius Service. De netaansluitkabel niet repareren of veranderen. 2.7.3 Aardaansluitingskabel Het ontbreken van een aardaansluitingskabel of het gebruik van een defecte aardaansluitingskabel kan tot gevaren leiden en personen levensbedreigend verwonden, bijvoorbeeld door elektrische schokken. -
Page 306: Handelwijze In Noodgevallen
− Storingen van het apparaat − Uitval van het apparaat Uitsluitend goedgekeurd toebehoren en verbruiksmateriaal van Sartorius Stedim Biotech en goedgekeurde reserveonderdelen van Sartorius Stedim Biotech gebruiken. Uitsluitend toebehoren, verbruiksmateriaal en reserveonderdelen gebruiken dat | die in een technisch perfecte staat verkeert | verkeren. -
Page 307: Werken Aan Het Apparaat
Veiligheidsinstructies 2.11 Werken aan het apparaat Niet alle delen van het apparaat of van de Palletank voor Mengen zijn altijd ® volledig te overzien. Er kan maar beperkt zicht op sommige delen zijn, bijvoorbeeld bij het aanbrengen of verwijderen van het apparaat op de Palletank voor Mengen. -
Page 308: Bewegende Onderdelen
Veiligheidsinstructies 2.15 Bewegende onderdelen 2.15.1 Motor Bij het koppelen van het apparaat aan de roerder van de mengbag beweegt de motor omhoog. Wanneer bedieners van het apparaat of omstanders daarbij in aanraking komen met de motor: vingers kunnen klem komen te zitten tussen de motor en de Palletank voor Mengen en gekneusd raken. -
Page 309: Magnetische Krachten
Veiligheidsinstructies 2.16 Magnetische krachten 2.16.1 Beïnvloeding van implantaten door magnetische krach- Tijdens het bedrijf treden er hoge magnetische krachten op de motor van het apparaat op. Magnetische krachten werken in op implantaten en magnetische voorwerpen. Personen met implantaten kunnen daardoor dodelijk of ernstig gewond raken;... -
Page 310: Beschrijving Van Het Apparaat
Beschrijving van het apparaat Beschrijving van het apparaat Apparaatoverzicht Afb. 1: Flexsafe Pro Mixer Drive Unit (bovenaanzicht) ® Pos . Aanduiding Beschrijving Geleidingsrol Bedoeld voor het aanbrengen en verwijderen van het apparaat onder de Palletank voor Mengen. Glijdt op de geleidingsrails van ®... -
Page 311: Componenten Voor Koppeling Aan Palletank
Beschrijving van het apparaat Componenten voor koppeling aan Palletank voor Mengen en mengbag ® Afb. 2: Componenten voor koppeling aan Palletank voor Mengen en mengbag (bewegende onderdelen omlaag bewogen) ® Pos . Aanduiding Beschrijving Palletank -herkenningssensor Bepaalt of het apparaat onder een Palletank voor Mengen is ®... -
Page 312: Aansluitingen, Kabelhaspel En Aan | Uit-Schakelaar
Afb. 3: Aansluitingen, kabelhaspel en Aan | Uit-schakelaar Pos . Aanduiding Beschrijving ETHERNET Aansluiting uitsluitend voor Sartorius Service. Is afgesloten met een beschermdop. REMOTE Aansluiting voor externe besturing. Is afgesloten met een beschermdop. Aansluiting voor USB-geheugen. Is afgesloten met een beschermdop. -
Page 313: Apparaat Op De Palletank ® Voor Mengen Koppelen En Ontkoppelen
Beschrijving van het apparaat Apparaat op de Palletank voor Mengen ® koppelen en ontkoppelen Afb. 4: Apparaat aan Palletank voor Mengen gekoppeld en ontkoppeld van Palletank voor ® ® Mengen (voorbeeld) Pos . Aanduiding Beschrijving Uitlijnpennen gekoppeld De uitlijnpennen zijn omhoog bewogen en met de uitlijnplaat van de Palletank voor Mengen... -
Page 314: Noodstopschakelaar
Betekenis Tijdens het bedrijf kunnen onderdelen in het apparaat onder spanning staan. Het apparaat mag uitsluitend door Sartorius Service worden geopend. Bij storingen aan de elektrische uitrusting moet het apparaat onmiddellijk spanningsvrij worden gemaakt. Bij het koppelen van het apparaat aan de Palletank voor ®... -
Page 315: Bedieningsconcept
Bedieningsconcept Bedieningsconcept Scherm van het hoofdmenu Access level: Admin DD.MM.YYYY HH:MM:SS Mixing with recipe Manual mixing Remote mixing Afb. 5: Scherm „Hoofdmenu” (voorbeeld) Pos . Aanduiding Beschrijving Statusbalk Toont de ingelogde gebruiker alsmede de datum en tijd. Programmamenu Bedoeld voor het selecteren van het mengproces, bijvoorbeeld bedrijfsmodus „Manual mixing”. -
Page 316: Scherm Van Het Mengproces
Bedieningsconcept Scherm van het mengproces Access level: Admin Manual mixing DD.MM.YYYY HH:MM:SS Set parameters Actual speed [rpm] Speed Duration Time [hh:mm:ss] Afb. 6: Scherm mengproces in de bedrijfsmodus „Manual mixing” (voorbeeld) Pos . Aanduiding Beschrijving Statusbalk Toont de ingelogde gebruiker, de datum en tijd alsmede de geselecteerde bedrijfs- modus. -
Page 317: Gebruikersbegeleiding
Bedieningsconcept Gebruikersbegeleiding De gebruikersbegeleiding leidt de gebruiker door de processtappenroutine en biedt ondersteuning bij het invoeren van waarden in invoervelden. Access level: Admin Access level: Admin Manual mixing Manual mixing DD.MM.YYYY HH:MM:SS DD.MM.YYYY HH:MM:SS Couple motor Lift up the motor by pressing the arrow up Install Palletank button. -
Page 318: Melding
Bedieningsconcept Melding Alarm Access level: Admin DD.MM.YYYY HH:MM:SS Time Date State Text Mixing Motor Error: Speed lost Mixing with recipe Manual mixing Remote mixing Afb. 9: Melding (foutmelding voorbeeld) Pos . Aanduiding Beschrijving Foutenlijst Toont de opgeslagen foutmeldingen en waarschuwingsmeldingen. Beschikbare functies Toont de beschikbare functies. - Page 319 Bedieningsconcept Pos . Symbool Aanduiding Beschrijving Knop [Omhoog bewegen] Laat de motor en de bijbehorende bewegende componen- Knop [Omlaag bewegen] ten van het apparaat omhoog bewegen (koppelen) of omlaag bewegen (ontkoppelen). Knop [Starten] Start een mengproces. Knop [Pauzeren] Onderbreekt een mengproces. Knop [Stoppen] Stopt een mengproces of de remote-modus van het apparaat.
-
Page 320: Menustructuur
Datum & tijd Datum en tijd instellen. Taal De taal instellen. Gebruikers- Gebruikerslogin Een toegangsbeperking voor het programmamenu beheer vastleggen. Gebruikers- Opgeslagen gebruikers bekijken en beheren. beheer Onderhoud Toegang uitsluitend voor Sartorius Service Handleiding Flexsafe Pro Mixer Drive Unit ®... -
Page 321: In Menu's Navigeren
Bedieningsconcept 4.10 In menu’s navigeren Om een menu op te roepen: op de knop van het menu drukken, Access level: Admin DD.MM.YYYY HH:MM:SS bijvoorbeeld op de knop [Manual mixing] (1). Het eerste scherm van de processtappenroutine of het submenu wordt Mixing with recipe Manual mixing weergegeven. -
Page 322: Installatie
Installatie Installatie Leveringsomvang Artikel Hoeveelheid Flexsafe Pro Mixer Drive Unit ® Schroef ter vervanging van de transportbeveiligingsschroef Landspecifieke netaansluitkabel (EU) Landspecifieke netaansluitkabel (VS) Aardaansluitingskabel, gecombineerd met netaansluit- kabel en voorzien van extra netaansluitstekker Handleiding Technische documentatie Uitpakken Handelwijze Het apparaat uitpakken. Wanneer het apparaat tussentijds wordt opgeslagen: de aanwijzingen voor de opslag opvolgen (zie Hoofdstuk „15.2 Omgevingscondities”, pagina 351). -
Page 323: Transportbeveiliging Verwijderen
Installatie Transportbeveiliging verwijderen Het apparaat is bij levering beveiligd door een transportbeveiliging. De transportbeveiliging bestaat uit 2 transportbeveiligingsschroeven. Deze transportbeveiligingsschroeven moeten worden verwijderd om het apparaat te kunnen gebruiken. Personeel: 2 personen, bediener Handelwijze Het apparaat aan de greep vasthouden en gecontroleerd naar beneden drukken. -
Page 324: Inbedrijfstelling
Nagaan of de landspecifieke stekker bij de netaansluitingen op de plaats van opstelling past. Indien nodig: contact opnemen met Sartorius Service (beschikbare netaansluitkabels zie Hoofdstuk „16 Toebehoren”, pagina 354). De moer van de trekontlasting (2) losdraaien en verwijderen. -
Page 325: Apparaat Laten Acclimatiseren
Inbedrijfstelling Apparaat laten acclimatiseren Wanneer het apparaat van de ene naar de andere locatie wordt verplaatst en de temperatuur op de huidige locatie lager is dan de temperatuur op de volgende locatie: het temperatuurverschil kan tot condensatie van lucht- vochtigheid in het apparaat leiden (condensvorming). Vocht in het apparaat kan tot storingen leiden. -
Page 326: Apparaat Naar De Plaats Van Opstelling Verplaatsen
Inbedrijfstelling Apparaat naar de plaats van opstelling verplaatsen Handelwijze De 2 vastzetremmen op de transportwieltjes lossen. WAARSCHUWING Letselgevaar bij het verplaatsen van het apparaat! Bij het verplaatsen erop letten dat er geen personen of objecten in de weg staan. De persoonlijke veiligheidsuitrusting dragen. VOORZICHTIG Struikelgevaar door aansluitkabels! Bij het verplaatsen van het apparaat op de positie van de aansluitkabels letten. -
Page 327: Systeeminstellingen
Systeeminstellingen Systeeminstellingen Inloggen op het apparaat Bij de levering zijn gebruikers vooraf ingesteld. De gebruiker „supervisor” moet als eerste inloggen op het apparaat. De gebruiker „supervisor” is bij de levering automatisch geselecteerd. Het standaardwachtwoord voor deze gebruiker is „1111”. Handelwijze In de statusbalk op de knop [Inloggen] drukken. -
Page 328: Gebruikers Aanmaken, Wijzigen Of Wissen
0 of 1 0 of 1 Beheerdersgroep 0 of 1 0 of 1 Alleen Sartorius Service 0 = geen toegangsbeperking 1 = kan toegangsbeperking hebben; indien er sprake is van toegangsbeperking: toegang door gebruikersgroep “Gebruikers”, “Groep” of “Beheerdersgroep” 2 = heeft toegangsbeperking, toegang alleen door gebruikersgroep “Groep” of “Beheerdersgroep”... -
Page 329: Gebruikers Aanmaken
Systeeminstellingen 7.3.3 Gebruikers aanmaken Handelwijze In de lijst van opgeslagen gebruikers de knop [Lijst omlaag] ingedrukt Settings Access level: Admin DD.MM.YYYY HH:MM:SS houden totdat het einde van de lijst is bereikt. User administration Twee keer in de lege regel drukken. User Password Group... -
Page 330: Gebruikers Wissen
Systeeminstellingen 7.3.5 Gebruikers wissen Handelwijze In de lijst van opgeslagen gebruikers naar het gewenste item gaan. Daartoe op de knop [Lijst omhoog] of [Lijst omlaag] drukken. Twee keer in de tabelcel [User] van het gewenste item drukken. De tabelcel wordt gemarkeerd. Nogmaals op het item drukken. -
Page 331: Items In Het Recept Wijzigen
Systeeminstellingen Pos . Aanduiding Receptnaam Laatste wijziging (tijdstempel) Beschikbare functies Lijst van recepten Opgeslagen fase Voorwaarden Wanneer de toegang tot de bedrijfsmodi voor het mengproces is beperkt: het persoonlijke gebruikersprofiel heeft de gebruikersgroep „Gebruikers”, het persoonlijke wachtwoord is bekend. Handelwijze In het programmamenu op de knop [Mixing with recipe] drukken. -
Page 332: Parameterlijst
Systeeminstellingen Parameterlijst 7.6.1 Parameters in het programmamenu Parameters Instelwaarden Toelichting Toerental [rpm] 20 – 750 Roersnelheid vastleggen. Duur [00 h / 00 min / 00 s] 00:00:01 – − Looptijd van een mengproces of van een fase in een 99:59:59 recept vastleggen. -
Page 333: Bediening
Bediening Bediening Verzamelen van procesgegevens door USB-geheugen instellen De procesgegevens uit het mengproces kunnen op een USB-geheugen (USB-stick) worden verzameld. De procesgegevens worden in een tekstbestand opgeslagen. Dit tekstbestand kan bijvoorbeeld naar Excel geëxporteerd en statistisch geanalyseerd worden. De volgende procesgegevens worden in het tekstbestand verzameld: −... -
Page 334: Mengbag In De Palletank
Bediening Mengbag in de Palletank voor Mengen ® installeren Voorwaarden Op het bedieningsdisplay is het scherm [Install Palletank] te zien. WAARSCHUWING Knelgevaar door magnetische krachten! Tussen de motor van het apparaat en de roerder in de mengbag treden hoge magnetische krachten op. De informatie op het bedieningsdisplay van het apparaat in acht nemen. - Page 335 Bediening Handelwijze De 2 vastzetremmen op de transportwieltjes lossen. WAARSCHUWING Letselgevaar bij het verplaatsen van het apparaat! Bij het verplaatsen erop letten dat er geen personen of objecten in de weg staan. De persoonlijke veiligheidsuitrusting dragen. Het apparaat vóór de Palletank voor Mengen uitlijnen.
-
Page 336: Apparaat Aan Palletank ® Voor Mengen En Aan Roerder Koppelen
Bediening Apparaat aan Palletank voor Mengen en ® aan roerder koppelen Om het apparaat aan de Palletank voor Mengen en aan de roerder te ® koppelen: de motor, uitlijnpennen en afstandssensor moeten omhoog worden bewogen. Manual mixing Manual mixing Access level: Admin Access level: Admin DD.MM.YYYY HH:MM:SS DD.MM.YYYY HH:MM:SS... -
Page 337: Mengbag Vullen
Bediening Handelwijze De positie van de motor in het scherm „Couple motor” controleren. De positiebalk moet zich in de onderste positie bevinden. Wanneer de positiebalk zich niet in de onderste positie bevindt: op de knop [Omlaag bewegen] drukken en deze knop ingedrukt houden. Hierdoor worden de motor en de bijbehorende componenten omlaag naar de uitgangspositie bewogen. -
Page 338: Mengproces Uitvoeren
Bediening Mengproces uitvoeren 8.9.1 Mengproces starten Handelwijze Wanneer de bedrijfsmodus „Mixing with recipe” of „Manual mixing” is geselecteerd: op de knop [Starten] drukken. Wanneer de bedrijfsmodus „Remote mixing” is geselecteerd: het mengproces op de externe besturing starten (zie handleiding van de externe besturing). -
Page 339: Geregistreerde Meldingen Bekijken
Bediening Handelwijze Op de knop [Fout] of [Waarschuwing] drukken. De foutenlijst verschijnt. Om tussen de items van de foutenlijst te schakelen: op de knop [Lijst omhoog] of [Lijst omlaag] drukken. De items in de foutenlijst controleren: Om de informatie over een melding op te roepen: op de knop [Info] drukken. -
Page 340: Mengbag Leegmaken En Verwijderen
Bediening Handelwijze De positie van de motor in het scherm „Separate motor” controleren. De Access level: Admin Manual mixing DD.MM.YYYY HH:MM:SS positiebalk moet zich in de bovenste positie (1) bevinden. Op de knop [Omlaag bewegen] drukken en deze knop ingedrukt Separate motor houden. -
Page 341: Verzamelen Van Procesgegevens Voltooien
Bediening Handelwijze Het apparaat langzaam wegtrekken van de Palletank voor Mengen ® totdat de achterste geleidingsrollen aan het einde van de geleidingsrails van de Palletank voor Mengen liggen. Het apparaat moet over de ® 2 rolelementen op de geleidingsrails van de Palletank voor Mengen ®... -
Page 342: Reiniging En Onderhoud
Onderhoudsschema Interval Component Werkzaamheden 12 maanden Apparaat De werking van het apparaat door Sartorius Service laten controleren. 12 maanden Sensoren De sensoren van het apparaat door Sartorius Service laten kalibreren. Heringebruikname Handelwijze Het apparaat in bedrijf stellen (zie Hoofdstuk „6 Inbedrijfstelling”, pagina 324). -
Page 343: Storingen
Storingen 10 Storingen 10.1 Waarschuwingsmeldingen Waarschuwings Storing (info) Oorzaak Oplossing Hoofd melding stuk, pagina [Mixing warning: [The measured Tijdens het meng- Controleren of de roerder Mixing motor position has proces meet de correct en vrij beweegt (visuele position] changed more than afstandssensor een controle in Palletank voor... -
Page 344: Foutmeldingen
Wanneer de foutmelding mengproces onder- opnieuw optreedt: contact broken en geblok- opnemen met Sartorius keerd. Service. [Mixing Motor Error: [Controller tempe- De temperatuur van Ervoor zorgen dat de omge- 15.2,... - Page 345 Storingen Foutmelding Storing (info) Oorzaak Oplossing Hoofd stuk, pagina [Mixing Motor Error: [Drive currents De aanstuurstroom De positie van mengbag en 10.5, Drive current] exceed limit is te hoog, daardoor roerder controleren. (at least one phase is het mengproces > 11 A rms)] onderbroken en geblokkeerd.
-
Page 346: Storingen Bij Het Gebruik Van Het Apparaat
Mengen aanbrengen en aan de roerder van de mengbag koppelen (zie ® Hoofdstuk 8.5, pagina 334 en Hoofdstuk 8.6, pagina 336). Wanneer de waarschuwingsmelding opnieuw optreedt: contact opnemen met Sartorius Service. 10.6 Koppeling aan mengbag en roerder controleren Handelwijze Het mengproces stoppen. -
Page 347: Buitenbedrijfstelling
Buitenbedrijfstelling Buitenbedrijfstelling 11.1 Apparaat buiten bedrijf stellen Voorwaarden Het apparaat is uit de Palletank voor Mengen verwijderd (zie Hoofdstuk ® „8.12 Mengproces voltooien”, pagina 339). Handelwijze Het apparaat uitschakelen. De stekker van de netaansluitkabel loskoppelen van de spanningsvoor- ziening op de plaats van opstelling. De stekker van de aardaansluitingskabel loskoppelen van de spannings- voorziening op de plaats van opstelling. -
Page 348: Transport
Transport 12 Transport 12.1 Transportbeveiliging monteren Wanneer het apparaat moet worden getransporteerd, bijvoorbeeld voor het verzenden van het apparaat: de transportbeveiliging moet worden gemonteerd. De transportbeveiliging bestaat uit 2 transportbeveiligingsschroeven, die bij levering in het apparaat zitten. Personeel: 2 personen, bediener Handelwijze Het apparaat aan de greep vasthouden en gecontroleerd naar beneden drukken. -
Page 349: Opslag En Verzending
Geretourneerde apparaten moeten schoon, gedecontamineerd en deskundig verpakt zijn. Transportschade en maatregelen voor de latere reiniging en desinfectie van het apparaat of van de onderdelen door Sartorius Stedim Biotech komen voor rekening van de afzender. WAARSCHUWING Letselgevaar door gecontamineerde apparaten! Apparaten die met gevaarlijke stoffen zijn gecontamineerd (ABC- contaminatie), worden niet teruggenomen voor reparatie en afvoer. -
Page 350: Afvoer
14.2.2 Afvoeren Voorwaarden Het apparaat is gedecontamineerd. Handelwijze Het apparaat afvoeren. Hiervoor de informatie over de afvoer op onze website (www.sartorius.com) in acht nemen. De verpakking afvoeren volgens de nationale wettelijke voorschriften. Handleiding Flexsafe Pro Mixer Drive Unit ®... -
Page 351: Technische Gegevens
Technische gegevens 15 Technische gegevens 15.1 Afmetingen en gewicht Eenheid Waarde Afmetingen (breedte x lengte x hoogte) 439 x 1242 x 1006 Gewicht 15.2 Omgevingscondities Eenheid Waarde Plaats van opstelling Binnenruimten Geen direct zonlicht Niet in de onmiddellijke nabijheid van verwarmingsinstallaties of airconditionings Geen stralingsbelasting door magnetrons, UV-lasers of röntgenstraling Vibratievrij Maximale hoogte boven de zeespiegel... -
Page 352: Elektromagnetische Compatibiliteit
(ook) woongebouwen van stroom voorziet. 15.4 Geschiktheid van Palletank voor Mengen en mengbags ® Alleen Sartorius Flexsafe Pro Mixer Bag ® Vulvolume van 50 L – 1000 L en maximaal 2 aansluitingen aan de voor- en onderkant Vulvolume van 50 L –... -
Page 353: Remote-Modus
Technische gegevens 15.6 Remote-modus Eenheid Waarde Goedgekeurd extern besturingssysteem Sartorius FlexAct ® Communicatieaansluiting Via een aansluitkabel voor remote-modus Type aansluitkabel voor remote-modus: inbouwstekker, afgeschermd, 8-polig, M12, A-gecodeerd, schroefmontage met M16-schroefdraad, 8 x 0,25 mm Ingangssignalen van externe besturing Streefwaarde voor roersnelheid bij 0 – 750 rpm 0 –... -
Page 354: Geluidsemissie
1000061414 17 Sartorius Service Sartorius Service is u graag van dienst bij vragen over het apparaat. Voor informatie over de service-adressen en services en voor het contact ter plaatse zie de website van Sartorius (www.sartorius.com). Bij vragen over het systeem en voor contact bij storingen de apparaatgegevens paraat houden en aan Sartorius Service meedelen, bijvoorbeeld serienummer, hardware, firmware, configuratie. - Page 355 E E C C / / E E U U D D e e c c l l a a r r a a t t i i o o n n o o f f C C o o n n f f o o r r m m i i t t y y Manufacturer Sartorius Stedim Systems GmbH...
- Page 356 E E G G - - / / E E U U - - K K o o n n f f o o r r m m i i t t ä ä t t s s e e r r k k l l ä ä r r u u n n g g Hersteller Sartorius Stedim Systems GmbH 34302 Guxhagen, German erklärt in alleiniger Verantwortung, dass das Betriebsmittel...
- Page 357 D D é é c c l l a a r r a a t t i i o o n n d d e e c c o o n n f f o o r r m m i i t t é é C C E E / / U U E E Fabricant Sartorius Stedim Systems GmbH 34302 Guxhagen, Allemagn déclare sous sa seule responsabilité...
- Page 358 D D e e c c l l a a r r a a c c i i ó ó n n d d e e c c o o n n f f o o r r m m i i d d a a d d C C E E / / U U E E Fabricante Sartorius Stedim Systems GmbH 34302 Guxhagen, Alemani declara bajo su sola responsabilidad que el equipo Flexsafe®...
- Page 359 D D i i c c h h i i a a r r a a z z i i o o n n e e d d i i c c o o n n f f o o r r m m i i t t à à C C E E / / U U E E Fabbricante Sartorius Stedim Systems GmbH 34302 Guxhagen, German dichiara sotto la propria responsabilità...
- Page 360 E E G G - - / / E E U U - - c c o o n n f f o o r r m m i i t t e e i i t t s s v v e e r r k k l l a a r r i i n n g g Fabrikant Sartorius Stedim Systems GmbH 34302 Guxhagen, Duitsland verklaart onder eigen verantwoordelijkheid dat het bedrijfsmiddel Apparaattype Flexsafe®...
- Page 363 The information and figures contained in these instructions correspond to the version date specified below. Sartorius reserves the right to make changes to the technology, features, specifications and design of the equipment without notice. Masculine or feminine forms are used to...
Need help?
Do you have a question about the Flexsafe Pro and is the answer not in the manual?
Questions and answers