Advertisement
Quick Links
®
iBoard
by APS
READ INSTRUCTIONS CAREFULLY BEFORE START ING
INSTALLATION. REMOVE CONTENTS FROM BOX AND
VERIFY ALL PARTS ARE PRESENT. ASSISTANCE IS
RECOMMENDED.
*ROCKER PANEL MOUNT
*DRILLING IS REQUIRED
Item
QTY
1#
2
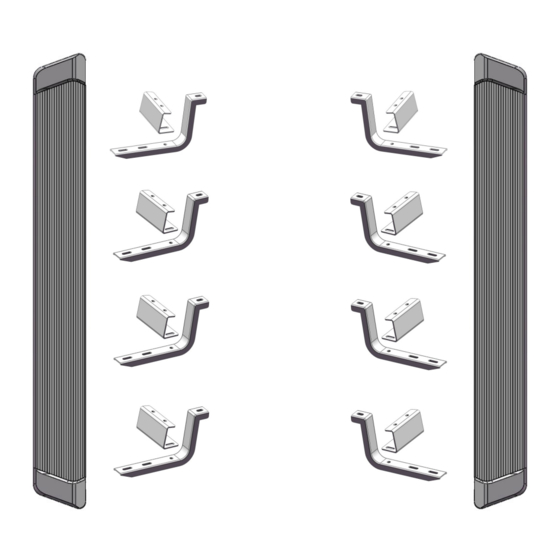
Driver/Passenger Front Mounting Brackets
2#
2
Driver/Passenger Front Support Brackets
3#
6
Mounting Brackets
4#
6
Support Brackets
5#
6
M8X1.25-25mm Hex Bolts
6#
24
M8X1.25-20mm Hex Bolts
7#
54
M8 Flat Washers
5 #
iBoard
Description
6 #
7 #
11 #
Customer Support: info@iboardauto.com
Fastener Size
Tightening Torque (ft-lbs)
6mm
8mm
10mm
12mm
14mm
Item
QTY
8#
24
M8 Nylon Lock Nuts
9#
6
M8 Clip Nuts
10#
2
ST6.3-25mm Hex Self Tapping Screws
M6X1-20mm Square Head Bolts
11#
16
12#
16
M6 Large Flat Washers
13#
16
M6 Nylon Lock Nuts
8 #
9 #
12 #
13 #
1
®
PART#: IB-R922
Required
6-7
16-18
31-32
56-58
92-94
Description
10 #
Rev. 20211001
√
√
X
X
X
Advertisement

Subscribe to Our Youtube Channel
Summary of Contents for APS iBoard IB-R922
- Page 1 ® iBoard ® iBoard by APS PART#: IB-R922 Fastener Size Tightening Torque (ft-lbs) Required READ INSTRUCTIONS CAREFULLY BEFORE START ING INSTALLATION. REMOVE CONTENTS FROM BOX AND √ VERIFY ALL PARTS ARE PRESENT. ASSISTANCE IS 16-18 √ RECOMMENDED. 10mm 31-32 12mm...
- Page 2 ® iBoard Front Driver Passenger Customer Support: info@iboardauto.com Rev. 20211001...
- Page 3 ® iBoard STEP 1 STEP 3 Start installation at the driver side of the vehicle, Remove Select (1) M8 Clip Nut. Line up the Clip Nut with the round hole splash guard from underside of vehicle. Drill 5/16”holes on the beside the support bracket, (Fig 3).
- Page 4 ® iBoard STEP 5 (1) M8X1.25-20mm Hex Bolt (2) M8 Flat Washers (1) M8 Nylon Lock Nut Move to the Mounting locations 2 & 4. Repeat Steps 2-4 to install Support Brackets and Mounting Brackets. Do not fully Support Bracket tighten at this time.
- Page 5 ® iBoard STEP 9 (2) M6X1-20mm Square Head Bolts (2) M6 Large Flat Washers (2) M6 Nylon Lock Nuts Repeat Steps 1-8 for the other side Running Board installation. The installation is completed. Attention Do periodic inspections to the installation to make sure that all hardware is secure and tight.


Need help?
Do you have a question about the iBoard IB-R922 and is the answer not in the manual?
Questions and answers