Advertisement
Quick Links
A41.1903
Operating Microscope, One Head 0~180° ,
Manual Step Zoom, 4.8x~16x, For Dental, ENT,
Ophthalmology, Gynecology
Instruction Manual
To ensure the safety and obtain satisfactory performance, please study this
instruction manual thoroughly before start to use your instrument.
www.optoedu.com
Page 1 of 14
sale@cnoec.com
Advertisement

Related Manuals for OPTO-EDU A41.1903


Summary of Contents for OPTO-EDU A41.1903
- Page 1 A41.1903 Operating Microscope, One Head 0~180° , Manual Step Zoom, 4.8x~16x, For Dental, ENT, Ophthalmology, Gynecology Instruction Manual To ensure the safety and obtain satisfactory performance, please study this instruction manual thoroughly before start to use your instrument. www.optoedu.com Page 1 of 14...
- Page 2 A41.1903 + beam slitter + demonstrator + video camera adapter + digital camera + computer General Description Operation Microscope Model A41.1903 (hereafter referred to as simply instrument) is a medical optical instrument with multiple function and application. The optical system of the instrument equipped with 0-180°...
- Page 3 The instrument is suitable for various diagnosis, examination and general microscope operation. Due to its flexible and stable structure and easy operation, the instrument can be widely used for micro-operation in dental especially, and also can be used for micros-operation in ophthalmology, ear-nose-throat, gynecology and surgery.
- Page 4 2.2 Output: DC12V3A, 36W 2.3 Table of Optical Characteristics for Operation Microscope: A41.1903 A41.1903 Series Operation Microscope Optical Characteristics Eyepiece WF12.5x/20mm F=400mm Focal Length (mm) F=200mm F=250mm F=300mm (Optional) (Optional) Zoom Body 1.6x 1.0x 0.6x 1.6x 1.0x 0.6x 1.6x 1.0x 0.6x...
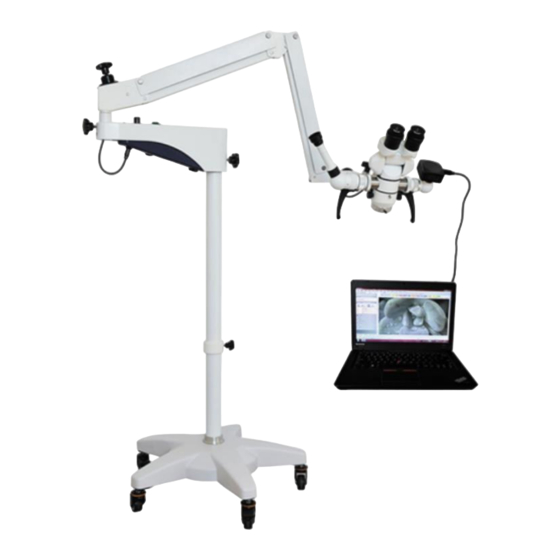
- Page 5 1. Base with wheels 2. Column 3. Power supply box 4. LED lamp plug 5. Torque adjusting hand wheel 6. Arm assembly 7. 0-180° Binocular 8. Eyepiece 9. CCD camera (optional) 10. Demonstrator (optional) 11. Beamsplitter (optional) 12. Magnification changer 13. Video camera adapter (optional) 4.
- Page 6 Photo adapter and other accessories. (1) Universal joint: Used to adjust viewing angle and direction. (2) Filter: Built-in green and yellow filters. (3) Magnification changer knob: Magnification can be changed by turning this knob. (4) Binocular with eyepiece: 8X. (5) Eyepiece: 12.5X. (6) Fine focusing lever: It is used for fine focusing.
- Page 7 (3) Output connector (Coaxial 5.5x2.1mm plug) Note: Non-professional maintenance staffs do not open the power supply adapter. 4.5 The description of other parts is as follows (see Figure 1): a. Beamsplitter 11 (optional): It is used to divide the light. It is provided with connections at left and right side for the connection of video camera adapter and demonstrator or SLR camera adapter etc.
- Page 8 5.3 Installation of arm Loosen arm rotating angle limit screw and locking handwheel on the power box, insert the shaft of arm into hole in the power box and screwing in arm rotating angle limit screw and locking handwheel in power supply box. Insert the LED lamp plug into the DC output socket for LED lamp of power supply box.
- Page 9 delivered. If the used finds the torque not suitable (too loose or too tight when turning), it can be adjusted by special person in the following way: 6.2.1 Screw off locking knob 1, screw 2 and nut 3. Tighten nut 4 to increase torque or vice versa. Then screw down nut 3, tighten screw 2 and screw 2 and screw in knob 1.
-
Page 10: Troubleshooting Guide
package. Pay attention to moisture and vibration. If the instrument is to be stored for a long period, it shall be cleaned and put into the package and kept in a dry and well ventilated store room without any corrosive chemicals. The relative humidity of the room shall not exceed 80% and the temperature shall be controlled in the range of -40 °... - Page 11 connection of LED lamp plug of microscope arm and the DC output socket for LED lamp in power supply box. If the connection is OK, please use the multi-meter to check whether there is a DC output voltage (about DC5.5-6.0v without load) between two jacks of DC output socket for LED lamp on the bottom of the power supply.
- Page 12 11.5 Use the multi-meter to check whether there is a DC input voltage (about DC5.5-6.0v without load) between LED- and LED+ of LED bulb. If No, please check connection of power line from power supply box to LED bulb. If yes, please replace LED bulb. 11.6 If you have two operation microscopes in your hand, you can cross check, for example, install this microscope whose LED bulb no light to the power supply box of other microscope.
- Page 13 B. Remove four screws in red circle and separate the LED lamp seat from the microscope head. Lose wire clip. C. Remove two screws fixed LED bulb and separate LED bulb from LED bulb seat. Welding-off two electric wire from LED bulb and remember the welding position for each electronic wire. Weld two electric wires to the LED lamp according to original welding position.
- Page 14 Packing List of A41.1903 Operation Microscope A. Microscope Carton: 1. Balance arm with binocular and magnification changer………………….1 set 2. Beamsplitter (optional)…………………………………………………….…1 pc 3. Video camera adapter (optional)…………….……………………..……….1 pc 4. CCD camera (optional)………………….……………...……………………1 pc 5. Demonstrator(optional)……………………………….…………..……….…1 pc 6. Objectives F=200mm (fitted on the microscope)………….………………..…….………1 pc F=250mm ………………………………………….………………….….……..1 pc...
Need help?
Do you have a question about the A41.1903 and is the answer not in the manual?
Questions and answers