
Related Manuals for OPTO-EDU A33.5121


Summary of Contents for OPTO-EDU A33.5121
- Page 1 A33.5121 7" LCD Biological + USB Portable Dual Lens Digital Microscope Instruction Manual www.optoedu.com sale@cnoec.com...
- Page 2 Precautions Before Using Microscopes 1. Put on the dust cover in time after use to avoid dust on the lens 2. Optical products are precision parts, please handle with care 3. Do not place microscope in damp or wet condition 4.
-
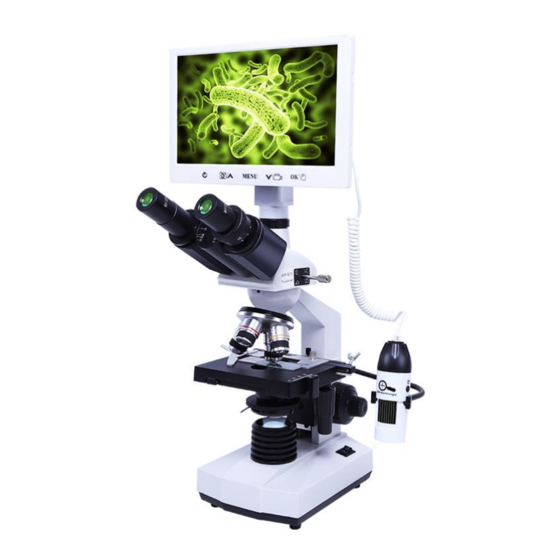
Page 3: Product Structure
Product Structure The Microscope Body Adopts All-Metal Process LCD Screen Eyepiece Set Bolt Screen Data Cable for the Handheld Binocular Head microscope Microscope Arm Objectives Working Stage Metal Holder Light Source Hand-held Microscope Microscope Base Power Switch X/Y Moving Knob www.optoedu.com sale@cnoec.com... - Page 4 LCD Power Switch Eyepiece Teaching Head Fix Screw of Head Slide Holder Abbe Condenser Coarse Focusing Knob Fine Focus Knob Brightness Adjustment Knob Power Socket Power On Indicator Micro SD Card Slot USB 2.0, Output to LCD, PC or Mobile Phone DC 5V/2A, Power Port 3.5/1.35 Reset Switch www.optoedu.com...
- Page 5 Operation interface introduction In the image preview mode, short press the MUNE button once, the dialog box on the left will appear, and you can set the image parameters; press it again, the dialog box on the right will appear, and you can set the system. Camera-Resolution-Image Quality- Time/Date - Auto Power Off - Screen Sharpness-Video Resolution-Exposure...
- Page 6 USB To Computer Use the USB data cable to connect to the computer, the following dialog box will appear on the screen, you can use the up and down keys to select the data access mode, and then press the OK key to confirm. 1.
- Page 7 Introduction to Image Processing Software Software Interface Software language selection Language Sidebar System Camera Image Image File Measurement Resolution Photo Video Selection Settings Selection Scale Directory Calibration Selection Diameter Angle Area Hand Add Text Move Parallel Line Straight Line Recently Delete Drawn Measurement...
-
Page 8: Abbe Condenser
Image Inversion And Camera Selection And Report Generation Resolution Settings Abbe Condenser Iris Diaphragm Abbe Condenser Filter Abbe Condenser for image enhancement, need to rotate the height of Abbe condenser to match different magnification objectives, and according to different specimens, the aperture size of Abbe can be adjusted to achieve the best effect of the image. -
Page 9: Display Installation
Objective Lens Color Ring Identification 4x - red 10x - yellow 40x-(bomb)-blue 100x (oil) - white (Please use alcohol to wipe the lens clean after 100x use) 100x Objective When using a 100x objective, a drop of cedar oil is required on the specimen (assisted conduction image). - Page 10 Display Key Description On-off button & image switching: After the microscope is powered on, press and hold the button (2 seconds) to turn on the microscope, and press and hold the button for 2 seconds again to turn off; when the microscope is on, short press this button to switch the image between the main lens and the handheld microscope lens .
- Page 11 Handheld Microscope Installation Brightness Adjustment The handheld microscope is mounted on a metal stand, align the bayonet of the bracket with the slot of the handheld microscope, and then gently buckle it. Insert the MINI USB cable into the USB port of the LCD screen.
- Page 12 www.optoedu.com sale@cnoec.com...
Need help?
Do you have a question about the A33.5121 and is the answer not in the manual?
Questions and answers