Advertisement
Quick Links
Advertisement

Related Manuals for OPTO-EDU A11.6603


Summary of Contents for OPTO-EDU A11.6603
- Page 1 A11.6603 Biological Microscope Instruction Manual...
-
Page 2: Table Of Contents
CONTENTS Attentions …………………………………………………2 1. Application ……………………………………………3 2. Specifications …………………………………………4 3. Installation and use ……………………………………4 4. Maintenance ……………………………………… 10 5. Troubleshooting ………………………………………13... -
Page 3: Attentions
ATTENTIONS 1. Disassembly only by the professionals The microscope has been adjusted before shipping, Unprofessional-person should not disassemble and remove any other parts. Disassemble and remove any other parts will result in equipment damage . If you have any questions, please contact with manufacturer or local distributor. -
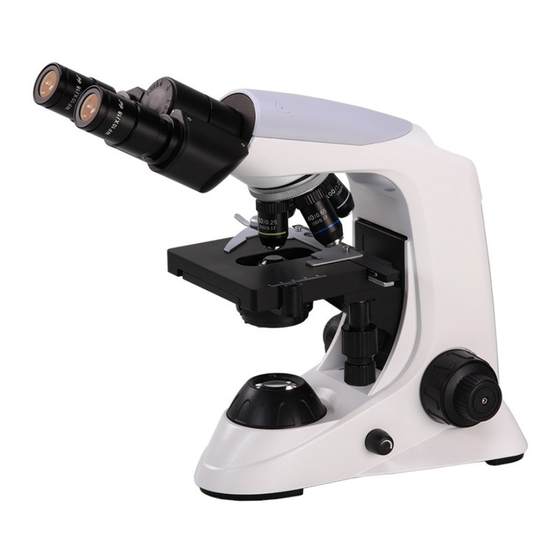
Page 4: Application
Binocular head Monocular head Nosepiece Eyepiece Objective Main body Stage Clamps Stage up-down knob Coarse & fine focusing unit Condenser Aperture diaphragm lever Power switch Collector Power supply base Fig.1 B Series Microscope Outside Drawing 1. Application B series biological microscope is designed for teaching, clinical verify. The series microscope with original style, steady structure, convenient operation and clear image is suitable for observing various biological specimens, and mostly applied in school, college, hospital, etc. -
Page 5: Specifications
2. Specifications Item B series Optical system Finity Mechanical 160mm tube length Total 40X~1600X Magnification Category Achromatic, plan achromatic, semi-plan Objective Magnifying Based on the standard GB/T 2609. power Magnification 10X. 16X(Optional) Obervation Binocular. Monocular (Optional) method Eyepiece Observation Binocular . Monocular(Optional), tube Trinocular(Optional)... - Page 6 and drive them into the holes of nosepiece orderly and tightly according to the multiplying power in order. Take out the oil bottle and dust cover, and place it properly for convenient use. ▲Please totally take out the devices in the packaging box. ▲Please don’t throw package waste away freely to protect the enviroment.
- Page 7 Interpupillary distance dial Clamps swtich knob Diopter Eyepiece Specimen adjusting ring Stage vertical adjusting Condenser knob adjusting Stage handwheel horizonal Aperture adjusting Right side Left side diaphragm knob lever Fig.2 Stage and condenser Fig.3 Adjustment of interpupillary distance and diopter 2.
- Page 8 eyepiece, at the same time, adjust the diopter ring of the left eyepiece tube(diopter difference compensation)to make the image of left eyepiece clear as same as the right eyepiece. 3.2.5 Focusing unit(Fig.4) Usually 10X objective with large field of view and long depth of field should be used for focusing adjustment first.
- Page 9 is to take the tooth-like part of the nosepiece to turn it, and make the objective into correct position and into the bright path. 3.2.6 Use of tension adjustment knob (Fig.4) The tension adjustment ring can adjust the tension of the coarse and fine focusing unit to prevent the stage from sliding down automatically and to improve the comfort of operation.
- Page 10 3. 2.8 Use of powersupply Plug the power line in base socket ( Fig.5) , plug the other end of power line into power socket. Adjusting LED lamp brightness by slide the base switch. Fig.6 Reflector Potentiomer Socket Fuse holder Fig.5 Replacement of fuse 3.
-
Page 11: Maintenance
pulled down. If immersion oil used, please clean objective and specimen soon. Finally, cover microscope with dust cover. Please take eyepiece and objectives out from microscope if user will stop using it for a long time, and place eyepiece and objectives into drier with drying agent. - Page 12 and mist damage when microscope is used in heavy humidity area. 4.2.4 Please pay attention to prevent microscope from violent shake and vibration in application and in carrying. Don’t drag it on the surface of worktable to avoid damage microscope and worktable. Replacement of bulb 4.3.1 Halogen Knurled...
- Page 13 G. Close the lampholder cover, and tighten the knurled thumb screw. 4.3.2 LED Lamp A. Cut off the power: Unplug the power in base. B. Open the base: Laying the microscope steadily on the table,unscrew the fixed screw and pull out the buttom base cover. (Fig.8) Fixed screw Fig.8 C.
-
Page 14: Troubleshooting
▲ After working for above 10 hours continuously, must cut off the microscope about 30 minutes. 4.4 Replacement of fuse(Fig.5) A. Cut off power of microscope, and pull out the plug. B. Unscrew fuse cap in the back of base, take out old fuse. C. - Page 15 Trouble Causation Remedy Lens (objective, eyepiece, condenser, light Clean it collector) has dust. Position of condenser is too low. Higher condenser Cover glass of specimen doesn’t meet the Use required thickness cover requirement. glass. (0.17mm) Cover glass of specimen isn’t in up Place specimen correctly.
Need help?
Do you have a question about the A11.6603 and is the answer not in the manual?
Questions and answers