Table of Contents
Advertisement
Quick Links
Advertisement
Table of Contents

Related Manuals for iTero Element 5D Plus


Summary of Contents for iTero Element 5D Plus
- Page 1 Element® 5D Plus User manual it starts with...
- Page 3 The information contained in this manual is subject to Trademarks change without notice. Align, Invisalign, ClinCheck and iTero among others, are The hardware and software described in this manual are trademarks and/or service marks of Align Technology, supplied under a Sales and Services Agreement and Inc.
- Page 4 For persons who have been diagnosed with Epilepsy, there is a risk of epileptic shock from the flashing light of the iTero scanner. These persons should refrain from any eye contact with the flashing light associated with the system during operation.
- Page 5 Element® 5D Plus User manual Symbols The following symbols may appear on iTero Element 5D Plus hardware components and may appear within this document and other iTero Element 5D Plus literature. CAUTION: US Federal Law restricts this device to sale...
- Page 6 This side should be up. Use-by date. This symbol is accompanied by a date to IEC 60417-5031: Direct current. indicate that the iTero Element 5D wand barrier sleeves should not be used after the end of the year, month, or day shown.
- Page 7 Element® 5D Plus User manual Safety instructions Before beginning to work with the system, all users are required to read these safety instructions. Power supply Power is supplied to the system via an internal medical-grade power supply. Charging – the scanner battery will be fully charged after being plugged into a power source for Battery power 2.5 hours.
- Page 8 Element® 5D Plus User manual Avoid twisting, knotting, pulling, and stepping on the wand cable and the power cable. When the system is not in use, the wand should be placed in the cradle with the probe facing the touch screen, in order to avoid eye contact with the laser beam, flickering white LED emission, and 850nm LED emission.
-
Page 9: Table Of Contents
Logging in to the scanner for the first time Registering the scanner – Make It Mine process Working in Demo Mode 2.4.1 Exiting Demo Mode Working with the iTero Element 5D Plus scanner Logging in to the scanner 3.1.1 Resetting your password 3.1.2... - Page 10 Viewing previous scans in the Viewer Working with orders Viewing messages Working with MyiTero iTero scanner features and tools Comparing previous scans using iTero TimeLapse technology Invisalign Go system Invisalign Outcome Simulator viii © 2020 Align Technology, Inc. All rights reserved.
- Page 11 Element® 5D Plus User manual Invisalign Progress Assessment Editing tools 9.5.1 Deleting a segment 9.5.2 Deleting a selection 9.5.3 Filling in missing anatomy 9.5.4 Disabling A.I. cleanup Working with the Eraser tool Working with the Occlusal Clearance tool Working with the Edge Trimming tool Working with the Die Separation tool 9.10...
- Page 12 Element® 5D Plus User manual Firewall Wi-Fi tips Align hostname recommendations EMC declaration FCC compliance information statement (SDoC) iTero Element product security whitepaper System specifications © 2020 Align Technology, Inc. All rights reserved.
- Page 13 Table of figures Figure 1: Front view of the scanner Figure 2: Rear view of the scanner Figure 3: iTero Element 5D Plus wand Figure 4: Protective sleeve Figure 5: Wand barrier sleeve Figure 6: Visible light spectrum showing NIRI on the 850nm wavelength Figure 7: Reflective concept –...
- Page 14 Element® 5D Plus User manual Figure 33: Forgot Password button Figure 34: Email field for forgotten password Figure 35: Security answer field Figure 36: Login window with notification about Windows security updates Figure 37: Home screen with notification about Windows security updates...
- Page 15 Element® 5D Plus User manual Figure 68: Slide the rigid section of the wand barrier sleeve into place Figure 69: Gently pull the transparent sheath to cover the entire wand Figure 70: New Scan window showing an empty Rx and the progress toolbar at the top of the window Figure 71: New Scan window –...
- Page 16 Figure 132: Messages page Figure 133: iTero TimeLapse – selecting the scans to compare Figure 134: iTero TimeLapse window showing the highlighted changes between the scans Figure 135: Area of interest from the first scan displayed in the animation window...
- Page 17 Element® 5D Plus User manual Figure 138: Progress Assessment window Figure 139: Editing tools Figure 140: Delete Segment tool Figure 141: Delete Selection tool Figure 142: Expanded Delete Selection tool Figure 143: Selected area of the anatomy is deleted Figure 144: Fill tool Figure 145: Areas that require scanning are highlighted in red –...
- Page 18 Element® 5D Plus User manual Figure 173: View mode – with Snapshot tool Figure 174: Screen capture thumbnail is displayed after taking a screen capture Figure 175: Screenshot with an annotations toolbar Figure 176: Annotations toolbar Figure 177: Adding text to the screenshot...
-
Page 19: Introduction
(e.g. aligners, braces, appliances, etc.) and accessories. iTero Element 5D Plus software is used with the iTero scanner in capturing 3D digital impressions of teeth, oral soft tissue and structures, and bite relationship. The software controls the processing of the data, facilitating the integration of data, and exporting of the data for CAD/CAM fabrication of dental restorations, orthodontic devices, abutments, and accessories. -
Page 20: Itero Element 5D Plus Hardware
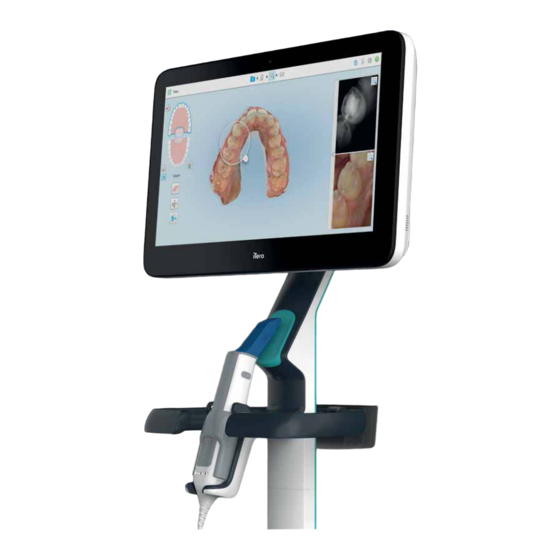
Element® 5D Plus User manual Refer to our website http://www.itero.com to learn how the iTero Service can enhance your business by increasing patient satisfaction, improving clinical outcomes, and enhancing office efficiency. iTero Element 5D Plus hardware Front view of the scanner... -
Page 21: Itero Element 5D Plus Wand
Detachable wand cable with USB connector Figure 3: iTero Element 5D Plus wand Note: In order to protect the wand cable if too much pulling force is applied, the cable cap is designed to detach from the wand. If this happens, gently reattach it. -
Page 22: Itero Element 5D Plus Software
1.3.1.1 Protective sleeves and wand barrier sleeves The following accessories must be used with the iTero Element 5D Plus wand: Protective sleeve: When the scanner is not in use, use the blue protective sleeve to protect the optical surface of the wand. -
Page 23: Working With Near Infra-Red Imaging (Niri)
Element® 5D Plus User manual Working with near infra-red imaging (NIRI) NIRI is a method of spectroscopy that uses the near-infrared region of the electromagnetic spectrum (850nm). Figure 6: Visible light spectrum showing NIRI on the 850nm wavelength When the wand is positioned above the tooth, NIR images are captured. -
Page 24: Figure 8: Interproximal Carious Lesion
NIR images are captured automatically and seamlessly during the scan, from every angle used for the 3D scanning, and all collected information can then be reviewed using the iTero Element 5D Review tool. Note: NIR images should be used in conjunction with the current standard of care for caries detection, and do not replace it. -
Page 25: Limitations
For more information on using NIRI and the clinical benefits, please refer to the iTero Element 5D Clinical Guide. About this manual This manual provides general information and an overview of the iTero Element 5D Plus scanners and software. - Page 26 Element® 5D Plus User manual © 2020 Align Technology, Inc. All rights reserved.
-
Page 27: Getting Started
Element® 5D Plus User manual Getting started Assembling the iTero Element 5D Plus scanner The scanner packaging is designed in a way that provides a simple and easy assembly process. Follow the instructions below to assemble the scanner. Contact iTero Support for additional help. - Page 28 Element® 5D Plus User manual 1. Remove the foam covering the 3. Attach the wheel base (C) to the 4. Move the wheel stand to an post (B). end of the post (B) and tighten upright position and lock at least 2 Note: The two Allen keys (A) are using the large Allen key.
- Page 29 Element® 5D Plus User manual 8. Attach the cradle (G) to the post 9. Carefully remove the computing 10. Standing behind the wheel stand, (B), and tighten using the small unit (H) from its protective mount the computing unit on the Allen key.
-
Page 30: Figure 9: Removing The Wand From The Cradle
Element® 5D Plus User manual 15. Secure the power cable (J) in the 16. For remote training or support 17. Plug the power cable (J) into a two cable clips, making sure it is sessions, position the webcam power outlet and then press the fully inserted. -
Page 31: Figure 10: Moving The Scanner
Element® 5D Plus User manual When moving the scanner, carefully wrap the power If the scanner needs to be lifted, use the upper handle cable around the upper handle and then use the upper and the post. handle to push the scanner. -
Page 32: Logging In To The Scanner For The First Time
User Password Company ID You will receive an email from an iTero representative with login credentials and detailed information on how to proceed with the Make It Mine process. Note: If you accessed the Demo Mode from the Welcome page before registering the scanner, you will have to restart the scanner to access the Make It Mine option. -
Page 33: Figure 13: Connect Page Listing The Available Networks
Element® 5D Plus User manual To register the scanner: 1. In the Welcome page, select the required language. 2. Tap Make It Mine. The Connect page is displayed, showing a list of available networks. Figure 13: Connect page listing the available networks... -
Page 34: Figure 14: Entering The Security Key
Element® 5D Plus User manual 3. Select the clinic network from the list and then tap Connect. You are prompted to enter the network security key. Figure 14: Entering the security key 4. Enter the security key and then tap Connect. -
Page 35: Figure 16: Verifying The Communication With Align
Element® 5D Plus User manual 5. Tap Next. The communication with Align is verified. Figure 16: Verifying the communication with Align 6. When the verification is complete, tap Next. The Time Zone page is displayed. Figure 17: Selecting the time zone... -
Page 36: Figure 18: Registering The System To Customize The Setup
Figure 18: Registering the system to customize the setup 8. Enter your email, password, and company ID in the fields provided, and then tap Register. The Scanner Configuration page is displayed, showing your iTero subscription package. Figure 19: iTero subscription package... -
Page 37: Figure 20: License Agreement
Element® 5D Plus User manual 9. Tap Next. The License Agreement page is displayed. Figure 20: License agreement 10. After reviewing the license agreement, select the check box to accept the terms of the agreement and then tap Next. -
Page 38: Working In Demo Mode
Demo Mode is currently running. Demo Mode is available from the Welcome screen when logging in for the first time, or at any point by tapping the iTero logo on the home screen. Note: Scans captured in Demo Mode cannot be saved or submitted for patient treatment. -
Page 39: Figure 23: Itero Element Logo
Element® 5D Plus User manual To enter Demo Mode after logging in: 1. Tap the iTero Element logo at the top of the scanner screen. Figure 23: iTero Element logo 2. Tap Demo Mode. Figure 24: Demo Mode option... -
Page 40: Figure 25: Login Window With A List Of Demo Users
The Login window is displayed, enabling you to select the demo user. Figure 25: Login window with a list of demo users 3. To view iTero restorative cases, select the Dr. Demo, iTero user from the Doctor Name drop-down list. Figure 26: Demo Login button... -
Page 41: Figure 27: Demo Mode Home Screen
A list of demo cases is displayed in the Past Orders pane. In addition to the examples of restorative and orthodontic scan types, the following iTero Element 5D Plus demo cases with NIRI are displayed in the list of Past Orders:... -
Page 42: Figure 28: Past Orders Pane - Options
Element® 5D Plus User manual 6. Tap the required demo case. The selected case is expanded to show the following options: Figure 28: Past Orders pane – options For more information on working with orders, see section 6. © 2020 Align Technology, Inc. All rights reserved. -
Page 43: Exiting Demo Mode
Element® 5D Plus User manual 2.4.1 Exiting Demo Mode To exit Demo mode: Tap the iTero Element logo and then tap Exit Demo to exit the demo mode. Figure 29: Exiting Demo mode © 2020 Align Technology, Inc. All rights reserved. - Page 44 Element® 5D Plus User manual © 2020 Align Technology, Inc. All rights reserved.
-
Page 45: Working With The Itero Element 5D Plus Scanner
Figure 30: Login window Make sure you have your MyAligntech account information ready when logging in to the iTero scanner. You need your name, account email, and password. Fill in all the necessary fields and then tap the Login button. -
Page 46: Figure 31: Unexpected Shutdown Notification
Element® 5D Plus User manual Figure 31: Unexpected shutdown notification To log in to the scanner: 1. Select your user name from the Doctor Name drop-down list. 2. Enter the email address you used when registering with myaligntech.com. Your email address is displayed automatically if you selected the Remember Me check box in a previous login session. -
Page 47: Figure 32: Itero Home Screen
Element® 5D Plus User manual The iTero home screen is displayed. Figure 32: iTero home screen Note: In order to ensure that all Windows security patches are up-to-date, you will see a notification at the bottom of the Login window and home screen as soon as security updates are available. For more information on installing security updates, see section 3.1.2. -
Page 48: Resetting Your Password
Element® 5D Plus User manual 3.1.1 Resetting your password You can reset your password, if required. To reset your password: 1. In the Login window, tap Forgot Password. Figure 33: Forgot Password button A window is displayed, describing what you should do next. -
Page 49: Figure 34: Email Field For Forgotten Password
Element® 5D Plus User manual Figure 34: Email field for forgotten password 2. In the Email field, enter the email address you used to register to myaligntech.com. 3. Tap Submit. Your predetermined security question is displayed. Figure 35: Security answer field... -
Page 50: Installing Windows Security Updates
3.1.2 Installing Windows security updates In order to ensure that the scanner is compliant with all cyber-security standards, whenever the iTero software is upgraded, the relevant Windows security updates will be downloaded on the scanner and be available for installation. -
Page 51: Logging Out Of The Scanner
Element® 5D Plus User manual Figure 37: Home screen with notification about Windows security updates A Windows progress bar is displayed during the installation. Once the updates have been installed, the scanner restarts and the Login page is displayed. -
Page 52: Moving The Scanner
Element® 5D Plus User manual To shut down the scanner: 1. Close all files and applications. 2. Press and release the Power button located on the top right of the screen to shut down the system. CAUTION: Never press the Power button for more than 4 seconds. This activates a hard reset, which can cause problems such as gray and blue screens. -
Page 53: User Interface
User interface The iTero system provides an intuitive user interface for performing digital scans for Restorative or Orthodontic use. The touch screen and wand buttons are used to respond to screen instructions during the scanning process. -
Page 54: Figure 40: Itero Home Screen
Element® 5D Plus User manual Figure 40: iTero home screen The following buttons are displayed on the home screen: Displays the status of the battery: A lightning bolt indicates that the scanner is connect to the power, and the battery is charging. -
Page 55: Figure 42: Help Overlay
Element® 5D Plus User manual Learning Center: Tap to access training materials and educational videos for the iTero scanner. Lock: Tap to log out of your account whenever the scanner is not in use, as described in section 3.2. This helps ensure that the dental practice is HIPAA compliant and that all medical information is secure. -
Page 56: Scanner Toolbar
Element® 5D Plus User manual Tap to access the iTero Element 5D Plus e-manual. Tap anywhere to close the Help overlay and return to the relevant screen. New Scan: Tap to open the New Scan window to fill in the Rx before starting a new scan. -
Page 57: Figure 44: Percentage Of Remaining Battery Charge
Element® 5D Plus User manual The 4 center buttons indicate the current status of the scan process. Tap the buttons to navigate through the scan flow. Tap to return to the home screen. Displays the current stage in the scanning process, also indicated by the relevant highlighted button in the toolbar. -
Page 58: Figure 45: Help Overlay
Help overlay. Note: Please call Customer Support before trying to connect remotely. Tap to access the iTero Element 5D Plus e-manual. Tap anywhere to close the Help screen and return to the relevant screen. © 2020 Align Technology, Inc. All rights reserved. -
Page 59: Touch-Screen Gestures
Element® 5D Plus User manual 3.5.2 Touch-screen gestures The iTero software supports touch-screen (also known as multi-touch) gestures. These gestures are predefined motions used to interact with multi-touch devices. Examples of common touch-screen gestures: Defining the scanner settings The scanner settings enable you to define your preferences and the settings that are displayed by default when you use the scanner. -
Page 60: Figure 46: Settings Window
Element® 5D Plus User manual Figure 46: Settings window 2. Tap the settings you would like to define. Computer settings, described in section 3.6.1 User settings, defined in section 3.6.2 System settings, defined in section 3.6.3 The relevant window opens. -
Page 61: Defining The Computer Settings
Element® 5D Plus User manual 3.6.1 Defining the Computer settings The Computer settings enable you to define the brightness, volume, Wi-Fi, and time- zone settings for the scanner. 3.6.1.1 Defining the default brightness setting To define the default brightness setting, tap the Brightness button, move the slider to the required brightness level, and then tap to save the changes and return to the Settings window. -
Page 62: Figure 49: List Of Nearby Wi-Fi Networks
Element® 5D Plus User manual 3.6.1.3 Defining the Wi-Fi settings The first time you connect the scanner to the clinic’s Wi-Fi network, you will need to add the password. After that, by default, the scanner will connect automatically. To connect to the Wi-Fi network: 1. -
Page 63: Figure 50: Connecting To The Clinic Wi-Fi Network
Element® 5D Plus User manual 3. Enter the network security key (password) in the window that opens and then tap Connect. Figure 50: Connecting to the clinic Wi-Fi network The scanner connects to the Wi-Fi network, and the status changes to Connected. -
Page 64: Figure 52: Time Zone Settings
Element® 5D Plus User manual 3.6.1.4 Defining the time zone To define the time zone, tap the Time Zone button, select the time zone from the drop-down list, and then to save the changes and return to the Settings window. -
Page 65: Defining The User Settings
Element® 5D Plus User manual 3.6.2 Defining the User settings The User settings enable each user to define the settings that are displayed by default when the specific user logs in to the scanner. 3.6.2.1 Defining the scan settings... - Page 66 Element® 5D Plus User manual 2. Select the default scanning preferences from the Scan Settings window. Scan setting Scan options Scanning Position Select your position while scanning the patient: Behind the patient In front of the patient Gyro Orientation...
-
Page 67: Figure 54: Only Scanning Range Is Highlighted
Element® 5D Plus User manual Scan setting Scan options Highlight recommended Select this check box to highlight only the scanning range on the scanning range check box navigation controls. Figure 54: Only scanning range is highlighted Additional Scan Feedback Select the relevant check boxes to display areas of missing anatomy while scanning, as described in section 4.5.3.1. -
Page 68: Figure 55: Rx Settings Window
Element® 5D Plus User manual 3.6.2.2 Defining the Rx settings You can define the settings that are displayed by default when you open the Scan Details window to fill in a new Rx. To define the Rx settings: 1. Tap the Rx Settings button. - Page 69 Element® 5D Plus User manual 2. Select the default Rx preferences from the Rx Settings window. Rx setting Rx options Tooth ID Select the default tooth ID system: Quadrant Shade System Select the default shade system: VITA Lumin VITApan 3D Master...
-
Page 70: Figure 56: Rx Settings Window - Niri Captures Option Enabled
Element® 5D Plus User manual If required, NIRI capture can also be disabled for a specific scan, as described in section 4.4.2. To disable NIRI data capture, by default: 1. In the Settings window, tap Rx Settings. 2. In the Rx Settings window, toggle the NIRI Captures option to Disabled. -
Page 71: Figure 58: Rx Settings Window - Niri Captures Option Disabled
Element® 5D Plus User manual 3. Tap OK to confirm. Figure 58: Rx Settings window – NIRI Captures option disabled © 2020 Align Technology, Inc. All rights reserved. -
Page 72: Figure 59: Signature Settings Window
Element® 5D Plus User manual 3.6.2.4 Defining the signature settings You can define the default settings that are displayed when sending an order to the lab. To define the signatures settings: 1. Tap the Signature Settings button. Figure 59: Signature Settings window 2. -
Page 73: Defining The System Settings
Element® 5D Plus User manual 3.6.2.5 Defining the language settings Tap the Language button, select the required language from the drop-down list, and then tap to save the changes and return to the Settings window. Figure 60: Language Settings window 3.6.3... -
Page 74: Figure 61: Login Settings Window
Element® 5D Plus User manual To define the period of inactivity: 1. Tap the Login Settings button. The Login Settings window is displayed. Figure 61: Login Settings window 2. Select the period of inactivity after which the user will be logged out of the scanner. (Min time: 10 minutes, Max time: 8 hours) 3. -
Page 75: Figure 62: Diagnostics Window
Element® 5D Plus User manual 3.6.3.2 Running diagnostics Tap the Diagnostics button to check the network connection and speed. To run system diagnostics: 1. Tap the Diagnostics button. The network connection and speed are checked. Figure 62: Diagnostics window 2. -
Page 76: Figure 63: Licensing Information Window
Element® 5D Plus User manual 3.6.3.3 Licenses Tap the Licenses button to view a list of third-party software components installed on the scanner and then tap return to the Settings window. Figure 63: Licensing Information window © 2020 Align Technology, Inc. All rights reserved. -
Page 77: Figure 64: System Information Window
Element® 5D Plus User manual 3.6.3.4 System information Tap the System Information button to view details about the software versions currently installed and the hardware serial numbers and ID, and then tap to return to the Settings window. Figure 64: System Information window 3.6.3.5... -
Page 78: Figure 65: Export Settings Window - Deleting Exported Files
Element® 5D Plus User manual To edit the export settings: 1. Tap the Export Settings button. 2. Select the number of days after which exported files should be deleted. By default, this is set at 30 days. Figure 65: Export Settings window – deleting exported files 3. -
Page 79: Starting A New Scan
To apply a wand barrier sleeve: 1. Place a new wand barrier sleeve in its original packaging near the iTero Element 5D wand. Note: Inspect the packaging to verify that there is no visible damage. Replace it if any damage is observed. -
Page 80: Figure 67: Remove The Wand Barrier Sleeve From Its Packaging
Element® 5D Plus User manual Figure 67: Remove the wand barrier sleeve from its packaging 4. Slide the rigid section of the wand barrier sleeve onto the optical tip of the wand until you feel a “click”, making sure that the transparent sheath is not pinched between the rigid section of the wand barrier sleeve and the wand. -
Page 81: Starting The Scan
Element® 5D Plus User manual 5. Gently pull the transparent sheath to cover the entire wand. Figure 69: Gently pull the transparent sheath to cover the entire wand Note: The white tape on the transparent sheath is for manufacturing purposes only, and should be ignored. -
Page 82: Figure 70: New Scan Window Showing An Empty Rx And The Progress Toolbar At The Top Of The Window
Element® 5D Plus User manual Figure 70: New Scan window showing an empty Rx and the progress toolbar at the top of the window The New Scan window is made up of the following areas: Doctor: Displays the doctor’s name and license number. -
Page 83: Patient Management
Element® 5D Plus User manual The scanning process requires the following steps, which are displayed on the toolbar: Filling in the Rx, described in section 4.4 Scanning the patient, described in section 4.5 Viewing the scan, described in section 4.6 Sending the scan to the lab, described in section 4.6.2... -
Page 84: Adding New Patients
Element® 5D Plus User manual 4.3.1 Adding new patients You can add a new patient while filling in the Rx or at any time before. To add a new patient: 1. In the New Scan window, in the Patient area, tap Figure 71: New Scan window –... -
Page 85: Figure 72: New Patient Window
Element® 5D Plus User manual The New Patient window is displayed. Figure 72: New Patient window 2. Enter the patient’s first name and last name. 3. If required, enter a chart number. 4. Tap Add to add the new patient. -
Page 86: Figure 73: Adding The New Patient
Element® 5D Plus User manual Figure 73: Adding the new patient Note: If you try adding a patient who already exists, a message is displayed notifying you that a patient with the same details exists. Figure 74: Message notifying that a patient with the same details exists... -
Page 87: Searching For Existing Patients
Element® 5D Plus User manual a. If this is the same person, tap Add. You are prompted to confirm whether the new patient is the same patient as the existing patient. Figure 75: Confirmation message regarding an existing patient b. -
Page 88: Figure 76: New Scan Window - Searching For An Existing Patient
Element® 5D Plus User manual To search for an existing patient: 1. In the Patient area, tap Figure 76: New Scan window – searching for an existing patient The Search Patient window is displayed. © 2020 Align Technology, Inc. All rights reserved. -
Page 89: Figure 77: Search Patient Window With Search Field
Element® 5D Plus User manual Figure 77: Search Patient window with search field 2. In the Search Patient window, enter at least three letters in the search field to display a list of patients matching the search criteria. © 2020 Align Technology, Inc. All rights reserved. -
Page 90: Figure 78: Search Criteria In The Search Field And List Of Matching Patients
Element® 5D Plus User manual Figure 78: Search criteria in the search field and list of matching patients 3. Select the required patient, and then tap Select Patient. Figure 79: Selecting the required patient The selected patient is displayed in the New Scan window. -
Page 91: Editing The Patient Details
Element® 5D Plus User manual Figure 80: Selected patient displayed in the New Scan window 4.3.3 Editing the patient details After you have searched for and selected a patient, or after you have added a new patient, you can edit the patient’s details. -
Page 92: Figure 81: New Scan Window - Editing A Patient
Element® 5D Plus User manual 2. In the Patient area, tap Figure 81: New Scan window – editing a patient The Edit Patient window is displayed. 3. Edit the patient’s details as required and then tap Update. Figure 82: Edit Patient window and Update button... -
Page 93: Clearing The Patient Details From The New Scan Window
Element® 5D Plus User manual If, while editing the patient’s name, you enter the same details as an existing patient, a message is displayed notifying you of such. Figure 83: Message that a patient with the same details already exists To differentiate between patients with the same details, use a chart number. -
Page 94: Filling In The Rx
Element® 5D Plus User manual To clear the patient details from the New Scan window: In the Patient area, tap Figure 84: Clear patient data button All data is cleared from the New Scan window, and you can now add a new user or search for an existing user, if required. -
Page 95: Figure 85: Selecting The Required Case Type
Element® 5D Plus User manual to search for an existing patient, as described in section 4.3.2. 2. In the Order area, from the Case Type drop-down list, select the required case type. Note: The list of case types displayed depends on your subscription package. -
Page 96: Figure 86: New Scan Window - Irecord Case Type
Element® 5D Plus User manual Invisalign + iRecord: Records the file (iRecord) and uploads an Invisalign scan to the IDS portal. Saves two different scans, as may be requested for insurance-refund purposes. Restorative: A scan that you need to send to a laboratory for modeling or milling. -
Page 97: Working With Restorative Scan Types
Element® 5D Plus User manual Figure 87: New sleeve attached check box 7. Tap on the toolbar to move to Scan mode, as described in section 4.5. 4.4.1 Working with restorative scan types When selecting restorative case types, you need to select the tooth that needs to be restored, the type of restoration required, as well as the material, shade, etc. -
Page 98: Figure 88: New Scan Window - Restorative Case Type With A Tooth Chart
Element® 5D Plus User manual Figure 88: New Scan window – Restorative case type with a tooth chart 2. Select the Pre-Treatment Scan check box if you would like to scan the patient before prepping the relevant tooth. In this case, the patient must be scanned twice – before and after the tooth has been prepped. -
Page 99: Figure 89: List Of Restorative Treatment Options
Element® 5D Plus User manual Figure 89: List of restorative treatment options The list of treatment options is the same for all teeth, except for the following: Inlay and Onlay: Relevant only for the molars and premolars Veneer: Relevant only for the incisors and the premolars 4. -
Page 100: Figure 90: Defining The Restoration Properties
Element® 5D Plus User manual Figure 90: Defining the restoration properties 5. Select the following settings from the relevant drop-down lists. Settings marked with an asterisk are mandatory. Initially, only the material selection is mandatory, but once the material has been selected, other settings become mandatory depending on the material selected. -
Page 101: Figure 91: Treatment Information Area
Element® 5D Plus User manual 6. Tap to save the selection and return to the New Scan window. The selected treatment options are displayed in the Treatment Information area. Figure 91: Treatment Information area You can change the selected treatment options at any time before sending the scan by tapping... -
Page 102: Disabling Niri Capture
Element® 5D Plus User manual 4.4.2 Disabling NIRI capture When patients are scanned, the NIRI data is captured by default. However, you can disable capturing the NIRI data, before starting a new scan. In this case, none of the NIRI features are displayed in the GUI, and NIRI data is not captured, saved, or sent. -
Page 103: Figure 93: Scan Tool Without The Option To Display Niri Data In The Viewfinder Or To Enlarge The Viewfinder
Element® 5D Plus User manual Figure 93: Scan tool without the option to display NIRI data in the viewfinder or to enlarge the viewfinder Figure 94: Review tool is not displayed in View mode After scanning, you can view the NIRI status of each scan in the Orders page on the scanner and in MyiTero. -
Page 104: Confirming A New Wand Barrier Sleeve Between Patients
Element® 5D Plus User manual 4.4.3 Confirming a new wand barrier sleeve between patients In order to prevent cross-contamination, you must confirm that a new wand barrier sleeve is used for each patient. See the scanning best practices, described in section 4.5.2 for more details. -
Page 105: Scanning The Patient
Scan mode. The Scan window is displayed, enabling you to start scanning the patient. The iTero Element 5D scanner provides simultaneous capture and display of NIRI, 2D color images, and 3D intraoral optical impression data. -
Page 106: Scanning Guidance
It will automatically disappear after a short while, or you can tap anywhere on the screen to hide it. iTero recommends you follow the scanning sequence for best results. Figure 97: Recommended scanning sequence – lower jaw Note: If you select the Don’t show again check box, this guidance will not be displayed in future scans. -
Page 107: Scanning Best Practices
To allow optimal capturing of the NIR images, the wand should be held 0-3 mm above the patient’s teeth. For a detailed description on how to scan restorative cases, refer to the iTero Element Restorative eGuidebook on the iTero website: http://www.itero.com/en/training/literature... -
Page 108: Scan Options
Element® 5D Plus User manual iTero recommends the following best practices for scanning restorative cases: Ensure that the prepped tooth and the surrounding area is free of debris, saliva, and blood contamination. The prepped tooth should be dry and the margin line should be clear of tissue. -
Page 109: Figure 100: Areas With Missing Anatomy Shown With And Without Additional Scan Feedback - Color Mode
Element® 5D Plus User manual Figure 100: Areas with missing anatomy shown with and without additional scan feedback – color mode By default, this mode is enabled, but it can be disabled per case by tapping or by default in the Scan settings, as described in section 3.6.2.1. -
Page 110: Toggling The 3D And Viewfinder Display
Element® 5D Plus User manual 4.5.3.3 Switching to the next scan segment During scanning, the current segment is highlighted in blue in the navigation controls, and also displayed in the segment indicator box, between the arrows. You can move to the next segment by:... -
Page 111: Figure 103: Default View - 3D Scan In The Center Of The Window And Viewfinder On The Left
Element® 5D Plus User manual Figure 103: Default view – 3D scan in the center of the window and viewfinder on the left To switch to a large viewfinder in the center of the screen, tap the button. Figure 104: Large viewfinder in the center of the screen and 3D image on the left... -
Page 112: Toggling Between Color And Niri Images In The Viewfinder
Element® 5D Plus User manual 4.5.5 Toggling between color and NIRI images in the viewfinder In addition to moving the viewfinder, you can toggle the display to show the viewfinder image either in color or as a NIRI image. to toggle between displaying a color image or a NIRI image in the viewfinder. -
Page 113: Viewing The Scan
Element® 5D Plus User manual Figure 106: Editing tools Viewing the scan After scanning the patient, tap to move to View mode to inspect the model and ensure that sufficient occlusal and buccal anatomy have been captured, and that the model is accurate and complete. -
Page 114: Missing Scan Segment Notifications
Element® 5D Plus User manual 4.6.1 Missing scan segment notifications If there are missing scan segments or bite scans when you tap the button, you will be notified at the beginning of the post-processing stage, and you will be able to go back and fix the scan, in order to reduce manual intervention later on. -
Page 115: Using The Scan Timer
Element® 5D Plus User manual 4.6.2 Using the scan timer The scan timer enables you to see how long it took to scan the model. To view the scan time: 1. On the toolbar, tap the button. The scan time is displayed. -
Page 116: Working With The Viewer
Element® 5D Plus User manual 2. Add your signature to authorize the order and then tap Confirm and Send. Figure 109: Sending the scan 3. If required, select the Save Signature check box to save your signature for authorizing future cases. -
Page 117: Figure 111: Viewer Option In Patient's Profile Page
Element® 5D Plus User manual Figure 111: Viewer option in patient’s profile page In the Viewer, you can tap the following to: Show/hide the upper jaw Show/hide the lower jaw Show both jaws Open the Review tool to view an area of interest as both NIRI and color images, one below the other, as described in section 9.10. -
Page 118: Figure 112: Model In A 1-Window View
Element® 5D Plus User manual Display the model in a 1-window view, with the upper and lower jaws in the same window (Frontal view). Figure 112: Model in a 1-window view Relevant for Orthodontic case types only. Display the model in a 2-window view, with the upper and lower jaws in separate windows (Occlusal view). -
Page 119: Figure 114: Model In A 5-Window View
Show/hide the occlusal clearance between the opposing teeth, as described in section 9.7. Note: When the case status is iTero Modeling, it is in the early stages of modeling and the margin line and die tools are disabled. When the modeling process is completed, and the die and margin line have been edited, the changes appear in color on the model and the tools are displayed in color, indicating that they are active. -
Page 120: Removing The Wand Barrier Sleeve
Element® 5D Plus User manual Removing the wand barrier sleeve The wand barrier sleeves are intended for single-patient use and must be disposed of and replaced after each patient in order to avoid cross-contamination. To remove the wand barrier sleeve: 1. -
Page 121: Figure 117: Remove The Wand Barrier Sleeve
Figure 118: Optical surface of the wand The iTero Element 5D wand and cradle must be cleaned and disinfected in between patients to avoid cross-contamination, as described in sections 1.1 and 1.1. A new wand barrier sleeve may be applied to the wand after cleaning and disinfection have been performed. - Page 122 Element® 5D Plus User manual © 2020 Align Technology, Inc. All rights reserved.
-
Page 123: Working With Patients
Element® 5D Plus User manual Working with patients On the home screen, tap the Patients button to display the Patients page. The Patients page displays a list of all your patients, their chart number, and the last scan date. -
Page 124: Searching For Patients
Element® 5D Plus User manual Searching for patients If required, you can search for patients in the iTero database using their names or chart numbers. To search for a patient: In the Patients page, enter the patient’s name or chart number (or part thereof) in the search field and then tap the... -
Page 125: Viewing The Patient Details
View the Rx details and edit the patient's details, described in section 5.4 View the patient’s previous scans in the Viewer, described in section 5.5 Compare 2 previous scans using iTero TimeLapse technology, described in section 9.1 View any Invisalign-related processes Creating a new scan for a specific patient If required, you can create a new scan for a specific patient. -
Page 126: Figure 123: Patient's Profile Page - New Scan Option
Element® 5D Plus User manual To create a new scan for a specific patient: 1. In the patient’s profile page, tap New Scan. Figure 123: Patient’s profile page – New Scan option The New Scan window is displayed, with the patients details already filled in. -
Page 127: Viewing The Rx
Element® 5D Plus User manual Viewing the Rx If required, you can view the Rx of a previous order. To view the Rx of a previous order: 1. In the patient’s profile page, select the order for which to view the Rx and then tap View Rx. -
Page 128: Viewing Previous Scans In The Viewer
Element® 5D Plus User manual Figure 126: Rx Details window 2. Tap to return to the patient’s profile page. Viewing previous scans in the Viewer If required, you can display previous scans in the Viewer. © 2020 Align Technology, Inc. All rights reserved. -
Page 129: Figure 127: Patient's Profile Page - Viewer Option
Element® 5D Plus User manual To view a previous scan in the Viewer: 1. In the patient’s profile page, tap the scan you want to display in the Viewer and then tap Viewer. Figure 127: Patient’s profile page – Viewer option The scan is displayed in the Viewer. - Page 130 Element® 5D Plus User manual © 2020 Align Technology, Inc. All rights reserved.
-
Page 131: Working With Orders
Sending: The scan is in the process of being sent Sent: The case has been sent iTero Modeling: The order has been sent to iTero Modeling Lab Review: The order has been sent to the lab for review Align Production: The case is undergoing an internal process... -
Page 132: Figure 129: Orders Page
Element® 5D Plus User manual Figure 129: Orders page To view or review orders: 1. Tap the Orders button on the home screen. The Orders page is displayed, showing two panes – In Progress orders and Past Orders. In Progress: Scans have not yet been submitted. -
Page 133: Figure 130: In Progress Pane - Options
Element® 5D Plus User manual 2. Tap on an order in the In Progress pane to view the following options: Figure 130: In Progress pane – options View Rx: Opens the Rx Details window, enabling you to view the prescription for this order. - Page 134 Element® 5D Plus User manual View Rx: Opens the Rx Details window, enabling you to view the prescription for this order. Viewer: Opens the Viewer window, enabling you to view and manipulate the model. For more information on working with the Viewer, see section 4.8.
-
Page 135: Viewing Messages
Element® 5D Plus User manual Viewing messages The Messages page displays notifications, updates, and other system messages from Align Technology, for example, product updates, upcoming educational sessions, or internet connectivity issues. If relevant, you can view the number of new or unread messages on the badge on the Messages button. - Page 136 Element® 5D Plus User manual © 2020 Align Technology, Inc. All rights reserved.
-
Page 137: Working With Myitero
Working with MyiTero MyiTero is a web-based portal, with the same look-and-feel as the iTero software. It enables users to carry out administrative tasks such as filling in a new Rx on any supported device, for example, a PC or a tablet, without using valuable scanner time. - Page 138 Element® 5D Plus User manual © 2020 Align Technology, Inc. All rights reserved.
-
Page 139: Itero Scanner Features And Tools
Comparing previous scans using iTero TimeLapse technology Patients who are scanned on a regular basis can have their scans analyzed using iTero TimeLapse technology. iTero TimeLapse technology compares 2 of the patient’s previously captured 3D scans to allow visualization of the changes of the patient’s teeth, tooth structure, and oral soft tissues over the period between the scans. -
Page 140: Figure 133: Itero Timelapse - Selecting The Scans To Compare
3. Tap the Compare Selected button to compare and analyze the scans. The iTero TimeLapse window is displayed, highlighting the areas with changes between the scans. The darker the color, the bigger the change between the scans, as displayed in the legend (scale measurements are in millimeters). -
Page 141: Figure 135: Area Of Interest From The First Scan Displayed In The Animation Window
Element® 5D Plus User manual If required, tap to move the scan to the default occlusal view – lower arch with anterior teeth at the bottom and upper arch with anterior teeth at the top and both arches in a frontal view like the iRecord default view. -
Page 142: Invisalign Go System
Element® 5D Plus User manual You can zoom in to the image in the animation window or tap the pause button to pause the animation. If required, you can change the scale of the changes displayed. a. On the legend, tap Scale. -
Page 143: Invisalign Outcome Simulator
Element® 5D Plus User manual Invisalign Outcome Simulator The Invisalign Outcome Simulator is a software tool that enables you to show the patients the simulated outcome of their Invisalign treatment. You can make real-time adjustments to the simulated outcome while showing the patient. This tool provides additional information for the patient in their decision to accept treatment. -
Page 144: Editing Tools
Element® 5D Plus User manual For more information regarding the Invisalign Progress Assessment tool, refer to the Progress Assessment section in the Invisalign Outcome Simulator User Guide http://storagy-itero-production- us.s3.amazonaws.com/download/en-us/iOSim_User_Guide.pdf. Editing tools After you have scanned the model, you can edit it using the following tools: Delete Segment tool, described in section 9.5.1... -
Page 145: Deleting A Selection
Element® 5D Plus User manual 2. Tap the Delete Segment tool Figure 140: Delete Segment tool A confirmation message is displayed. 3. Tap OK to confirm the deletion. The entire scanned segment is deleted. 9.5.2 Deleting a selection The Delete Selection tool enables you to delete a section of the scan so that it can be rescanned. -
Page 146: Figure 141: Delete Selection Tool
Element® 5D Plus User manual 2. Tap the Delete Selection tool Figure 141: Delete Selection tool The Delete Selection tool expands and the model is displayed in monochrome: Figure 142: Expanded Delete Selection tool © 2020 Align Technology, Inc. All rights reserved. -
Page 147: Filling In Missing Anatomy
Element® 5D Plus User manual 3. Touch the area of the anatomy you want to delete. The selection is removed. Figure 143: Selected area of the anatomy is deleted 4. If required, tap to undo the changes. 5. Tap to rescan the deleted anatomy. -
Page 148: Figure 144: Fill Tool
Element® 5D Plus User manual 2. Tap the Fill tool Figure 144: Fill tool Areas that require scanning are highlighted in red. Figure 145: Areas that require scanning are highlighted in red – Fill tool © 2020 Align Technology, Inc. All rights reserved. -
Page 149: Disabling A.i. Cleanup
Element® 5D Plus User manual 3. Rescan the patient. In order to prevent over scanning, only the highlighted areas are scanned and the voids are filled. 9.5.4 Disabling A.I. cleanup By default, excess tissue is removed from around the edges of the 3D model during scanning. If required, you can turn off this functionality for the current case. -
Page 150: Working With The Eraser Tool
Element® 5D Plus User manual The scan is displayed with the excess material showing. Figure 147: Scan displayed with excess material showing 3. To return the excess tissue, press the screen to display the editing options and then tap Enable A.I. Cleanup. -
Page 151: Figure 148: Eraser Tool
Element® 5D Plus User manual Figure 148: Eraser tool The Eraser tool expands to show the following options: Figure 149: Eraser tool options © 2020 Align Technology, Inc. All rights reserved. -
Page 152: Figure 150: Mark The Area To Be Modified
Element® 5D Plus User manual 2. With your finger, mark the area to be modified. Figure 150: Mark the area to be modified As soon as you lift your finger, the selected area is removed and the scan tool is enabled. -
Page 153: Working With The Occlusal Clearance Tool
Element® 5D Plus User manual 3. If required, tap to undo the deletion. 4. After adjusting the clearance on the patient’s tooth, tap to return to Scan mode and rescan the deleted area, which is marked in red. Figure 152: Deleted area marked in red 5. -
Page 154: Figure 153: Occlusal Clearance Between The Opposing Teeth
Element® 5D Plus User manual Figure 153: Occlusal clearance between the opposing teeth 2. If necessary, reduce the prepped tooth and rescan the area, as described in section 9.6, above. 3. If required, you can change the occlusal values displayed on the opposing teeth. -
Page 155: Figure 154: Occlusal Clearance Range Options
Element® 5D Plus User manual a. On the legend, tap Scale. The legend is expanded to display a list of range options, in millimeters. Figure 154: Occlusal Clearance range options b. Select the required scale. c. The occlusal clearance is displayed according to the new scale. -
Page 156: Working With The Edge Trimming Tool
Element® 5D Plus User manual Figure 155: Occlusal Clearance tool and legend displayed in the Viewer 3. If required, tap to take a screenshot of the occlusal clearance. For more information on capturing screenshots and adding annotations, see section 9.11. -
Page 157: Figure 156: Edge Trimming Tool
Element® 5D Plus User manual To trim the excess material: 1. In the View window, tap the Edge Trimming tool Figure 156: Edge trimming tool The Edge Trimming tool expands to show the following options: Figure 157: Edge trimming tool options... -
Page 158: Figure 158: Mark The Area To Be Trimmed Away
Element® 5D Plus User manual 2. With your finger, mark the area you would like to trim away. Figure 158: Mark the area to be trimmed away The area to be trimmed away is highlighted and the confirmation icon is enabled. -
Page 159: Working With The Die Separation Tool
Element® 5D Plus User manual 3. If required, you can tap to undo the trimming. 4. Tap to confirm the trimming. The selected area is removed. Figure 160: Selected area has been removed Working with the Die Separation tool The die separation is created automatically, according to the position of the green hint point, which must be located on the center of the prepped tooth after scanning. -
Page 160: Figure 161: Green Hint Point Centered On The Prepped Tooth
Element® 5D Plus User manual Figure 161: Green hint point centered on the prepped tooth 2. Tap on the toolbar to move to View mode. 3. In the View window, tap the Die Separation tool The die separation is displayed in high resolution. -
Page 161: Figure 163: Die Separation Tool Options
Element® 5D Plus User manual To create the die separation manually: 1. In the View window, tap the Die Separation tool The tool expands to show the following options: Figure 163: Die Separation tool options 2. Tap and mark the whole segment with your finger. -
Page 162: Figure 165: Before Selecting The Die Separation
Element® 5D Plus User manual 3. Tap to mark the prepped tooth in high resolution. The model is displayed as follows: Figure 165: Before selecting the die separation 4. Draw the area for the die separation. The selected area is displayed in high resolution. -
Page 163: 9.10 Working With The Review Tool
Element® 5D Plus User manual Figure 166: Prepped tooth is displayed in high resolution 9.10 Working with the Review tool The View mode includes a Review tool that enables you to view the NIRI and colored intraoral images captured during the scan, for every area of interest. -
Page 164: Figure 167: Review Tool With The Snapshot Tool On The Toolbar And The Loupe In The Right Pane
Element® 5D Plus User manual To activate the Review tool: In the View window, tap and then drag the loupe from the right pane over an area of interest. Figure 167: Review tool with the Snapshot tool on the toolbar and the loupe in the right pane The area within the loupe is displayed in the image pane on the right. -
Page 165: 9.10.1 Zooming In To And Out Of The Images In The Image Pane
Element® 5D Plus User manual Figure 168: Image pane on the right showing the area of interest as both NIRI and colored intraoral images 9.10.1 Zooming in to and out of the images in the image pane In order to better evaluate the scanned images in the image pane, you can zoom in to and out of the images, as well as adjust the contrast and brightness of each image. -
Page 166: Figure 169: Zoom-In Buttons On The Images In The Image Pane
Element® 5D Plus User manual To zoom in or out using the zoom button: 1. Tap on either the NIRI or the colored intraoral image to zoom in to that view. Figure 169: Zoom-in buttons on the images in the image pane The image in the image pane is enlarged and only the specific image is displayed. -
Page 167: 9.10.2 Adjusting The Brightness And Contrast Of Images In The Image Pane
Element® 5D Plus User manual 9.10.2 Adjusting the brightness and contrast of images in the image pane You can set the brightness and contrast of each of the images displayed in the image pane by adjusting the relevant sliders in the brightness and contrast toolbar. -
Page 168: 9.10.3 Capturing The Review Tool Images
MyiTero. In addition, these screenshots can added to the iTero Scan Report, which is created in MyiTero. For more information on the iTero Scan Report, refer to the MyiTero User Guide. -
Page 169: Figure 173: View Mode - With Snapshot Tool
Element® 5D Plus User manual If you are taking screenshots while using the Review tool, the following screenshots are included: Entire Review tool window, including 3D image, and 2D NIRI and color viewfinder images 3D image 2D NIRI viewfinder image (if the loupe has been dragged onto the 3D image) 2D color viewfinder image (if the loupe has been dragged onto the 3D image) Each set of screenshots is saved in a separate folder and saved in a folder with the patient’s name, which can be... -
Page 170: Figure 174: Screen Capture Thumbnail Is Displayed After Taking A Screen Capture
Element® 5D Plus User manual Figure 174: Screen capture thumbnail is displayed after taking a screen capture 2. Tap the thumbnail if you would like to add annotations to the screenshot. The Draw window is displayed, showing a screenshot of the entire window, with an annotations toolbar on the top. -
Page 171: Figure 176: Annotations Toolbar
Element® 5D Plus User manual Figure 176: Annotations toolbar The annotations toolbar contains the following buttons: Tap to undo previous annotations. Tap to draw on the screenshot. Tap to enter text on the screenshot. Tap the color for the drawing and text. By default, these will be the same color. -
Page 172: Figure 178: Screenshot With Annotations
Element® 5D Plus User manual 4. To save the screenshot with the annotations, tap Keep Annotations. Figure 178: Screenshot with annotations A pop-up message is displayed at the bottom of the screen, notifying that the screenshots and annotations will be uploaded to MyiTero, where you can access them. -
Page 173: Figure 180: Confirmation About The Annotations Being Discarded
Element® 5D Plus User manual Figure 180: Confirmation about the annotations being discarded a. Tap OK to proceed. A pop-up message is displayed notifying that the screenshots will be uploaded to MyiTero. Figure 181: Notification that the screenshots will be uploaded to MyiTero The screenshots will be sent to the lab, together with the scan, and can then be downloaded from MyiTero, from the Orders page or the Viewer. -
Page 174: Figure 182: Option To Download Screenshots From The Orders Page In Myitero
Element® 5D Plus User manual Figure 182: Option to download screenshots from the Orders page in MyiTero © 2020 Align Technology, Inc. All rights reserved. -
Page 175: 10 Care And Maintenance
Element® 5D Plus User manual 10 Care and maintenance If you are performing any sanitation procedures in the office that involve fogging or spraying, make sure that the iTero scanner is not in the room. To avoid cross-contamination, it is mandatory to: Clean and disinfect the wand, cradle, touch screen, and wheel-stand handle, as described in the following sections. -
Page 176: 10.2.2 Wand Cleaning And Disinfection
3. Visually inspect the wand for any noticeable damage, for example, deterioration such as corrosion, discoloration, pitting, or cracks. Do not clean, disinfect, or use the wand if any damage is found. Please contact iTero Customer Support for further instructions. -
Page 177: Figure 184: Remove Gross Contaminants Using Caviwipes1
Element® 5D Plus User manual Figure 184: Remove gross contaminants using CaviWipes1 2. Using the soft bristle brush, remove any remaining marks and stains on the wand body and wand tip, paying special attention to the grooves, indents, joints, vents, etc. Brush until visibly clean. -
Page 178: 10.2.3 Drying - Wand Body
1. Visually inspect the wand for any noticeable damage, for example, deterioration such as corrosion, discoloration, pitting, or cracks. Pay special attention to the optical surface, making sure it remains clean. Do not use the wand if any damage is detected. Please contact iTero Support for further instructions. -
Page 179: Figure 187: Release And Remove The Vent Cover
Element® 5D Plus User manual Figure 187: Release and remove the vent cover 3. Gently insert the tip of the wand into a new vent cover, making sure that the vent cover dimples are aligned towards the top of the wand. -
Page 180: 10.3 Cleaning And Disinfecting The Cradle
1. Visually inspect the cradle for any noticeable damage, for example, deterioration such as discoloration, pitting, or cracks. CAUTION: Do not clean, disinfect, or use the cradle if any damage is detected. Please contact iTero Customer Support for further instructions. -
Page 181: 10.3.2 Cradle Cleaning And Disinfection
Element® 5D Plus User manual PPE and work environment Please follow the cleaning and disinfecting material manufacturers’ instructions. Note: Replace cleaning and disinfection materials (brushes/wipes) if visibly damaged or soiled. Before starting the cleaning and disinfection procedure, put on your PPE. -
Page 182: 10.3.3 Drying - Cradle
Visually inspect the cradle for any noticeable damage, for example, deterioration such as discoloration, pitting, or cracks. Do not use the cradle if any damage is detected. Please contact iTero Customer Support for further instructions. 10.4 Cleaning and disinfecting the scanner touch screen and the wheel-stand handle The scanner screen and wheel-stand handle must be cleaned between patients, as follows: 1. - Page 183 Element® 5D Plus User manual Material Active Ingredient Contact time (minutes) CaviWipes1/CaviCide1 Quats-alcohol CaviWipes/CaviCide Quats-alcohol Clorox HP Wipes 1.4% Hydrogen Peroxide Oxivir® 1 Wipes AHP Hydrogen Peroxide Clinell Universal Range Wipes ≤50% Peracetic Acid Note: If the recommended alternative disinfectants are not available in your region, consult your local supplier of disinfecting materials for equivalent products in your region.
- Page 184 Element® 5D Plus User manual © 2020 Align Technology, Inc. All rights reserved.
-
Page 185: A Clinic Lan Network Guidelines
-60 to -70 dBm <-70 dBm IMPORTANT: In order to achieve the best performance of your iTero scanner, ensure that the Wi-Fi signal strength is Excellent or at least Good. Never connect the LAN cable to the scanner, in order to prevent electrical shock. -
Page 186: Router Guidelines
Internet connection guidelines In order to achieve the best performance of your iTero scanner, ensure that the internet connection upload speed is at least 1Mbps per scanner. Also, note that any additional devices connected to the internet in parallel to the scanner may affect the scanner’s performance. -
Page 187: Align Hostname Recommendations
Element® 5D Plus User manual Align hostname recommendations Align constantly improves its products and services, and can therefore commit to a Hostname, rather than a specific IP address. The following list of hostnames was created to provide Align’s scanners the proper operation functions, in order to be able to utilize all the advanced capabilities of the scanner performance. - Page 188 Element® 5D Plus User manual © 2020 Align Technology, Inc. All rights reserved.
-
Page 189: Bemc Declaration
Professional Healthcare and Home Healthcare Facility Environment The iTero Element 5D Plus intraoral scanner essential performances are: Display near-infrared imaging without interference on the iTero Element 5D touch screen as part of the caries- detection solution. Stored scan data is accessible and can be displayed. - Page 190 Element® 5D Plus User manual Test Test Standard Class / Severity level results Voltage changes, Voltage IEC 61000-3-3 AC mains Complies fluctuations and Flicker test (230 V @ 50 Hz & 220 V @ 50 EN 610003-3 Immunity (IEC 60601-1-2 / EN 60601-1-2 sections 8.9 and 8.10)
- Page 191 Element® 5D Plus User manual Test Test Standard Class / Severity level results Immunity from voltage dips, short IEC 61000-4- On AC mode (240 V @ 50 Hz, Complies interruptions and voltage variations 11 / 100 V @ 50 Hz): 0 % - 0.5 cycle EN 61000-4-11 &...
- Page 192 Element® 5D Plus User manual Test Test Standard Class / Severity level results Immunity from Electrical Fast EN 61000-4-4 AC mains: ± 1.0 kV; Complies transient (EFT) Tr/Th – 5/50 ns, 5 kHz Immunity from Surge EN 61000-4-5 AC mains: ± 1.0 kV DM / ± 2.0...
-
Page 193: Cfcc Compliance Information Statement (Sdoc)
C FCC compliance information statement (SDoC) We Align Technology Ltd. declare: Type of equipment: The iTero Element 5D is an integrated intraoral imaging system capable of intraoral optical impression for CAD/CAM of dental devices which also captures 2D color images, and Near Infrared (NIR) images. - Page 194 Element® 5D Plus User manual Standards applied: FCC Part 15B - For Unintentional radiators, performed by Align & Advantech FCC Part 15C for 2.4GHz band based on Qualcomm Atheros FCC ID PPD- QCNFA364AH, performed by Qualcomm Atheros FCC Part 15E for the 5GHz bands based on Qualcomm Atheros...
-
Page 195: D Itero Element Product Security Whitepaper
D iTero Element product security whitepaper This whitepaper applies to the iTero Element Family of products. Depending on the version of the product you have procured, there may be differences in the features of the product. In addition, as this whitepaper was created at a point-in-time, changes may have occurred in Align Technology’s product security practices to address evolution and... - Page 196 The anti-virus software definitions are updated frequently and scans are scheduled to run daily on the devices. Applicable to iTero Element, iTero Element 2, iTero Element 5D, iTero Element 2 Plus, iTero Element 5D Plus, iTero Element 5D Plus Lite Remote maintenance is not possible without permission: The devices use TeamViewer for establishing a remote session.
- Page 197 Applicable to iTero Element, iTero Element 2, iTero Element Flex, iTero Element 5D, and iTero Element 5D Laptop Configuration, iTero Element 2 Plus, iTero Element 5D Plus, iTero Element 5D Plus Lite Detect malicious and mobile code: It is the customer’s responsibility to select and implement anti-virus/anti-...
- Page 198 Element® 5D Plus User manual © 2020 Align Technology, Inc. All rights reserved.
-
Page 199: E System Specifications
Element® 5D Plus User manual E System specifications Monitor 21.5” Full HD (1920x1080) touch screen Wand The wand emits red laser light (680nm Class 1), as well as white LED emissions and 850nm LED emissions. Wireless LAN A LAN card provides local network communications with wireless connectivity 2.4GHz, 5GHZ... - Page 200 Element® 5D Plus User manual Wand: Length:346 mm (13.3 in) Width:50 mm (~2.0 in) Depth: 68 mm (~2.7 in) Cable length Power cable: 3000 mm Wand cable: 1830 mm Net Weight Monitor: 10.5 kg (~23.1 lbs) Wand: 0.47 kg (~1 lbs.) without the cable Wheel stand: 12.5 kg (~27.5 lbs)
- Page 201 Element® 5D Plus User manual Auto-trimming tool: Provides a 3D model cleaned from excess scan AI Scan Assistant material Auto-margin marking tool: Provides automatic marking of the margin line on crown cases Cloud storage Data can be stored and accessed on the web using cloud storage and the MyiTero web portal ©...
- Page 202 Element® 5D Plus User manual © 2020 Align Technology, Inc. All rights reserved.
- Page 203 Element® 5D Plus User manual Index Confirming new sleeve 86-87 Contraindications ii Adding patients 66 Delete Segment tool 126 Additional scan feedback 90 Delete Selection tool 127 Demo mode 20 Exit 25 Barrier Diagnostics 57 Removing 102 Die Separation tool 141 Benefits 1 Disabling A.I.
- Page 204 Element® 5D Plus User manual Messages 117 Missing scan segment notifications 96 Hardware 2 Moving the scanner 34 Hostname recommendations 169 Moving to next segment 92 MyiTero 119 Installing security updates 32 Intended use 1 New Scan 61 Internet connection guidelines 168...
- Page 205 Element® 5D Plus User manual New scan 107 Scan timer 97 Searching 106 Scan types Searching for 69 Restorative 79 View Rx 109 Scanner settings 41 Viewing scans 110 Scanning best practices 89 Scanning guidance 88 Scanning the patient 87...
- Page 206 Element® 5D Plus User manual Signature settings 54 Sleeves 4 User interface 35 Confirming new 86 User settings 47 Confirming new check box 86 Confirming new popup 87 Snapshot tool 150 Viewer 98 Software 4 Viewing the scan 95...
- Page 208 2820 Orchard Parkway San Jose, CA 95134 ©2020 Align Technology, Inc. All rights reserved. Align, Invisalign, iTero Element, among others, are trademarks and/or service marks of Align Technology, Inc., or one of its subsidiaries or affiliated companies and may be registered in the U.S. and/or other countries. 210886 Rev. B...
Need help?
Do you have a question about the Element 5D Plus and is the answer not in the manual?
Questions and answers