
Related Manuals for LINET Sprint 200


Summary of Contents for LINET Sprint 200
- Page 1 Instructions for Use and Technical Description Sprint 200 Emergency Stretcher without scales with i-Drive Power and without i-Drive Power D9U001ES2-0101 Version: 02 Publication Date: 2022-06...
- Page 2 Želevčice 5 274 01 Slaný Tel.: +420 312 576 111 Fax: +420 312 522 668 E-mail: info@linet.cz http://www.linet.com Service department: service@linetgroup.com Sprint 200 Emergency Stretcher Author: L I N E T, s.r.o. Related links: www.linet.com D9U001ES2-0101 Version: 02 Publication Date: 2022-06 Copyright ©...
-
Page 3: Table Of Contents
15.1 Infusion Stand ............86 9.4.1 Transport Position ............36 15.2 Telescopic Infusion Stand .........87 9.5 Firmware (only Sprint 200 with i-Drive Power) .... 37 15.3 Chart Holder ..............88 10 Power Supply Cord (only Sprint 200 with i-Drive Power) 15.4 Monitor Shelf .............89 ..................37... - Page 4 16.1.3 Complete Cleaning and Disinfection ...... 98 17 Troubleshooting (Sprint 200 without scales and without i-Drive Power) ..............98 18 Troubleshooting (Sprint 200 with i-Drive Power) ..99 19 Maintenance (Sprint 200 without scales and without i- -Drive Power) ..............100 19.1 Regular maintenance ..........100 19.2 Spare Parts ...............100...
-
Page 5: Symbols And Definitions
1 Symbols and Definitions 1.1 Warning Notices 1.1.1 Types of Warning Notices Warning notices are differentiated by the type of danger using the following signal words: ► CAUTION warns about the risk of material damage. ► WARNING warns about the risk of physical injury. ► DANGER warns about the risk of fatal injury. 1.1.2 Structure of Warning Notices SIGNAL WORDS! Type and source of danger! ►... -
Page 6: Symbols On The Package
1.4 Symbols on the Package FRAGILE, HANDLE WITH CARE THIS WAY UP KEEP DRY (PROTECT FROM HUMIDITY) PAPER RECYCLING SYMBOL DO NOT USE HAND TRUCK HERE DO NOT STACK DURING STORAGE D9U001ES2-0101_02... -
Page 7: Symbols On The Stretcher
1.5 Symbols on the Stretcher READ INSTRUCTIONS FOR USE SAFE WORKING LOAD WARNING AGAINST CRUSHING OR TRAPPING JACK FOR ATTACHMENT OF CONDUCTOR FOR POTENTIAL EQUALISATI- GENERAL WARNING SIGN APPLIED PARTS TYPE B ONLY SUITABLE FOR INDOOR USE MAXIMUM WEIGHT OF PATIENT WEIGHT OF STRETCHER (depending on confi guration) RECYCLING SYMBOLS DO NOT POLLUTE THE ENVIRONMENT... - Page 8 MAXIMUM LOAD OF THE MONITOR SHELF 15 KG PLACE MONITOR ON THIS SIDE OF THE MONITOR SHELF MAXIMUM LOAD OF THE MONITOR SHELF 15 KG DO NOT PLACE MONITOR ON THIS SIDE OF THE MONITOR SHELF INSTRUCTION FOR PLACEMENT OF THE MONITOR SHELF (L=LEFT, R=RIGHT) MAXIMUM LOAD OF ONE HOOK 5 KG FOLD THE MARKED FOLDABLE INFUSION STAND AS THE FIRST ONE...
- Page 9 MAXIMUM MASS OF MOBILE HOSPITAL BED (MAXIMUM MASS OF EMPTY STRETCHER + SAFE WORKING LOAD) OFF (i-DRIVE POWER) ON (i-DRIVE POWER) CE MARKING FOR SPRINT 200 WITHOUT SCALES (PRODUCT NORMATI- VELY HARMONIZED FOR EUROPEAN ECONOMIC AREA) Fig. Warning, read instructions for use...
-
Page 10: Symbols On The Mattress
1.6 Symbols on the Mattress READ INSTRUCTIONS FOR USE CE MARKING (PRODUCT NORMATIVELY HARMONIZED FOR EUROPEAN ECONOMIC AREA) COVER MATERIALS ARE FIRE RESISTANT TO BS7175, SOURCE 0, 1 AND DO NOT IRON DO NOT USE PHENOL DO NOT WRING REGULARLY INSPECT THE INSIDE OF THE COVER FOR CONTAMINATION MACHINE WASH AT MAX. - Page 11 TUMBLE DRY ON LOW HEAT SETTING (MAX. 60°C) MATTRESS FOOT PART HANDWASH WITH DETERGENT (INITIAL TEMPERATURE OF HOT WATER SHOULD NOT EXCEED 50°C) D9U001ES2-0101_02...
-
Page 12: Serial Label With Udi
1.7 Serial Label with UDI 1.7.1 Sprint 200 There is a serial label of the stretcher under the Backrest. Fig. Position of serial label on the Sprint 200 D9U001ES2-0101_02... -
Page 13: Acoustic Signalisation (Only Sprint 200 With I-Drive Power)
1.8 Acoustic signalisation (only Sprint 200 with i-Drive Power) SOUND MEANING REPEATED BEEP: 0,125s sound / 0,125s silence Fault Notification (Overload) 1.9 Definitions Adult Patient having a physical size equal to or more than 146 cm, a mass equal to or more than 40 kg and a body mass index (BMI) equal to or more than 17 (according to IEC 60601-2-52). -
Page 14: Abbreviations
1.10 Abbreviations AC ( ~ ) Alternating Current Cardiopulmonary Resuscitation Sound Intensity Unit DC ( Direct Current Configuration number Electromagnetic Compatibility High Frequency High Pressure Laminate Hardware Ingress Protection Intravenous Light Emitting Diodes Medical Electrical (Equipment) Activation Deactivation parts per million, millionth (1000 ppm = 0,1%) Reference Number (product type depending on configuration) Serial Number Software... -
Page 15: Safety Instructions
2 Safety Instructions WARNING! Risk of injury due to incorrect use! ► Staff expert assessment is needed to consider all individual cases of contraindications! WARNING! Risk of trapping or squeezing because of patient´s body constitution disproportionate to the size of mattress support platform! WARNING! Risk of injury due to incorrect use! Certain stretcher positions are not suitable for specific diagnosis/medical conditions. Fowler position ... - Page 16 An additional multiple socket-outlet or extension cord shall not be connected to the medical electrical system of Sprint 200 with i-Drive Power. WARNING! Inappropriate handling of the power supply cord of Sprint 200 with i-Drive Power, e. g. by kinking, shearing or other mechanical damages is hazardous! WARNING! During specific investigations or treatments, the significant risks of reciprocal interference posed by Sprint ...
- Page 17 Additional Instructions for correct use: ► Follow the instructions for use carefully. ► Use the stretcher exclusively if it is in perfect working order. ► If necessary, check the stretcher functions daily or at each shift change. ► Ensure any user has read and understood this manual completely before operating the product. ►...
-
Page 18: Intended Use (Sprint 200 Without Scales)
3 Intended use (Sprint 200 without scales) The intended use is the short term hospitalization of the patient in the emergency departments and one day care de- partments, or other applicable departments, which includes above all the following aspects: ►... -
Page 19: Intended Use (Sprint 200 Mattresses)
The intended use of the Sprint 200 Standard mattress, Sprint 200 Comfort mattress, Sprint 200 Advanced mattress and Sprint 200 Reactive mattress is to provide basic support surface for patient being treated on LINETs Sprint 200 range of stretchers only. -
Page 20: Product Description
5 Product Description 5.1 Hierarchy of Product Variants 1. level Sprint 200 2. level Sprint 200 without scales Sprint 200 without i-Drive Power Sprint 200 with i-Drive Power 3. level Sprint 200 with 2-part Sprint 200 with 4-part Sprint 200 with 2-part... -
Page 21: Sprint 200 With 4-Part Mattress Support Platform
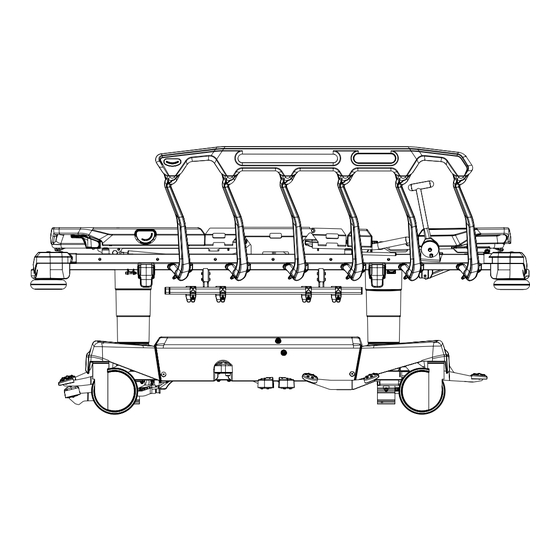
5.2 Sprint 200 WITH 4-PART MATTRESS SUPPORT PLATFORM Fig. Stretcher Overview (Sprint 200 with 4-part Mattress Support Platform) Angle Indicator Backrest Release Handle Mattress Support Platform Collapsible Siderail Thighrest Handle Mobi-Lift Handle Drive Pedal Brake Pedal Corner Bumper Thighrest Latch... -
Page 22: Sprint 200 With 2-Part Mattress Support Platform
5.3 Sprint 200 WITH 2-PART MATTRESS SUPPORT PLATFORM Fig. Stretcher Overview (Sprint 200 with 2-part Mattress Support Platform) Angle Indicator Backrest Release Handle Mattress Support Platform Collapsible Siderail Mobi-Lift Handle Drive Pedal Brake Pedal Corner Bumper Drive Pedal and Brake Pedal (optional) -
Page 23: Technical Specification
Trendelenburg Tilt Angle / Anti-Trendelenburg Tilt Angle +17°/-17° Maximum Angle between Calfrest and Thighrest 115° Average Stretcher Weight of the Sprint 200 without i-Drive Power 143 kg / 315 lb Average Stretcher Weight of the Sprint 200 with i-Drive Power 154 kg / 340 lb... -
Page 24: Electrical Specifications (Only Sprint 200 With I-Drive Power)
Trendelenburg Tilt Angle / Anti-Trendelenburg Tilt Angle +17°/-17° Maximum Angle between Calfrest and Thighrest 115° Average Stretcher Weight of the Sprint 200 without i-Drive Power 143 kg / 315 lb Average Stretcher Weight of the Sprint 200 with i-Drive Power 154 kg / 340 lb... -
Page 25: Environment Conditions (Sprint 200)
6.4 Environment Conditions (Sprint 200) WARNING! Risk of damaging the product due to incorrect environment conditions! Do not use the Sprint 200 stretcher under the environmental conditions outside of those specified in ► the Environment Conditions (Sprint 200) chapter! CAUTION! -
Page 26: Electromagnetic Compatibility (Only Sprint 200 With I-Drive Power)
WARNING! Mobile RF communication device (including end use devices like antenna cables and external antenna) should not be used closer than 30 cm (12 inches) from any part of this stetcher Sprint 200 with i-Drive Power, including cables specified by manufacturer. Otherwise this could lead to deterioration of functionality of this stretcher. -
Page 27: Manufacturer Instructions - Electromagnetic Susceptibility
6.5.2 Manufacturer instructions - electromagnetic susceptibility Immunity Tests Compliance level Electrostatic discharge (ESD) ± 8 kV for contact discharge IEC 61000-4-2 ± 15 kV for air discharge Radiated RF 3 V/m IEC 61000-4-3 80 MHz – 2,7 GHz 80 % AM at 1 kHz Proximity fields from RF wireless communications equipment IEC 61000-4-3 See Table 1... -
Page 28: Use And Storage Conditions
Use exclusively Hospital Grade or Hospital Only receptacles for grounding. Sprint 200 is designed for use in rooms for medical purposes. Electrical installations connected to the Sprint 200 with i-Drive Power must therefore meet local norms laying down the necessary conditions for electrical installations. -
Page 29: Sprint 200 Variants
8.3 Sprint 200 Variants Basic Configuration: ■ 2-part Mattress Support Platform ■ Siderails □ Head and Foot Siderail Release Mechanism ■ 4x Tente 200 mm castors □ Directional Castor at Head End □ Directional Castor at Foot End ■ Brakes from Head End and from Foot End ■... -
Page 30: Putting Into Service
Do not use pedals for lifting or lowering if the stretcher undercarriage is not in horizontal position! NOTE For safe, easy handling, LINET ® recommends having two technicians put the stretcher into service. Set up the stretcher as follows: ►... -
Page 31: Mattress Support Platform
9.1 Mattress Support Platform Sprint 200 has Mattress Support Platform with two sections or four sections. 4-PART MATTRESS SUPPORT PLATFORM LEFT SIDE RIGHT SIDE Fig. 4-part Mattress Support Platform 2-PART MATTRESS SUPPORT PLATFORM LEFT SIDE FOOT SECTION RIGHT SIDE Foot Section of the 2-part Mattress Support Platform con- sists of the Seat Section, Thighrest Cover and Calfrest Fig. -
Page 32: Removal Of The Plastic Mattress Support Platform Covers
9.1.1 Removal of the Plastic Mattress Support Platform Covers Fig. Instructions to remove the plastic mattress support platform covers To remove Backrest plastic cover: ► Grasp the end of the Backrest plastic cover next to the Seat section and lift the Backrest plastic cover up. ►... -
Page 33: Insertion Of The Plastic Mattress Support Platform Covers
9.1.2 Insertion of the Plastic Mattress Support Platform Covers Fig. Instructions to insert the plastic mattress support platform covers To insert Backrest plastic cover into the mattress support platform: ► Insert the upper end of the Backrest plastic cover into the Backrest upper part. ►... -
Page 34: Patient Restraint Points
9.1.3 Patient Restraint Points Eight Patient Restraint Points are located on the parts of the 4-part mattress support platform or 2-part mattress support platform. Fig. Eight Patient Restraint Points (4-part mattress support platform) D9U001ES2-0101_02... -
Page 35: Potential Interconnection (Optional)
Check that the Siderails function properly. ► Dispose of all packaging (see „21 Disposal (Sprint 200 without scales and without i-Drive Power)“ on the page 102 or see „22 Disposal (Sprint 200 with i-Drive Power)“ on the page 103). D9U001ES2-0101_02... -
Page 36: Transport
Sprint 200 stretcher! WARNING! Siderails in down position can cause patient‘s fall from the Sprint 200 stretcher during transport of the Sprint 200 stretcher! Transport Position of the Sprint 200 stretcher: ►... -
Page 37: Firmware (Only Sprint 200 With I-Drive Power)
Inappropriate handling of the power supply cord, e. g. by kinking, shearing or other mechanical damages is hazardous! WARNING! When routing Power Supply Cord in a Sprint 200 with i-Drive Power avoid squeezing the cable between parts of the Sprint 200 with i-Drive Power! WARNING! - Page 38 Fig. Power Supply Cord on the head end of the Sprint 200 with i-Drive Power Fig. Hook for hanging Power Supply Cord D9U001ES2-0101_02...
-
Page 39: Connection Of The Power Supply Cord
Power! WARNING! Power Supply Cord must not be wound around the Accessory Rail or DIN Rail at head end of the Sprint 200 with i-Drive Power before and when the Power Supply Cord is connected to the mains power! Fig. - Page 40 Power as on the picture above. To connect Sprint 200 with i-Drive Power to the mains power: ► Unwind the whole Power Supply Cord from the Accessory Rail or DIN Rail at head end of the Sprint 200 with i-Drive Po- wer. ►...
-
Page 41: Batteries (Only Sprint 200 With I-Drive Power)
11 Batteries (only Sprint 200 with i-Drive Power) WARNING! Risk of damaging the product due to incorrect maintenance! ► Only authorised and trained service technician is allowed to change the batteries and fuses of the i-Drive Power system! 12 Manipulation... -
Page 42: Collapsible Siderails
12.1 Collapsible Siderails The collapsible siderails are components of the stretcher in contact with patient. The nursing personnel are responsible for the siderails being raised up while the patient is in the stretcher. WARNING! Risk of injury due to incorrectly latched siderail! ►... - Page 43 MANIPULATION To raise siderail up: ► Grab siderail by Siderail Handle (1). ► Pull siderail up until it latches. To release siderail down: ► Unlock siderail by pulling Siderail Release Lever (2) at Foot End or at Head End. ► Fold down siderail slowly.
-
Page 44: Castor Control
12.2 Castor Control CAUTION! Material damage due to incorrect transport and involuntary movement! ► Ensure that the castors are braked prior to putting into service, removal from service and maintenance. ► Ensure that the castors are braked when the stretcher is occupied. ►... -
Page 45: Braked Stretcher
12.2.1 Braked Stretcher To brake the stretcher: ► Press red Brake pedal (1 or 2) to the lower position. All four castors are braked. Fig. Positions of Brake pedals 1. Brake Pedal (standard) - RED 2. Brake Pedal (optional) - RED 12.2.2 Forward Movement (Steering) To set forward movement: Press green Drive pedal (3 or 4) to the lower position. -
Page 46: Unrestricted Movement
12.2.3 Unrestricted Movement To set unrestricted movement: ► Leave all Brake pedals and Drive pedals in their middle position. All four castors are unlocked. Unrestricted movement is enabled. 12.3 Stretcher Positioning 12.3.1 Backrest WARNING! Risk of injury or material damage due to incorrect lifting of the Backrest without any patient on the mattress support platform! ►... - Page 47 To position Backrest: ► press Backrest Release Handles towards the Backrest frame ► hold the Backrest and position it carefully Fig. Positions of Backrest Release Handles Fig. Manipulation with Backrest Release Handle D9U001ES2-0101_02...
-
Page 48: Thighrest (Only 4-Part Mattress Support Platform)
12.3.2 Thighrest (only 4-part Mattress Support Platform) To lift Thighrest: ► grab Thighrest Handle, press Thighrest Latch and lift Thighrest Handle with Thighrest Latch until intended position is reached ► release the Thighrest Latch To lower Thighrest: ► grab Thighrest Handle, press Thighrest Latch and push Thighrest Handle with Thighrest Latch down until intended position is reached ►... - Page 49 Fig. Position of Thighrest Latch D9U001ES2-0101_02...
-
Page 50: Calfrest (Only 4-Part Mattress Support Platform)
12.3.3 Calfrest (only 4-part Mattress Support Platform) To position Calfrest, position Thighrest firstly. To lift Calfrest: ► lift Calfrest by the handle to intended position ► lower the Calfrest so that catch fits in the ratchet-bar To lower Calfrest: ► lift Calfrest slightly by the handle ►... - Page 51 Fig. Calfrest Positioning Fig. Catch in the ratchet-bar D9U001ES2-0101_02...
-
Page 52: Lifting
12.3.4 Lifting To lift Mattress Support Platform: ► press Lifting pedal and repeat it until intended position is reached To perform bleeding procedure of hydraulic units: ► press Lifting pedal 10 times in the highest stretcher position Fig. Positions of Lifting pedals D9U001ES2-0101_02... -
Page 53: Lowering
12.3.5 Lowering CAUTION! Risk of material damage due to objects on the undercarriage cover! ► Do not place objects on the undercarriage cover outside storage space! ► Respect dimensions of objects placed in storage space of the undercarriage cover! ► For information about objects intended for storage in the space of undercarriage cover follow chapter Acces- sories. -
Page 54: Trendelenburg Position
12.3.6 Trendelenburg Position WARNING! Risk of injury due to improper use of Trendelenburg Position! ► Hospital staff is responsible for assessing if the physical and psychological state of the patient is in accordan- ce with use of the Trendelenburg Position. ►... - Page 55 Fig. Positions of Head End Lowering pedals Fig. Position of Head End Trendelenburg Pedal (optional) D9U001ES2-0101_02...
-
Page 56: Anti-Trendelenburg Tilt
12.3.7 Anti-Trendelenburg Tilt WARNING! Risk of injury due to patient´s sliding! ► Hospital staff is responsible for assessing whether used bedclothes increase the risk of patient´s sliding from the stretcher! To reach Anti-Trendelenburg Tilt: ► press Foot End Lowering pedal until intended position is reached Fig. -
Page 57: Cardiac Chair Position (Only 4-Part Mattress Support Platform)
12.3.8 Cardiac Chair Position (only 4-part Mattress Support Platform) To reach Cardiac Chair Position: ► lift the Mattress Support Platform to facilitate Thighrest and Backrest positioning (1) ► lift the Thighrest (2) ► lift the Backrest (3) ► lift the Mattress Support Platform to the maximum position (4) ►... -
Page 58: Emergency Backrest Release
12.4 Emergency Backrest Release In order to adjust Mattress Support Platform for Cardiopulmonary Resuscitation (CPR) it is necessary to position Backrest to the lowest position and Mattress Support Platform to the lowest position. In the case of Mattress Support Platform with 4 sections posi- tion Backrest and Thighrest to the lowest position and Mattress Support Platform to the lowest position. -
Page 59: The 4-Part Mattress Support Platform
12.4.2 The 4-part Mattress Support Platform Set the position as follows: ► Adjust Backrest and Thighrest to the lowest position. ► Adjust Mattress Support Platform to the lowest position. Fig. Preparation for Cardiopulmonary Resuscitation (4-part Mattress Support Platform) 12.5 Ergoframe Ergoframe is the kinematic system of Backrest and Thighrest Adjustment resulting in extension of the Mattress support platform in the seat section. -
Page 60: Equipment
It is located on the sides of stretcher or at head end / foot end. Power Supply Cord in safety position must be wound around the Accessory Rail at head end in the case of Sprint 200 with i-Drive Power. -
Page 61: Din Rail
DIN Rail is intended for hanging accessories. It is located on the sides of stretcher. Power Supply Cord in safety position must be wound around the DIN Rail at head end in the case of Sprint 200 with i-Drive Power. Fig. DIN Rail (on side) 13.3 Urinary Bag Holders... -
Page 62: Undercarriage Cover
Longitudinal storage space (1) is intended for oxygen bottle (with capacity 10 litres (type E only), 5 litres or less). Suitable oxygen bottle can be fixed with quick-release strap. Fig. Storage space (Undercarriage Cover of the Sprint 200 with i-Drive Power) Fig. Storage space (Undercarriage Cover of the Sprint 200 without i-Drive Power) -
Page 63: Straps For Oxygen Bottles
13.4.1 Straps for oxygen bottles Undercarriage cover of the Sprint 200 without i-Drive Power is equipped with 2 straps for oxygen bottles. Undercarriage cover of the Sprint 200 with i-Drive Power is equipped with 1 strap for oxygen bottle. Fig. Fixation of an oxygen bottle on the undercarriage cover with straps for oxygen bottles To fix the compatible oxygen bottle on the undercarriage cover:... -
Page 64: Flexidrive (Sprung Retractable Fifth Castor)
To retract the Fifth castor: ► Leave all Brake pedals and Drive pedals unpressed in their middle position. Fig. Activation of Fifth castor 13.6 Sprint 200 with Solido 3 Solido 3 with T-shape undercarriage is compatible with Sprint 200. D9U001ES2-0101_02... -
Page 65: Iv&Drive (Infusion Stands/Pushing Handles)
13.7 IV&Drive (Infusion Stands/Pushing Handles) WARNING! Risk of injury due to incorrect placement of an infusion pump! ► Ensure the infusion pump on the Foldable infusion stand will not collide with any movable parts of the Sprint 200 (especially Backrest) or with the patient! CAUTION! Risk of material damage due to incorrect placement of an infusion pump! ►... - Page 66 To fold Foldable infusion stands down: ► Ensure the right Foldable infusion stand is not extended. ► Grasp orange bar of the right Foldable infusion stand. ► Lift the right Foldable infusion stand up (1) to unlock it. ► Fold the right Foldable infusion stand down (2). ►...
-
Page 67: Handles
13.8 Handles Pair of handles is intended for stretcher transport. The handles are located in head end corners or in foot end corners. There are 3 types of the handles: removable, foldable or fixed in their positions. 13.8.1 Foldable handles To fold Foldable handle down: ►... -
Page 68: Fixed Handles
13.8.2 Fixed handles Fixed handles are screwed to corners of the stretcher at head end or at foot end. User is not allowed to change positions of the Fixed handles. Removal and installation must be performed by trained service technician according to the corresponding service instruction provided by manufacturer. -
Page 69: Angle Indicators
13.9 Angle Indicators Angle Indicators are situated on both sides of the Backrest or on both outer sides of siderails. Backrest angle indicators are inten- ded for an approximate Backrest angle measurement. Angle indicators on siderails are intended for an approximate measurement of Trendelenburg tilt and Anti-Trendelenburg tilt. -
Page 70: Mobi-Lift Handle
13.10 Mobi-Lift Handle Mobi-Lift® is intended as support handle when patient gets up. Fig. Mobi-Lift Handle To fold Mobi-Lift Handle down: ► Lift the Mobi-Lift Handle up to unlock it. ► Fold the Mobi-Lift Handle down. To lift Mobi-Lift Handle up: ►... -
Page 71: I-Drive Power
13.11 i-Drive Power It is possible to equip the stretcher with the i-Drive Power wheel. The i-Drive Power helps hospital staff to drive the stretcher during patient transport with minimal manpower. The i-Drive Power wheel is located in the center of the stretcher under the undercarriage. i-Drive Power is equipped with its own accumulator and charger and it is not dependent on the stretcher functions so, if discharged you can still use the stretcher func- tions. -
Page 72: Manipulation
NOTE For information concerning uses other than those outlined in the “Specifications of Use” section above, please contact LINET ®. 13.11.3 Manipulation CAUTION! Damage to i-Drive Power Main Control Panel cable due to wrong cable placement! ►... - Page 73 i-Drive Power Control Panel The i-Drive Power Control Panel is enhanced with a touch sensor. Your hand must always be in contact with the i-Drive Power Control Panel to use the functions. If released, the i-Drive Power will stop. 1. ON LED (ON Indicator) 2.
-
Page 74: I-Drive Power Activation/Deactivation
To retract the i-Drive Power Wheel: ► Press or lift a pedal to leave all Brake pedals and Drive pedals unpressed in their neutral middle position or brake the Sprint 200. To deactivate the i-Drive Power: ► It is recommended to fold the Foldable infusion stand with i-Drive Power Control Panel down. -
Page 75: Powered Drive
Prior to transport, ensure that the Sprint 200 with i-Drive Power is disconnected from the mains. ► Hang the mains cable on the appropriate hook on the Sprint 200 with i-Drive Power during transport. ► Ensure that the castors are locked prior to putting into service, removing from service and maintenance of the i-Drive Power system. -
Page 76: Batteries
100% - the batteries are charged (LED4) To charge the batteries: ► Connect the mains cable of the Sprint 200 with i-Drive Power to mains power. ► i-Drive Power system will be charged (with the accumulator discharged, the charging may take up to 9 hours). -
Page 77: Technical Specifications
13.11.11 Technical Specifications Parameter Value i-Drive Power wheel diameter 21 cm Max. fast forward speed (flat ground, loaded) 4,43 km/h (±15%) Max. forward speed (flat ground, loaded) 2,16 km/h (±15%) Max. reverse speed (flat ground, loaded) 2,16 km/h (±15%) Max. angle of ascent 6°... -
Page 78: Mattress
& egress or with agitated patients. The bottom surface of the Sprint 200 mattress has an ‘anti-slip’ coating. This is intended to help prevent the mattress moving around on the Sprint 200 mattress support platform during patient transport, mattress support platform articulation or whilst the patient is moving around. -
Page 79: Installation Of Passive Mattress
Fig. Passive Mattress (Sprint 200 with 2-part mattress support platform) Fig. Passive Mattress (Sprint 200 with 4-part mattress support platform) 14.2.1 Strap with side release buckles The Sprint 200 passive mattresses can be equipped with strap with buckles to fix mattress on the Mattress Support Platform. To fix mattress on the Mattress Support Platform: ►... - Page 80 Fig. Fixation of mattress with straps on the Sprint 200 with 2-part mattress support platform Fig. Fixation of mattress with straps on the Sprint 200 with 4-part mattress support platform D9U001ES2-0101_02...
-
Page 81: Mattresses Specifications
14.3 Mattresses Specifications 14.3.1 Sprint 200 with Standard Mattress Support Platform MATTRESS FOR 2-PART STANDARD MATTRESS SUPPORT PLATFORM Specification Sprint 200 Standard Sprint 200 Standard Sprint 200 Comfort Length 203 cm 203 cm 203 cm Width 76 cm 76 cm 76 cm... - Page 82 MATTRESS FOR 4-PART STANDARD MATTRESS SUPPORT PLATFORM Specification Sprint 200 Standard Sprint 200 Standard Sprint 200 Comfort Length 203 cm 203 cm 203 cm Width 76 cm 76 cm 76 cm Height 10 cm 13 cm 13 cm Maximum Mattress Weight...
-
Page 83: Cleaning Of Passive Mattress
14.4 Cleaning of Passive Mattress CAUTION! Incorrect cleaning/disinfection can damage the mattress! ► Do not use pressure or steam cleaners. ► Follow the instructions and observe the dosages recommended by the manufacturer. ► Ensure that disinfectants are selected and applied by qualified hygiene experts only. ►... -
Page 84: Routine Cleaning And Disinfection
14.4.2 Routine Cleaning and Disinfection Cleaning the mattress: ► Check mattress cover top for any signs of damage or for liquid ingress. ► Replace or repair and completely disinfect mattress cover top if damaged. Also check if the mattress core is not contami- nated. -
Page 85: Accessories
Risk of injury or material damage due to incorrect use! ► Compatible accessories manufactured by different manufacturers have their own instructions for use. It is necessary to read instructions for use of a compatible accessory with instructions for use of the compatible LINET product to respect especially technical parameters, warning notifications, cleaning and maintenance instructions of LINET products and their compatible accessories! Compatible Configurations Sprint 200 with Standard Mattress Compatible Accessories Identification ... -
Page 86: Infusion Stand
WARNING! Risk of injury due to incorrect placement of an infusion pump! ► Ensure the infusion pump on the Infusion stand will not collide with any movable parts of the Sprint 200 (especially Backrest) or with the patient! WARNING! Risk of injury and risk of material damage due to incorrect use! ►... -
Page 87: Telescopic Infusion Stand
► Ensure the infusion pump on the Infusion stand will not collide with any mova- ble parts of the Sprint 200 (especially Backrest) or with the patient! WARNING! Risk of injury and risk of material damage due to incorrect use! ►... -
Page 88: Chart Holder
15.3 Chart Holder Chart Holder is intended for placing charts, which are registering the development of health condition of the patient. Chart Holder is located on a siderail. Fig. Position for Chart Holder D9U001ES2-0101_02... -
Page 89: Monitor Shelf
15.4 Monitor Shelf Monitor shelf is intended for carrying a monitor when the monitor shelf is folded towards the stretcher (4). When the monitor shelf is folded away from the stretcher (3) it serves for writing. When the monitor shelf is folded down (2) it serves as a foot board. Moni- tor shelf is equipped with straps to fix a monitor on the monitor shelf. -
Page 90: Paper Roll Holder
Insert both nibs of the Paper Roll Holder to both openings in the optional holders at foot end of the Sprint 200 carefully. ► Place the Paper Roll Holder on the foot end of the Sprint 200 carefully to prevent the Paper Roll Holder from falling on the Sprint 200. - Page 91 Fig. Paper Roll Holder (foot end) D9U001ES2-0101_02...
-
Page 92: Storage Box
15.6 Storage Box Storage Box is intended for patient´s things. Storage Box is located under the Backrest. Maximum load of the Storage Box is 10 kg. To clean the Storage Box: ► remove it from its place. Fig. Storage Box (under the Backrest) D9U001ES2-0101_02... -
Page 93: Oxygen Bottle Holder
Ensure the oxygen bottle valve will not get damaged by careless or incorrect manipulation or placement. CAUTION! Oxygen Bottle Holder must be placed to the correct position on the left side at head end of the Sprint 200 stretcher during its installation and its removal! Oxygen Bottle Holder is intended for transporting oxygen bottles with a weight of up to 15 kg and a volume of 5 litres. - Page 94 To place the Oxygen Bottle Holder: ► Lift the Backrest. ► Place Oxygen Bottle Holder with adapter to designated position on the frame of Mattress Support Platform on the left side at head end. To remove the Oxygen Bottle Holder: ►...
-
Page 95: Cleaning/Disinfection
Risk of injury due to incorrect preparation! ► Ensure pedals will not be pressed accidentally during cleaning. ► Ensure the Sprint 200 with i-Drive Power is disconnected from the mains before cleaning the Sprint 200 with i-Drive Power. WARNING! Risk of environmental pollution! ►... - Page 96 Lacquered steel + Stainless steel Fixed handles, Foldable handles Lacquered steel Foldable infusion stands Lacquered steel + Stainless steel + Polyamide (PA) Power Supply Cord (only Sprint 200 with i-Drive Ethylene-propylene rubber (EPR) Power) Cables (only Sprint 200 with i-Drive Power) Polyvinyl chloride (PVC)
-
Page 97: Cleaning (Sprint 200)
■ by the environmental protection agency of the country in which the mattress replacement system is to be used. 16.1 Cleaning (Sprint 200) Prepare for cleaning as follows: ►... -
Page 98: Complete Cleaning And Disinfection
Freely accessible metal parts of Mattress Support Platform ■ Infusion stand sleeve fitting ■ Bumpers ■ Castors ■ Brakes 17 Troubleshooting (Sprint 200 without scales and without i- -Drive Power) Error/Fault Cause Solution Faulty Mattress Support Platform Height Obstacle on the undercarriage cover. Remove the obstacle. Adjustment Obstacle under the pedals. -
Page 99: Troubleshooting (Sprint 200 With I-Drive Power)
18 Troubleshooting (Sprint 200 with i-Drive Power) Error/Fault Cause Solution Faulty Mattress Support Platform Height Obstacle on the undercarriage cover. Remove the obstacle. Adjustment Obstacle under the pedals. Remove the obstacle. Faulty pedal. Notify the manufacturer´s service department. Lowering Backrest from the upright position Obstacle under the Backrest or in the drive Remove the obstacle. -
Page 100: Maintenance (Sprint 200 Without Scales And Without I- -Drive Power)
19 Maintenance (Sprint 200 without scales and without i- -Drive Power) WARNING! Risk of injury when working on the stretcher! ► Ensure that the castors are locked prior to installation, putting into service, maintenance and deinstallation. WARNING! Risk of injury due to defective stretcher! ►... -
Page 101: Maintenance (Sprint 200 With I-Drive Power)
Ensure that the castors are locked prior to installation, putting into service, maintenance and deinstallation. ► No part of the Sprint 200 ME equipment shall be serviced or maintained while in use with a patient. WARNING! Risk of injury due to defective stretcher! ►... -
Page 102: Disposal (Sprint 200 Without Scales And Without I-Drive Power)
Power) 21.1 Environment Protection The company LINET® is aware of the importance of environmental protection for future generations. Within this company the envi- ronmental management system is applied in accordance with the internationally agreed standard ISO 14001. The compliance with this standard is annually tested by the external audit executed by an authorised company. -
Page 103: Disposal (Sprint 200 With I-Drive Power)
Based on the Directive No. 2002/96/ EC (Directive WEEE - Waste, Electric and Electronic Equipments) the company LINET, s. r. o. is registered in the List of Electric and Electronic Equipment Producers (Seznam výrobců elektrozařízení) on the Ministry of the Environment of the Czech Republic... -
Page 104: Warranty
23 Warranty LINET ® will only be held responsible for the safety and reliability of products that are regularly serviced, maintained and used in accordance with the safety guidelines included in the instructions for use. Should a serious defect arise that cannot be repaired during maintenance: ►...
Need help?
Do you have a question about the Sprint 200 and is the answer not in the manual?
Questions and answers