Table of Contents
Advertisement
Quick Links
Advertisement
Table of Contents

Related Manuals for Solid State Logic SSL UC1


Summary of Contents for Solid State Logic SSL UC1
- Page 1 SSL UC1 User Guide SSL UC1...
- Page 2 As research and development is a continual process, Solid State Logic reserves the right to change the features and specifications described herein without notice or obligation. Solid State Logic cannot be held responsible for any loss or damage arising directly or indirectly from any error or omission in this manual.
-
Page 3: Table Of Contents
Contents Table of Contents Overview What is SSL UC1? SSL 360° Enabled Plug-ins Features Supported DAWs - For UC1 & The Plug-in Mixer 5 Things About UC1 UC1/Plug-in Mixer DAW Integration Get-Started Unpacking Fitting The Stands (Optional) Additional Elevation Angles... - Page 4 Not Supported - Mixing VST and AU formats Transport Control Introduction Plug-in Mixer Transport - Setup Pro Tools Logic Pro Cubase Live Studio One UC1 LCD Messages SSL 360° Software Messages SSL Support - FAQs, Ask a Question and Compatibility Safety Notices SSL UC1 User Guide...
-
Page 5: Overview
Overview Overview What is SSL UC1? UC1 is a hardware control surface that provides hands on control of SSL 360°-enabled channel strip plug-ins and the Bus Compressor 2 plug-in. UC1 is designed to put the fun back into mixing, with a workflow that promotes muscle-memory operation and ultimate operator confidence. -
Page 6: Things About Uc1
Coming in √ √ √ Selection 360° v1.5 Follow Solo Coming in √ √ √ and Mute 360° v1.5 Track √ √ √ √ √ Number Track Name √ √ √ √ √ √ √ √ SSL UC1 User Guide... -
Page 7: Get-Started
1. Unscrew the rubber feet and move to the other end 2. Rotate the stands so that the short side fixes to the chassis Short Side Long Side Short Long Side Side SSL UC1 User Guide... -
Page 8: Dimensions
Newer computers may have 'C' ports, whereas older computers may have 'A'. Please ensure that you are connecting to the port labelled USB on UC1, which is a 'C' type connection. SSL UC1 User Guide... -
Page 9: Downloading Ssl 360°, 4K B, Channel Strip 2 And Bus Compressor 2 Plug-Ins
Double-click to open the .dmg. Double-click to run the SSL 360.exe. Double-click to run the SSL 360.pkg. Proceed with the installation, following the Proceed with the installation, following the on-screen on-screen instructions. instructions. SSL UC1 User Guide... -
Page 10: Installing 360°-Enabled Channel Strip And Bus Compressor 2 Plug-Ins
Essentials .dmg which contains the MCU mappings for the plug-ins. General System Requirements Computer operating systems and hardware are constantly changing. Please search for 'UC1 Compatibility' in our online FAQs to check if your system is currently supported. SSL UC1 User Guide... -
Page 11: Redeeming And Authorising Your Plug-In Licenses
Once logged into your account, click on REGISTER PRODUCT on the Dashboard page. Choose SSL UC1 and complete the form. SSL UC1 User Guide... - Page 12 On this page, enter your iLok User ID into the box, wait for your iLok account to be validated and then click DEPOSIT LICENSES. Repeat this process for the 4K B entry box that will be underneath the Channel Strip 2 and Bus Compressor 2 box. SSL UC1 User Guide...
- Page 13 Finally, open iLok License Manager, locate the UC1 Channel Strip 2 and Bus Compressor 2 licenses and right-click Activate onto your computer or physical iLok. 4K B will appear as a separate license. Locate it in iLok License Manager, then right-click to Activate onto your computer or physical iLok. SSL UC1 User Guide...
-
Page 14: Uc1
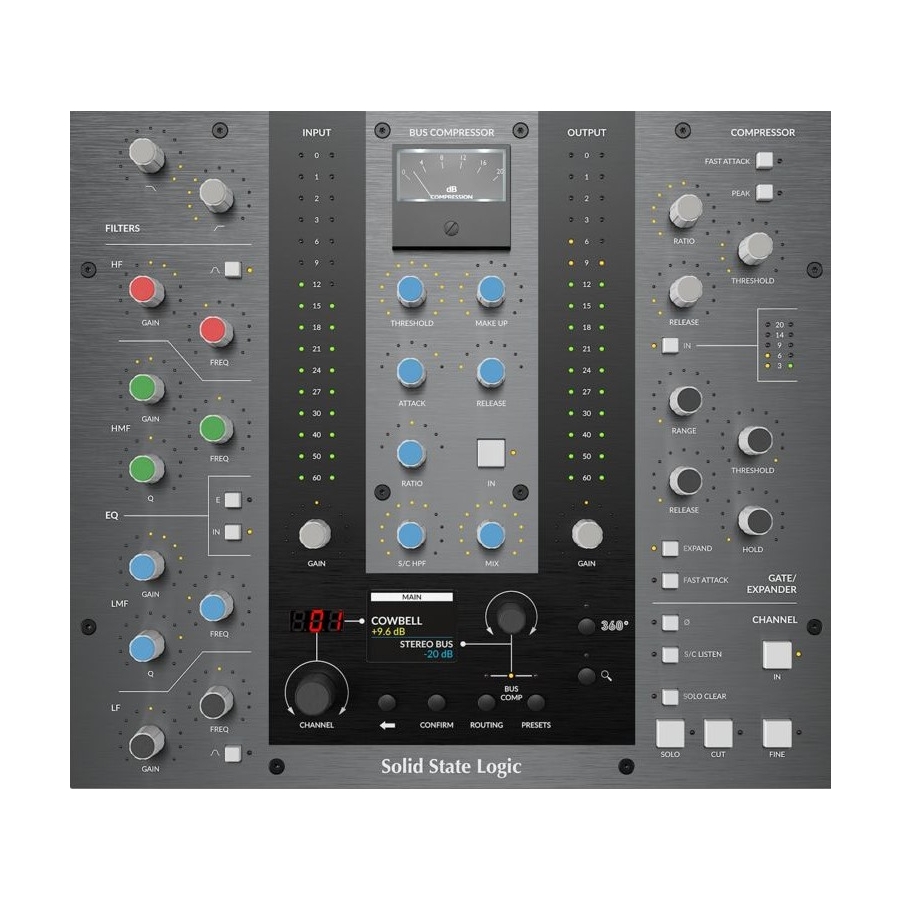
Bus Compressor 2 Controls and Meter Channel Strip Input Channel Strip Output Metering and Trim Control Metering and Trim Control Channel Strip Filters & EQ Central Control Panel Channel Strip Dynamics & Controls Solo, Cut and Fine Controls SSL UC1 User Guide... -
Page 15: Smart Led Rings
Two vertical arrays of five LEDs on the right-hand side show the compression and gate activity for the selected channel strip plug-in on the UC1 front panel. Channel strip Dynamics activity is shown on the right-hand side of UC1 SSL UC1 User Guide... -
Page 16: Bus Compressor Meter
Please note: This button does not function for DAWs where SOLO and CUT are linked to the DAW. FINE BUTTON FINE - puts all front panel Channel Strip and Bus Compressor rotary controls into a finer resolution, for mix critical tweaks. This can be latched or held for a momentary action. SSL UC1 User Guide... -
Page 17: Central Control Panel
When in the EXTENDED FUNCTIONS menu, can be used to confirm the parameter selection. Also used to navigate forward through the PRESETS list or confirms preset loading. When in TRANSPORT mode, this functions as the Play command. SSL UC1 User Guide... -
Page 18: Extended Functions Menu
Output Trim and Solo Safe (exact list depends on the parameters of that particular 360°-enabled channel strip plug-in). To select and adjust a parameter, follow the steps below: Don't forget, that you can use the FINE button to increase the resolution of control when adjusting any Extended Functions parameter. SSL UC1 User Guide... -
Page 19: Process Order Routing
BACK ARROW key to navigate back up through preset folders. Press PRESETS once more to return the secondary encoder to controlling Bus compressor selection. Press the PRESETS key and then choose channel strip Navigate through your presets list using the or Bus Compressor secondary encoder and push to load SSL UC1 User Guide... -
Page 20: Transport
2 - USB - 'C' Type Connector Connect one of the included USB cables from your computer to the USB port on UC1. This handles all of the communication between the plug-ins and UC1, via the SSL 360° software application. SSL UC1 User Guide... -
Page 21: Uc1/360°-Enabled Channel Strip Plug-Ins
B-Series channel compressor, featuring a circuit topology that is based on the SSL Bus Compressor – peak detection and a sidechain VCA in a feedback loop • Unique ‘ds’ mode re-purposes the compressor to be a de-esser. SSL UC1 User Guide... -
Page 22: Channel Strip Plug-In User Guides
SSL 360° releases will often require a certain version of plug-in to be installed in order for the system to function correctly. Please check the SSL 360° Release Notes article on the SSL knowledgebase to check you are running compatible versions. SSL UC1 User Guide... -
Page 23: Bus Compressor 2
Beneath the Oversampling options, the DAW's Track Name is displayed. Below this, there is a button labelled PLUG-IN MIXER that opens the SSL 360° on the Plug-in Mixer page (presuming SSL 360° is installed). Otherwise, it will take you to the SSL website. SSL UC1 User Guide... -
Page 24: Ssl 360° Software
This area shows any UC1s and UF8s that are connected to your computer, along with their respective serial numbers. Please allow 5-10 seconds for units to be discovered once they are plugged in. If your unit(s) are not showing up, try unplugging and re-plugging the USB cable from the port on your computer. SSL UC1 User Guide... - Page 25 SSL 360° activity, which may help to diagnose any issues. When you click EXPORT REPORT, you'll be asked to choose a destination on your computer to export the generated .zip file to, which you can then forward on to the support agent. SSL UC1 User Guide...
-
Page 26: Plug-In Mixer
When channel strip and/or Bus Compressor 2 plug-ins are inserted in your DAW, they trigger that DAW to come online as a HOST in the Plug-in Mixer. Clicking on the appropriate HOST button will switch the Plug-in Mixer (and UC1) to control that DAW. SSL UC1 User Guide... -
Page 27: Adding/Removing Channel Strips To The Plug-In Mixer
Click and drag in the Track Name area will dynamically follow the order of the tracks in your DAW session. You cannot manually to re-order in non-automatic DAWs re-arrange channel strips in this mode. (Pro Tools, Logic 10.6.0 and below & LUNA) SSL UC1 User Guide... -
Page 28: Logic Pro 10.6.1 And Above - Aux Tracks
Go to File > Project > General and un-tick Only load plug-ins needed for project playback. Logic 10.6.0 and below users, make sure that 'Only load plug-ins needed for project playback' is un-ticked at the start of each project SSL UC1 User Guide... -
Page 29: Adding/Removing Bus Compressors To The Plug-In Mixer
Bus Compressors on the right-hand side. There are two other ways of selecting a Bus Compressor, which are using the secondary encoder on the UC1 hardware, or simply opening the plug-in GUI in the DAW session. Selected channel strip & Bus Compressor has a blue outline SSL UC1 User Guide... -
Page 30: Follow Daw Track Selection
SOLO SAFE prevents a channel strip from being cut when another channel strip's SOLO is activated. SOLO CLEAR Clears any active channel strip solos. This button does not function for DAWs where SOLO and CUT are linked to the DAW. SSL UC1 User Guide... - Page 31 Transport: Rewind* Transport: Forward* Transport: Record* Transport: Loop/Cycle* Bypass Channel Strip Alt+Mouse Click Move Plug-in Mixer Up/Down/Left/Right Up, Down, Left, Right Fine Control of Knobs CTRL + Mouse click and drag *Requires Transport Control to be configured. SSL UC1 User Guide...
-
Page 32: Restrictions And Important Notes
The Plug-in Mixer system hooks into special VST3 extensions in order to more tightly integrate with the DAW in Cubase, Live and Studio One. Therefore, using a mixture of AUs and VST3s in a session is not supported. Stick to only using VST3 channel strips and Bus Compressors in these DAWs. SSL UC1 User Guide... -
Page 33: Transport Control
Transport counter can display a choice of the following formats: between Bars/Beats by clicking with the mouse in the • Bars/Beats display area, or by triggering the SMPTE/BEATS MCU • SMPTE or Min:Secs Time* *The format is determined by the DAW Host command on UF8. SSL UC1 User Guide... -
Page 34: Plug-In Mixer Transport - Setup
STEP 1 : Enable SSL V-MIDI Port 1 in Pro Tools. and Send to SSL V-MIDI Port 1. STEP 3 : On the CONTROL SETUP tab, set DAW 1 to Pro Tools in DAW CONFIGURATION and also set TRANSPORT LINED TO as DAW 1 (Pro Tools). SSL UC1 User Guide... -
Page 35: Logic Pro
Input Port to SSL V-MIDI Port 1. STEP 3 : On the CONTROL SETUP tab, set DAW 1 to Logic Pro in DAW CONFIGURATION and also set TRANSPORT LINED TO as DAW 1 (Logic Pro). SSL UC1 User Guide... -
Page 36: Cubase
STEP 2 : Disable (un-tick) In 'ALL MIDI Inputs' for SSL V-MIDI Ports STEP 3 : On the CONTROL SETUP tab, set DAW 1 to Cubase in DAW CONFIGURATION and also set TRANSPORT LINED TO as DAW 1 (Cubase). SSL UC1 User Guide... -
Page 37: Live
SSL V-MIDI Port 1 Source and set Output to SSL V-MIDI Port 1. STEP 2 : On the CONTROL SETUP tab, set DAW 1 to Live in DAW CONFIGURATION and also set TRANSPORT LINKED TO as DAW 1 (Live). SSL UC1 User Guide... -
Page 38: Studio One
Receive From SSL V-MIDI Port 1 Source and Send To SSL V-MIDI Port 1 Destination. Click OK. STEP 2 : On the CONTROL SETUP tab, set DAW 1 to Studio One in DAW CONFIGURATION and also set TRANSPORT LINKED TO as DAW 1 (Studio One). SSL UC1 User Guide... -
Page 39: Uc1 Lcd Messages
'Attempting To Reconnect' This message means that communication between SSL 360° and UC1 has been lost. If you experience this, then check that your USB cable connecting UC1 and 360° has not been removed. Re-connect if so. SSL UC1 User Guide... -
Page 40: Ssl 360° Software Messages
If the HOME page of SSL 360° is displaying the message 'SOMETHING WENT WRONG... PLEASE EXIT AND RE-LAUNCH SSL 360°', then please quit SSL 360° and re-launch. If that does not work then restart your computer. SSL UC1 User Guide... -
Page 41: Ssl Support - Faqs, Ask A Question And Compatibility
Troubleshooting & FAQs SSL Support - FAQs, Ask a Question and Compatibility Visit the Solid State Logic Help Centre to check compatibility with your system and find answers to your questions: www.solidstatelogic.com/support Thank you Don’t forget to register your UC1 for the best possible experience. -
Page 42: Safety Notices
Only connect units to single phase supplies with the neutral conductor at earth potential. • Both the mains plug and appliance coupler can be used as the disconnect device, ensure that the mains plug is connected to an unobstructed wall outlet and is permanently operable. SSL UC1 User Guide... - Page 43 This Class B digital apparatus complies with Canadian ICES - 003. RoHS Notice Solid State Logic complies with and this product conforms to European Union's Directive 2011/65/EU on Restrictions of Hazardous Substances (RoHS) as well as the following sections of California law which refer to RoHS, namely sections 25214.10, 25214.10.2, and 58012, Health and Safety Code;...
- Page 44 WARNING: Operation of this equipment in a residential environment could causes radio interference. Environmental Temperature: Operating: +1 to 30 degrees Celsius. Storage: -20 to 50 degrees Celsius. Further information For additional information, install and user guides, knowledge base and technical support visit www.solidstatelogic.com SSL UC1 User Guide...
- Page 45 SSL UC1...
Need help?
Do you have a question about the SSL UC1 and is the answer not in the manual?
Questions and answers